
Bottom Line
The Gigabyte M32QC is an excellent gaming monitor for the price if you’re not sensitive to VA ghosting.
You get a big 32″ curved 1440p screen with deep blacks, vibrant colors and smooth tear-free gameplay up to 170Hz. In addition, the monitor has a sturdy height-adjustable design, rich connectivity options and plenty of additional features, including a dedicated KVM switch.
The Gigabyte M32QC is an affordable gaming monitor with a big 31.5″ 1440p curved screen, a high 170Hz refresh rate, high contrast ratio, wide color gamut, a height-adjustable stand, a built-in KVM switch and plenty of additional nifty features!
Image Quality
The M32QC is based on a VA panel with 178° wide viewing angles, dithered 10-bit color depth support, a wide ~94% DCI-P3 color gamut coverage and a high ~3,000:1 static contrast ratio for deep blacks.
First, we’ll look at how the monitor performs out of the box and if there are any settings you can adjust to improve its color accuracy, gamma and whitepoint.
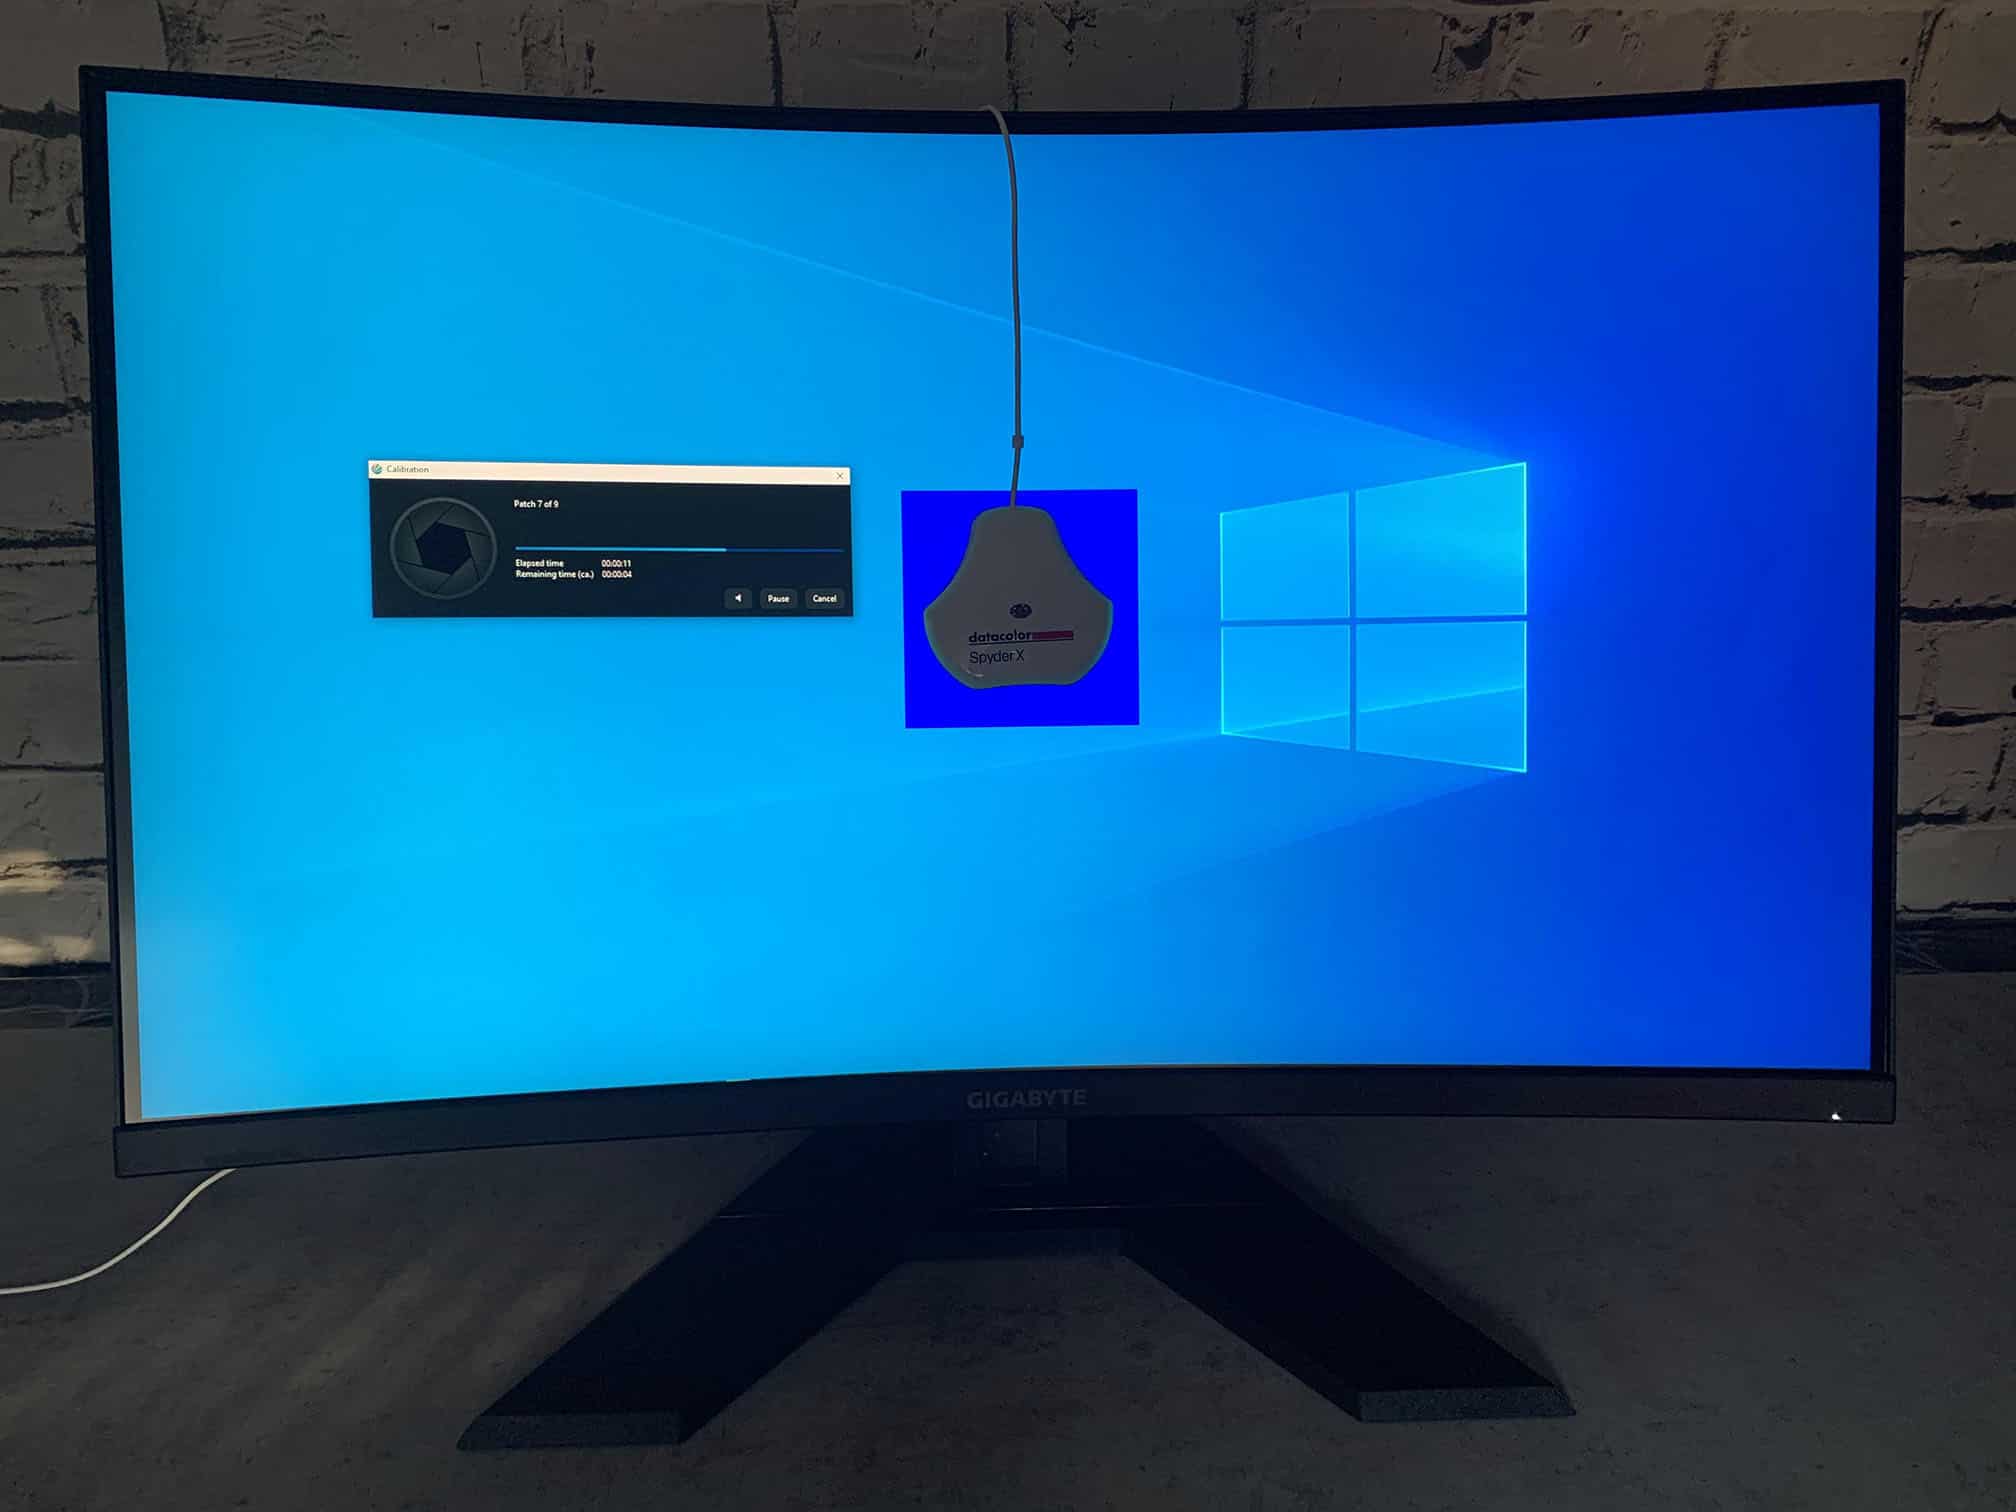
For our testing, calibration and profiling, we’re using the Datacolor SpyderX Pro paired with DisplayCAL and HCFR software. The testing was done after the monitor had warmed up and we disabled all eco/power-saving features.
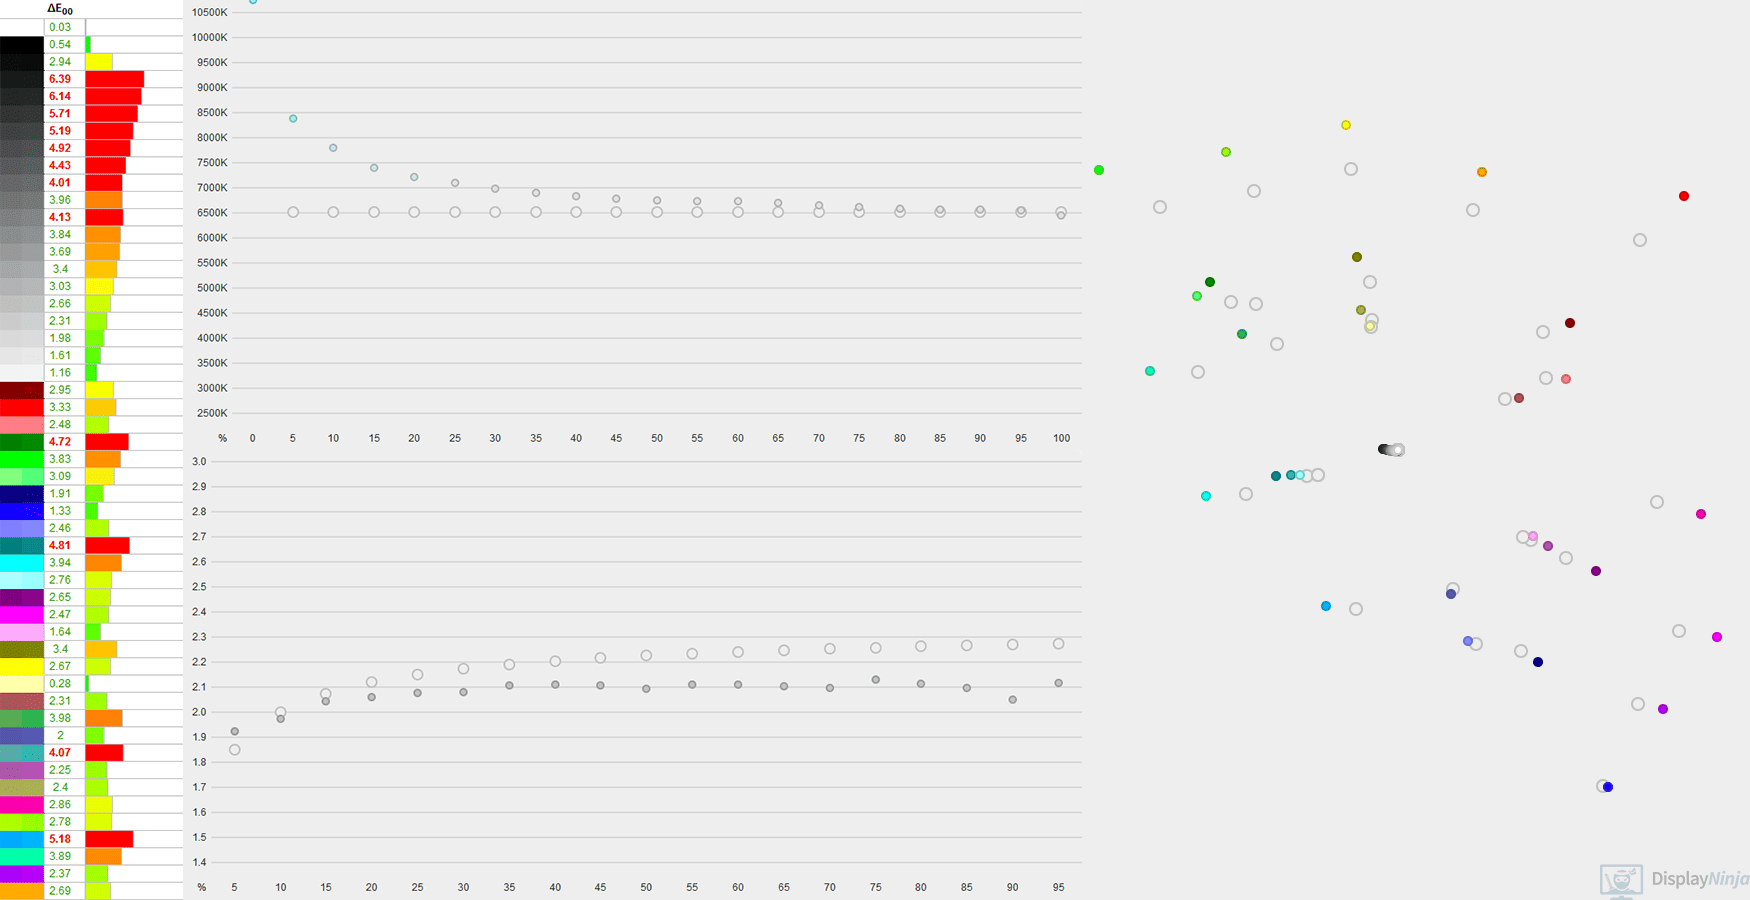
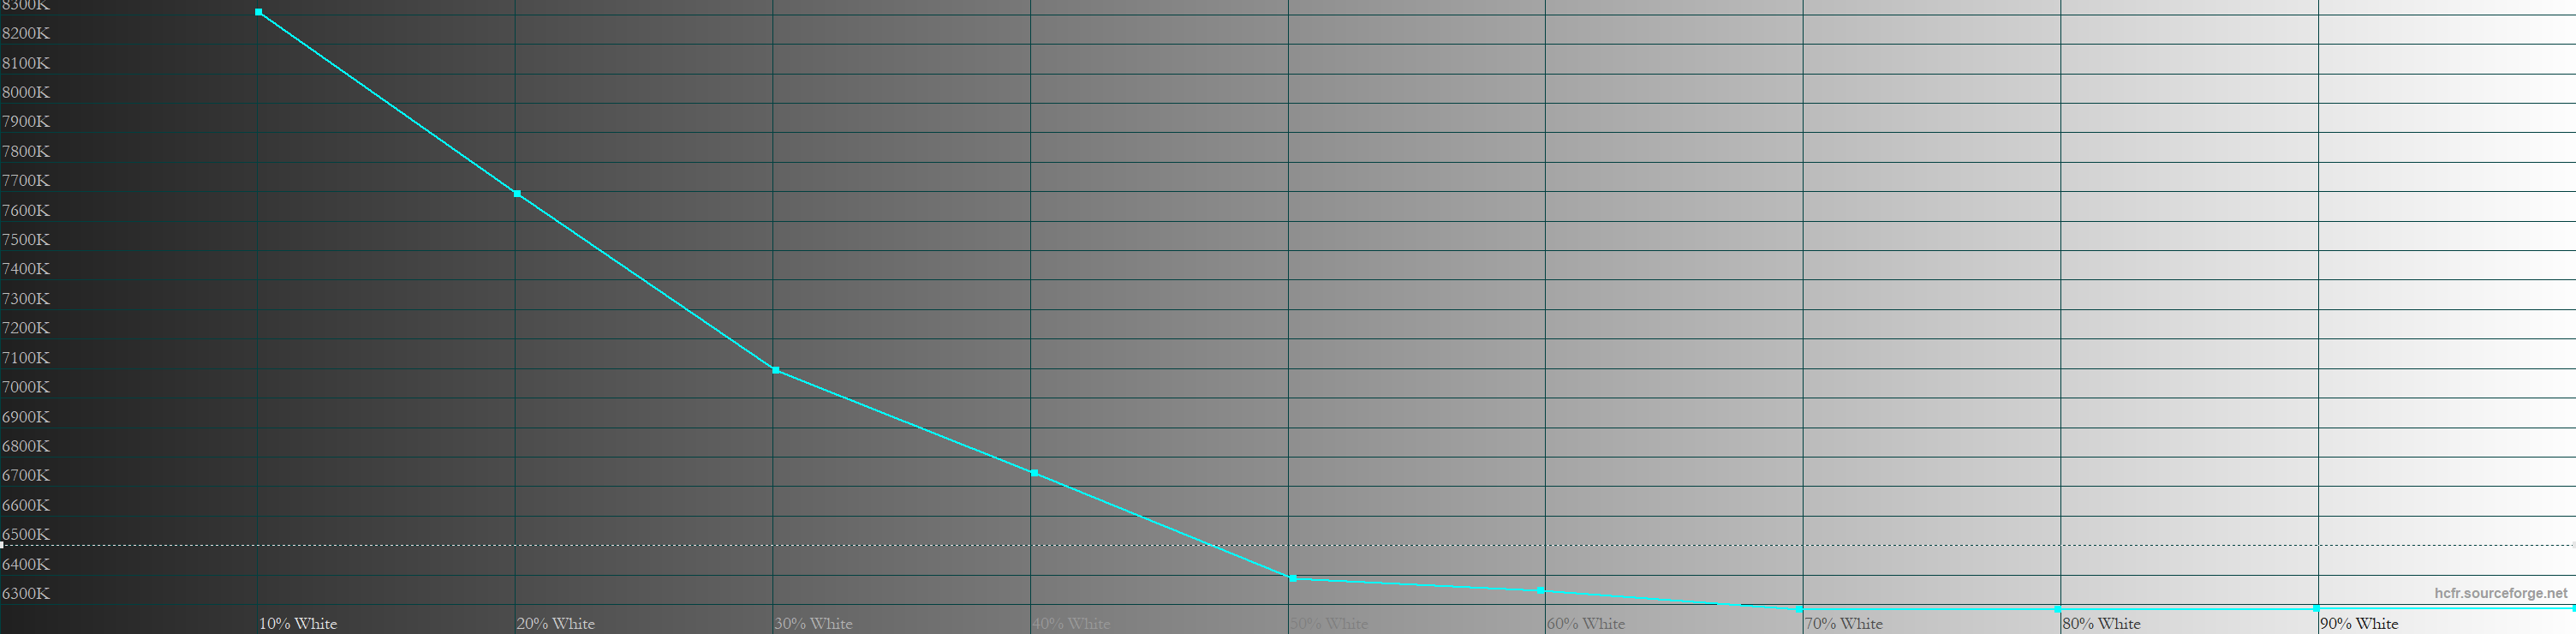
In the default Standard mode, we measured an average Delta E of 3.13, a maximum Delta E of 6.39, a 2.08 gamma, and a 6792K color temperature.
The factory calibration is decent for a gaming display, but due to the low gamma, the image will be a bit brighter than intended, while the high color temperature has a slight cold/bluish tint to whitepoint.
We managed to improve this by simply selecting Gamma 2.4 instead of the default 2.2, which brings the approximate gamma closer to the 2.2 target at 2.23. We also selected the User Define color temperature preset instead of Normal, which has a 6576K whitepoint without any noticeable color tint.

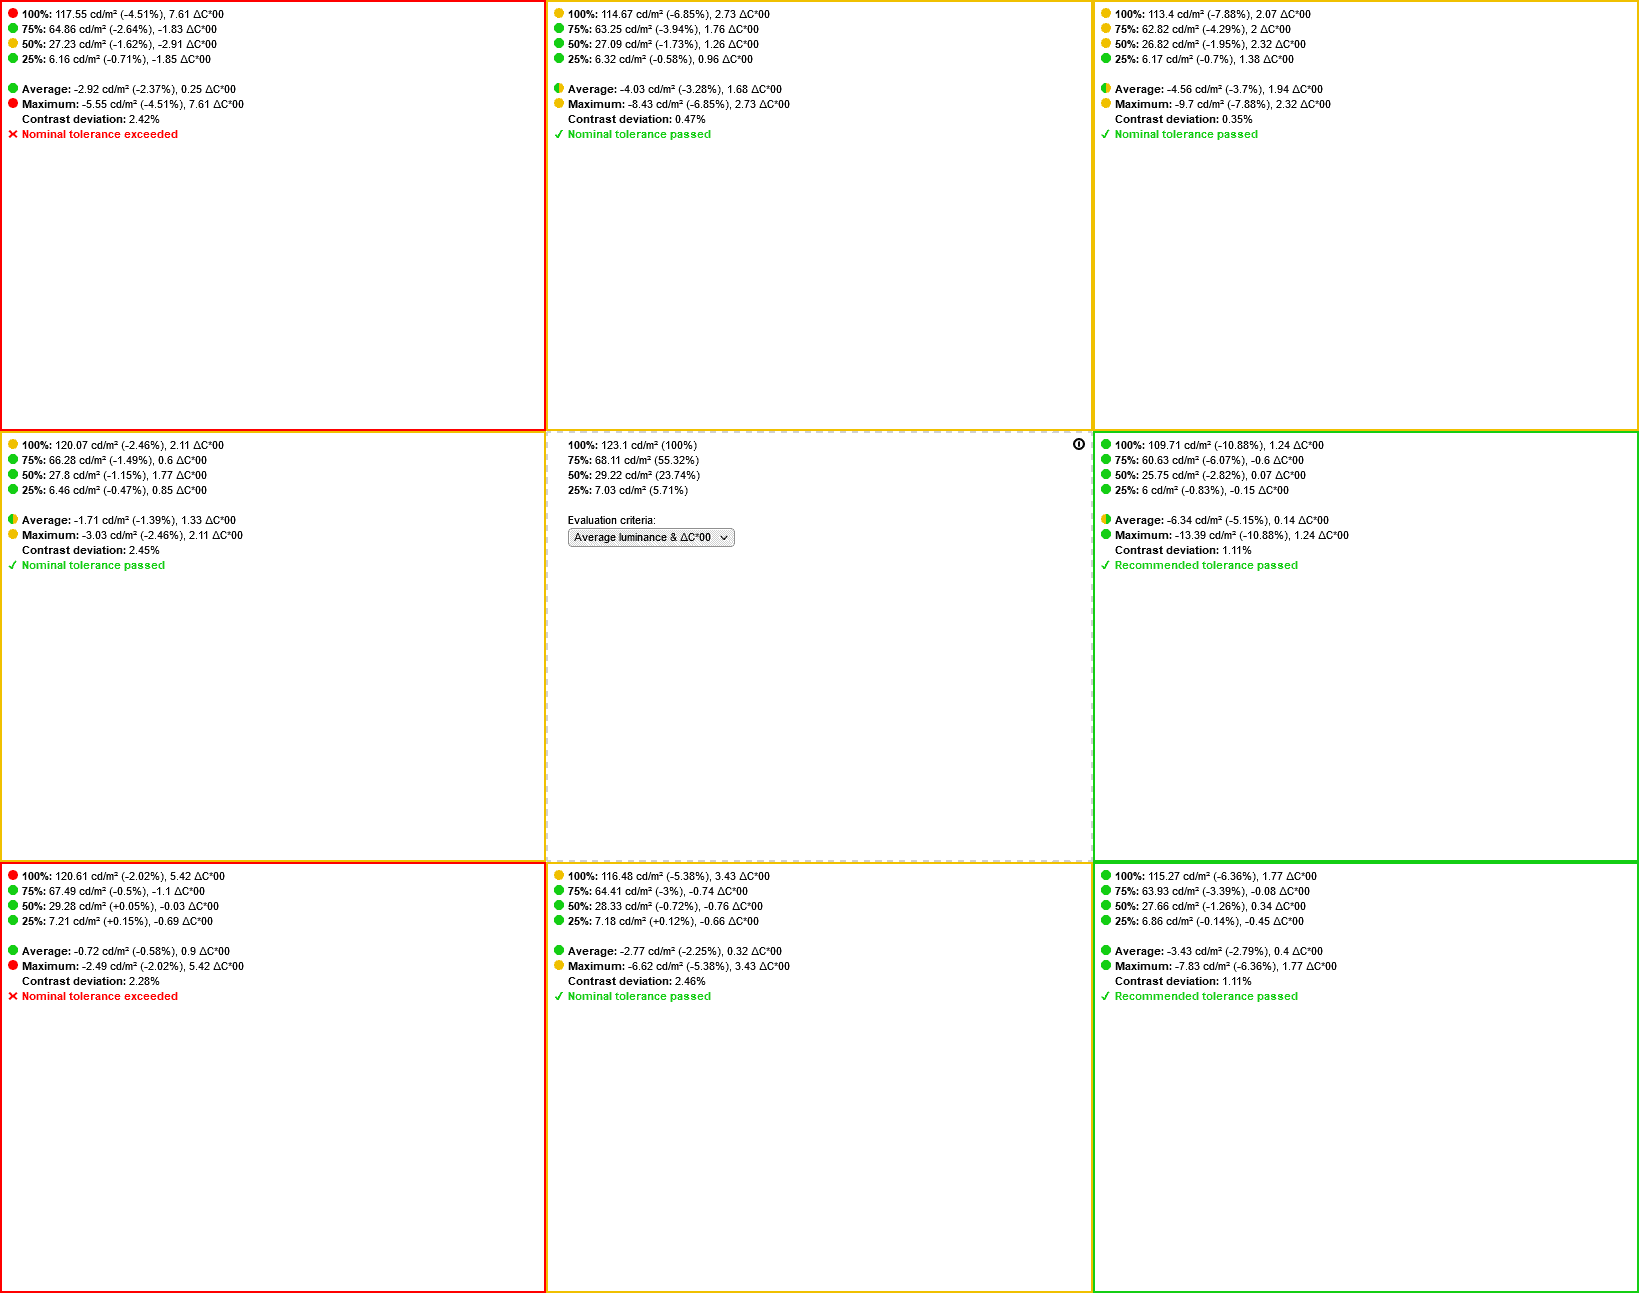
Other picture presets include FPS and RTS/RPG, which mainly just have an even lower gamma for better visibility in dark scenes but less accurate image, three Custom modes and a Movie mode, all of which are just the Standard mode with different default brightness setting, Reader (with a warm 5600K color temperature) and an sRGB emulation mode. Here’s a quick summary of all these presets.
| Standard (Default), Movie, Custom 1-3 | Standard, CT: User Define, Gamma 2.4 | FPS | RTS/RPG | Reader | sRGB | |
| Delta E (average) | 3.13 | 3.25 | 5.85 | 4.37 | 3.06 | 2.34 |
| Delta E (maximum) | 6.39 | 6.32 | 11.52 | 8.25 | 6.24 | 6.54 |
| Gamma | 2.08 | 2.23 | 1.68 | 1.75 | 2.06 | 2.04 |
| Color Temperature | 6792K | 6576K | 6731K | 6569K | 5592K | 6786K |

With a few tweaks, we managed to get excellent results. The high Delta E average is partially due to the monitor’s wide color gamut (which can be fixed via the sRGB emulation mode) – and partially because of the bad RGB gray balance (high Delta E of dark grays), which cannot be fixed without full calibration.
However, this is not a big issue for gaming and content consumption and mainly affects color-critical work, in which case you should be going with an IPS panel monitor anyway.
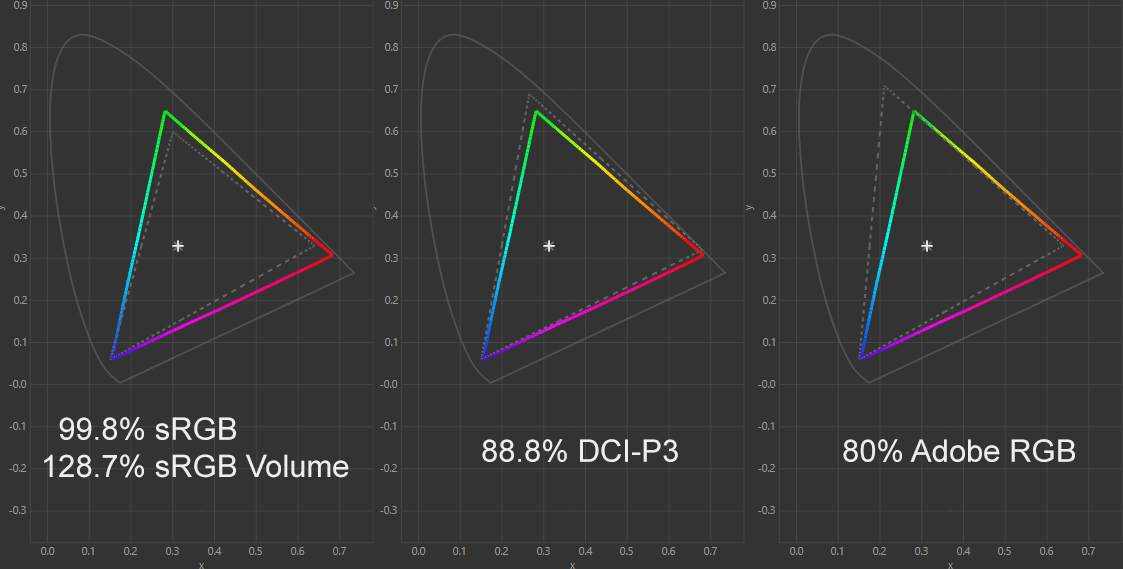
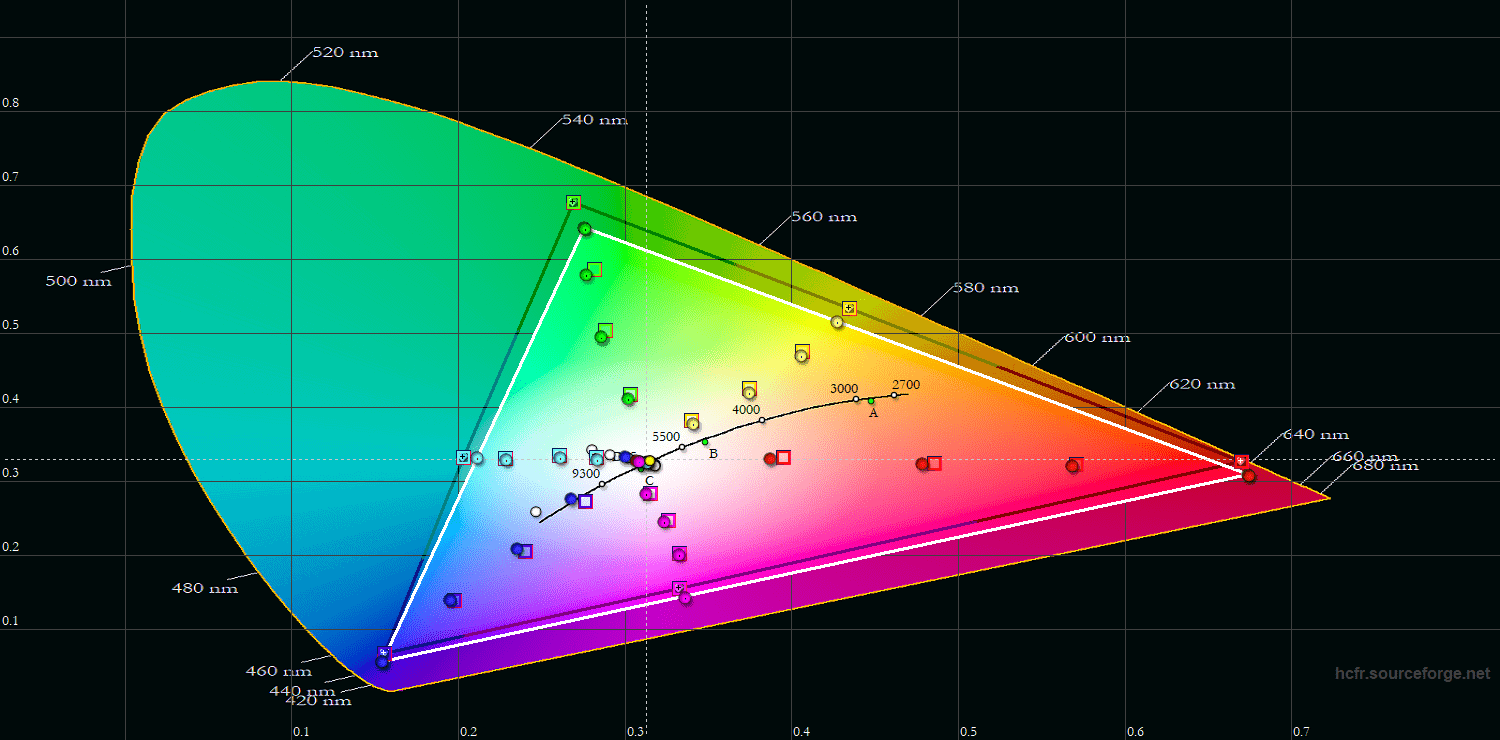
Moving on, the Gigabyte M32QC monitor has a wide color gamut backlight with 88.8% measured DCI-P3 color space coverage – a bit shy from the specified 94% (which is closer to the 91.2% DCI-P3 gamut volume), but you still get noticeably more vibrant colors than that of the standard sRGB gamut displays, especially when it comes to reds and greens.
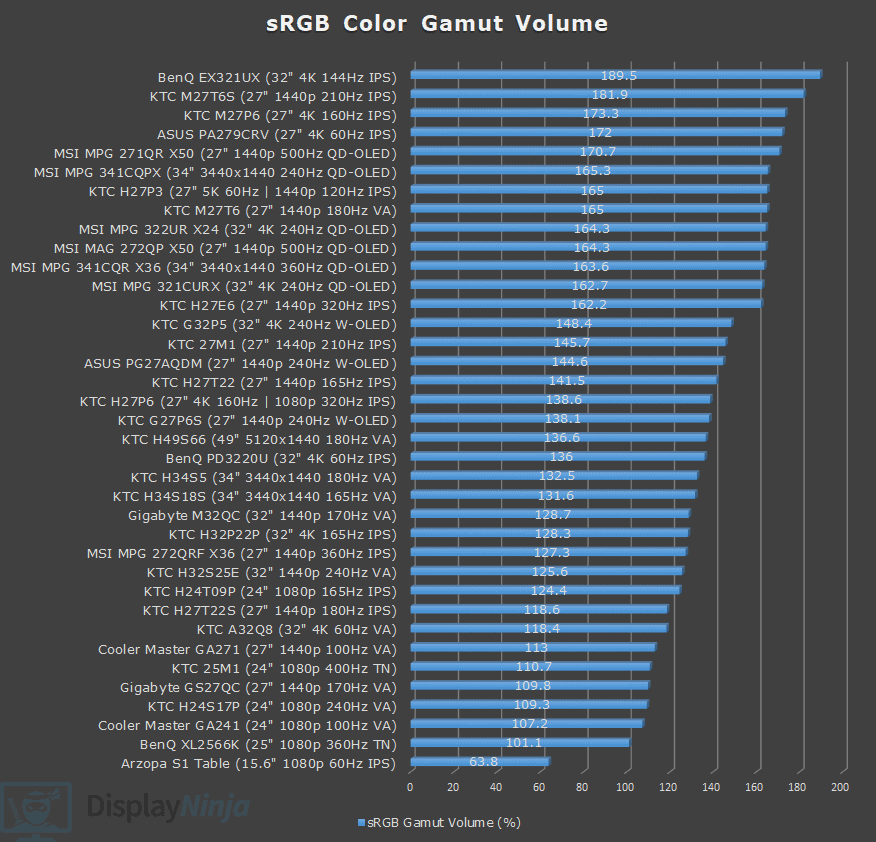
While the wide 128.7% sRGB gamut volume causes some over-saturation when viewing sRGB content, it’s very minor and most people will prefer the extra vibrancy.
The sRGB mode also locks you out of all settings except for brightness, so you cannot improve the gamma and color temperature as we did with the Standard mode.

You can, however, use AMD’s Custom Color feature (or the novideo_srgb tool if you have an NVIDIA GPU), to clamp the gamut down on the software side, which actually provided us with better results. The monitor’s sRGB mode clamps the color space a bit too much (92.7% coverage, 94.8% volume) in comparison to the software clamp (97.3% coverage, 101% volume).
After full calibration, we got the average Delta E down to 0.31, the maximum down to 1.46 and the average gamma to 2.18. Changing the red gain to 94, blue to 99 and leaving green at 100 provided us with a 6512K color temperature at 120-nits (brightness setting of 16).
You can download our ICC profile here.
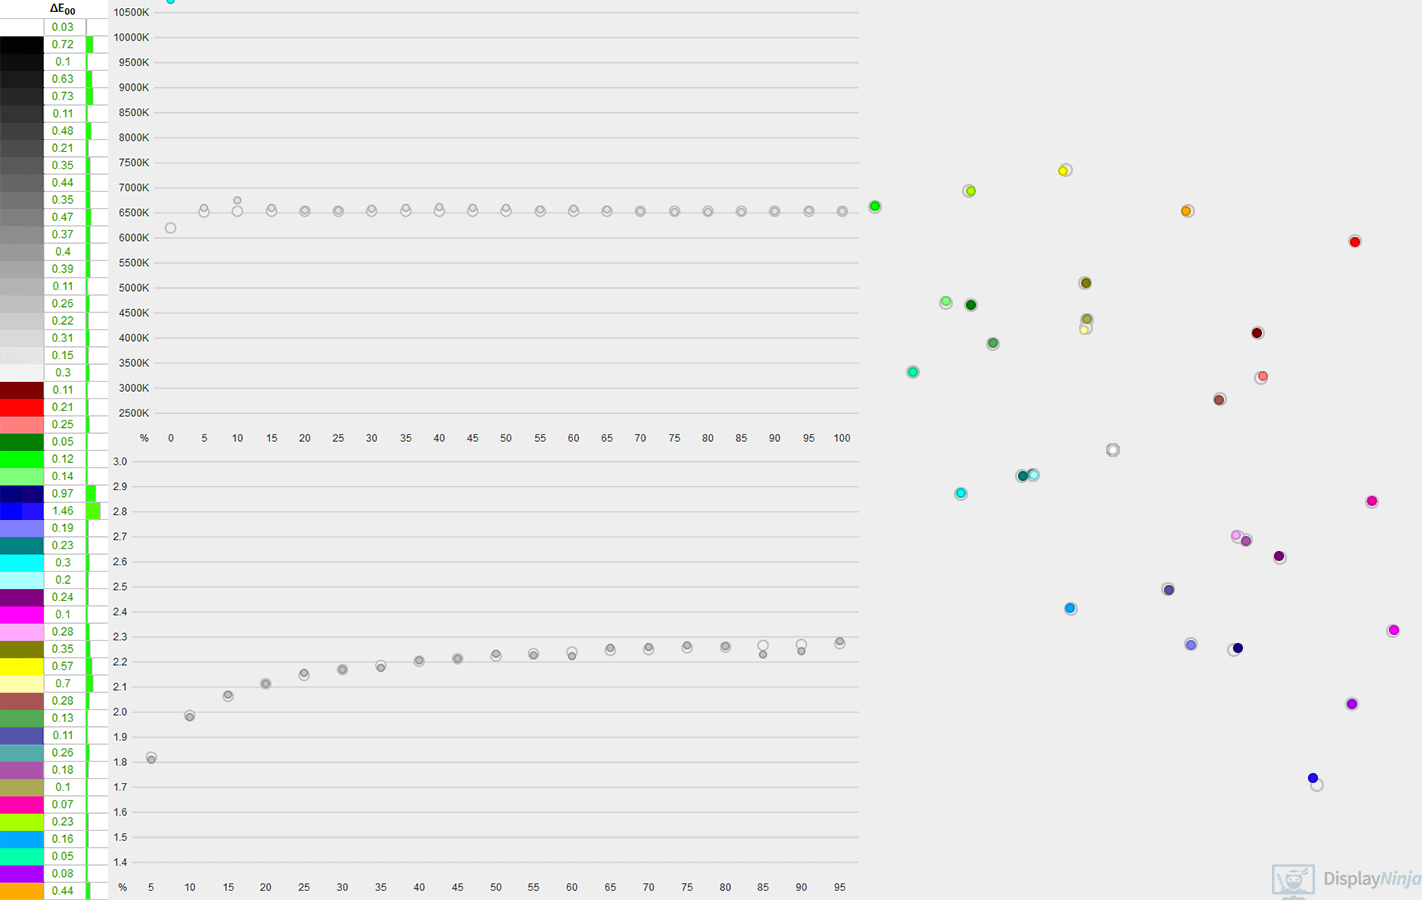
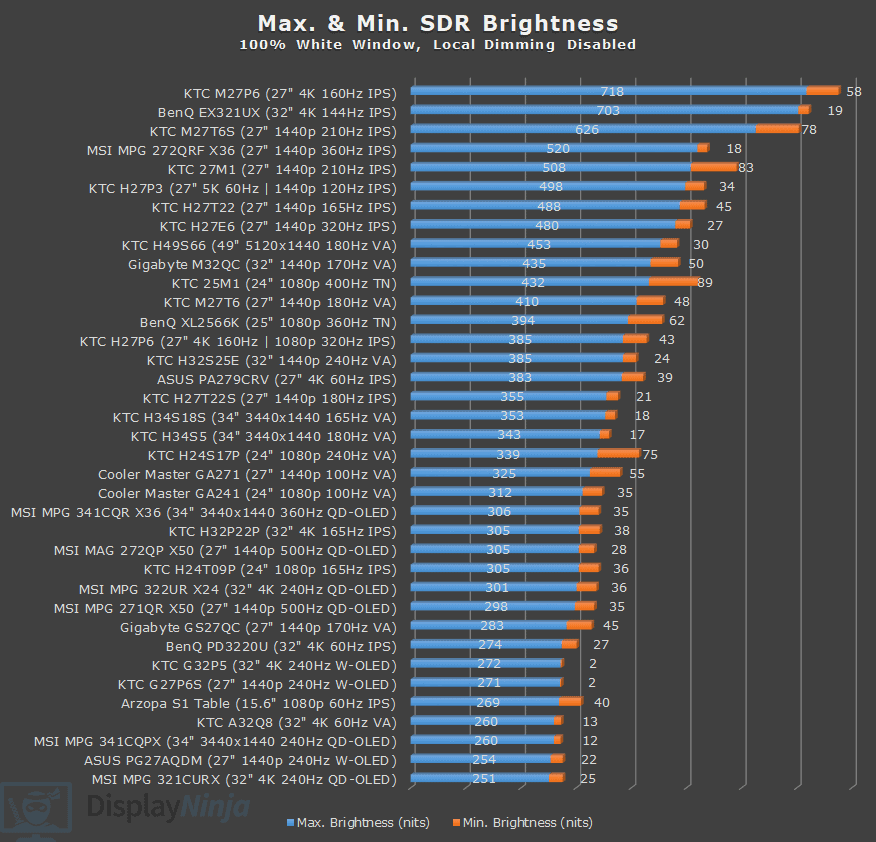
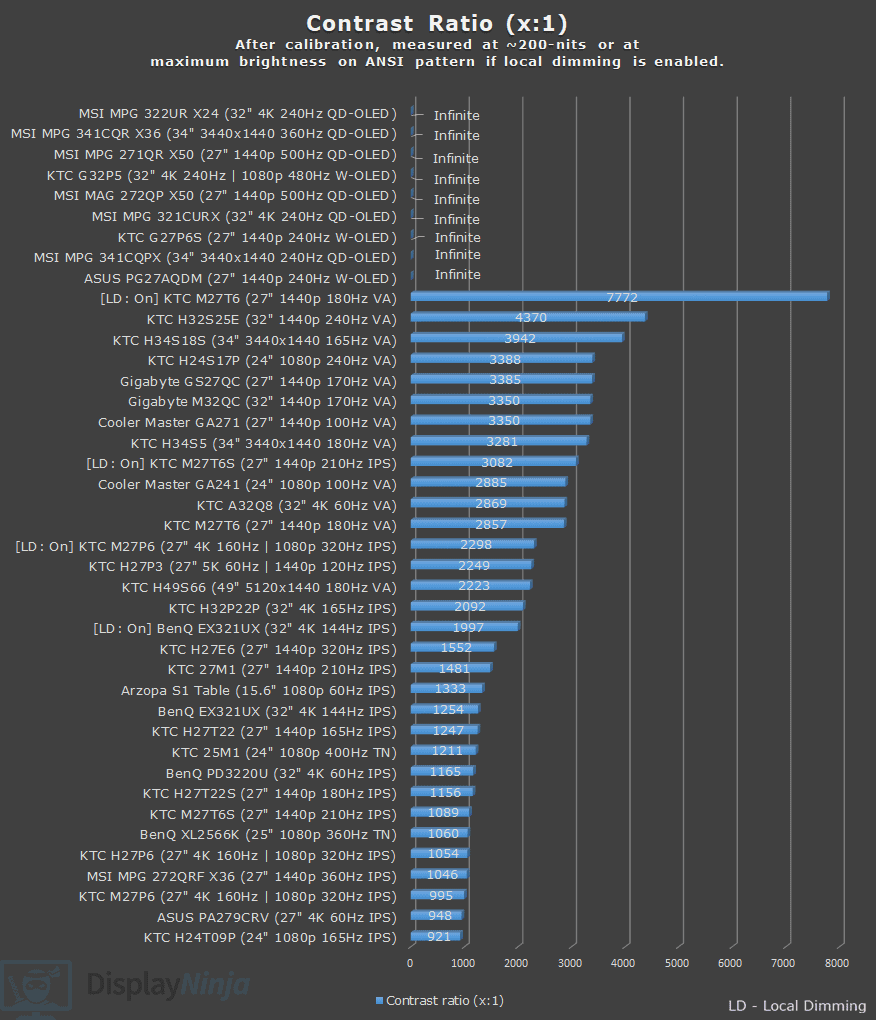
Finally, we measured a maximum brightness of 435-nits and a minimum of 50-nits, while the static contrast ratio amounts to 3350:1 at 200-nits. Both the contrast ratio and peak brightness exceed the specified values.
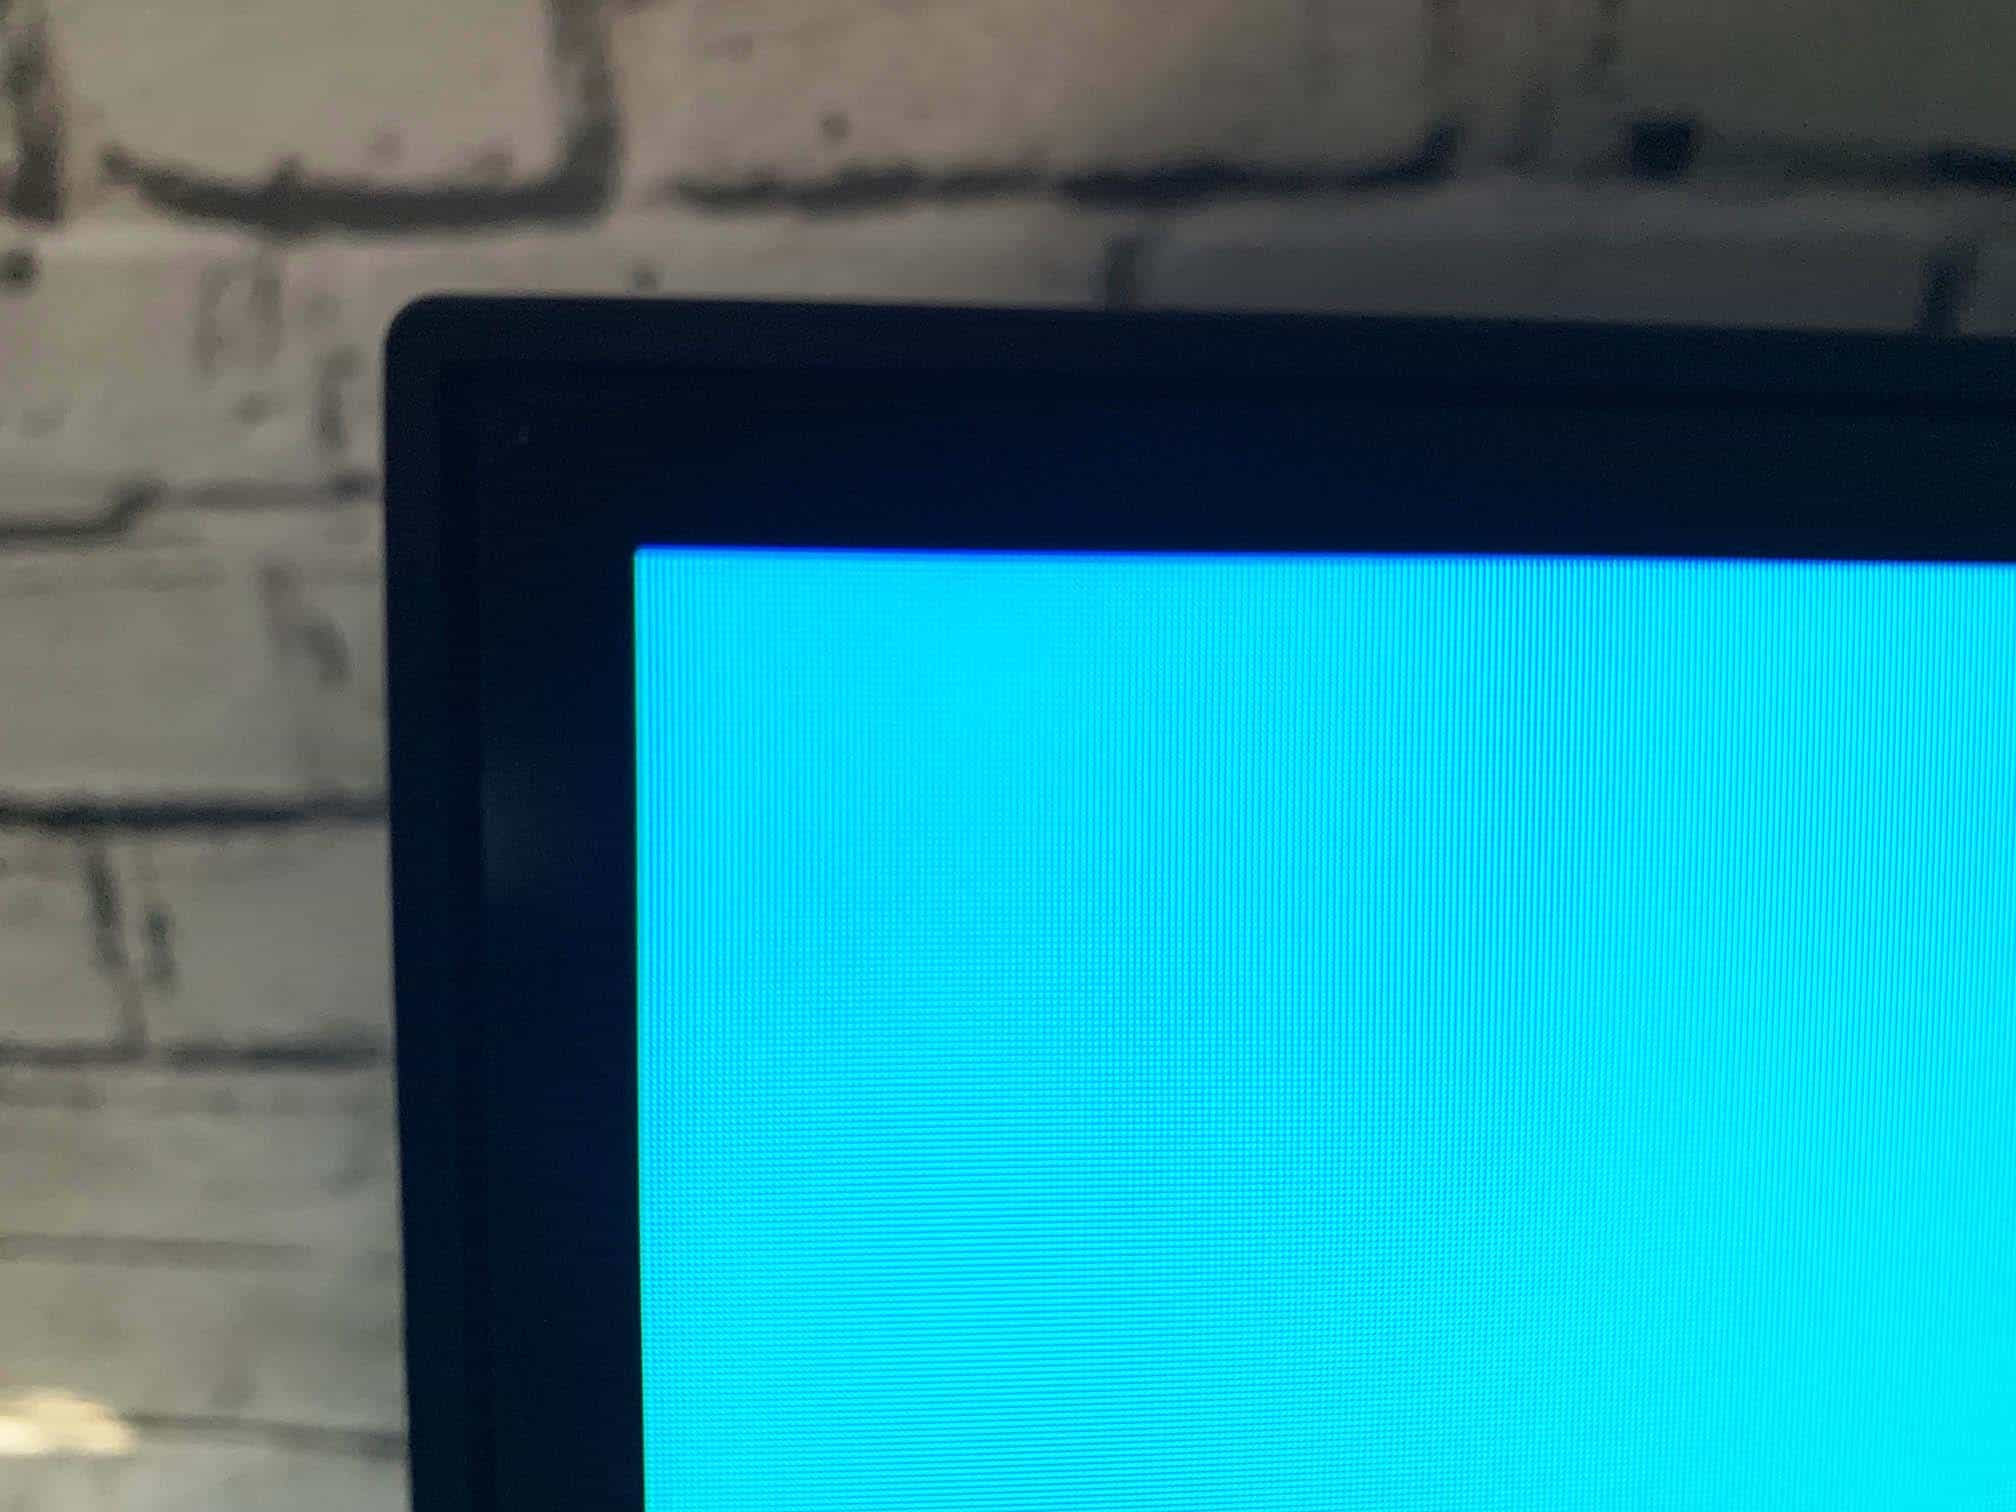
We didn’t find any dead or stuck pixels, there is no excessive backlight bleeding or VA glow, no frame skipping, no image retention and no pixel inversion artifacts using Lagom’s pixel-walk tests.

As expected from a VA panel display, there is some gamma/saturation shift when looking at the screen from certain angles. This isn’t an issue for everyday use, but it’s one of the reasons professional colorists go with the IPS technology with wider viewing angles.
As for the image uniformity, there’s some minor contrast deviation on the left side of the screen, but it’s not noticeable in real use.
The 2560×1440 resolution results in a pixel density of 93.24 PPI (pixels per inch), so in terms of text and detail clarity, you get the same experience as that of 24″ 1080p displays. However, since the screen is a lot bigger, you’ll be sitting a bit further away from it, so the individual pixels won’t be noticeable.
In games and videos, this pixel density is even less of an issue as it allows you to enjoy a reasonably sharp image on a big 31.5″ screen without being nearly as taxing on the GPU as 4K UHD.
HDR
The Gigabyte M32QC also supports HDR (High Dynamic Range) and has VESA’s entry-level DisplayHDR 400 certification.
Thanks to its decent brightness, contrast ratio and color gamut, some HDR content might appeal better to you than SDR, but keep in mind that due to the lack of a full-array local dimming solution or an OLED panel, HDR content won’t look the way the creator intended and details in shadows and highlights of the image will be lost.
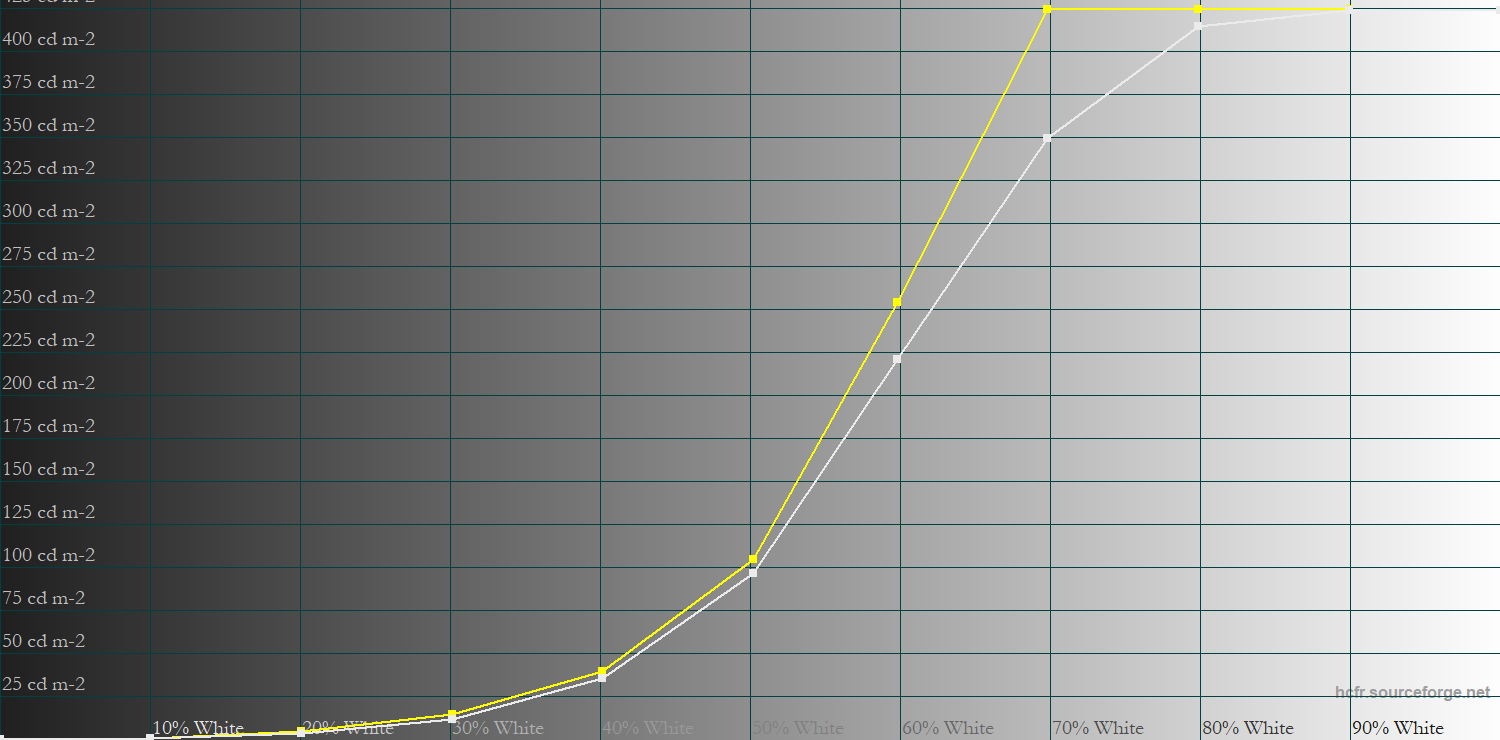
We measured a peak brightness of 422-nits regardless of the window size, while the color temperature was 6717K. In the images above, you can see that due to the limited DCI-P3 color space coverage, there is some under-saturation – and based on the EOTF tracking, most scenes will be brighter than they should be.
Once HDR is enabled, you also get additional picture settings, including Dark, Color and Light Enhance. The Color Enhance option, for instance, increases color saturation but, naturally, it doesn’t actually extend the gamut, so the result is even further straying away from the creator’s intent. So, we don’t recommend fiddling with these settings if you care about HDR accuracy.
Some scenes can still look better, depending on the game and your personal preference, so you might choose to enable HDR in some titles, especially those with FreeSync Premium Pro certification (if you have an AMD GPU). In most content, you’ll prefer to have HDR disabled though.
Performance
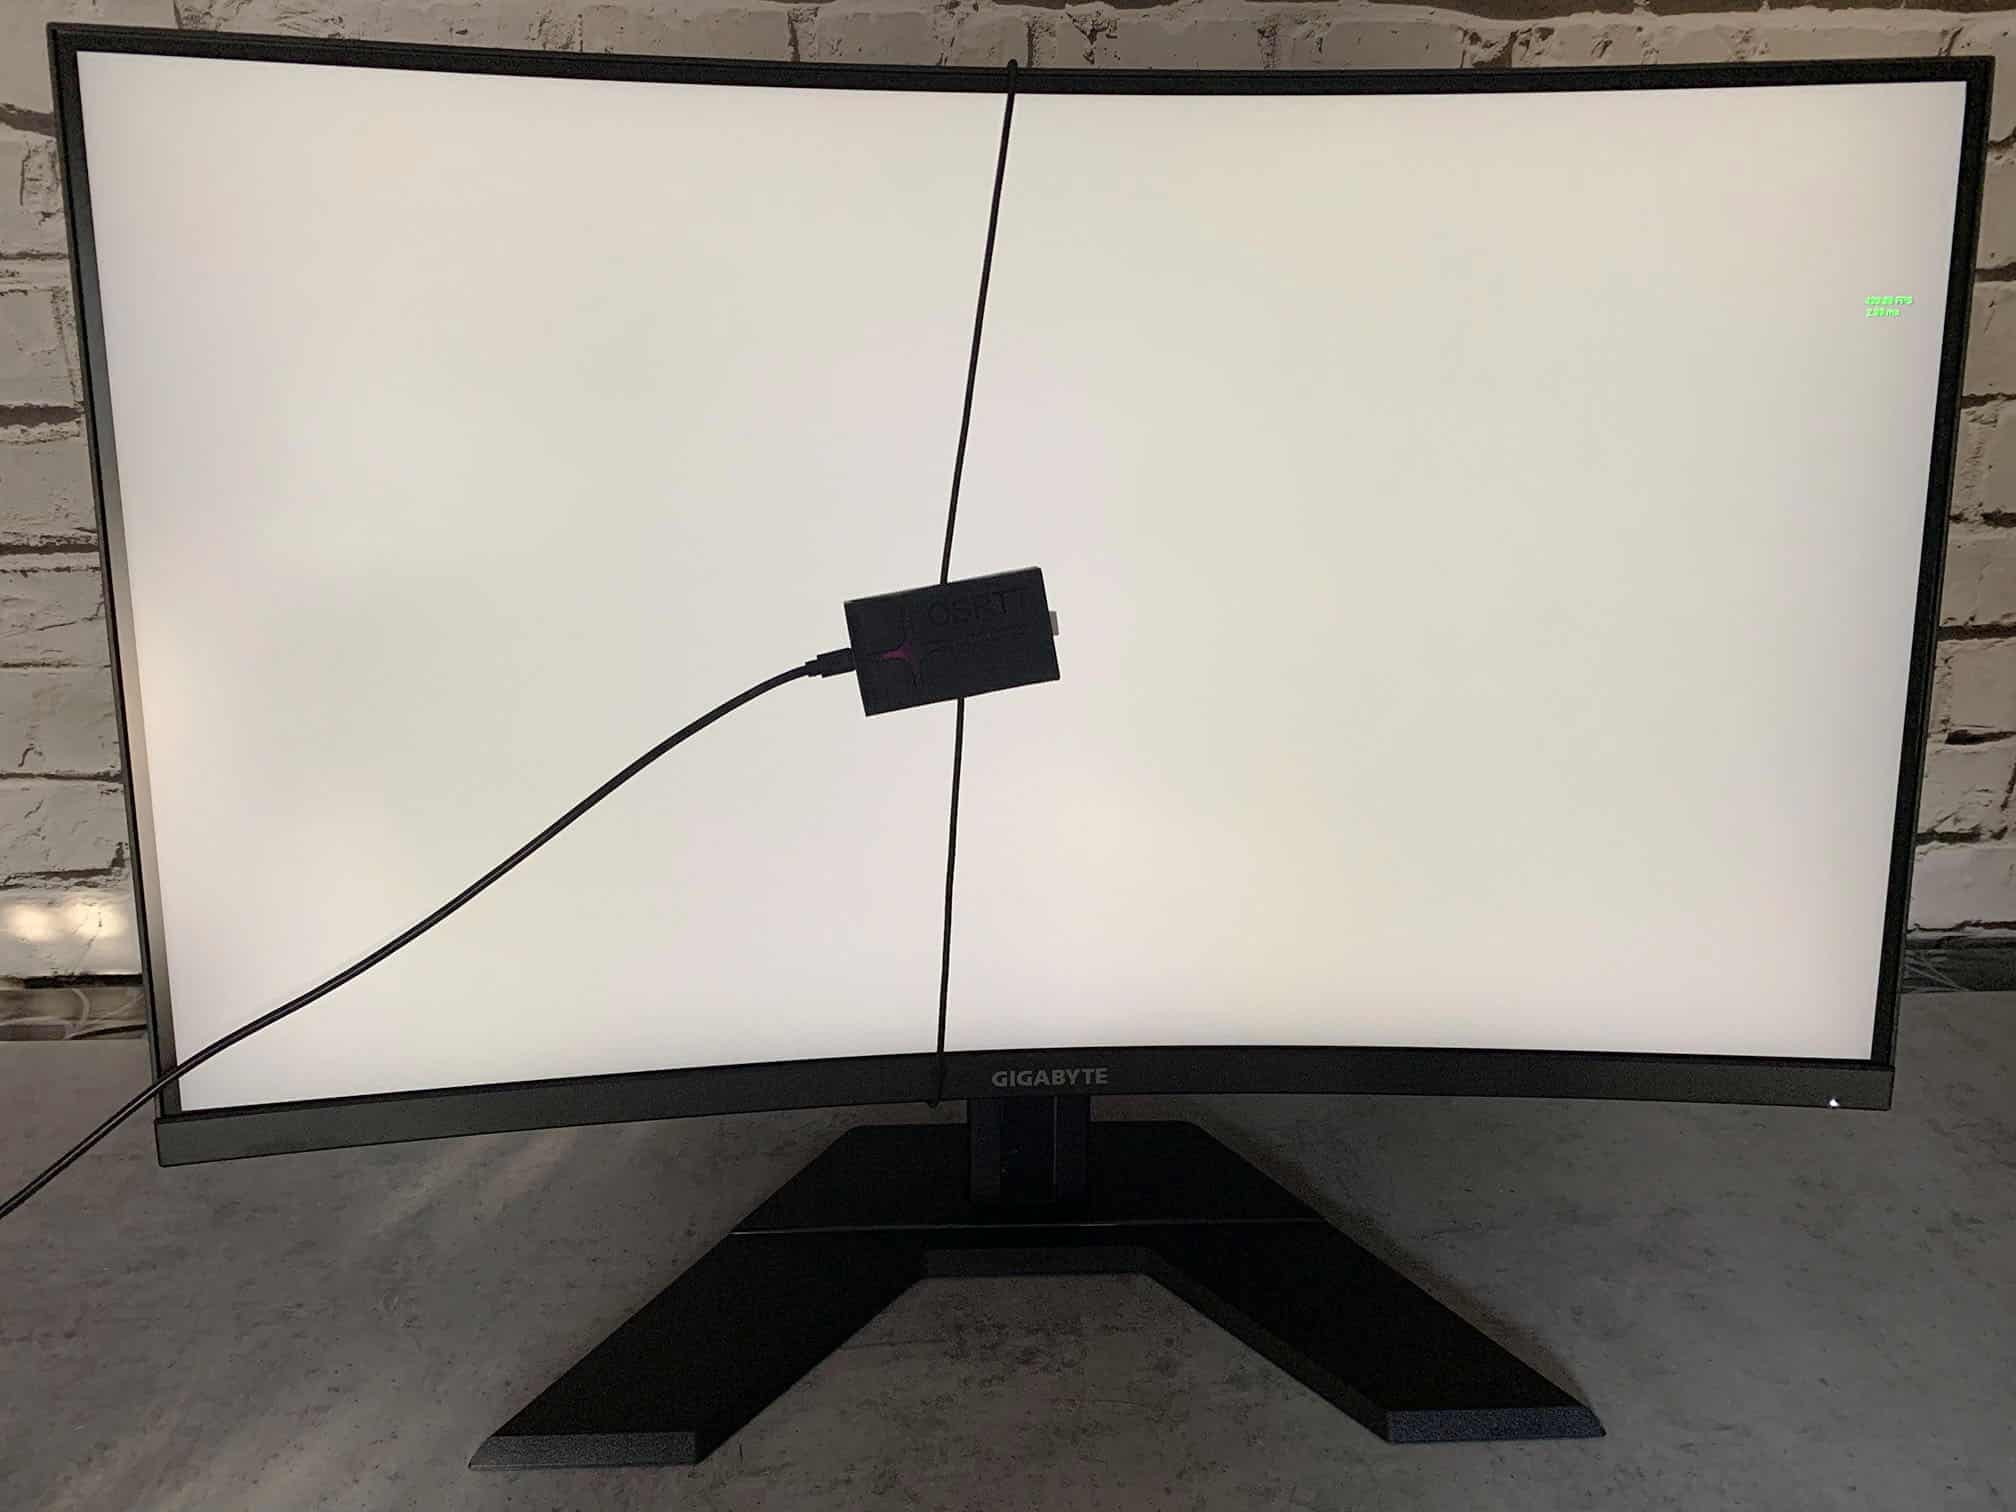
For pixel response time speed and input lag testing, we’re using OSRTT. We’re also using Blur Buster’s UFO ghosting test with 960 Pixels Per Sec, shutter speed set to 1/4 of the refresh rate with fixed focus, ISO and color temperature (6500K). Before the tests, the monitor was calibrated and warmed up.
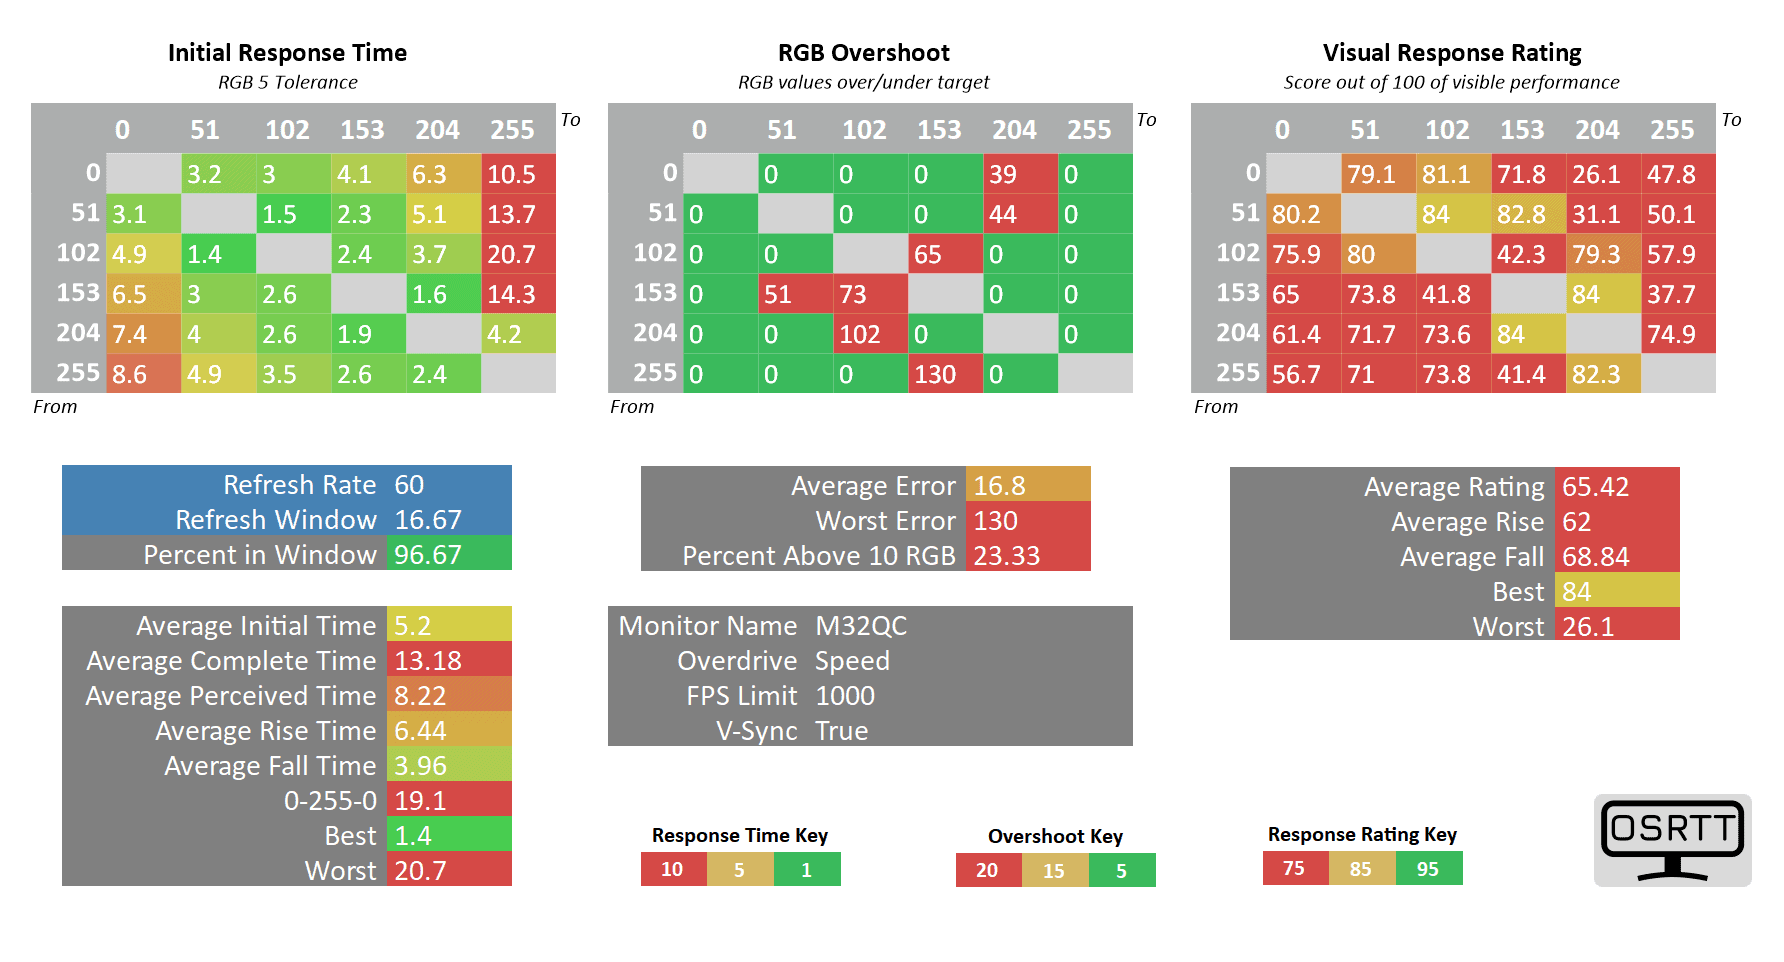
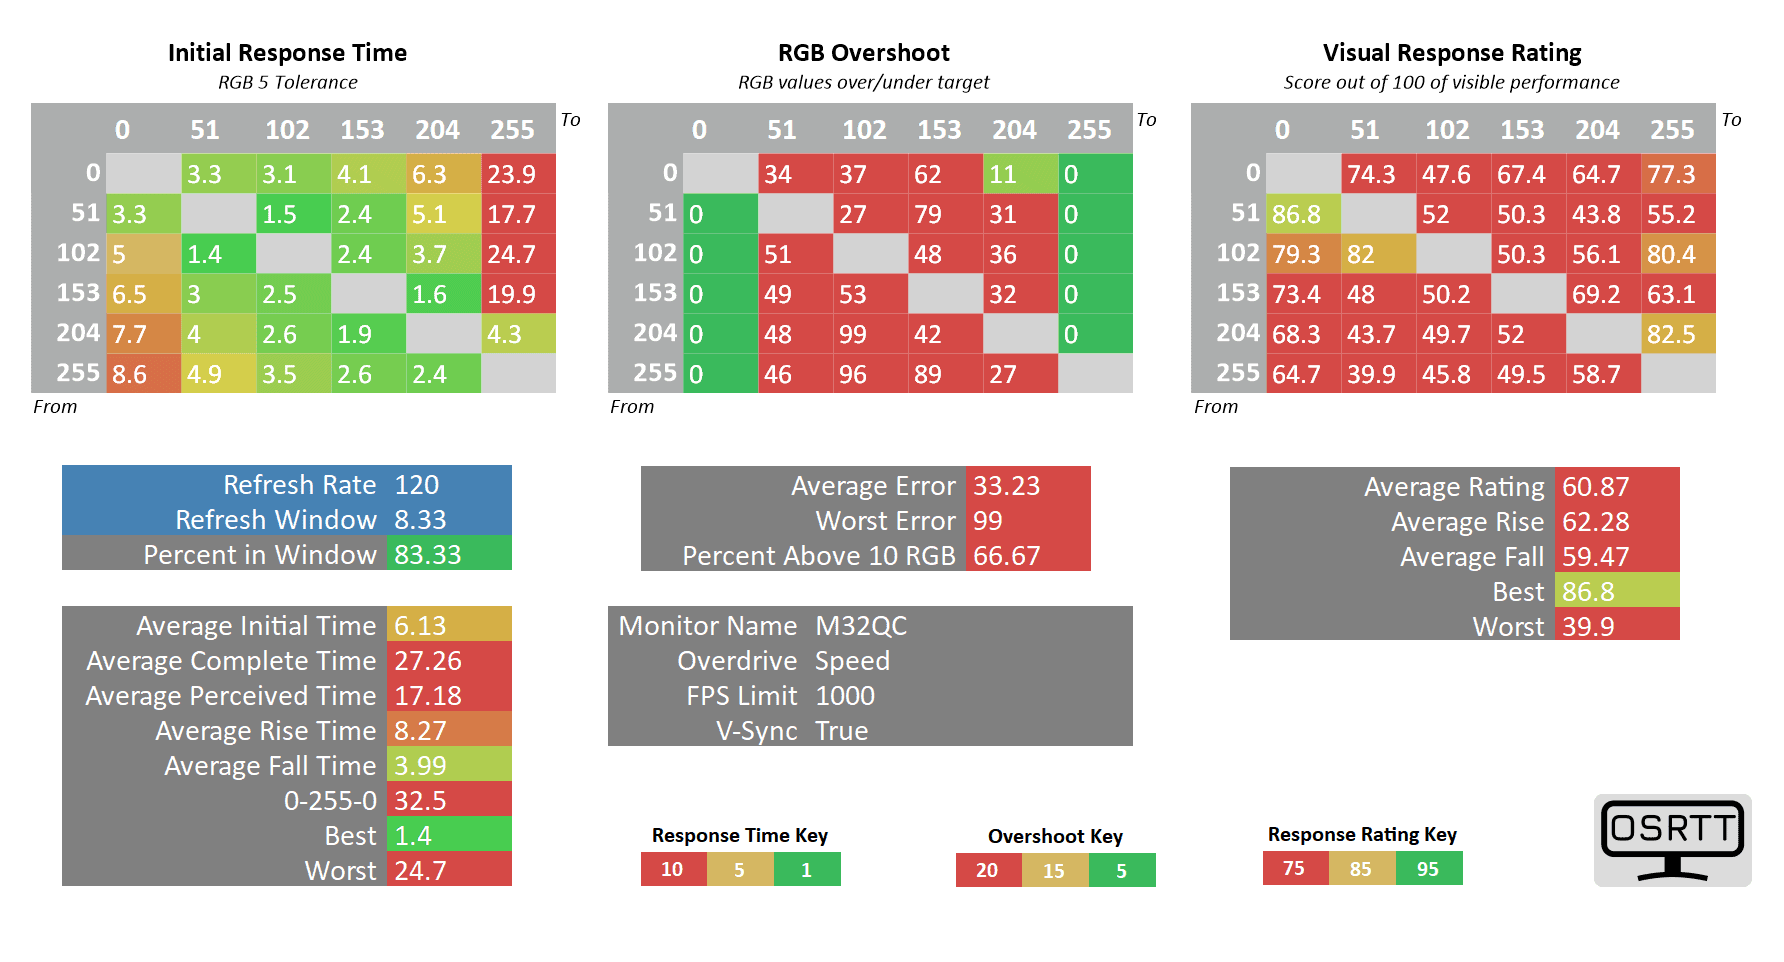
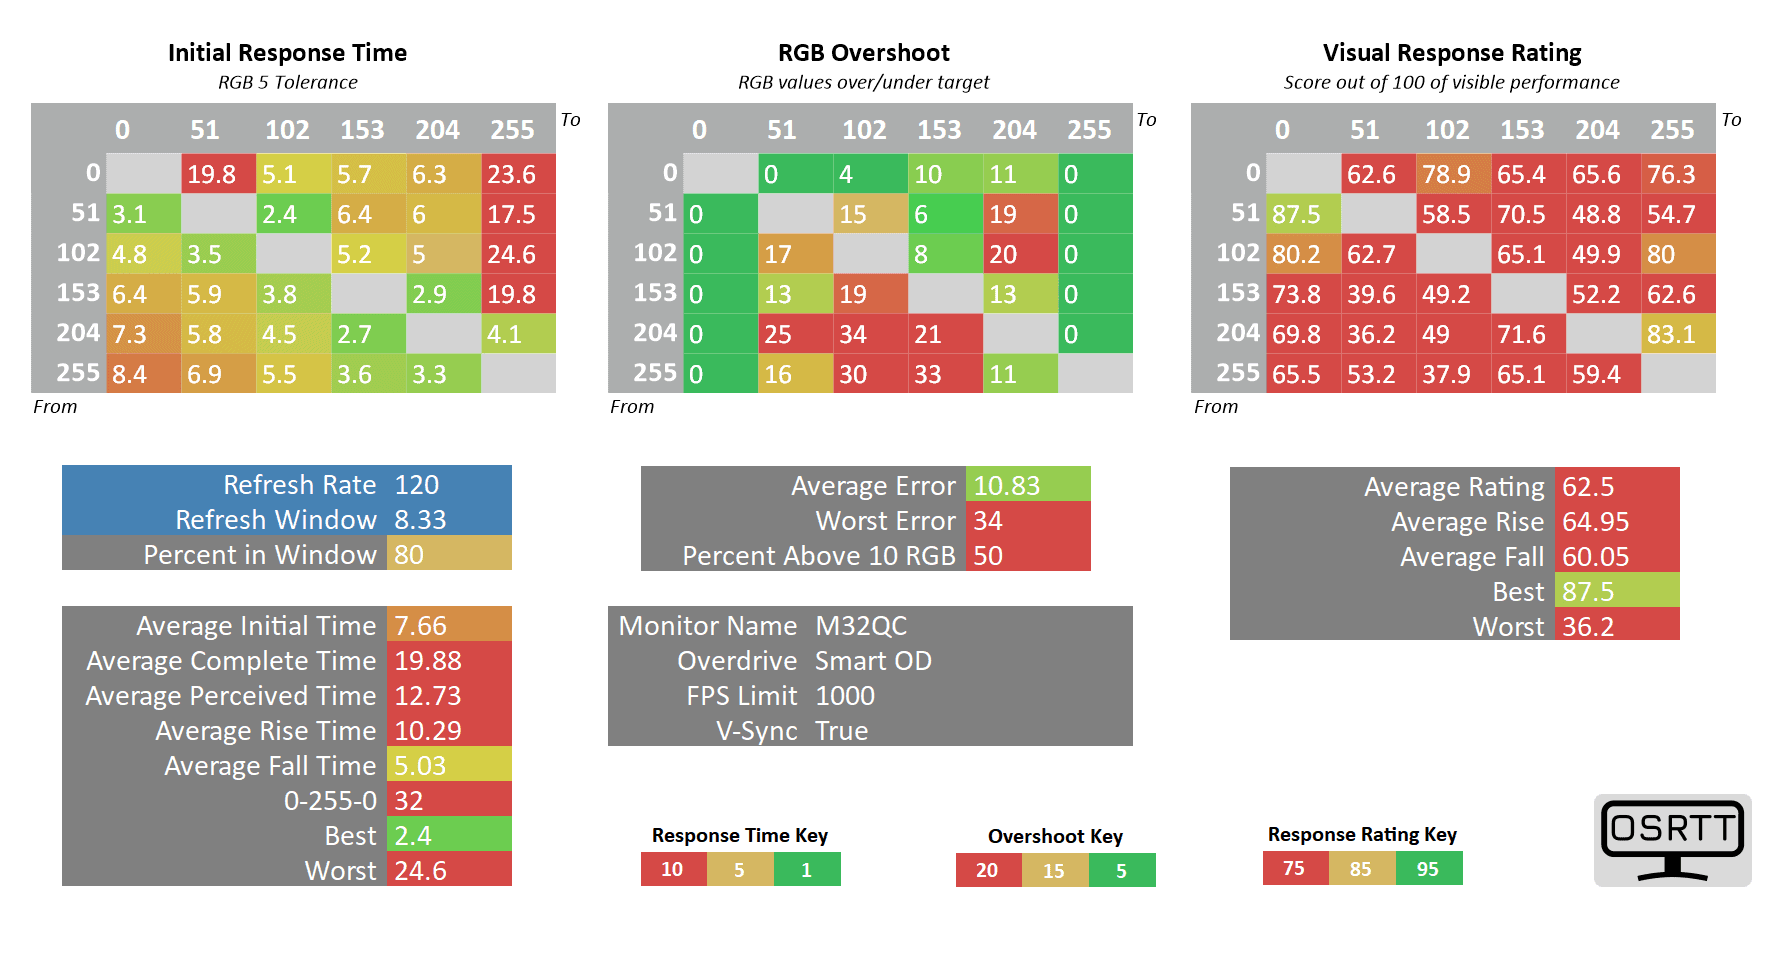
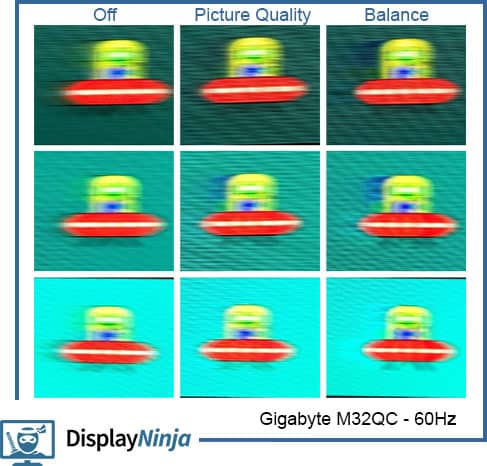
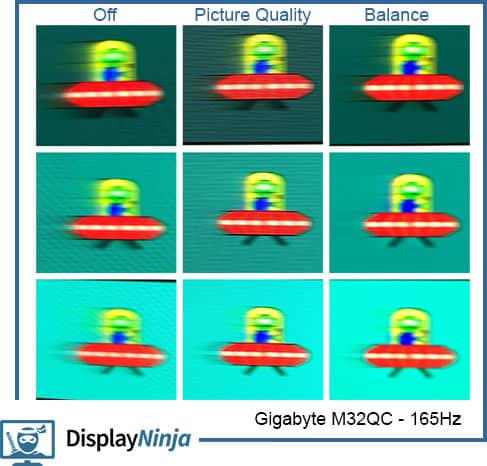
The Gigabyte M32QC has five response time overdrive modes: Off, Picture Quality, Balance, Speed and Smart OD.
Speed has way too much overshoot, while Smart OD is supposed to act as variable overdrive and change according to the refresh rate, however, it mostly behaves the same as Balance and even though it changes sometimes, it’s not switching to the optimal mode.
Therefore, we don’t recommend using these two modes.
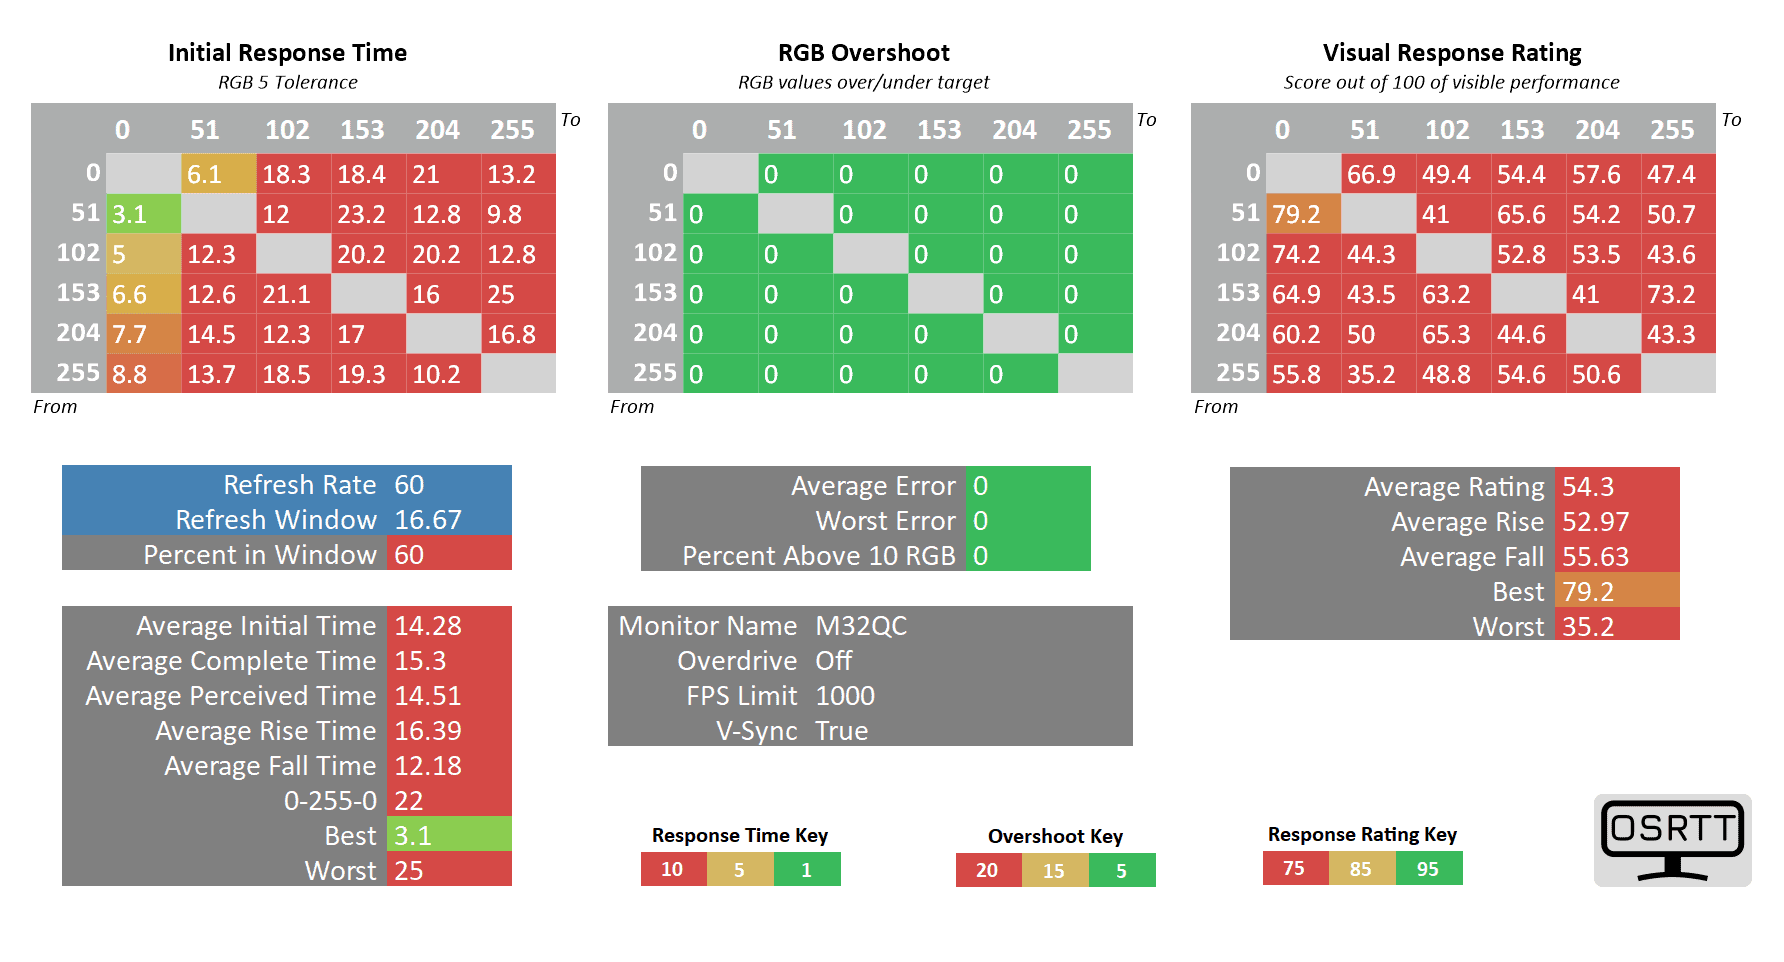
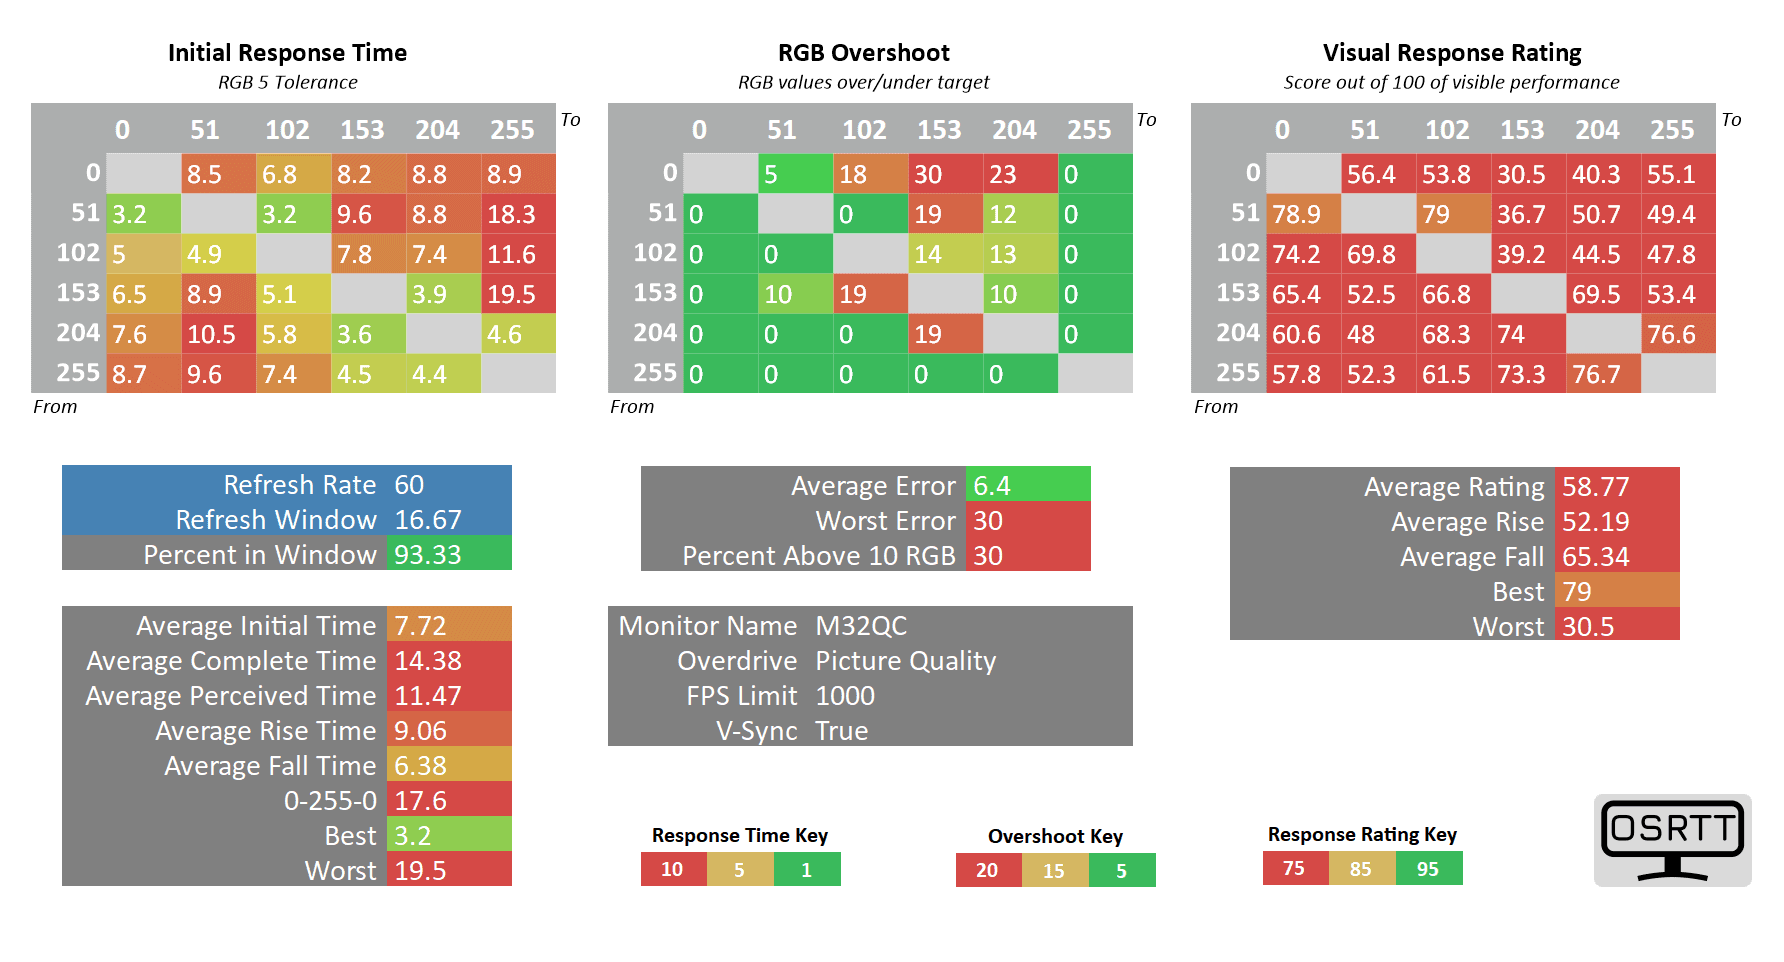
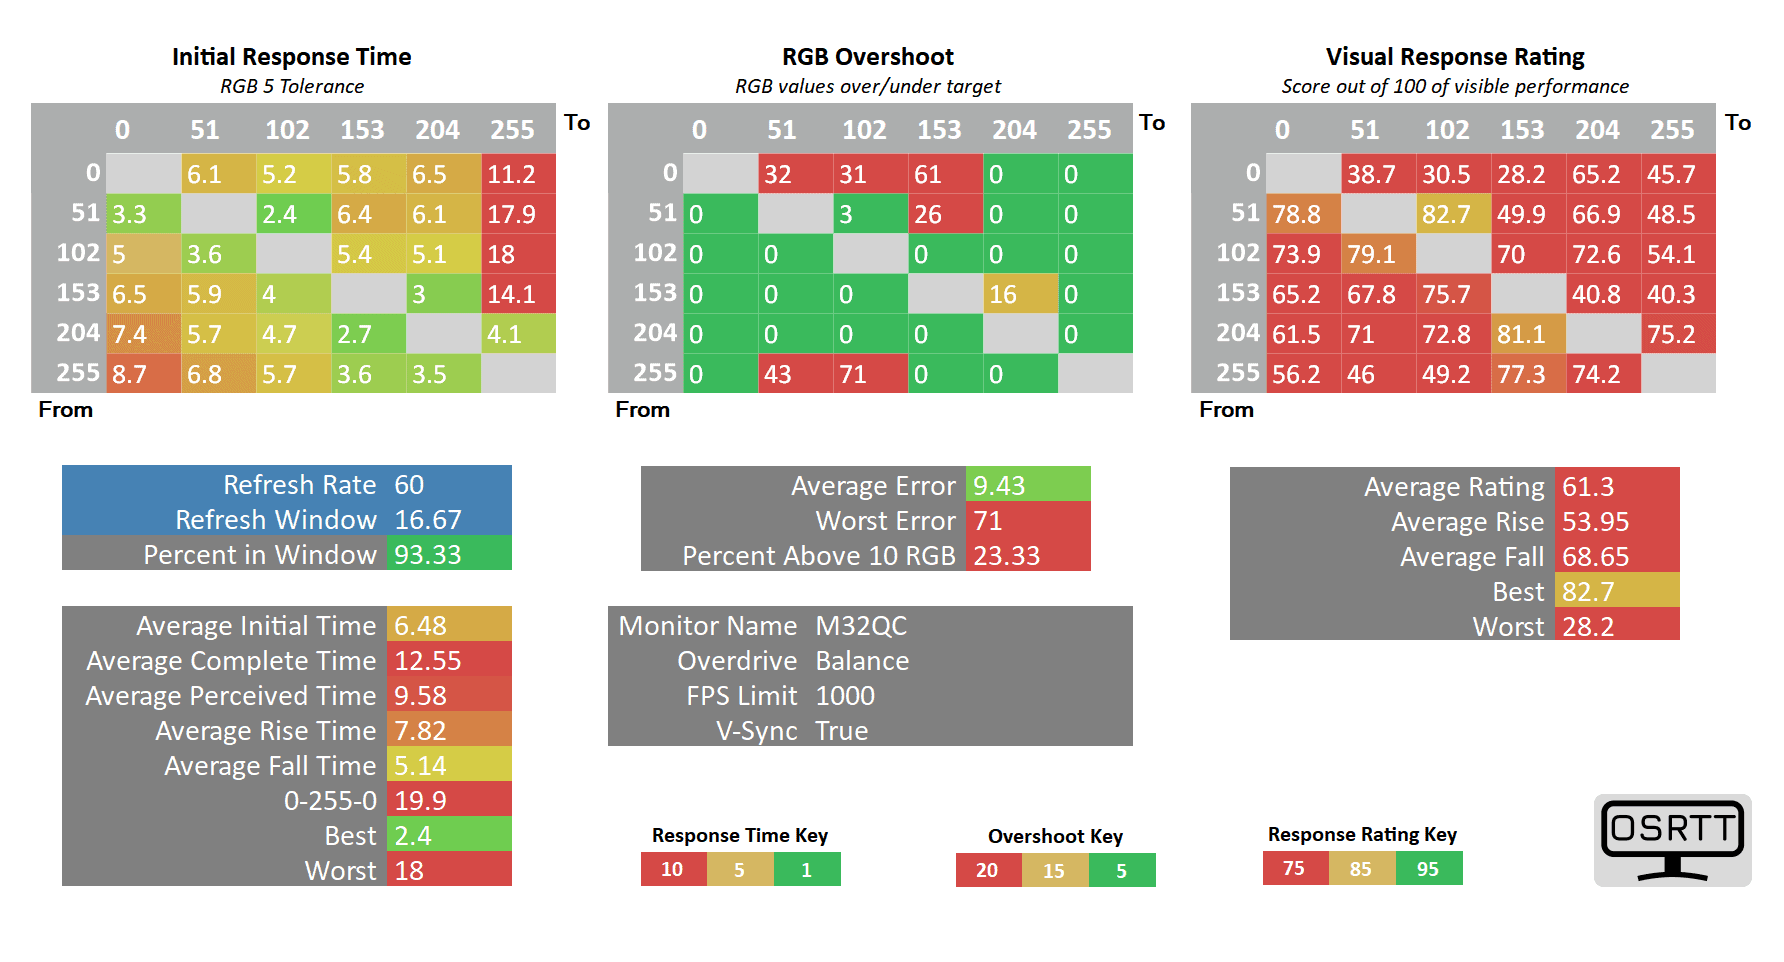

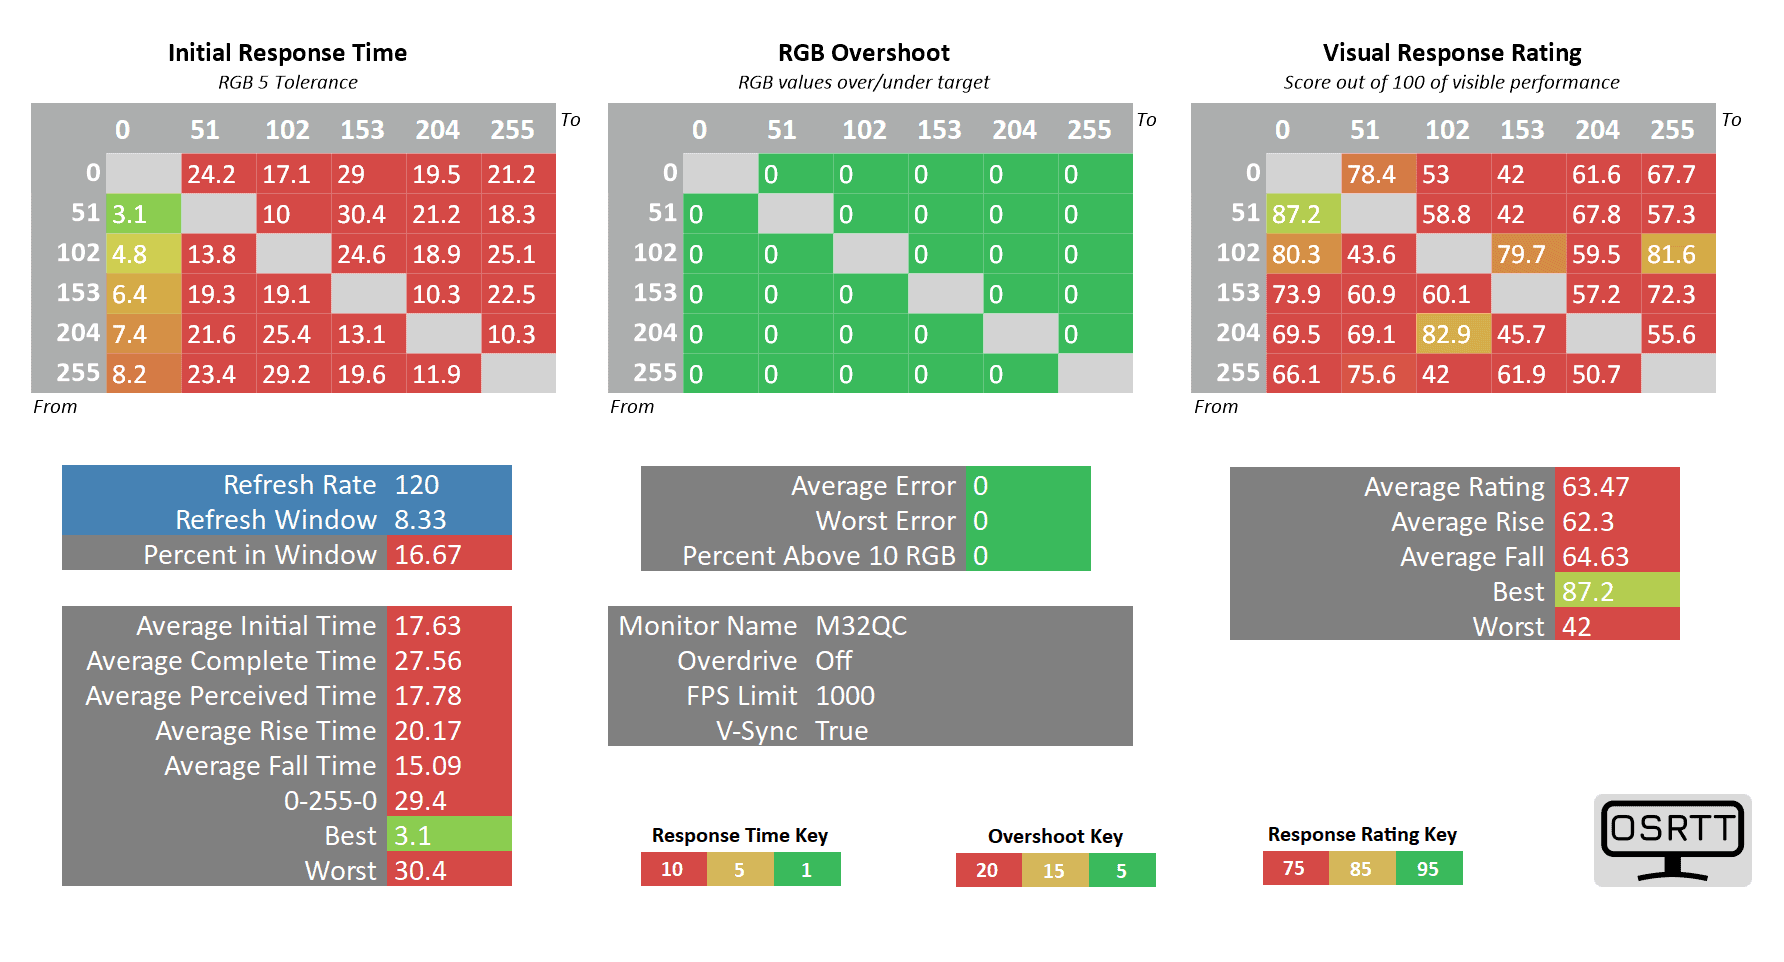

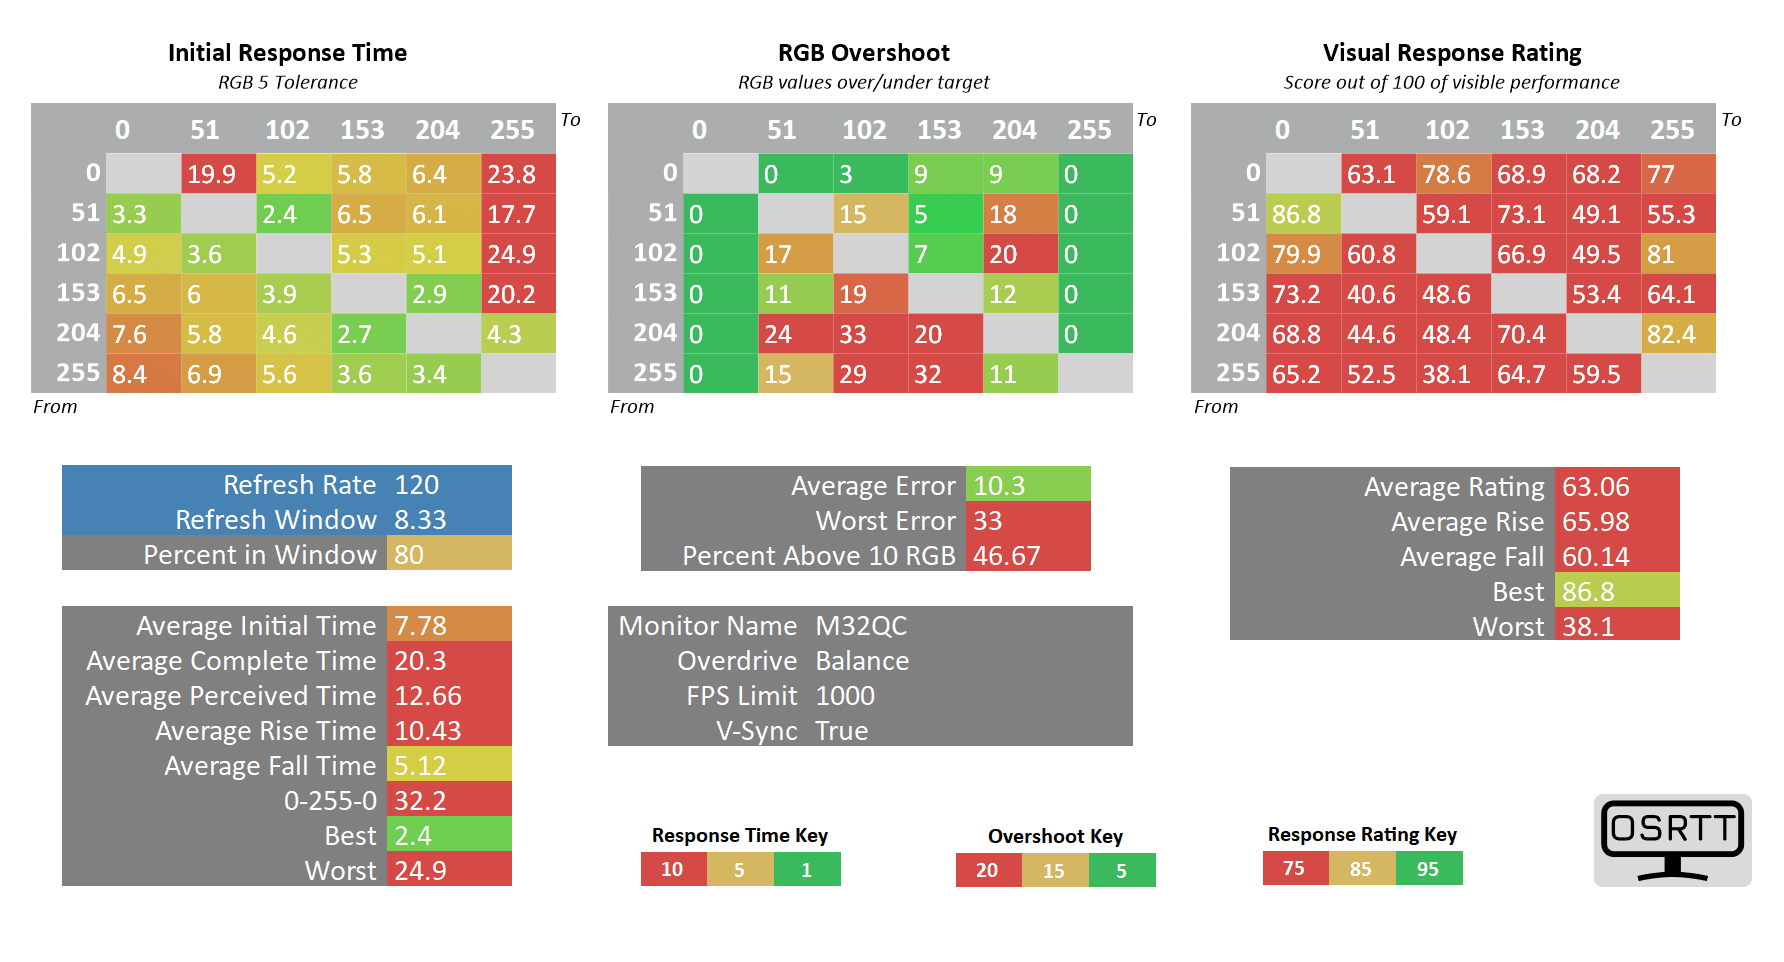


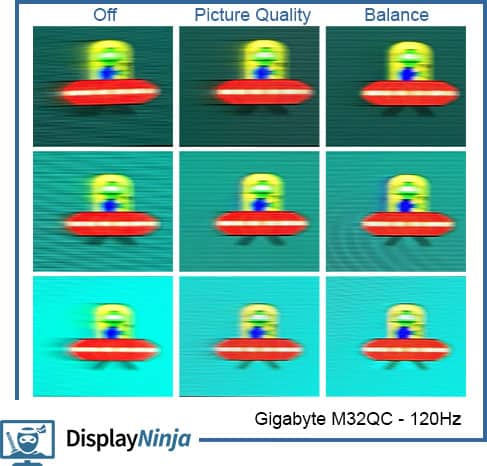
When it comes to gaming at high refresh rates (~100Hz – 165Hz), the choice comes down to Picture Quality and Balance. The former has more ghosting with a 10.02ms average GtG response time speed and 3.03% overshoot, while the latter has more overshoot (12.43%) but a faster response time at 7.37ms GtG, measured at 165Hz.
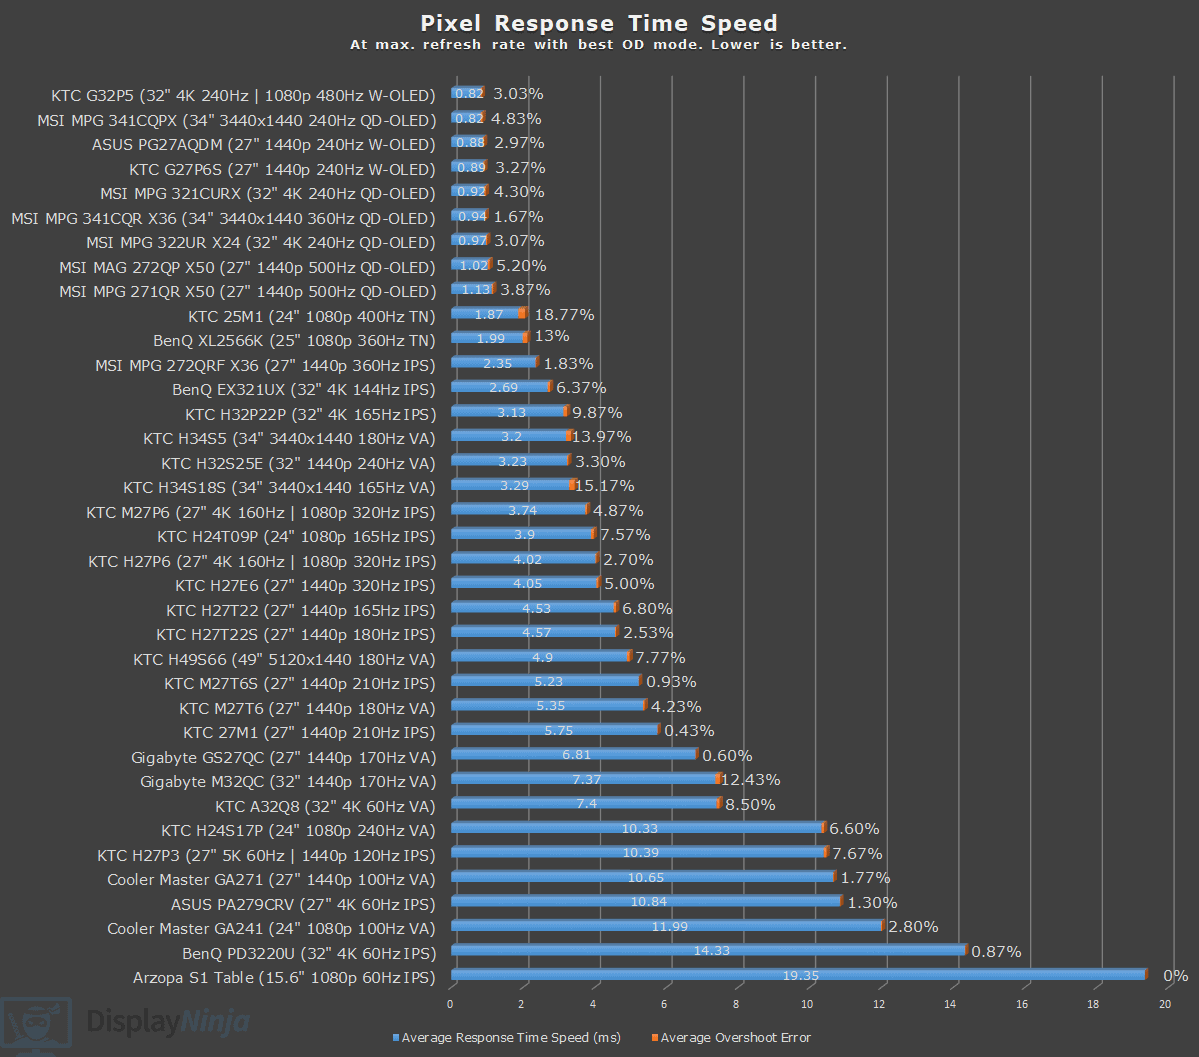

Overall, we recommend going with the Balance mode as we didn’t find the amount of overshoot bothersome in games. At lower refresh rates, such as 60Hz, you should dial back the overdrive to Picture Quality to prevent excessive inverse ghosting.
Note that in the sRGB mode, you’re locked to the Smart OD setting, but we don’t find this to be an issue since you’ll want the slightly wider color gamut in video games anyway and you can use the software clamp as a workaround.
As expected from a budget VA panel gaming monitor, the rise time (pixel transitions from dark to bright shades) is slow, resulting in smearing of fast-moving objects in dark scenes. Some gamers are sensitive to this, others aren’t bothered by it, so it comes down to your personal tolerance for this visual artifact.
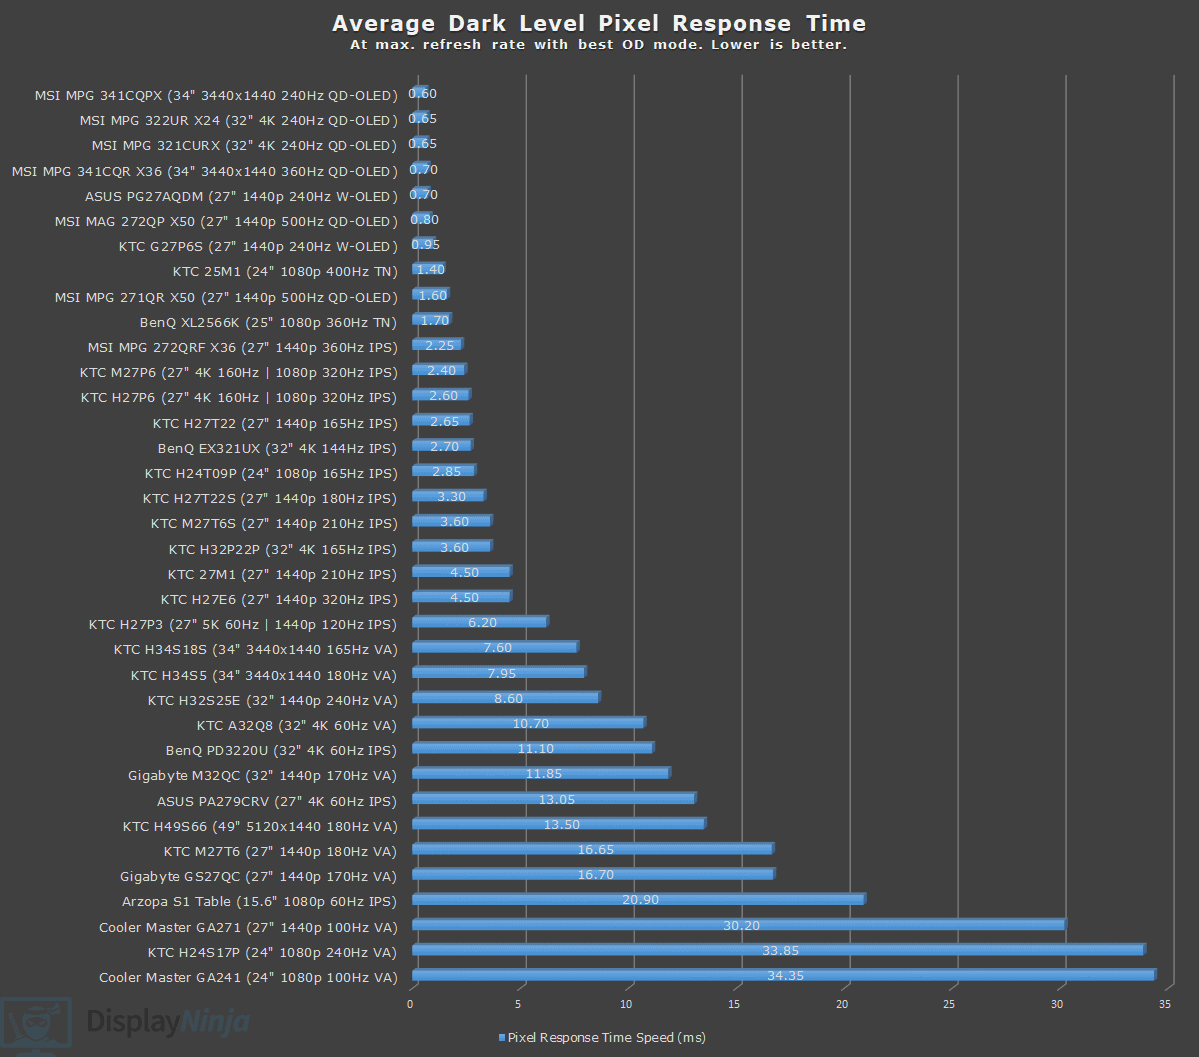
Overall, we find the amount of smearing to be tolerable, especially after considering that a monitor of this size is not intended for competitive fast-paced games anyway; It’s mainly aimed at more immersive gameplay thanks to the VA panel’s high contrast ratio and lack of IPS glow.
You can also enable the Overclock option in the OSD (On-Screen Display) menu, which will allow you to select a higher 170Hz refresh rate. While we haven’t noticed any frame skipping at 170Hz, we don’t recommend overclocking since a 5Hz difference won’t be noticeable but can introduce issues on some units.
Moreover, the pixel response time speed is not entirely keeping up with 165Hz (67% pixel transitions in time with 165Hz or 80% at 120Hz), let alone over that.
In addition, the Gigabyte M32QC supports MBR (Motion Blur Reduction) via their Aim Stabilizer Sync technology, which uses backlight strobing in conjunction with a variable refresh rate to reduce perceived motion blur at the cost of picture brightness (limited to 150-nits on this monitor), while also keeping screen tearing at bay between 100FPS and 170FPS.
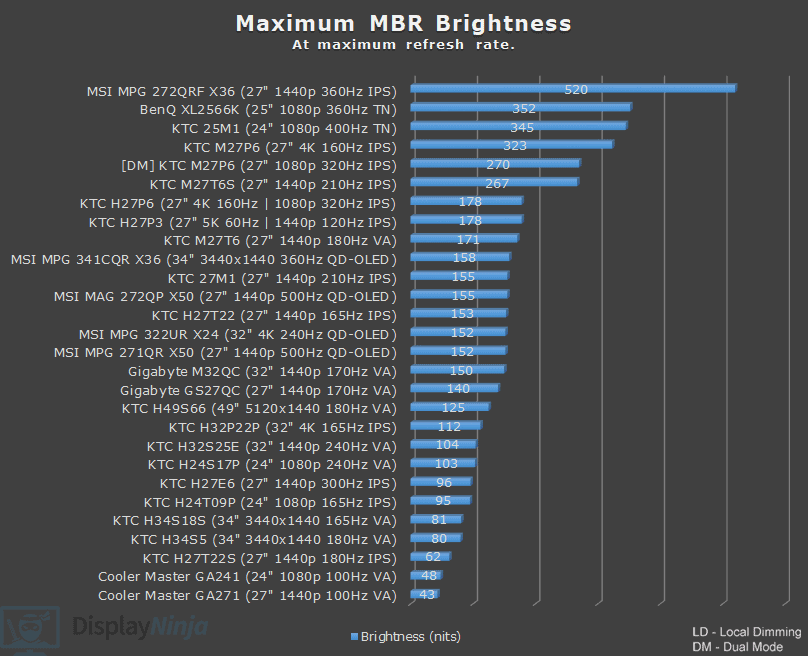
Due to the slow pixel response time, backlight strobing performance isn’t ideal, but it can help clear up some trailing behind fast-moving objects.
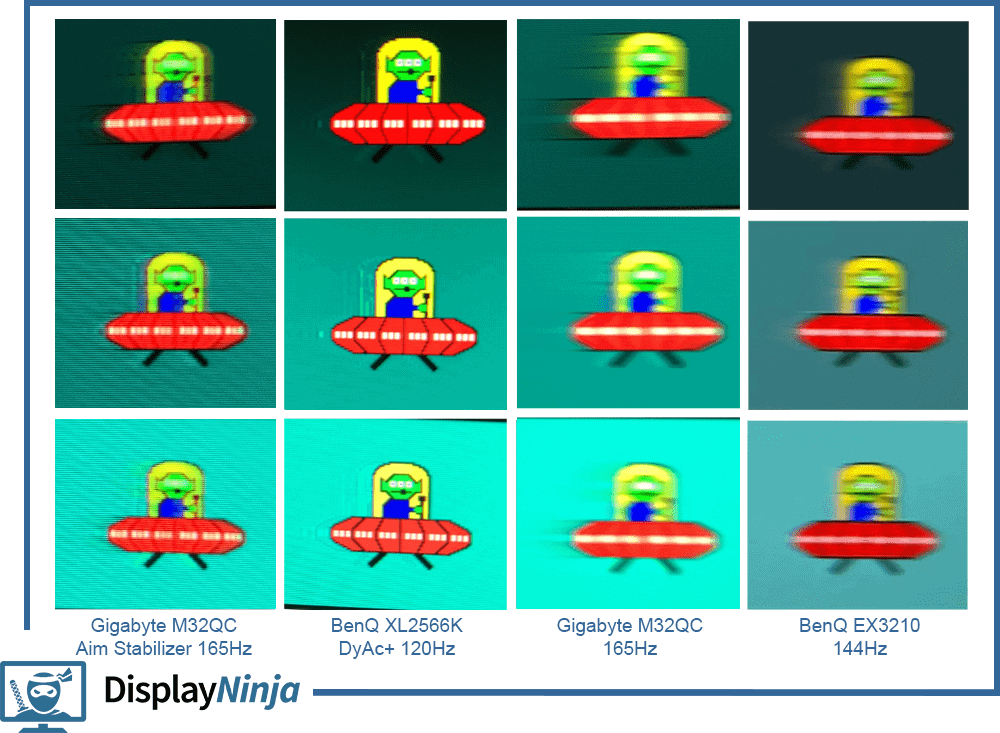
In the image below, you can see how using Aim Stabilizer can improve motion clarity, but it’s not as effective as that of a monitor with a faster pixel response time speed, such as the BenQ XL2566K. You can also see how the BenQ EX3210U with an IPS panel has less ghosting than the M32QC.
Another tool to minimize ghosting is to increase Black Equalizer to somewhere between 12 and 14. This will alter the gamma curvature so that the blacks are lighter for less black smearing, but the rest of the image will also be lighter than intended.
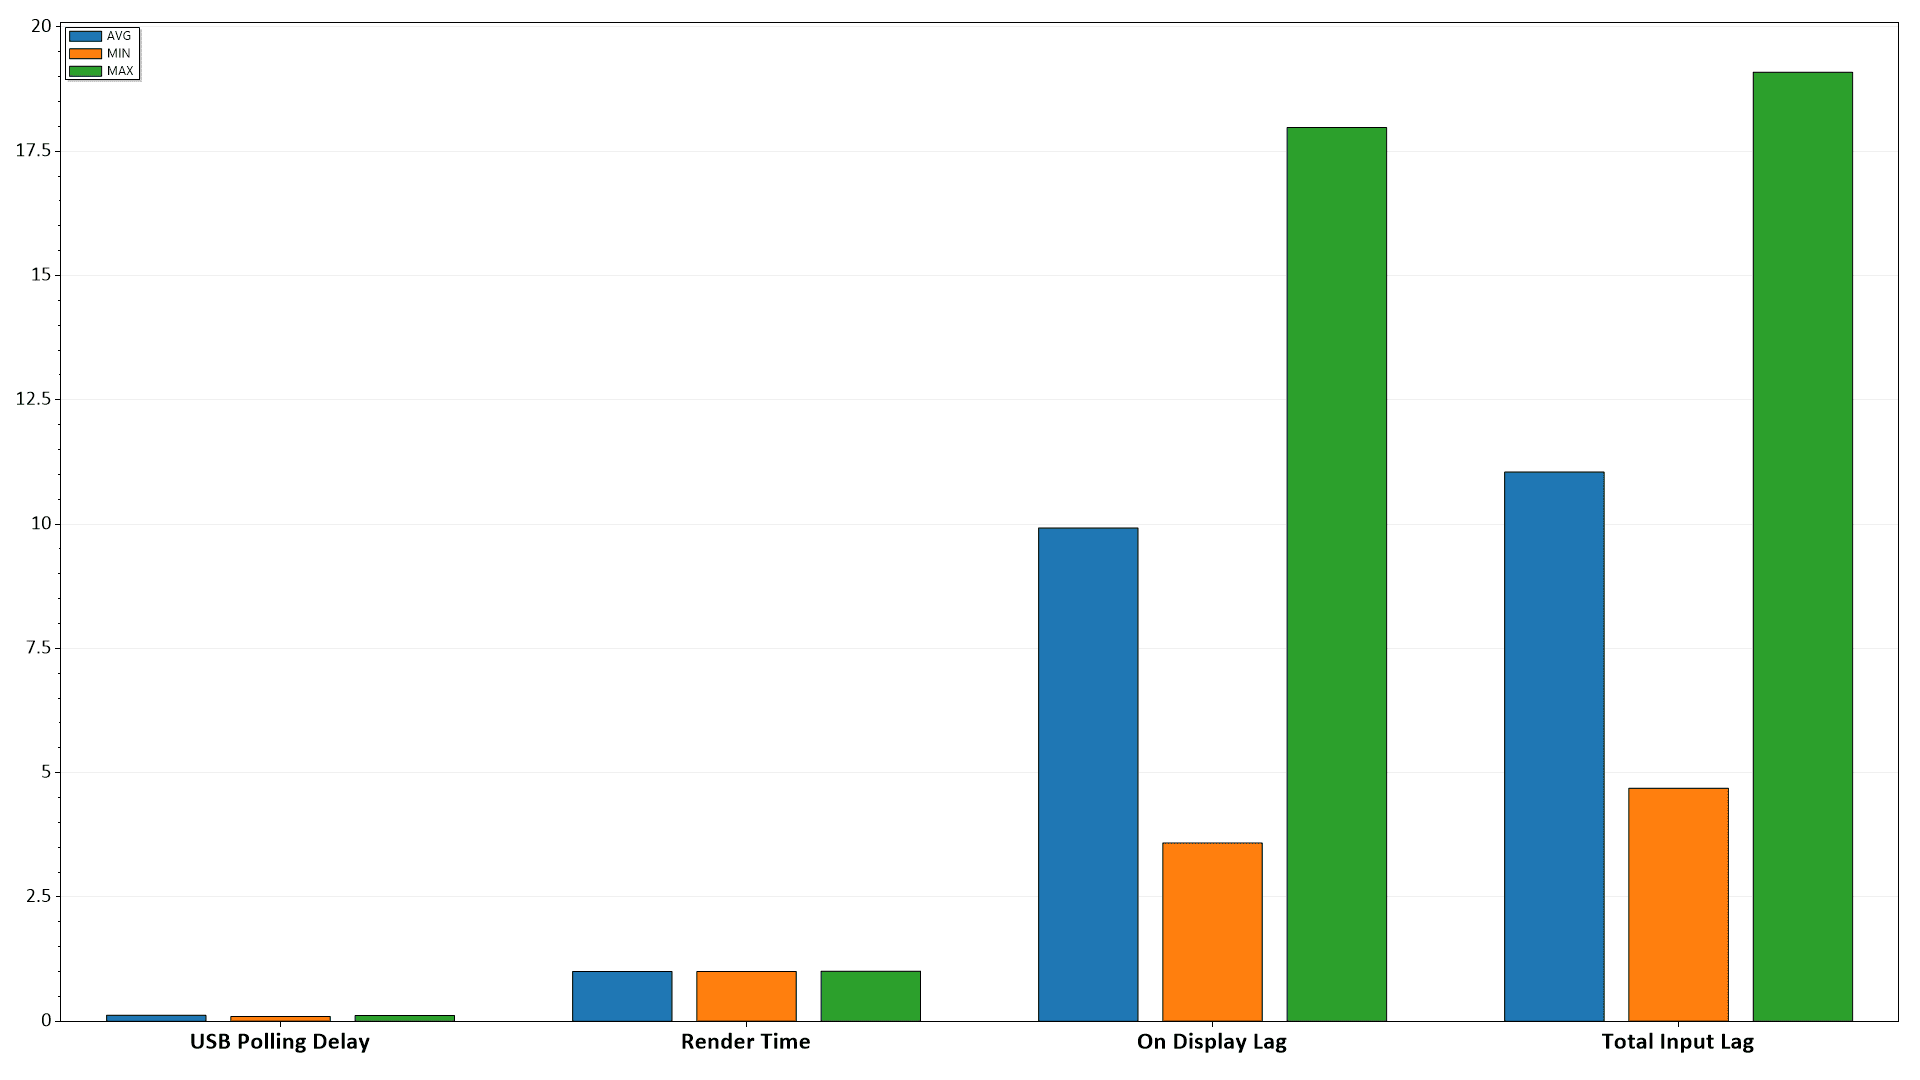
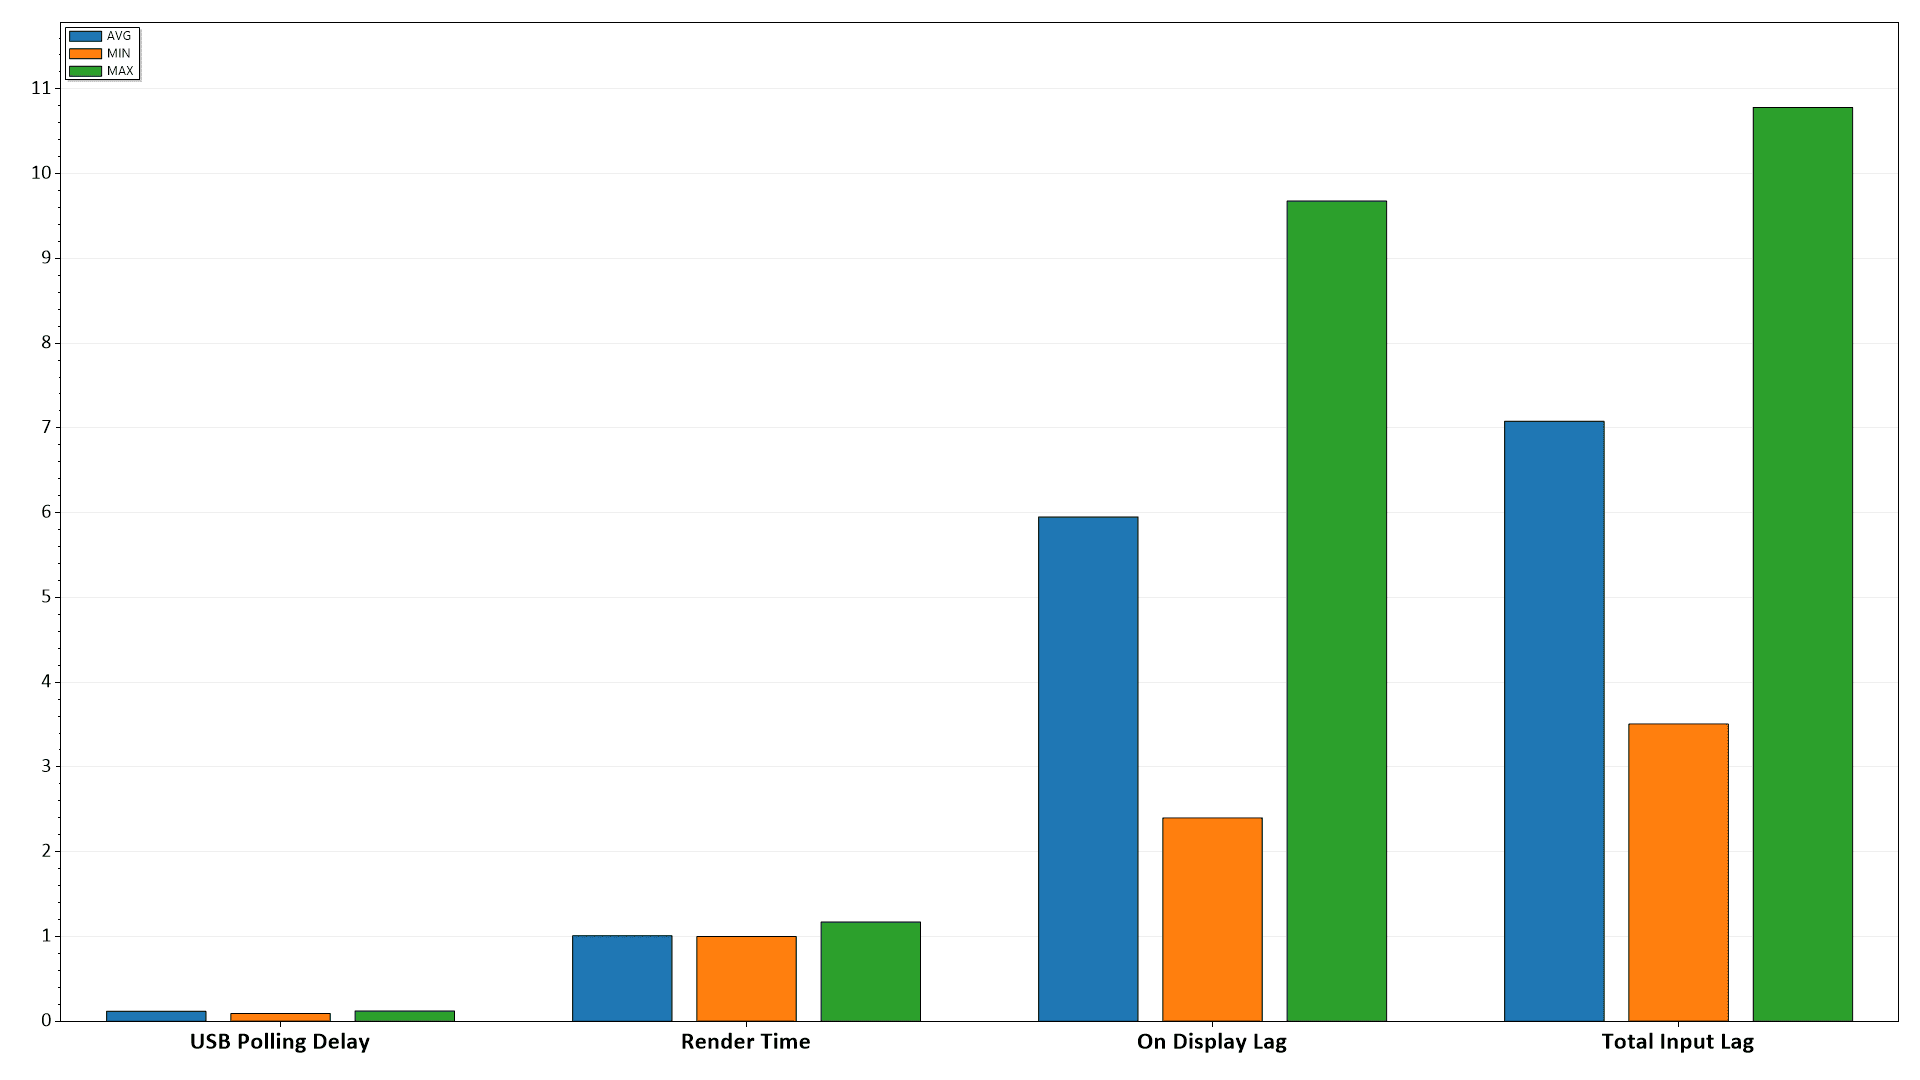
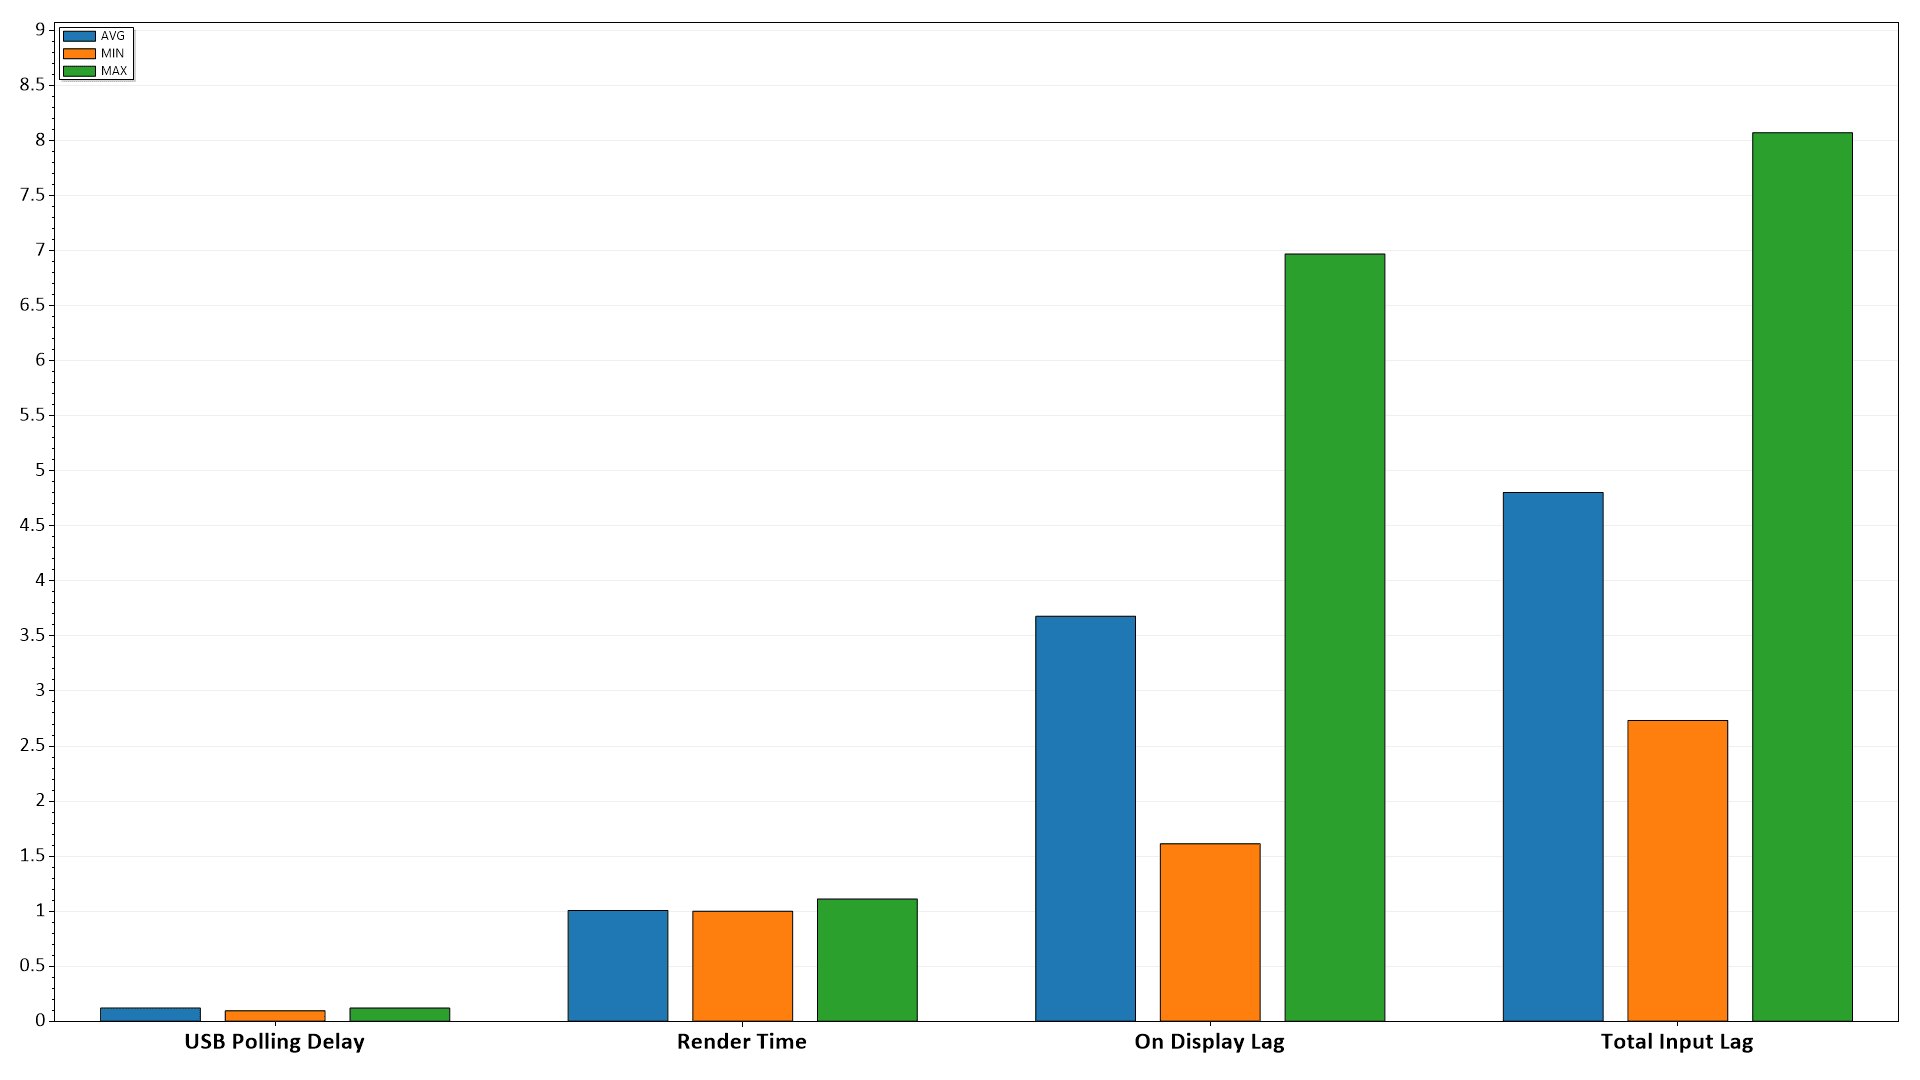
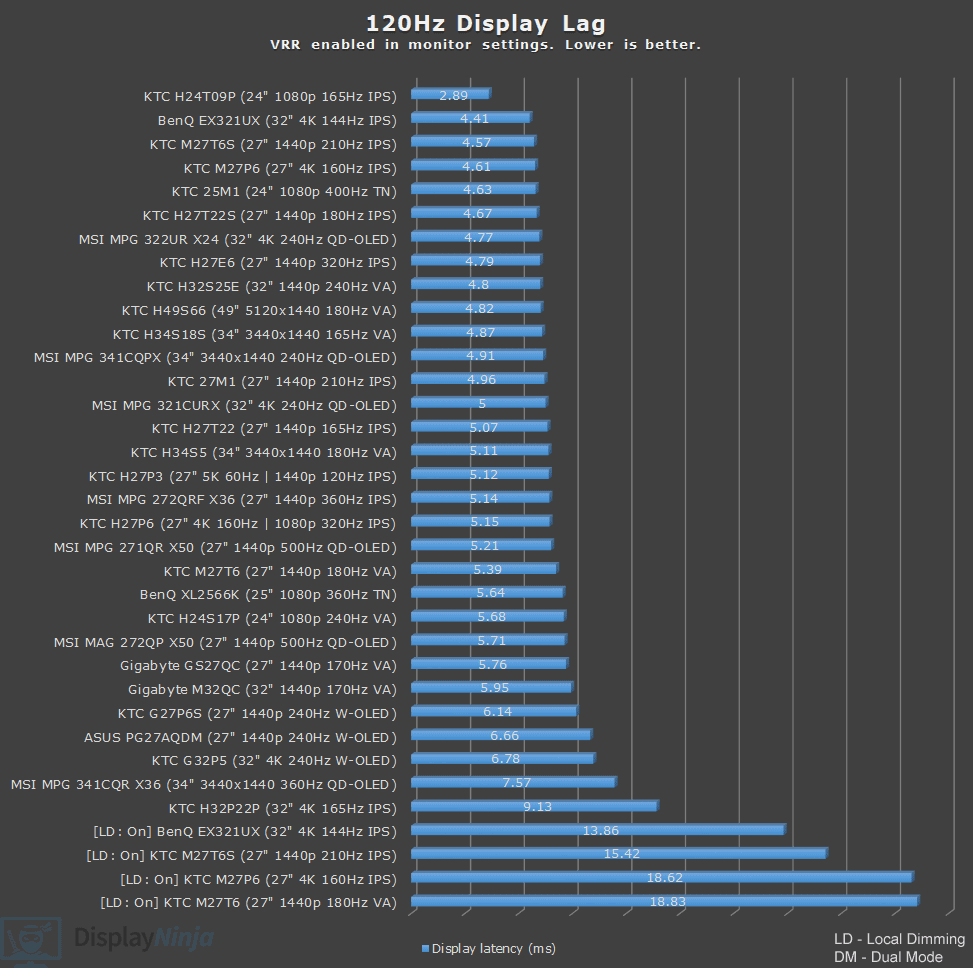
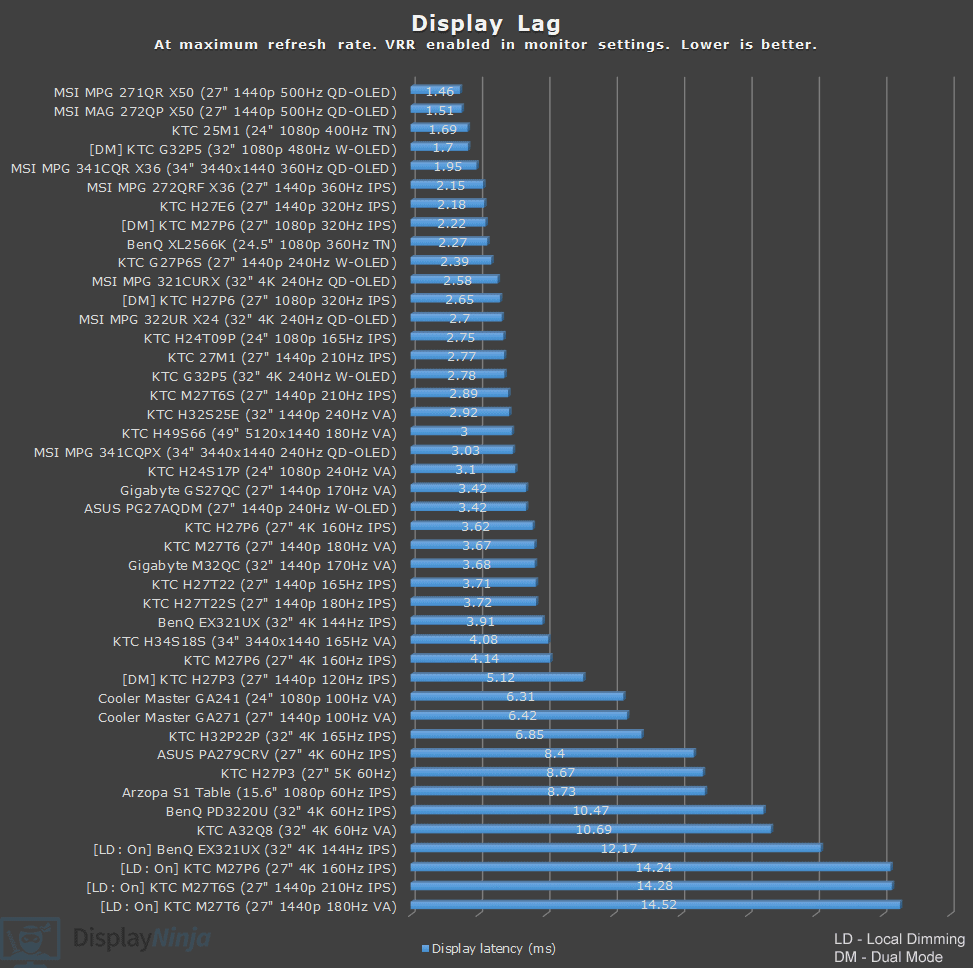
We measured low display latency of 3.68ms at 165Hz, 5.95ms at 120Hz and 9.93ms at 60Hz, meaning that there is no perceptible delay between your actions and the result on the screen.

Next, the Gigabyte M32QC supports variable refresh rate with AMD FreeSync Premium Pro certification and a 48-170Hz dynamic range for tear-free gameplay.
While it doesn’t have an official G-SYNC Compatible certification by NVIDIA, VRR works without issues with compatible GeForce GPU cards over DisplayPort, whereas FreeSync works over both DP and HDMI.
We didn’t detect any major VRR brightness flickering on our unit, except for some minor oscillations in in-game menus and loading screens, which is typical for most high refresh rate gaming monitors.
The backlight is flicker-free (unless Aim Stabilizer is enabled) and there’s a low blue light filter mode (adjustable from 0 to 10 in increments of 1, from 6800K to 4910K color temperature).
Features

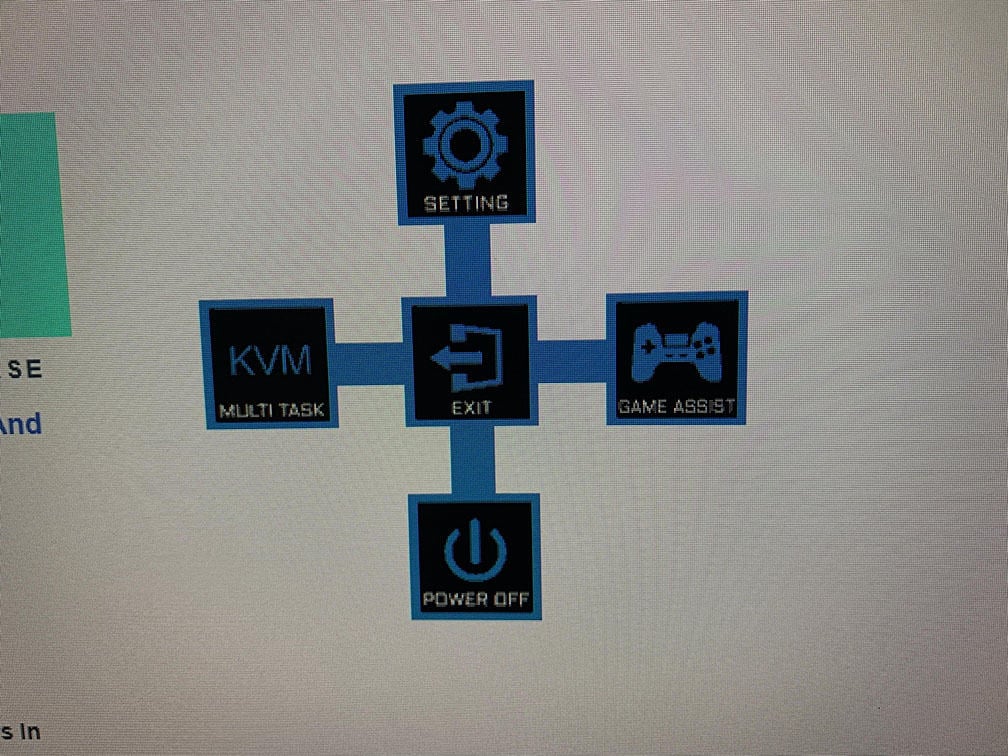
At the rear of the monitor, there’s a directional joystick for quick and easy navigation through the OSD menu. Pressing the joystick opens up a quick menu with Setting (main menu), Multi Task (KVM settings), Game Assist and Power Off options.
In the main menu, you’ll find plenty of features, including Black Equalizer (improves visibility in dark scenes), Color Vibrance (increases color saturation), Super Resolution (increases sharpness) and Display Mode (aspect ratio modes, including full, aspect, 1:1, 22″ 16:10 and 23″, 23.6″, 24″ and 27″ 16:9).
In addition to the standard image adjustment tools, such as brightness, contrast, color temperature, etc., you also get access to advanced settings, including 6-axis hue/saturation, sharpness, and five gamma presets (from 1.8 to 2.6).
The Gigabyte M32QC monitor also features Senseye Demo (splits the screen and compares it to the Standard mode) and DCR (dynamic contrast ratio, automatically increases brightness with bright scenes and decreases it with dark scenes, we recommend leaving it disabled).
Other options include RGB PC Range (0-255, 16-235, auto), overscan, LED power and standby indicator, OSD lock, Input Auto Switch, audio volume and mute.
Pressing the joystick up, down, left or right can also serve as a shortcut for certain settings, including Aim Stabilizer, Black Equalizer, LBL, volume, input, contrast, brightness, picture mode, KVM switch and Eagle Eye, which can be assigned in the OSD menu.
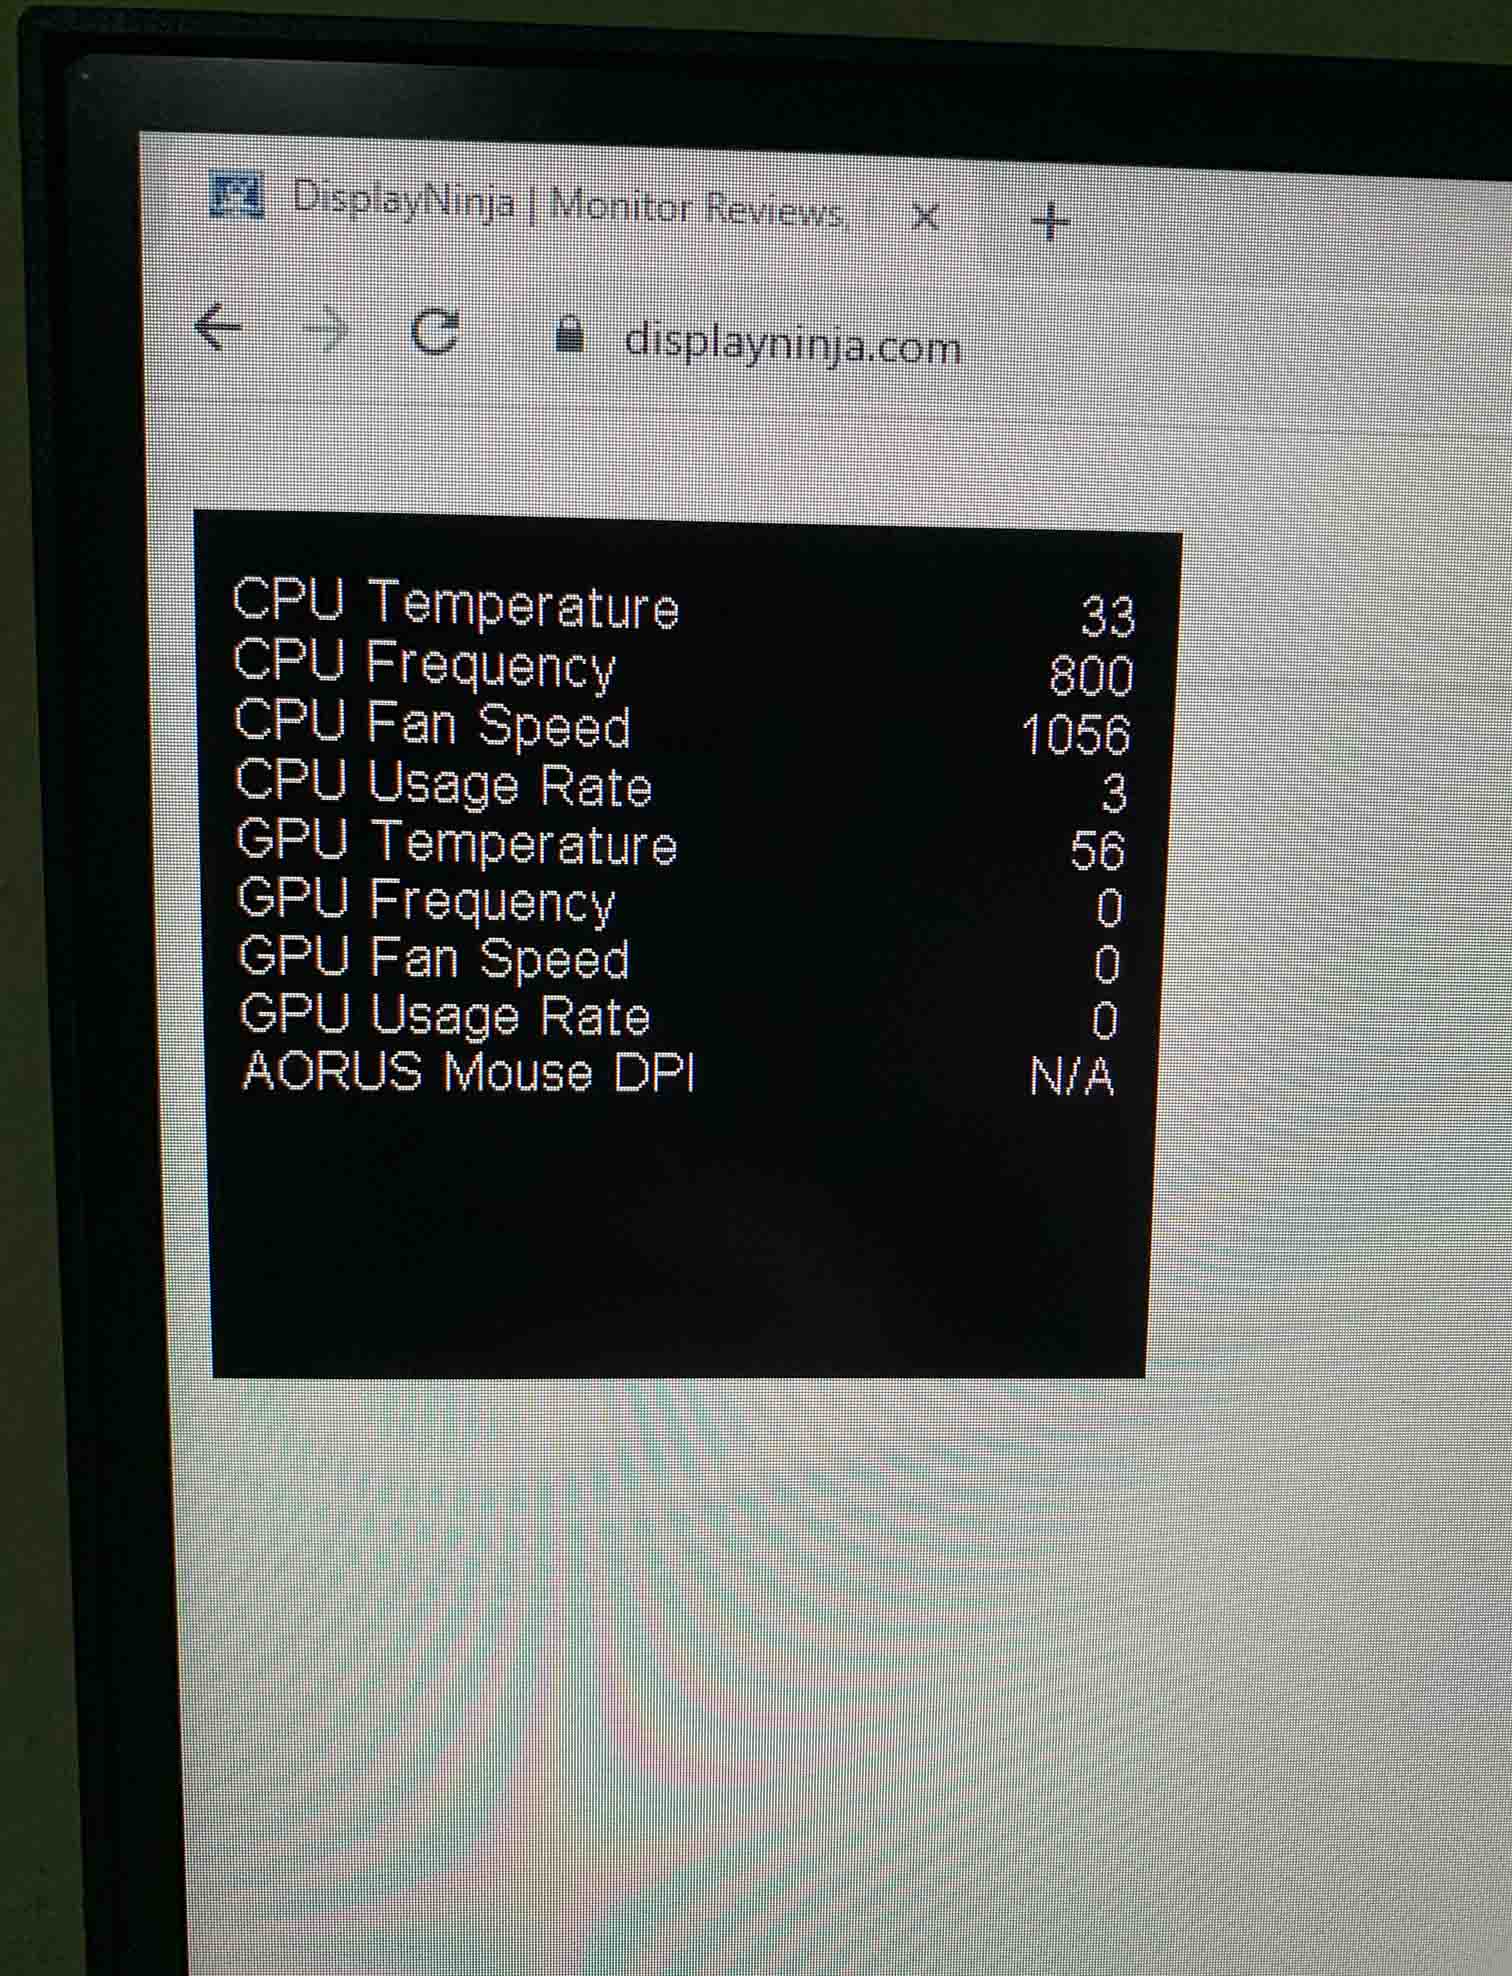
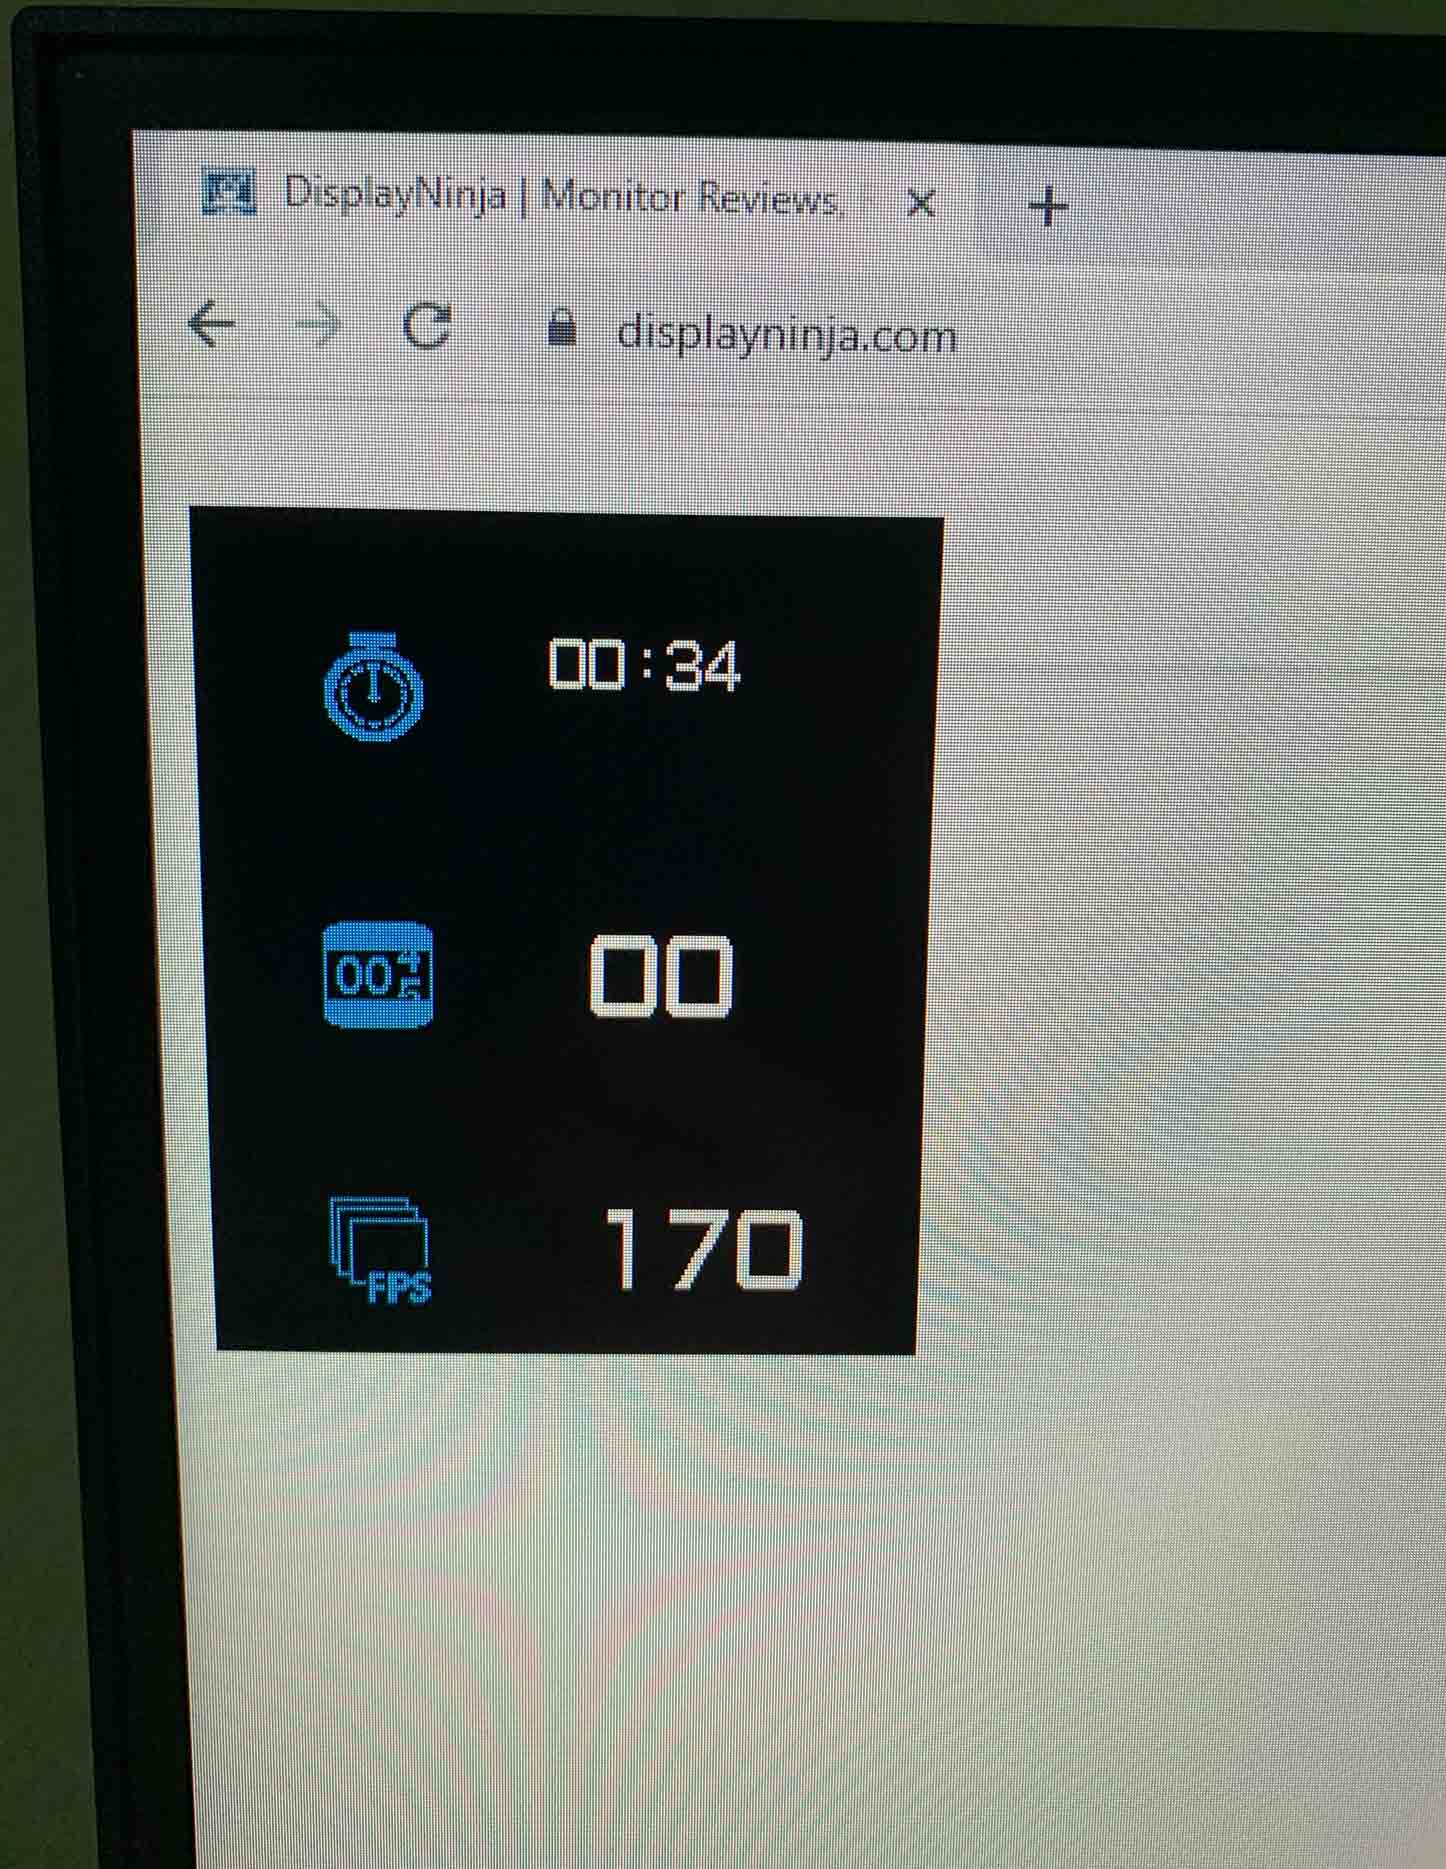
The Game Assist feature consists of on-screen timers, a refresh rate tracker, customizable crosshair overlays, Eagle Eye (zooms in the area of the screen), Display Alignment (displays lines for aligning multiple monitors) and Dashboard (shows CPU/GPU temperature, frequency, usage, etc.).


Alternatively, you can download the OSD Sidekick desktop application and make all your adjustments there. You also get additional options, such as using keyboard shortcuts for certain features, linking applications to different picture presets, easy firmware updates, drawing your own crosshairs, etc.
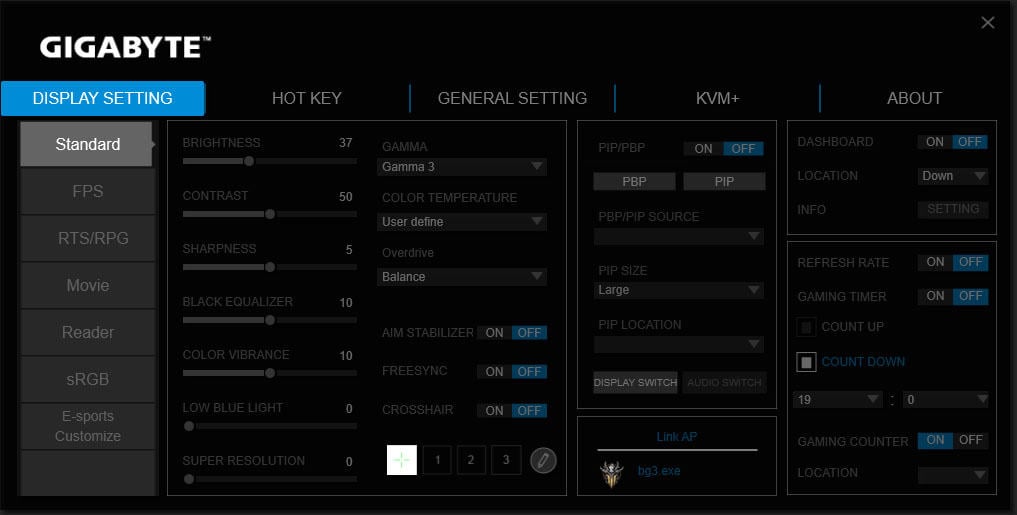
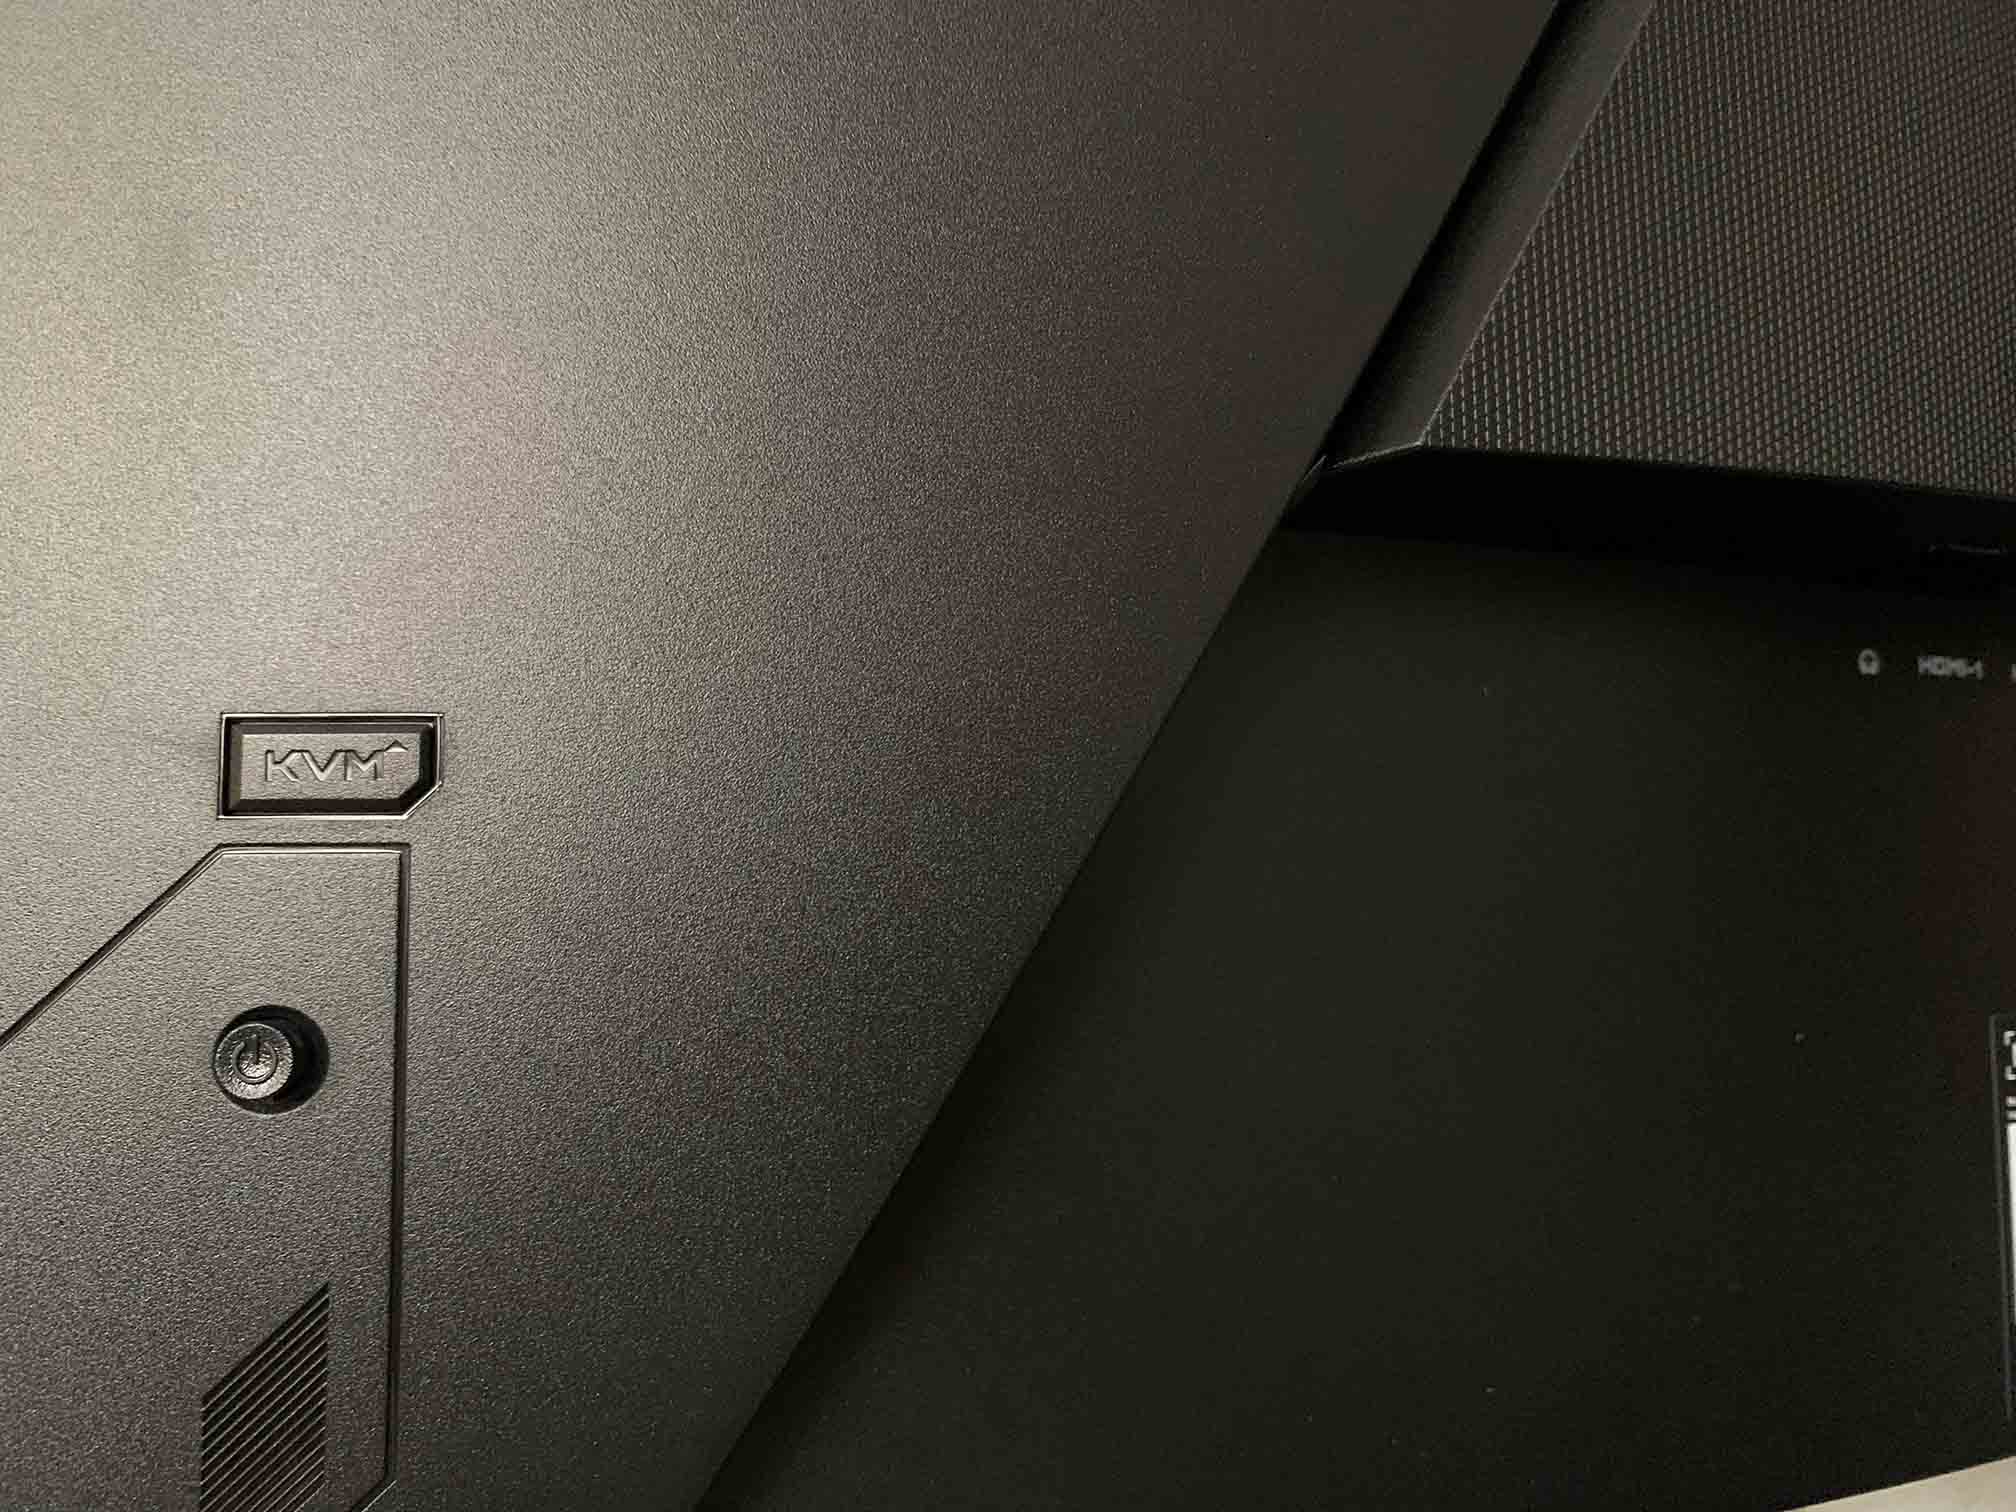
Lastly, the Gigabyte M32QC supports Picture in Picture and Picture by Picture modes, and has a dedicated KVM button, which allows you to connect your keyboard and mouse to the monitor and switch control between the two connected PCs. You can also use the KVM switch in PiP/PbP mode.
Design & Connectivity
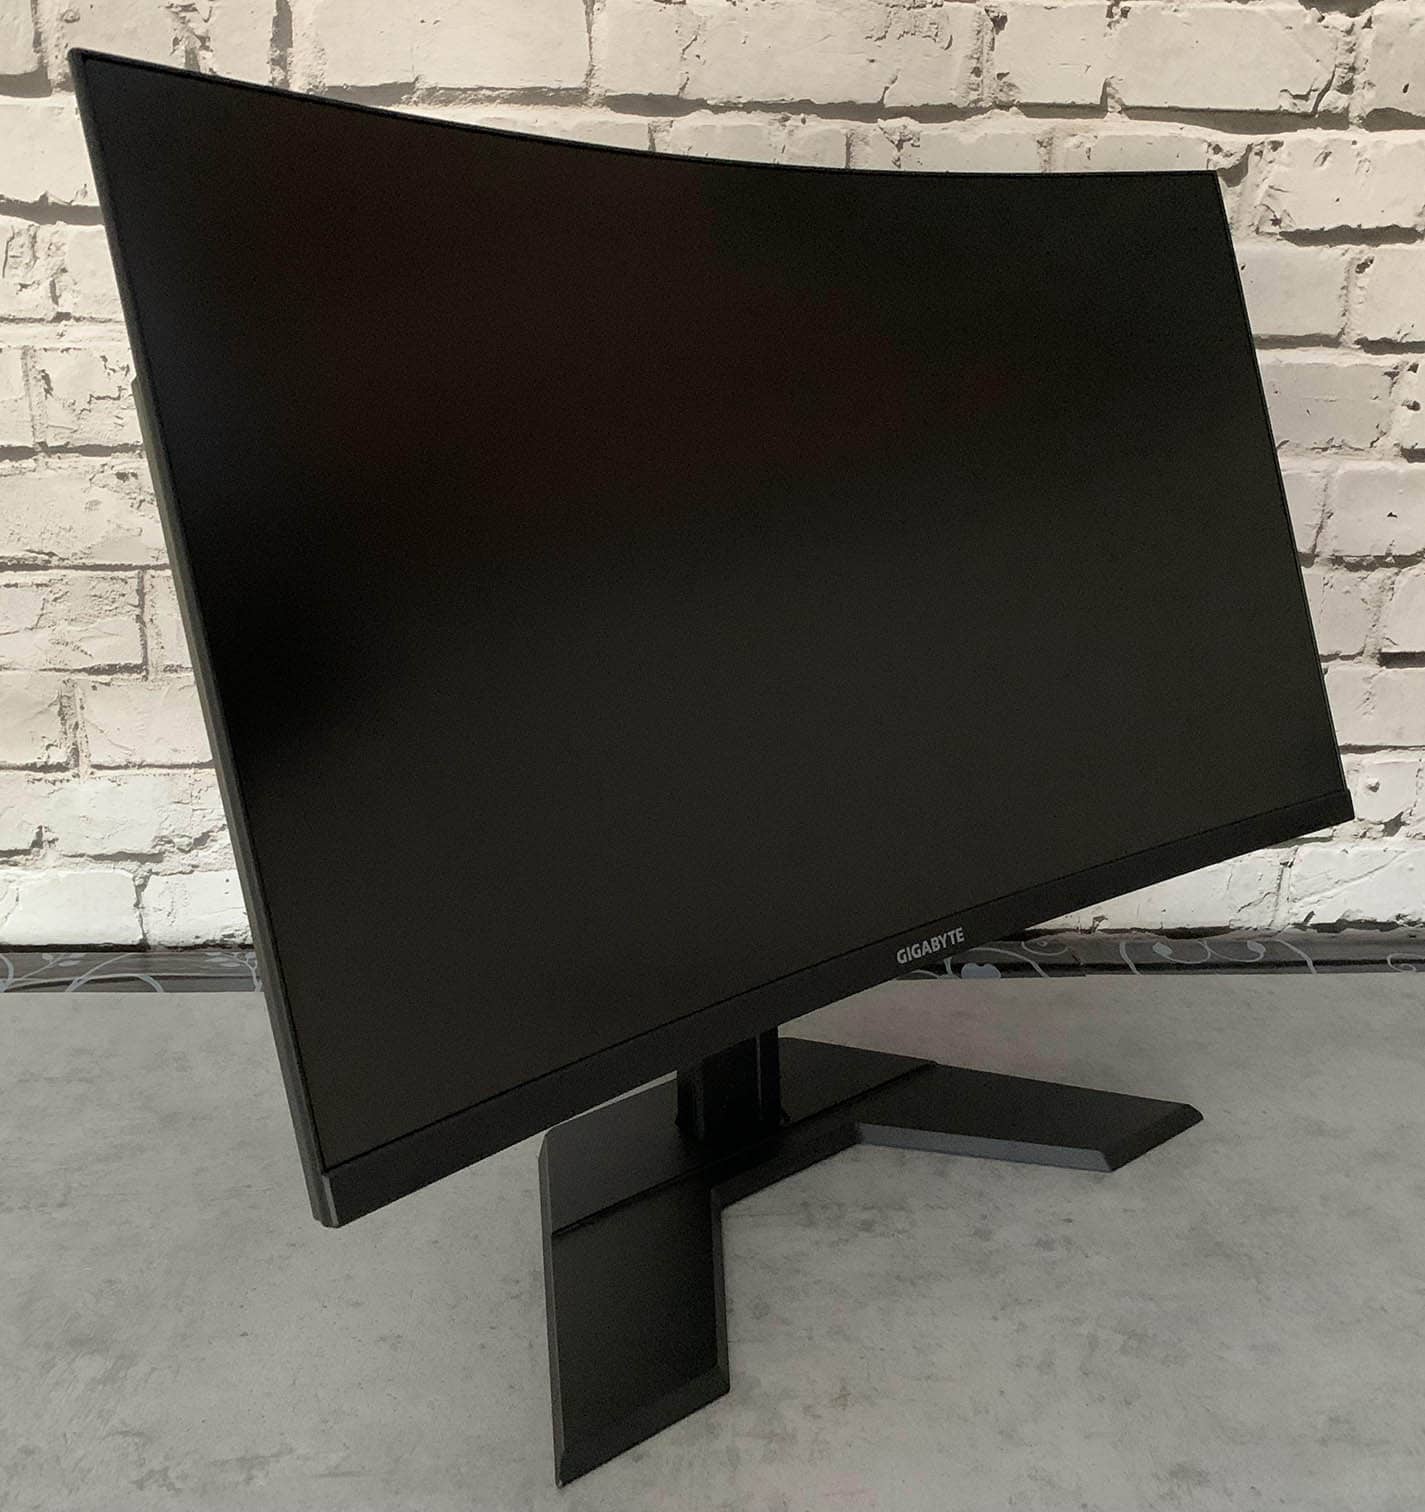
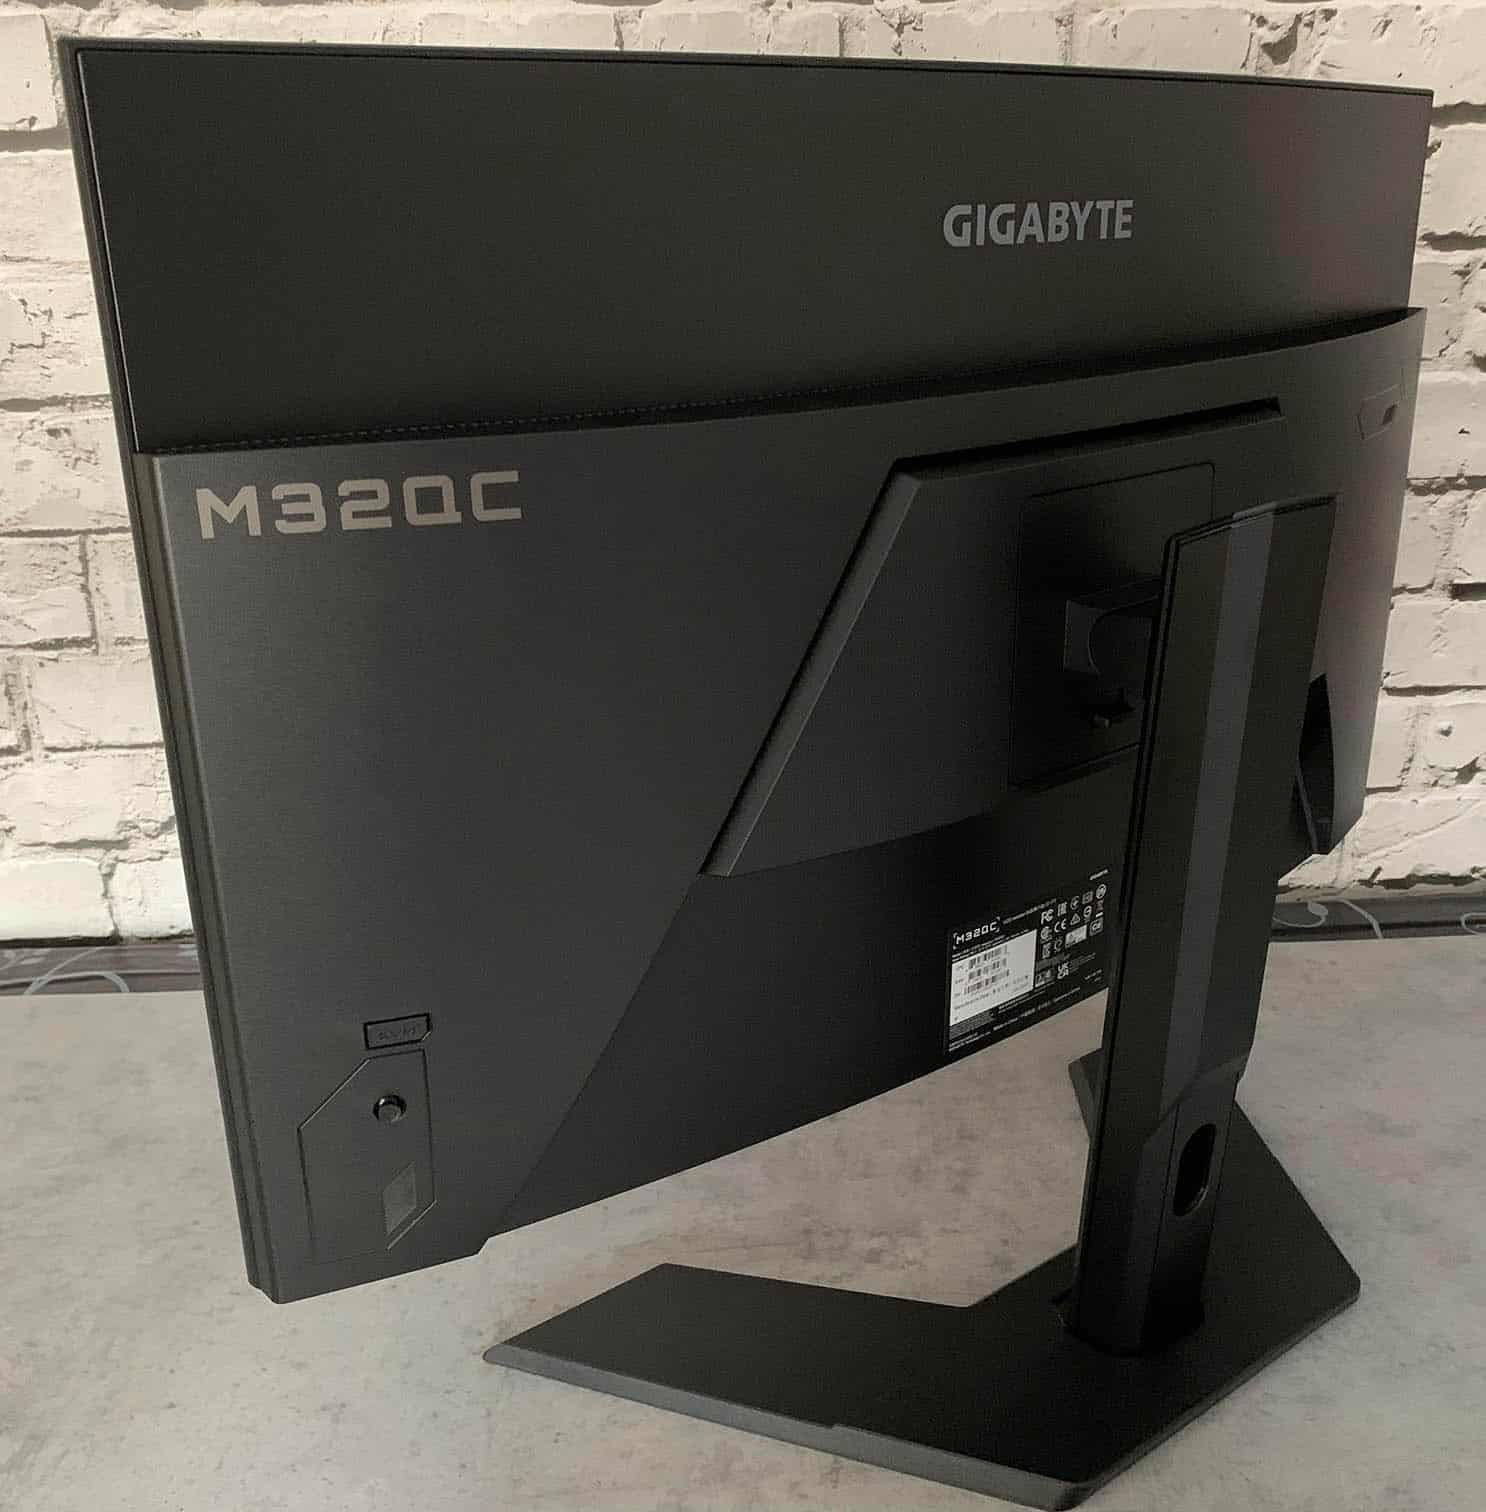
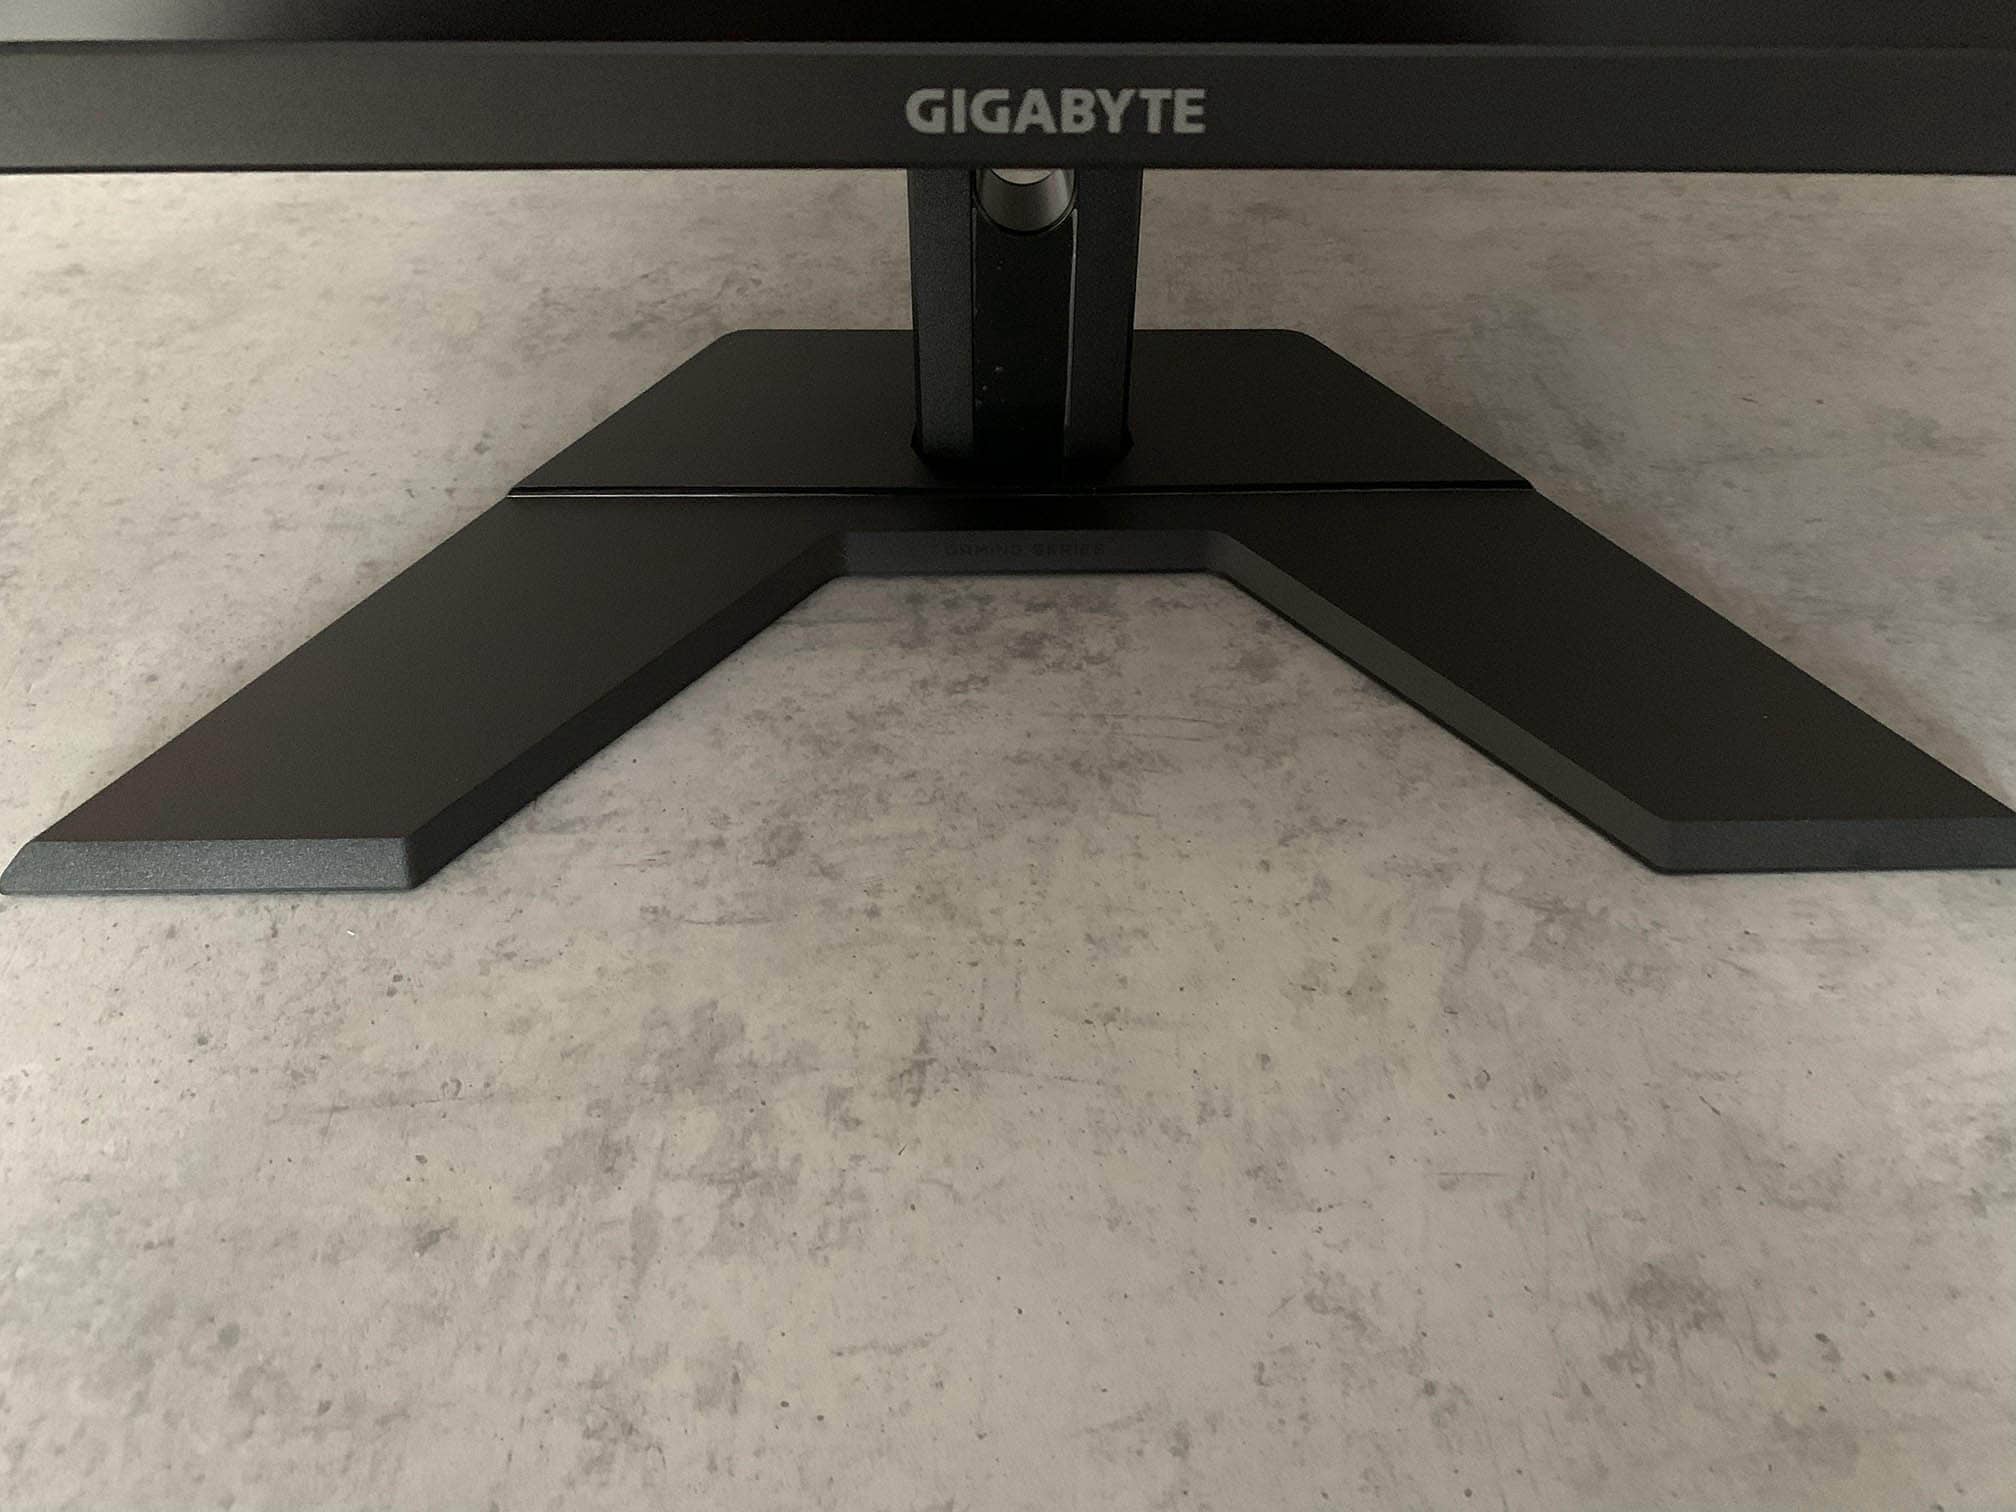
The stand of the Gigabyte M32QC monitor is quite sturdy and offers height adjustment up to 100mm, tilt by -5°/20° and 100x100mm VESA mount compatibility, but it lacks swivel and pivot options.
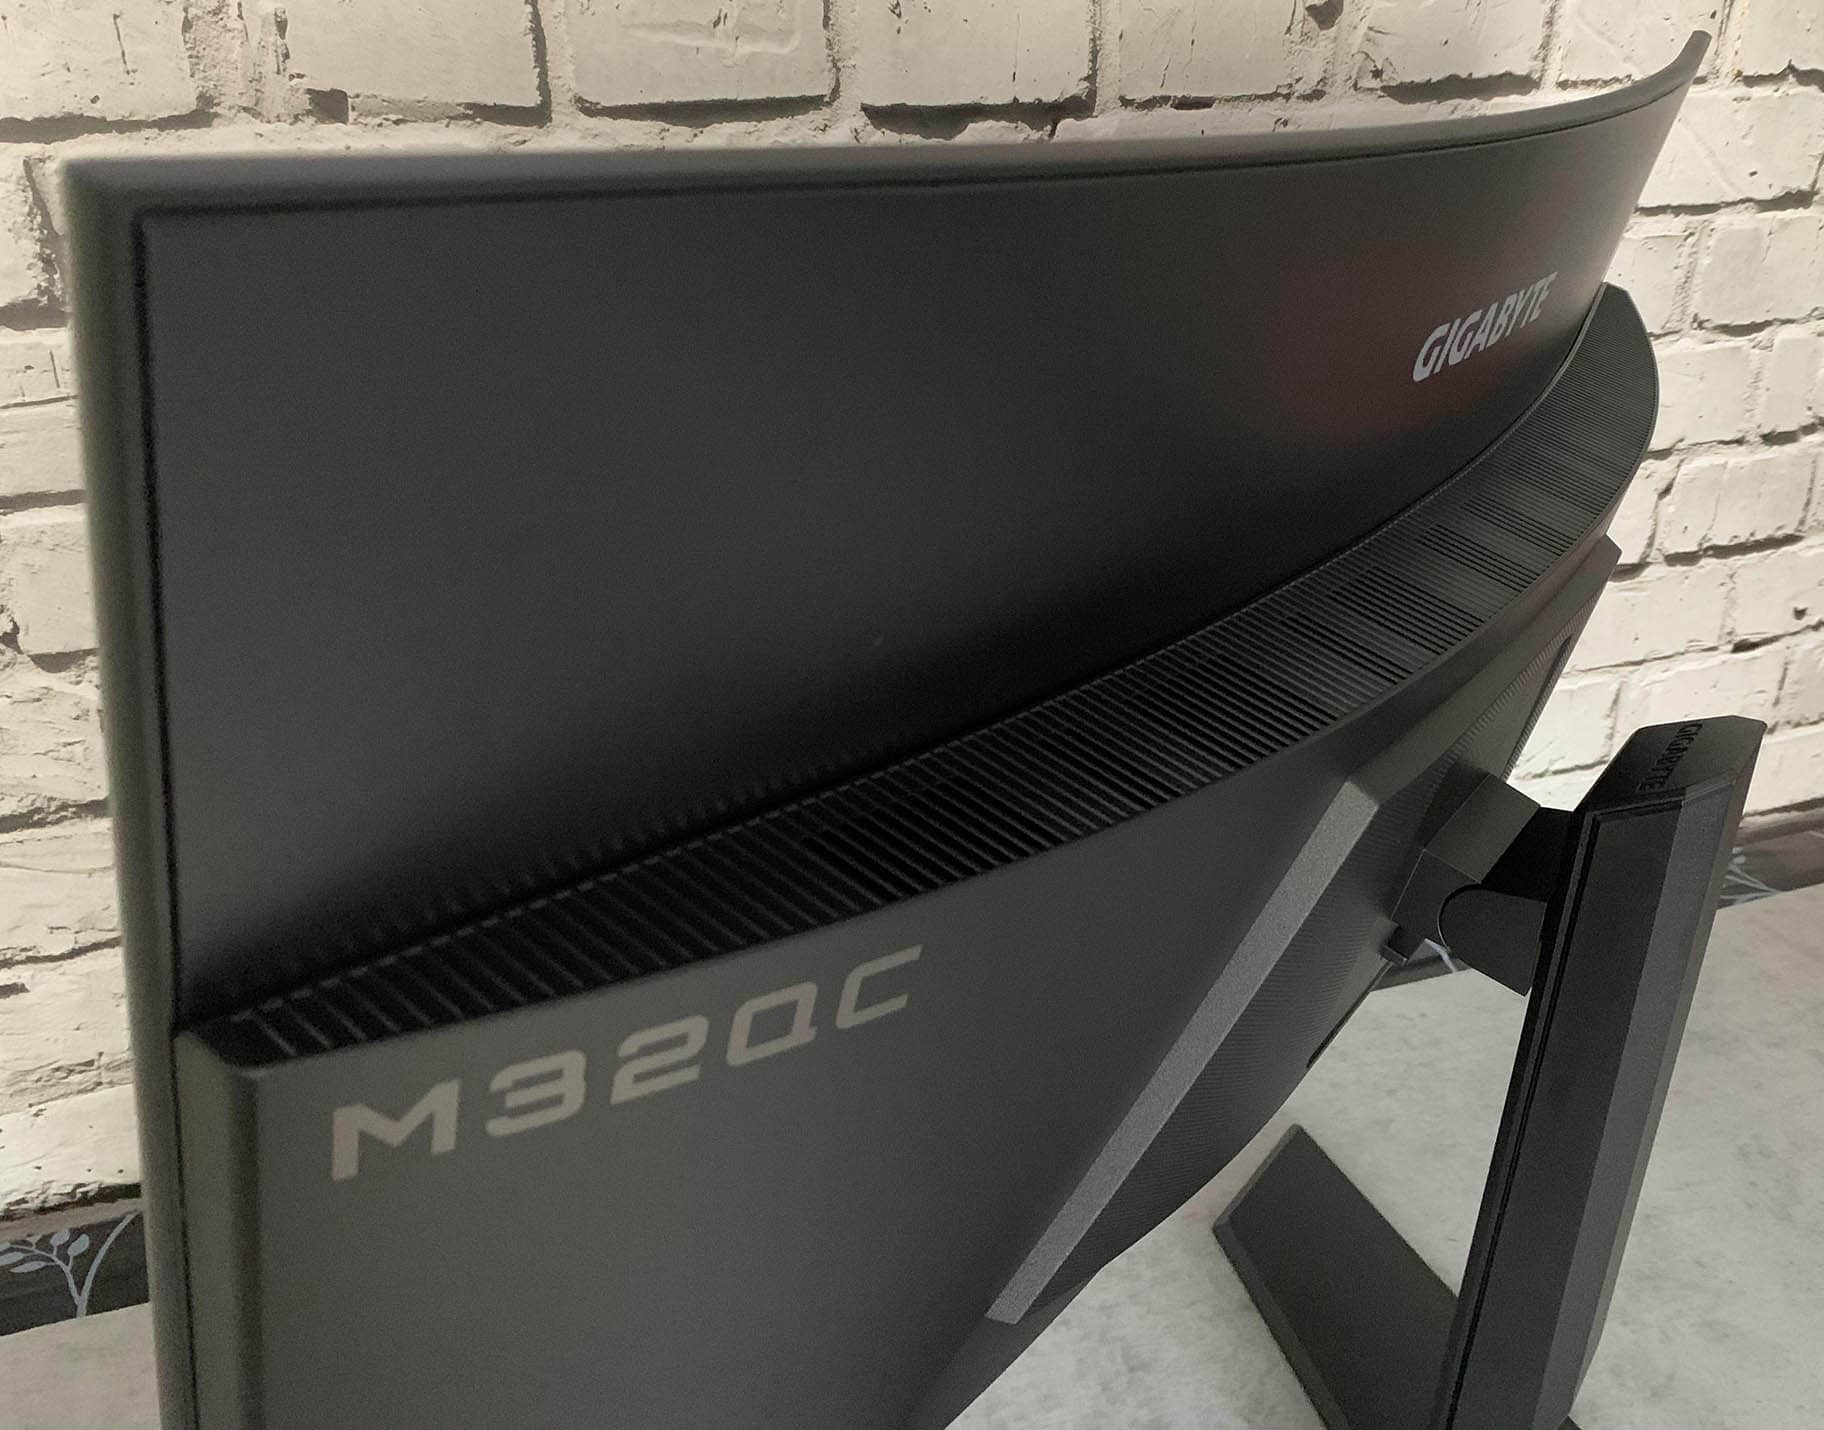
Further, the screen has a moderate 1500R curvature for added immersion and a light matte anti-glare coating that prevents reflections without being too grainy. The screen has ultra-thin bezels at the top and at the sides with a 5mm back border before the image starts, while the bottom bezel is a bit thicker at 2cm.

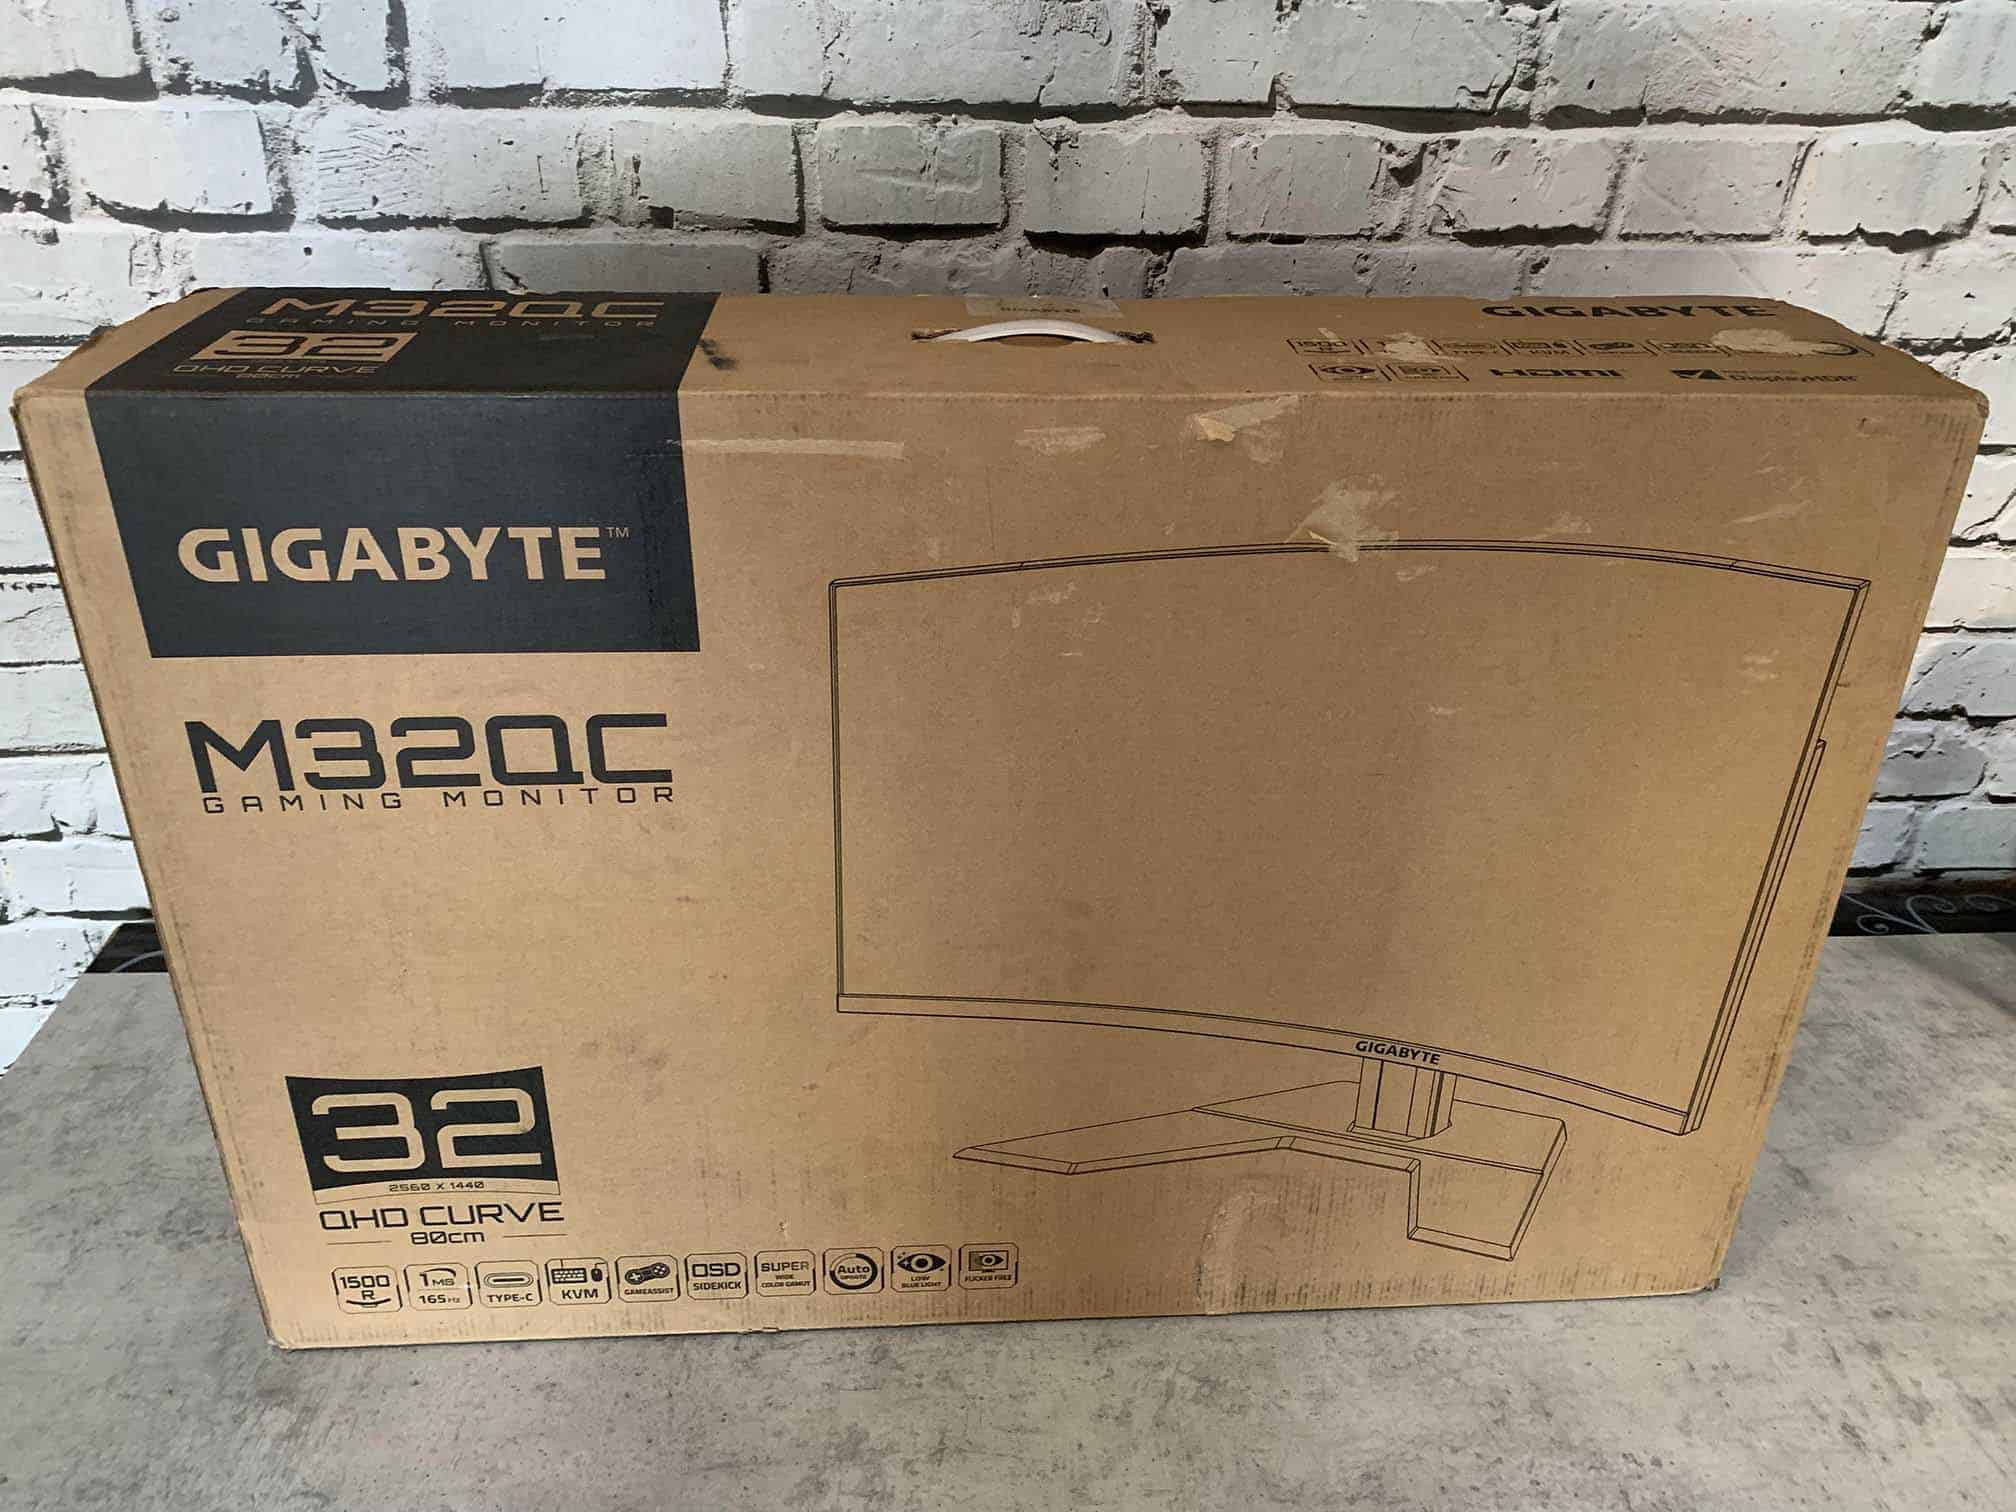
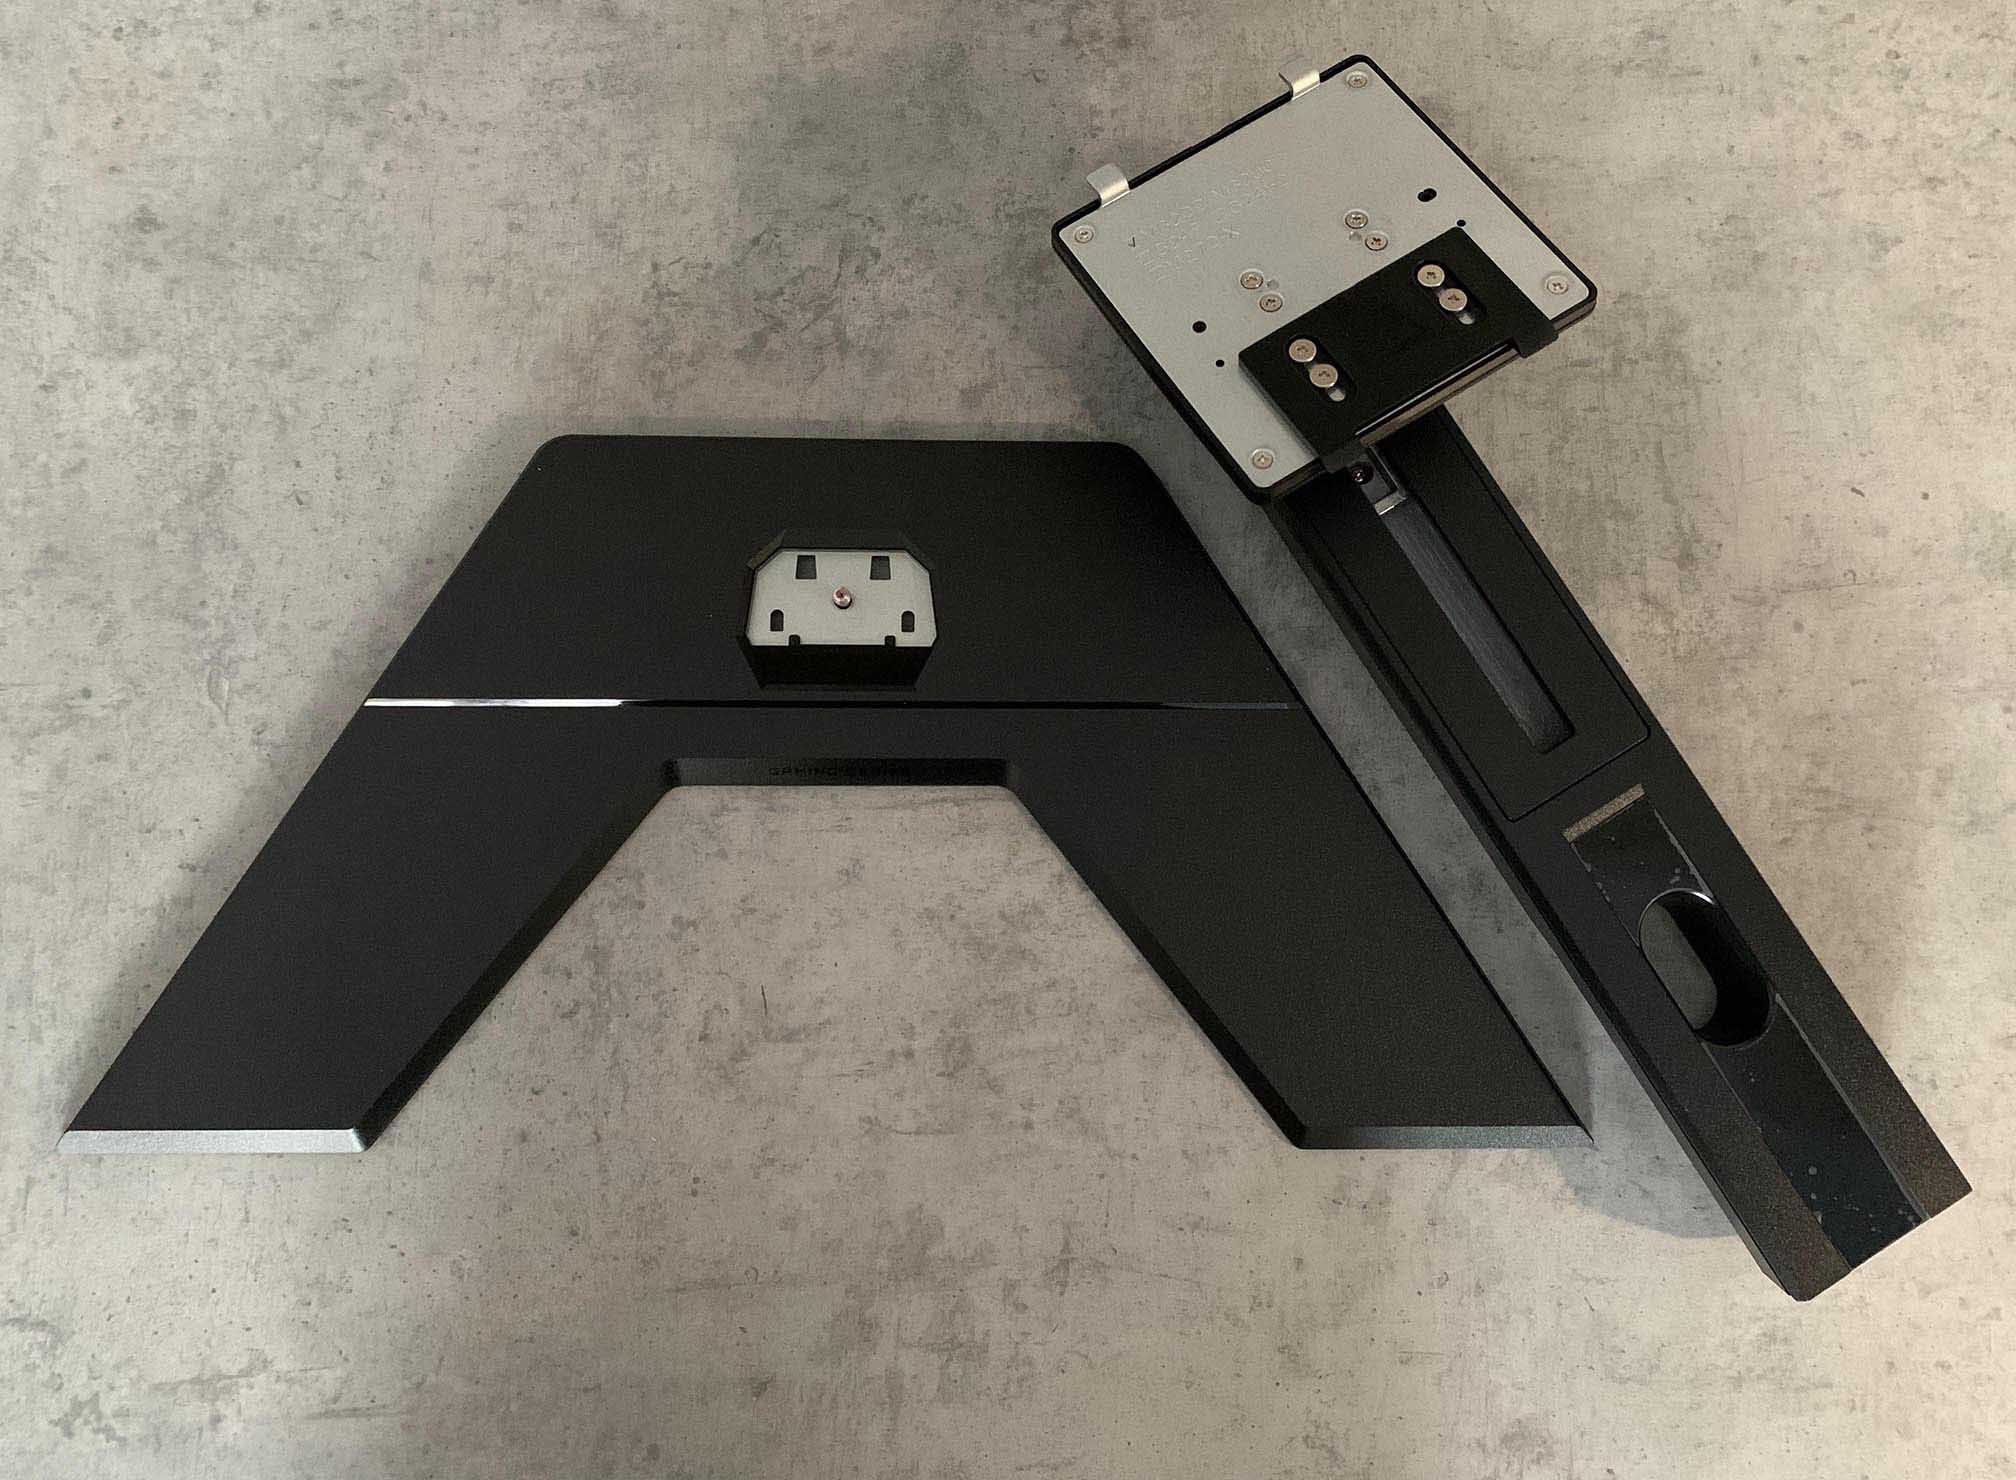
In the box, along with the monitor and the stand, you also get the required cables, including HDMI, DisplayPort, USB-B to USB-A, a power cord and a power brick, as well as a warranty card and a quick start guide.
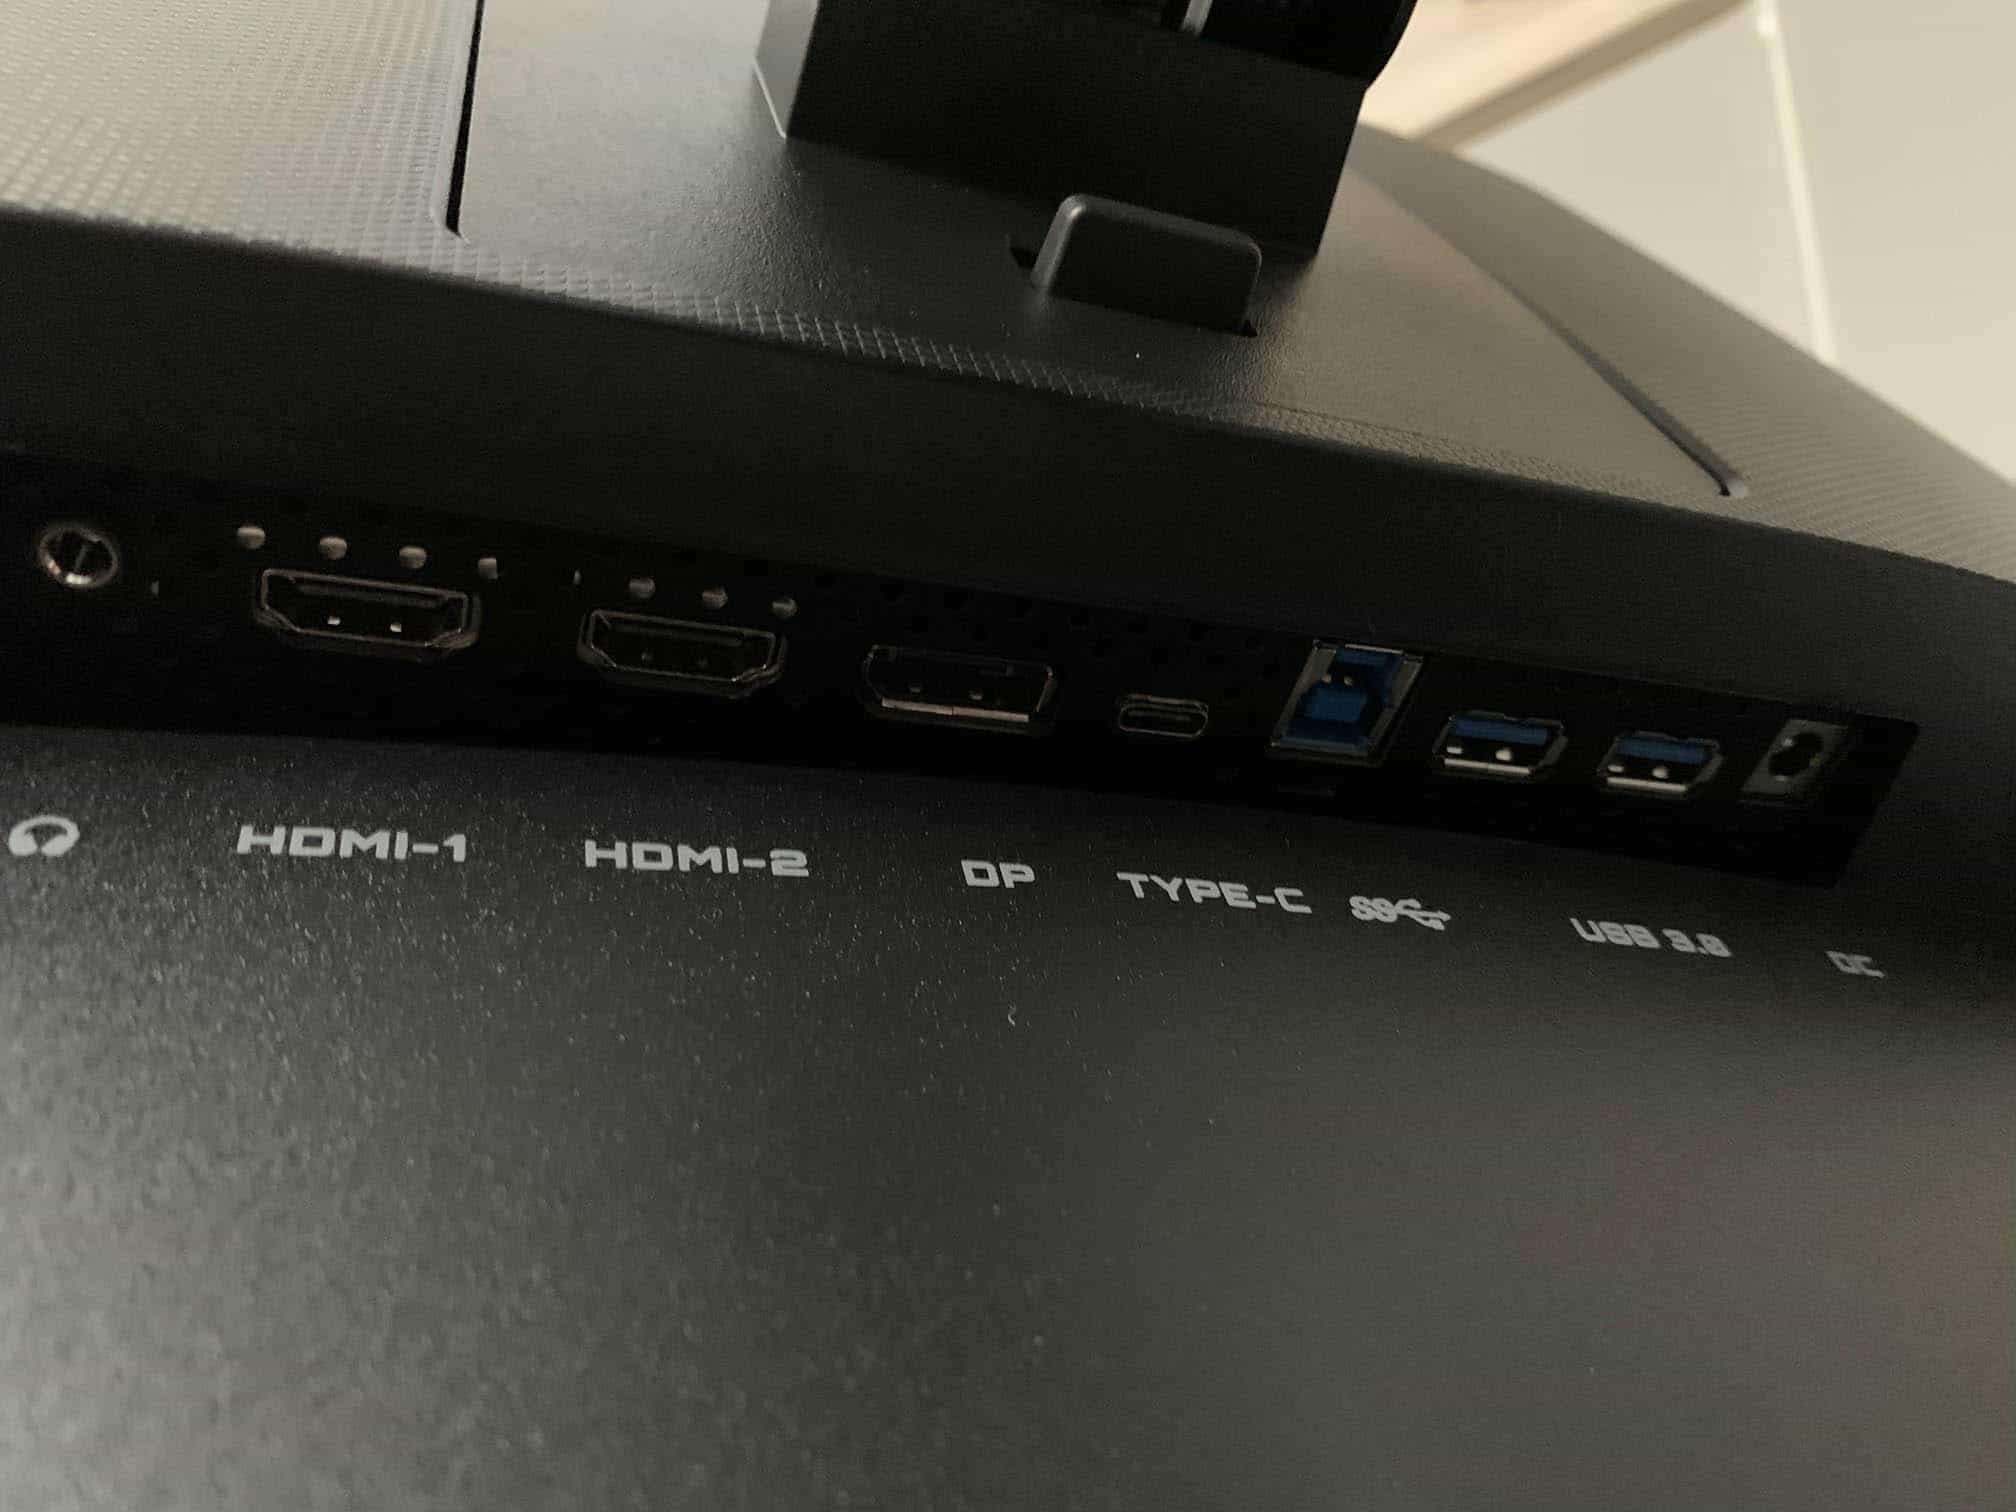
Connectivity options are abundant and include DisplayPort 1.2 with HDR support, two HDMI 2.0 ports (limited to 144Hz at 1440p), a USB-C port with DP 1.2 Alt Mode and 18W PD, an upstream USB-B port, two downstream USB-A 3.0 ports and a headphone jack.
Price & Similar Monitors
The Gigabyte M32QC can usually be found for around $275, which is an excellent price if you want a big gaming monitor with immersive image quality and responsive gameplay, but don’t mind the slower pixel response time.
You also get a sturdy and height-adjustable stand, rich connectivity options and plenty of useful features, including an integrated KVM switch.
The M32QC has been replaced with the Gigabyte GS32QCA. It’s cheaper at $220, but doesn’t have an ergonomic stand or built-in KVM and USB ports.
If you want better performance in a similar form factor, there’s the KTC H32S25E with a 32″ 1440p 240Hz VA panel with a steeper 1000R curvature for $300. However, it doesn’t have an ergonomic stand or as extensive connectivity options.
If you’re sensitive to VA smearing, consider the Gigabyte GS32Q instead. It uses an IPS panel with wider viewing angles and faster response time, but it doesn’t have as high contrast ratio and suffers from IPS glow, resulting in grayish blacks in comparison.
You can even get a proper HDR display in this price range – the KTC M27T6 with a 27″ 1440p 180Hz flat-screen VA panel and a 1152-zone mini LED FALD.
To learn more about monitors and ensure you’re getting the model most suited for your personal preference, visit our comprehensive and always up-to-date best gaming monitor buyer’s guide.
Conclusion
Overall, the Gigabyte M32QC is a great gaming monitor for the money. You get a big curved screen with decent detail clarity without being too demanding on the GPU, as well as deep blacks and vibrant colors.
Further, variable refresh rate up to 170Hz ensures smooth and tear-free gameplay, and while there is some ghosting in dark scenes, it’s tolerable for gaming unless you’re particularly sensitive to it. Competitive FPS players should be looking for a smaller and higher refresh rate IPS display at this price range anyway.
Finally, you also get an excellent feature set, design quality and connectivity options for the price.
Specifications
| Screen Size | 31.5-inch |
| Screen Curvature | 1500R |
| Resolution | 2560×1440 (WQHD) |
| Panel Type | VA |
| Aspect Ratio | 16:9 (Widescreen) |
| Refresh Rate | 165Hz (170Hz OC) |
| Response Time (GtG) | Not specified |
| Response Time (Aim Stabilizer Sync) | 1ms (MPRT) |
| Adaptive-Sync | FreeSync Premium Pro (48-170Hz) |
| Ports | DisplayPort 1.2, 2x HDMI 2.0, USB-C (DP Alt Mode, 18W PD) |
| Other Ports | Headphone Jack, 2x USB 3.0 |
| Brightness | 350 cd/m² |
| Brightness (HDR) | 400 cd/m² |
| Contrast Ratio | 3000:1 (static) |
| Colors | 1.07 billion (8-bit + FRC) 94% DCI-P3 |
| HDR | VESA DisplayHDR 400 |
| VESA | Yes (100x100mm) |
The Pros:
- High contrast ratio, wide color gamut
- Plenty of features including MBR + VRR up to 170Hz
- Height-adjustable stand and rich connectivity options
- Dedicated KVM button
The Cons:
- Design lacks swivel/pivot
- Minor ghosting in fast-paced games, mainly in darker scenes


