Bottom Line
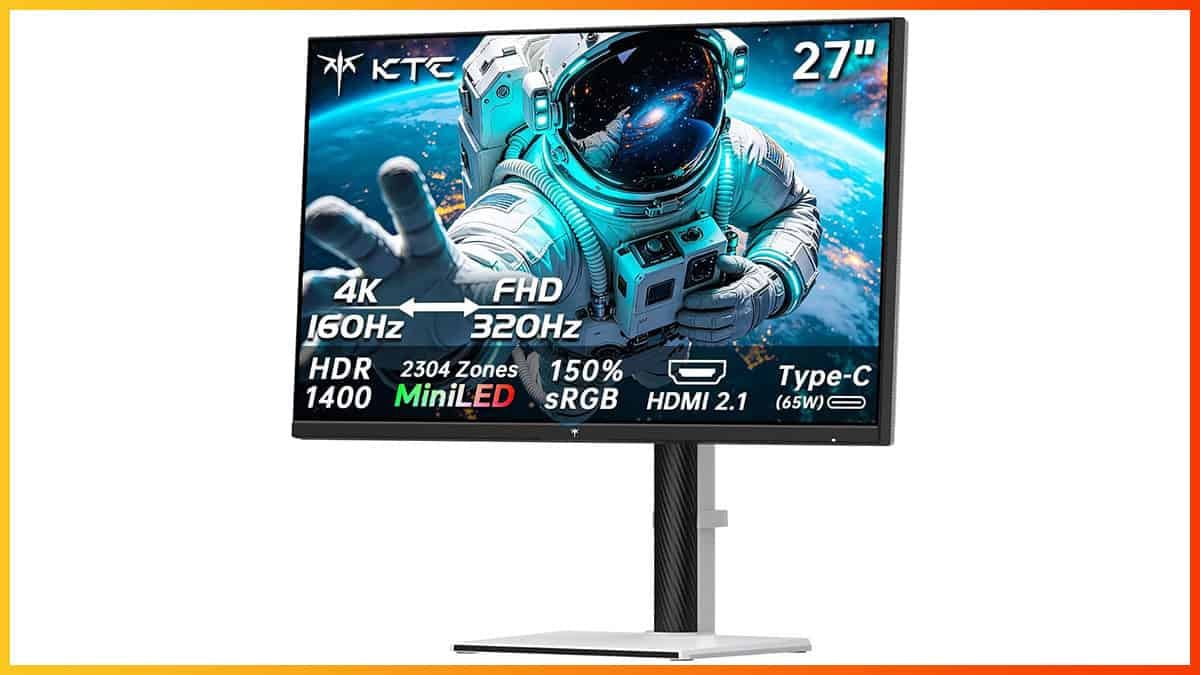
The KTC M27P6S is currently the only 27″ 4K glossy mini LED gaming monitor available. Combined with its fast IPS panel, wide color gamut, up to 1,800-nit peak brightness, 2304 dimming zones, USB-C with 65W power delivery, KVM and other useful features, it stands out as one of the most interesting mini LED monitors today.
However, there’s still room for improvement. We hope a future firmware update can address the HDR color calibration, local dimming latency and a few other minor issues.
10% off code: 10M27P6S on Amazon. Also available at Best Buy.
The KTC M27P6S is a 27″ 4K 160Hz IPS gaming monitor with 1080p 320Hz Dual Mode, USB-C (65W PD), built-in KVM and DisplayHDR 1400 certification.
It’s an upgraded version of the M27P6, now featuring twice as many dimming zones, with 2,304 in total. Another big change is that it features a 0% haze glossy screen surface!
Let’s see how the monitor handles our tests.
Image Quality
The monitor is based on a fast AU Optronics IPS panel with quoted 99% DCI-P3 and 97% Adobe RGB color space coverage, 178° wide viewing angles, a 2ms GtG response time, a 550 nits SDR peak brightness (1400 nits HDR peak), Delta E < 2 factory calibration and dithered 10-bit color depth support (8-bit + 2-bit FRC).
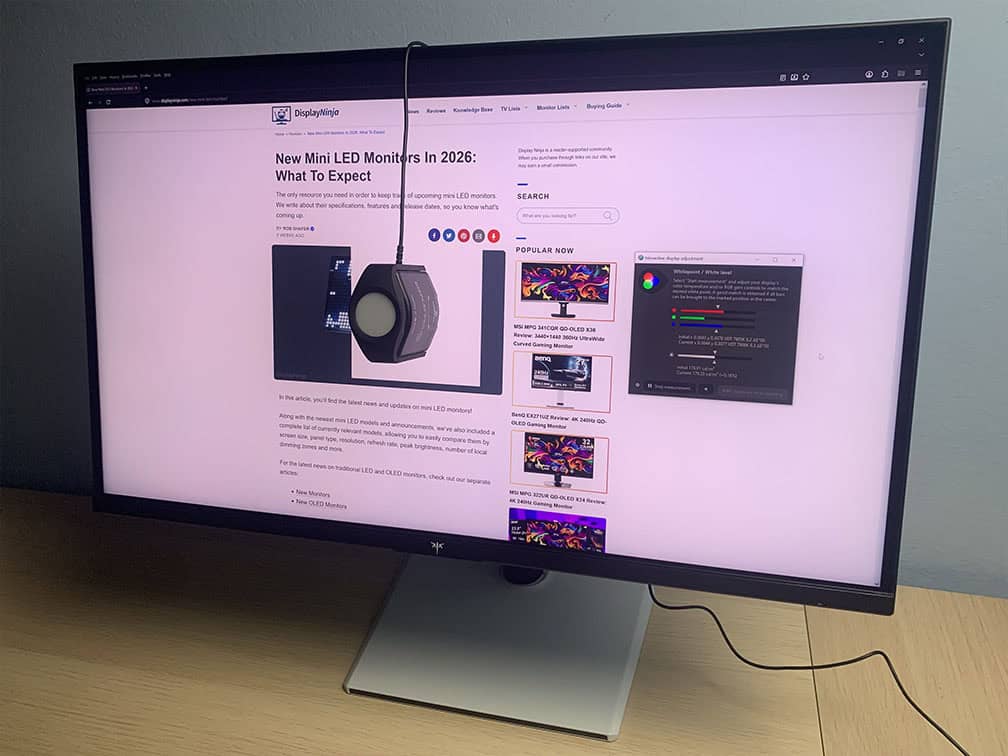
To test the display’s capabilities and accuracy, we’re using our Calibrite Display Pro HL colorimeter paired with DisplayCAL and HCFR.
Note that we’re testing the USA-1.0.1 firmware version.
In the OSD (On-Screen Display) menu, under the ‘Display’ settings, you’ll find several ‘Preset’ options: Standard (Default), Movie, Reader, RTS, FPS1, FPS2, Player1, Player2 and Player3.
Options other than ‘Standard’ and ‘Player’ simply apply pre-set brightness, contrast, hue, saturation and Black Equalize values, which you can’t adjust. So, for full customization, we recommend using the most accurate default ‘Standard’ mode.
If you scroll a bit further in the ‘Display’ section, you’ll find the ‘Professional Modes’ options, including Native, sRGB, DCI-P3, Adobe RGB and BT.2020.
Subpixel Layout, Dual Mode & Pixel Density
Thanks to its 3840×2160 4K UHD resolution, it has a high pixel density of 163 PPI (pixels per inch), resulting in incredibly sharp details and text. You’ll need to apply some scaling in order for small text to be readable, but this won’t be an issue in modern apps.

4K UHD is more taxing on the GPU when it comes to gaming, but thanks to advancements in upscaling technologies, such as DLSS 4 and FSR 4, high frame rate gaming at 4K is feasible even with a decent mid-range graphics card.
It also supports Dual Mode, which switches the screen to 320Hz at 1920×1080 for an additional boost in responsiveness and motion clarity.
Of course, the 1920×1080 image will look a bit blurry on a 27″ sized screen due to the lower pixel density of 81.59 PPI. There’s also added blurriness due to the fact that the monitor is not displaying its native resolution.
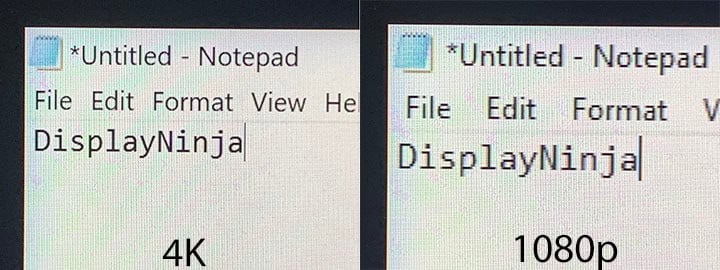
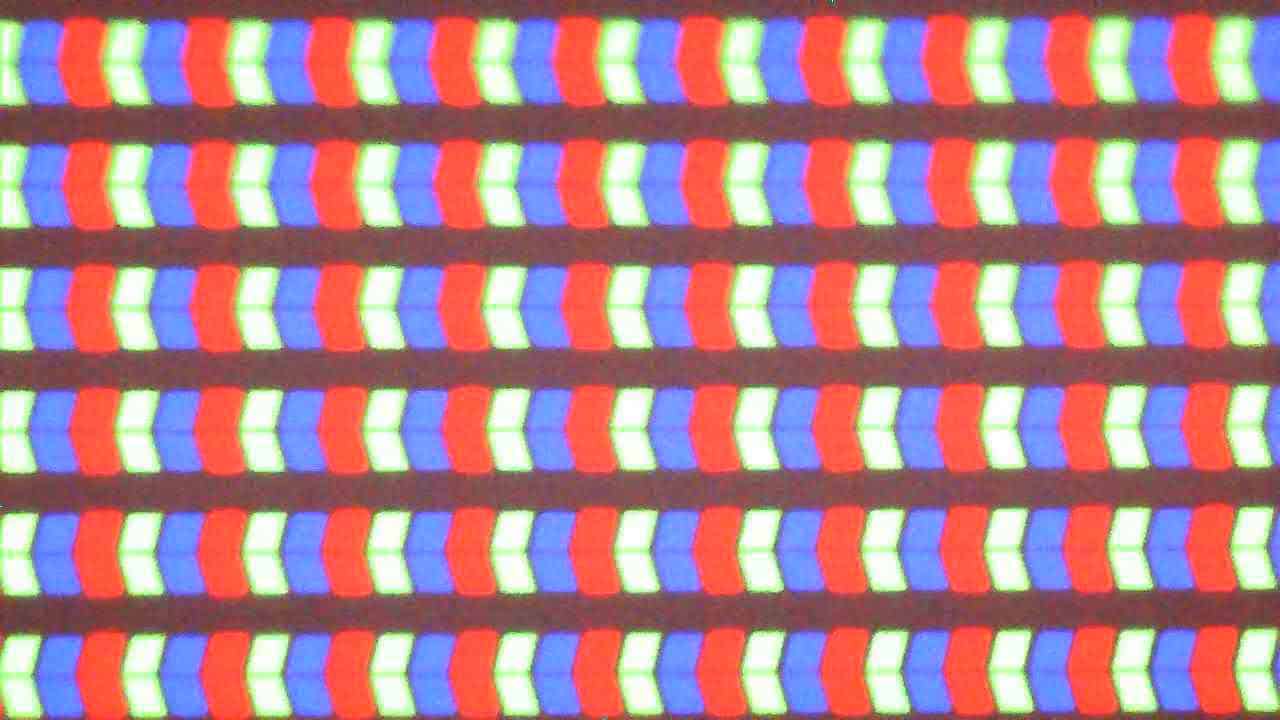
Next, the monitor has a standard RGB subpixel layout, resulting in sharp text without any fringing.
It’s not using integer scaling, which would have displayed every 2×2 block of pixels as one pixel at 1080p (without interpolation) for an even sharper native-like image.
Below are microscope photos of a 1-pixel-thick red crosshair on a black background. The left photo was taken at 4K, while the photo on the right was taken at 1080p. You can see how the pixels are simply doubled horizontally, but the vertical row is interpolated, causing minor blur.
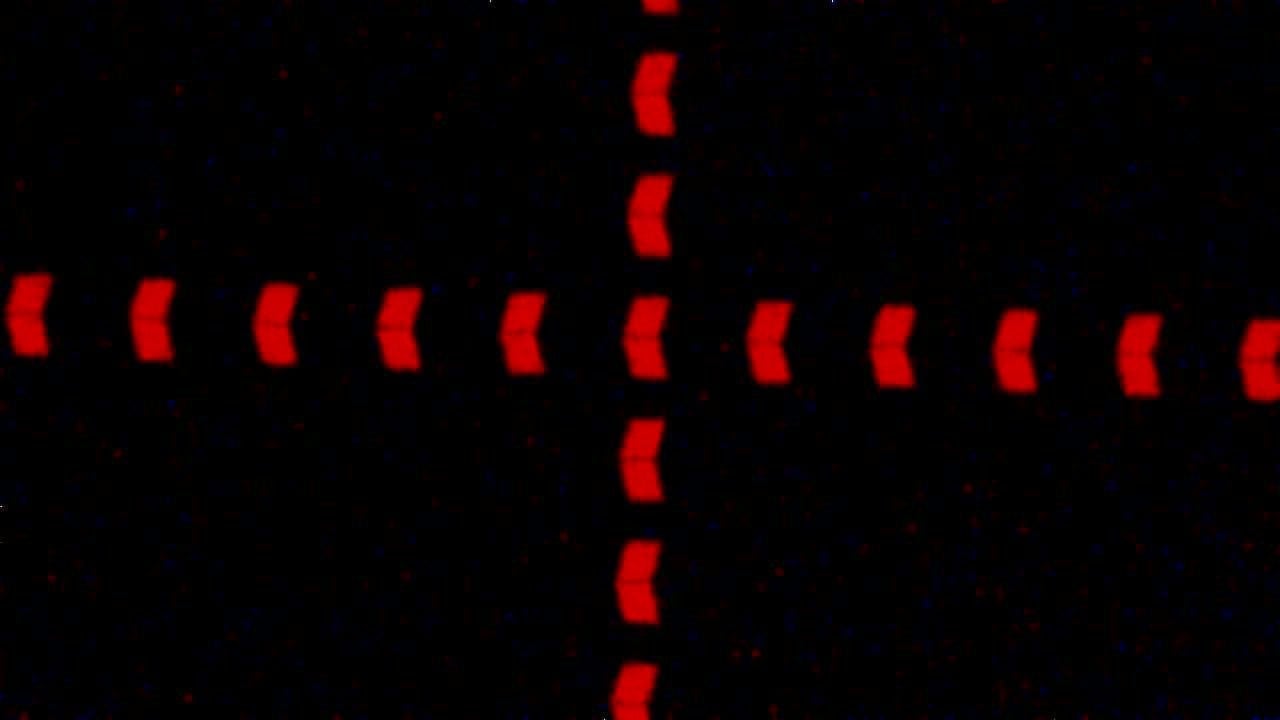
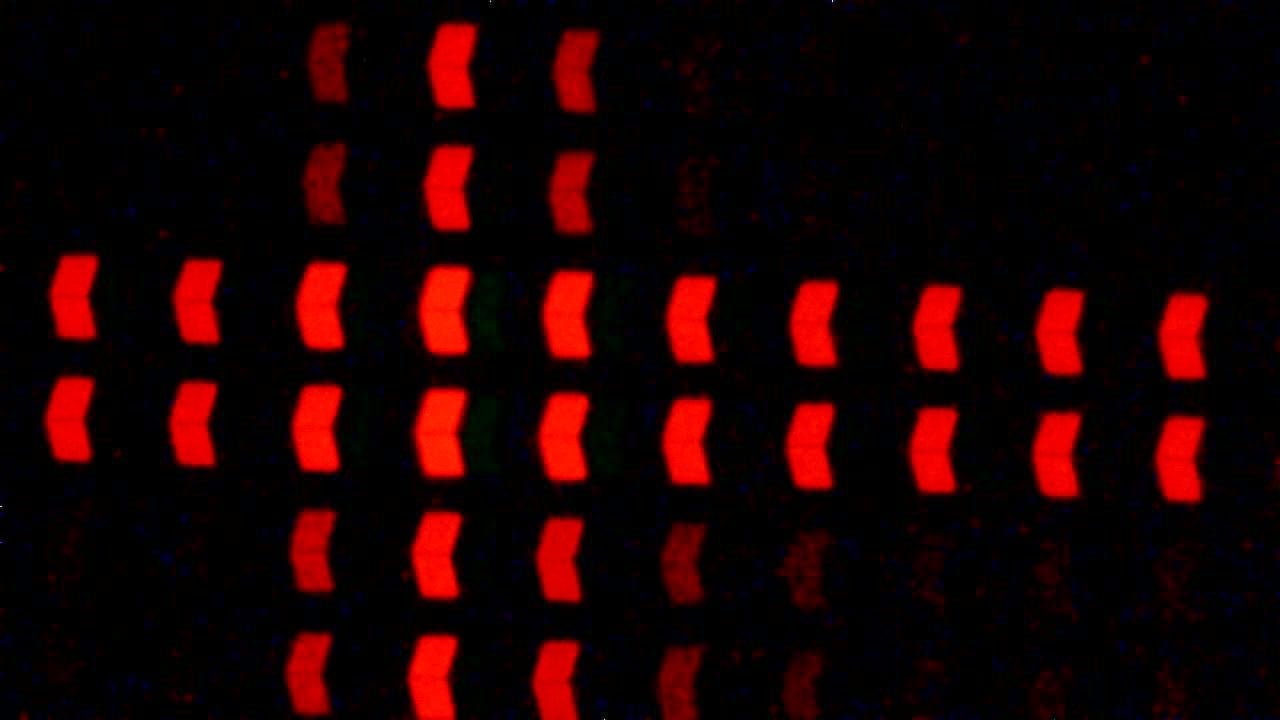
In video games, the difference in detail clarity won’t be as noticeable, which is why it’s recommended to only use the 1080p 320Hz mode in undemanding fast-paced titles where you can actually achieve such high frame rates.
Color Gamut
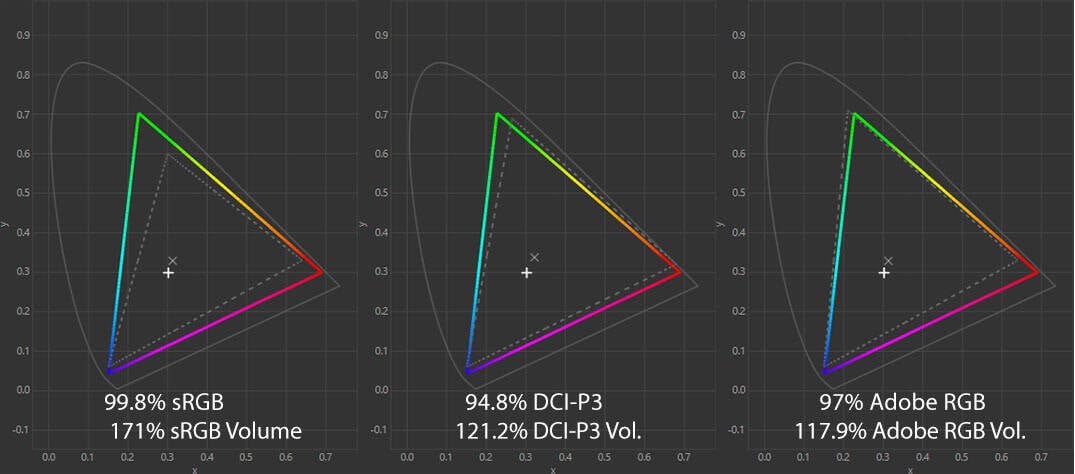
The KTC M27P6S has an impressive color gamut with 171% sRGB volume, providing you with rich and vibrant colors!
We measured a bit lower DCI-P3 color space coverage of 94.8% than the specified 99%, but this is most likely due to the different colorimeters and testing methodologies.
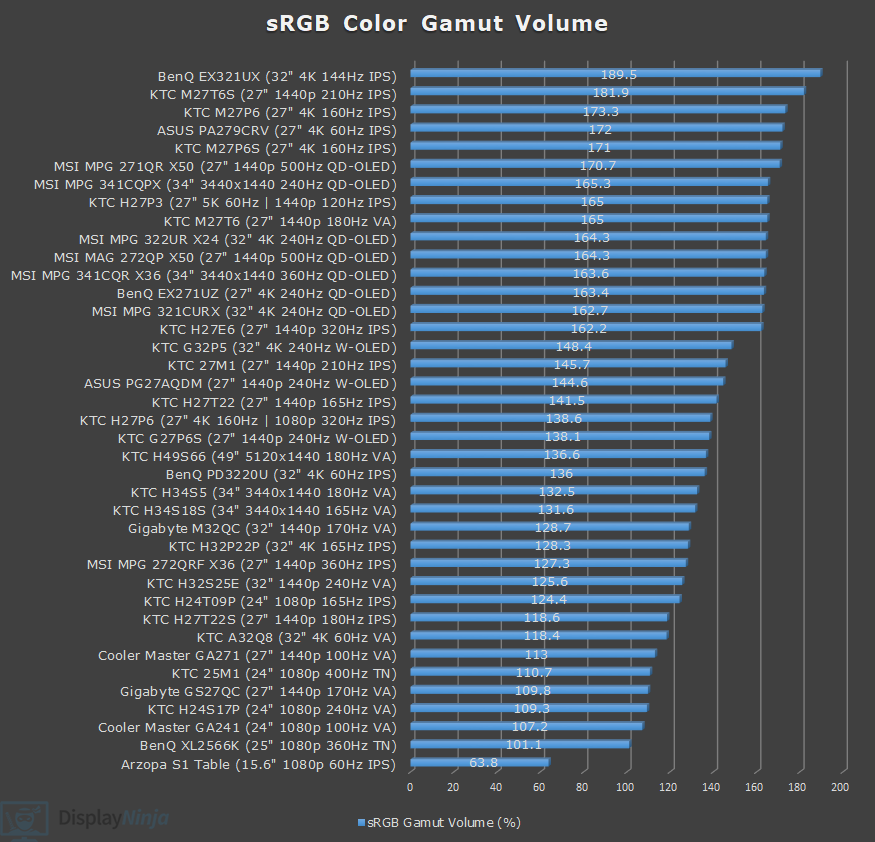
Image Accuracy
By default, Windows doesn’t do proper color management, which results in SDR colors being oversaturated, with a high average Delta E of 3.2 (color deviation from the target, less than 1.5 is considered good) and a maximum Delta E of 8.01 (target is less than 3).
The gamma tracking is very good at 2.24 (target is 2.2).
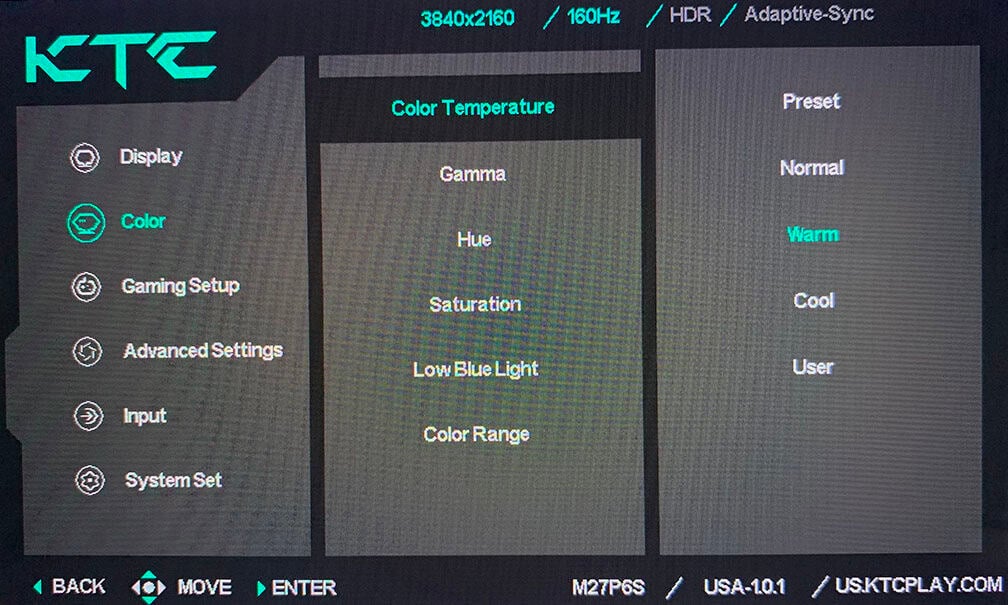
Color temperature in the default ‘Preset’ option is too high at 7408K (target is 6500K), which causes a bluish tint to the whitepoint. We recommend changing the color temperature mode to ‘Warm’, which we measured at 7003K. It’s still higher than ideal, but the bluish tint isn’t noticeable.
Some users might prefer the oversaturated colors in the Native mode, but if you want better accuracy, you should use the ‘sRGB’ Professional Mode instead, which clamps the gamut down to 99.2% volume and a respectable 96.5% coverage.
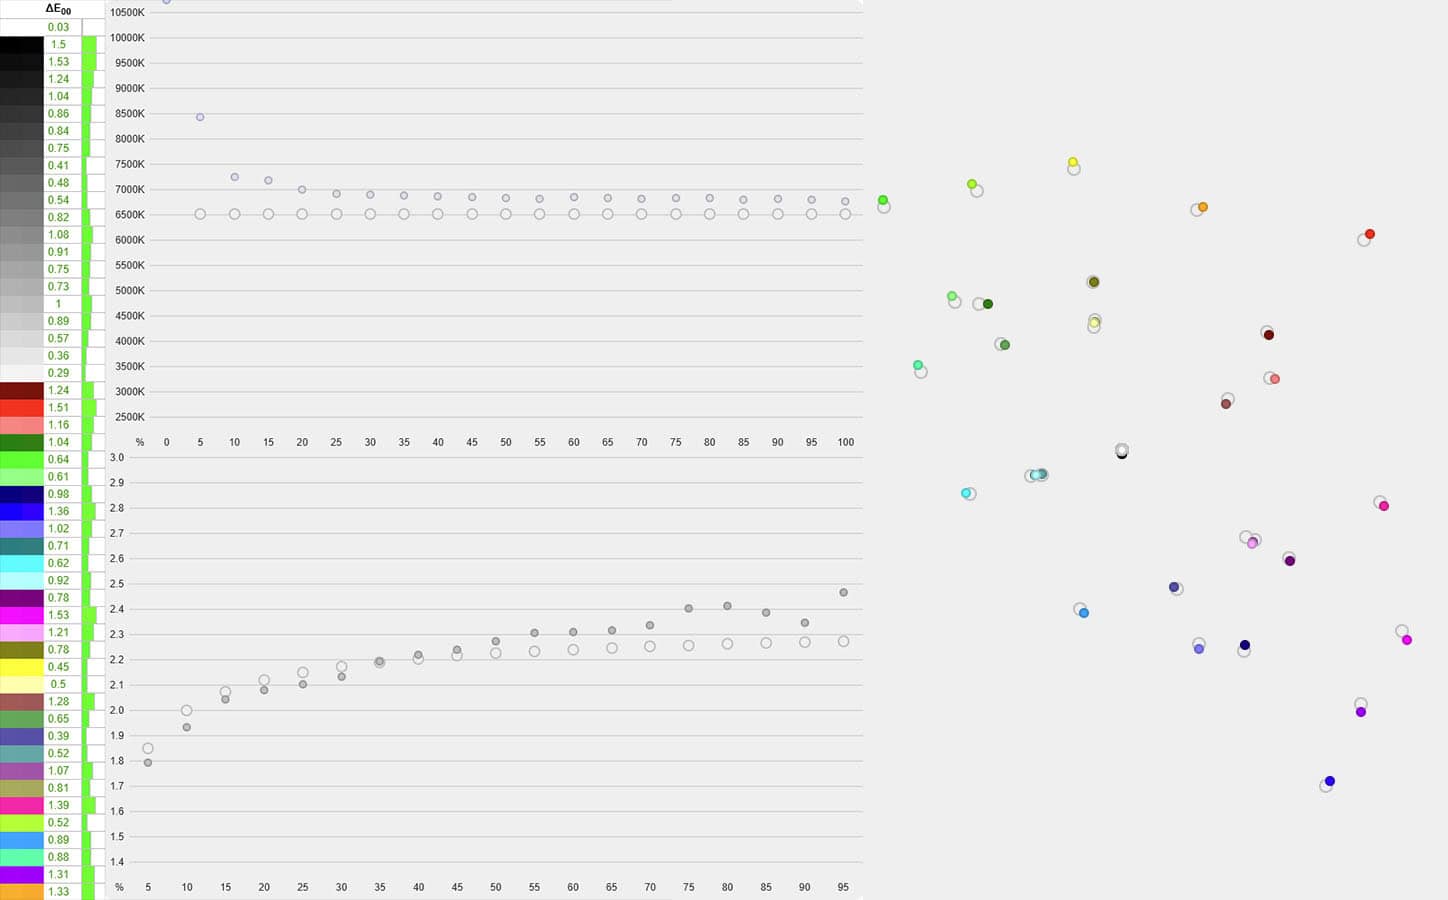
The color accuracy is now excellent, with a low Delta E of 0.88 average and 1.53 maximum. Color temperature is also improved at 6763K in the default ‘Warm’ color temperature mode.
Gamma tracking is very good with a 2.22 average and it follows the sRGB tone curve properly.
You can adjust brightness and color temperature in the sRGB and other modes, but gamma settings are locked.
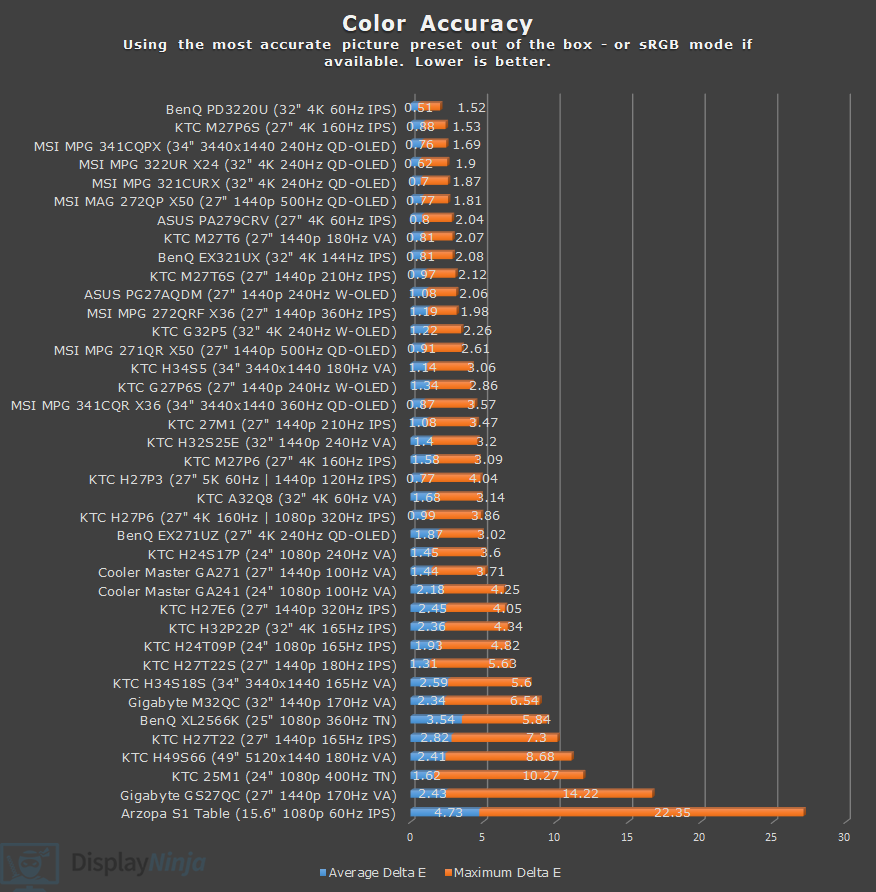
We also tested the other modes.
The Adobe RGB mode clamps the gamut volume from 117.9% to 93.5% with 91.4% coverage, a low Delta E of 1.11 average and 3.05 maximum, 6815K and the same 2.22 gamma average as that of the sRGB mode.
The DCI-P3 mode brings the gamut volume down to 97.4% from 121.2% with 95% coverage, a low Delta E of 1.14 average and 4.47 maximum, and 6784K color temperature. Gamma is 2.61, which is correct for the DCI-P3 color space used for cinema/video mastering and viewing.
Sometimes, a monitor’s DCI-P3 mode uses the sRGB 2.2 tone curve, but this is technically Display P3, which is commonly used by macOS. Since macOS has proper color management, you can simply use the monitor’s Native mode instead.
Overall, all three modes provide excellent factory calibration, which, together with the IPS panel’s wide viewing angles and consistent image quality, makes the monitor suitable for professional color-critical work for both web and print applications.
We also tested the color accuracy when using software clamp (in AMD drivers, via the novideo_sRGB tool for NVIDIA GPUs or Windows 11 Automatic Color Management), but the results weren’t as good due to incorrect EDID data with a Delta E of 1.73 average and 7.83 maximum, so we don’t recommend this method.
Keep in mind that IPS monitors exhibit IPS glow, which can be characterized as a faint glow that’s sometimes visible in the corners of the screen when viewed from certain angles. Its intensity can vary from unit to unit, so some panels may show it more than others.
It’s most noticeable when viewing dark content in a dark room at higher brightness levels, but you can minimize it with a proper setup, for example, by lowering the brightness in dim environments and adding some ambient lighting behind the screen. Our KTC M27P6S unit didn’t show any excessive IPS glow or backlight bleed.
Calibration
For full calibration, we set the brightness to 9/100 for 120 nits, used the ‘Native’ mode, and ‘Custom’ color temperature with red, green and blue channels set to 50, 49 and 42, respectively, to get 6435K.
Delta E improved to 0.47 average and 1.92 maximum with accurate gamma tracking (2.19 average). You can download our ICC profile here.
Brightness & Contrast
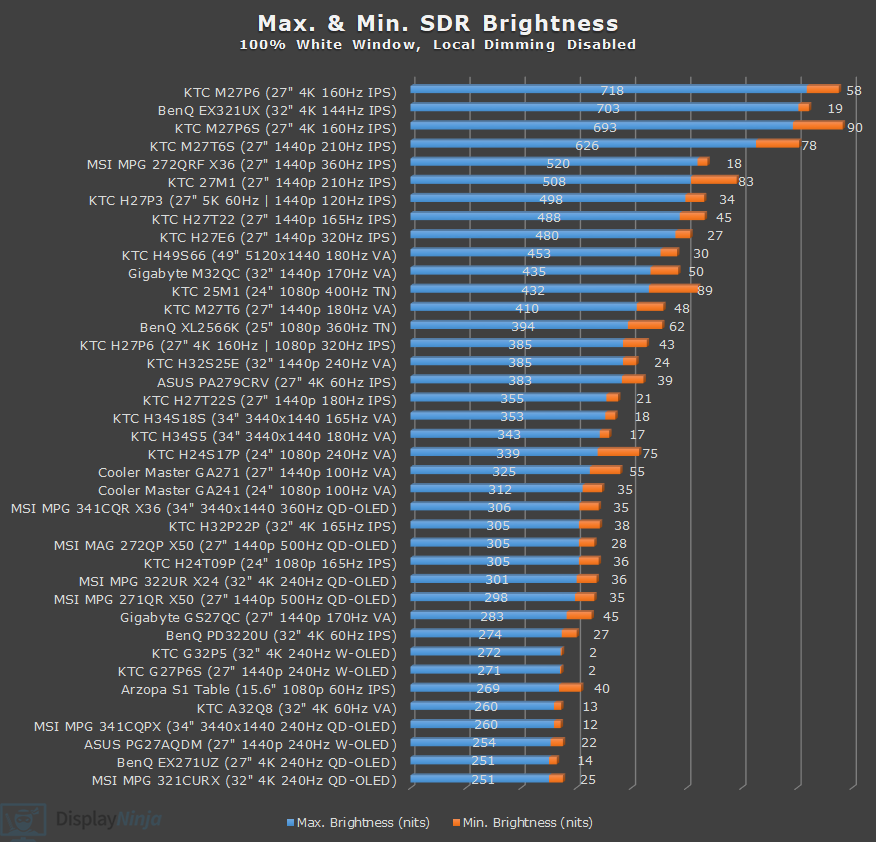
In SDR, with local dimming disabled, we measured a peak brightness of 693 nits and a minimum of 90 nits. The high peak brightness makes the monitor suitable even for particularly bright rooms, though some users might find the minimum brightness a bit too high for comfortable use in darker environments.
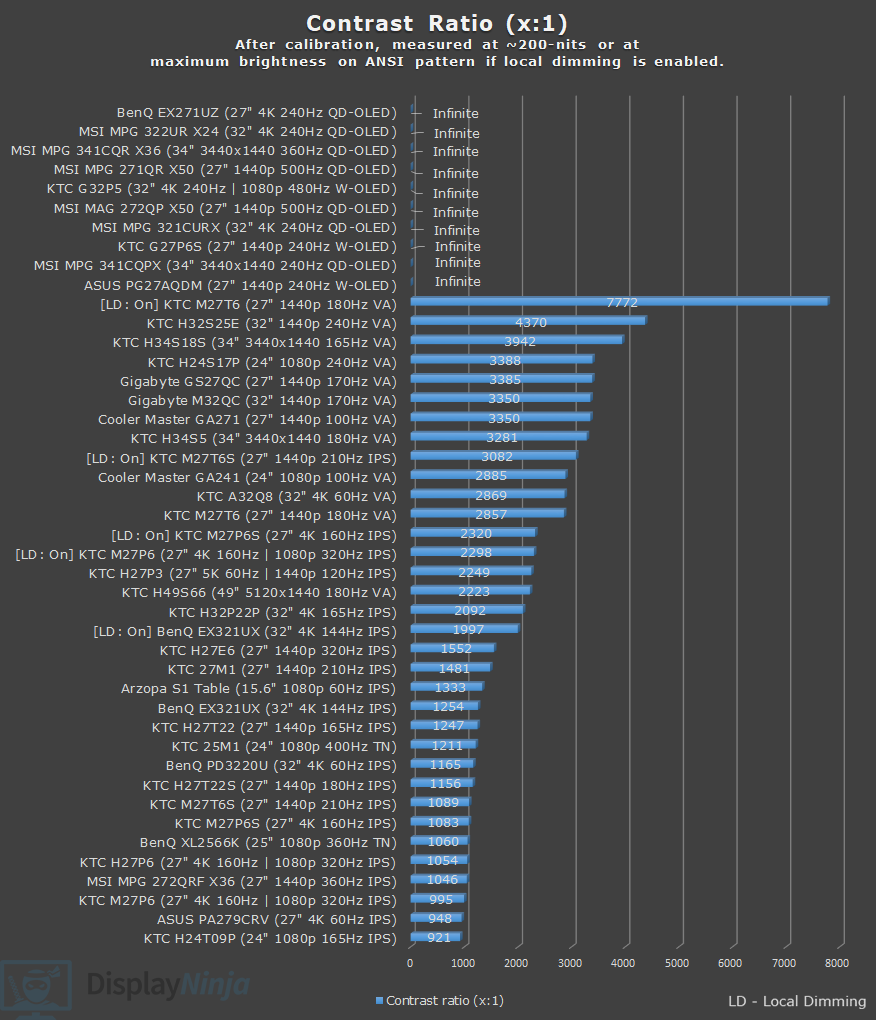
At 200 nits, we measured a contrast ratio of 1083:1 with local dimming disabled, which is a typical result for an IPS panel.
With local dimming enabled, contrast ratio increases up to 7116:1 on a 2×4 checkerboard pattern using the High local dimming mode.
OLED panels have an infinite contrast ratio as each pixel produces its own light, allowing them to completely turn off for true blacks.
You can also achieve ‘infinite’ contrast on a mini LED panel, but only in scenes where the dark and bright objects are far apart so that the light from a bright zone doesn’t bleed into the surrounding dimmed zones.
Since our colorimeter cannot accurately measure really low black depth, we only measure contrast ratio on 2×4, 4×4 and ANSI checkerboard patterns.
 |  |  | |
| KTC M27P6S (LD: Low) | 4388:1 | 2474:1 | 1798:1 |
| KTC M27P6S (LD: High) | 7116:1 | 3417:1 | 2320:1 |
| KTC M27T6 (LD: Low) | 16732:1 | 9523:1 | 6889:1 |
| KTC M27T6 (LD: High) | 24912:1 | 11575:1 | 7772:1 |
| KTC M27T6S (LD: Low) | 7932:1 | 3762:1 | 2768:1 |
| KTC M27T6S (LD: High) | 9111:1 | 4616:1 | 3082:1 |
| KTC M27P6 (LD: Low) | 6624:1 | 3101:1 | 2288:1 |
| KTC M27P6 (LD: High) | 6569:1 | 3145:1 | 2298:1 |
| BenQ EX321UX | 6695:1 | 3322:1 | 1997:1 |
In synthetic tests, the contrast ratio of the M27P6S is similar to the previous-gen M27P6 model despite its double dimming zone count, which looks disappointing, but we’ll see how the local dimming differs in real scene tests later in the article.
HDR
The KTC M27P6S has a mini LED backlight with 2304 full-array local dimming (FALD) zones, which can individually turn on and off depending on the content. As a result, you can get both deep blacks and bright whites simultaneously for a proper HDR viewing experience.
The downside is that sometimes the light from an illuminated object will bleed into the surrounding dimmed zones and create blooming. It only occurs in demanding scenes, such as fireworks, stars in a night sky, etc.
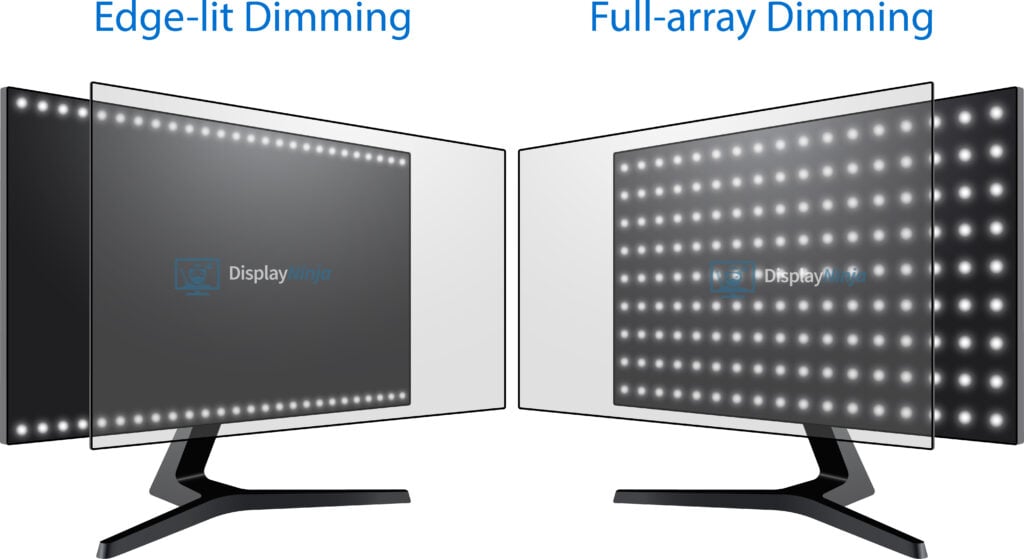
The monitor has five local dimming options: Off, Auto, Low, Standard and High.
The ‘Auto’ option means that local dimming is set to ‘Low’ in SDR and to ‘High’ in HDR mode.
The High mode is the most aggressive as it’s the only mode that dims black all the way; however, it also has the lowest brightness for small highlights as it tries to minimize blooming.
The Low mode has the highest brightness but also the most visible blooming and raised blacks. The Standard mode strikes a balance between the two.
Brightness & EOTF Tracking
There are four HDR modes: VESA DisplayHDR, HDR Game, HDR Cinema and HDR 600. With three different local dimming modes, this means there are 12 different combinations you could use, in addition to manually adjusting Halo Control.
Halo Control is a new option under ‘Local Dimming’ that allows you to adjust its intensity from 0 to 100 in increments of 1. By default, Low is ’40’, Standard is ’60’ and High is ’80’.
Here’s how maximum brightness compares across different combinations.
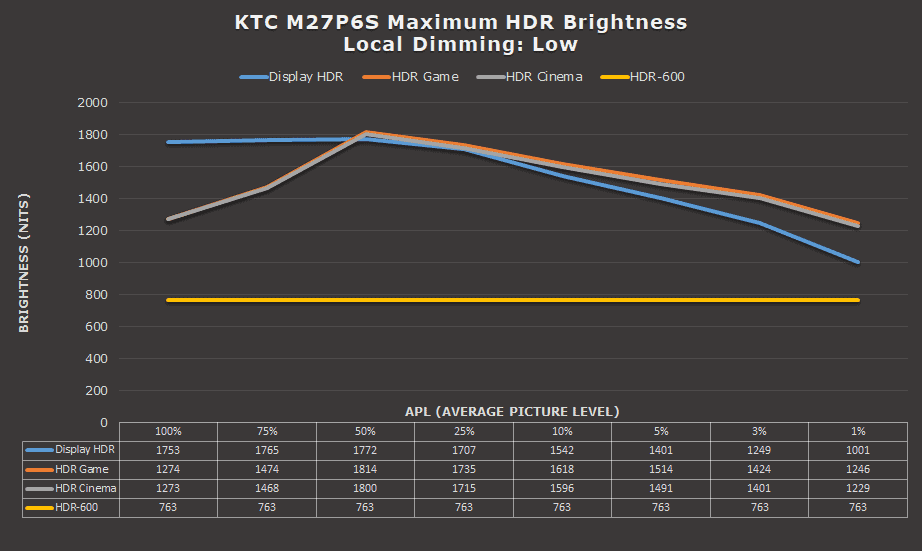
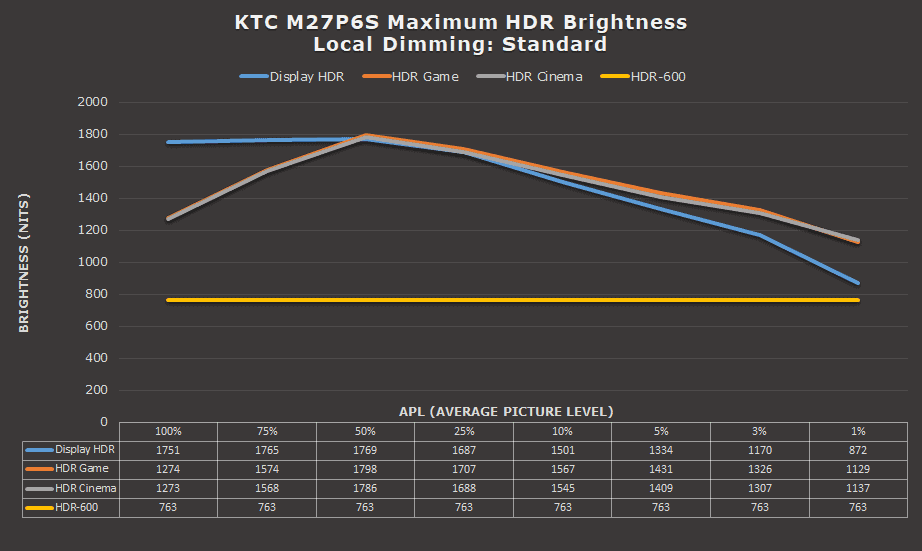
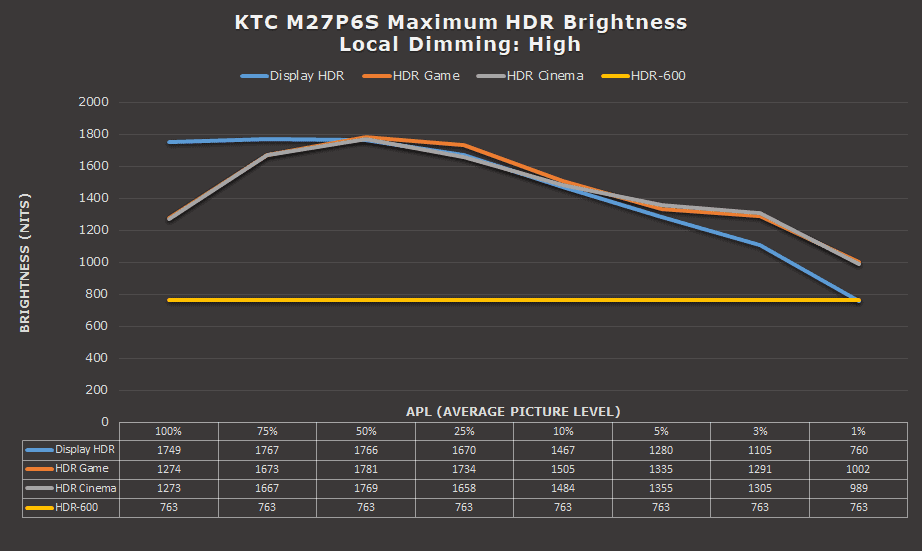
The DisplayHDR mode is the brightest from 100% down to 50% APL, but its brightness starts to drop around 10% APL, with the HDR Game and Cinema modes being up to 30% brighter at 1% APL.
The HDR-600 mode just caps the brightness to 763 nits regardless of APL or local dimming mode.
Here’s how the different local dimming modes compare within the same HDR mode.
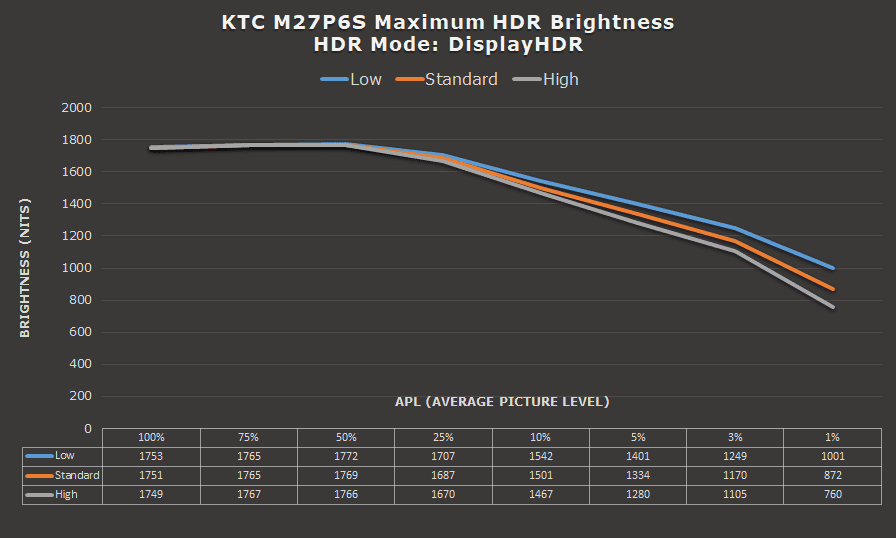
Setting Halo Control to ‘100’ in DisplayHDR mode with High local dimming, for instance, reduces the 1% APL brightness from 760 nits to 685 nits, while setting it to ‘0’ increases it to 1131 nits.
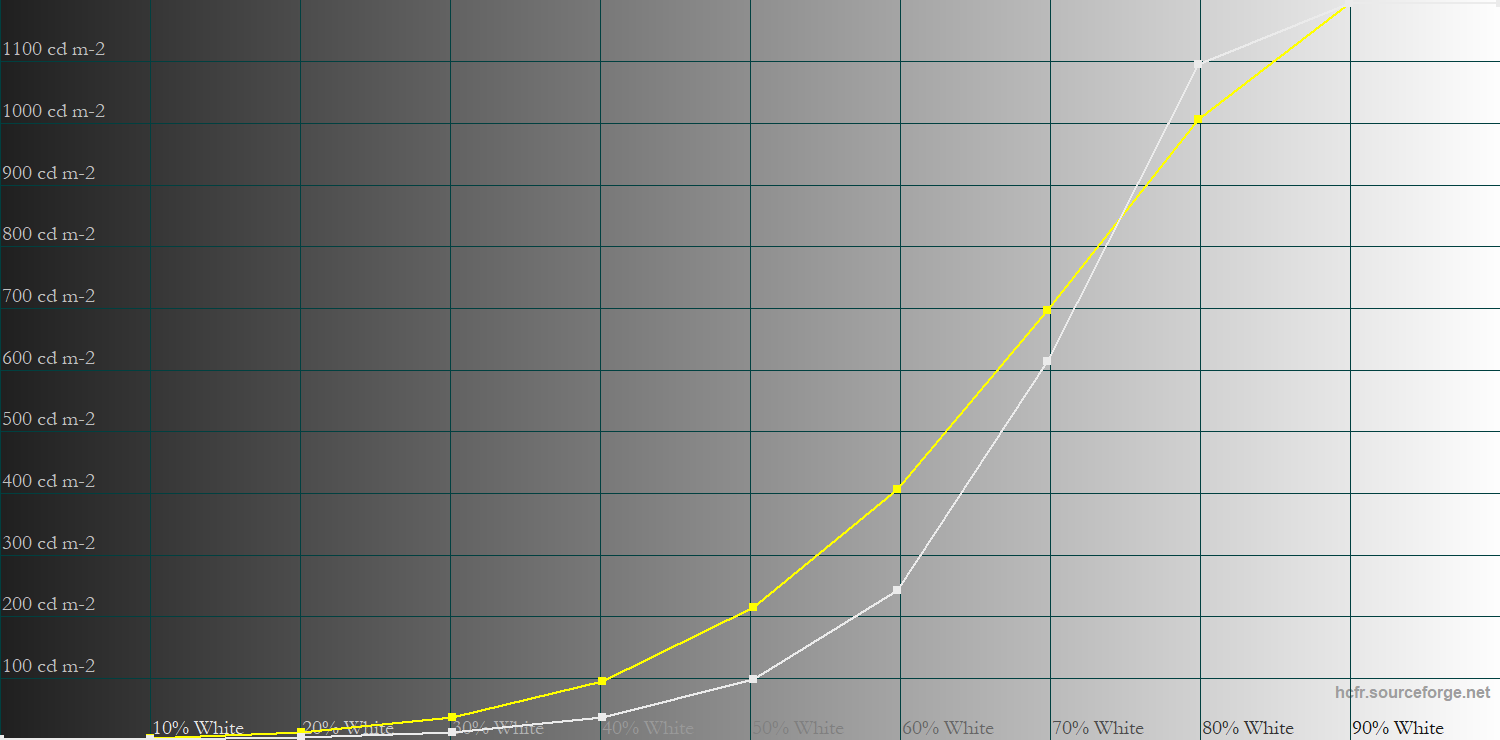
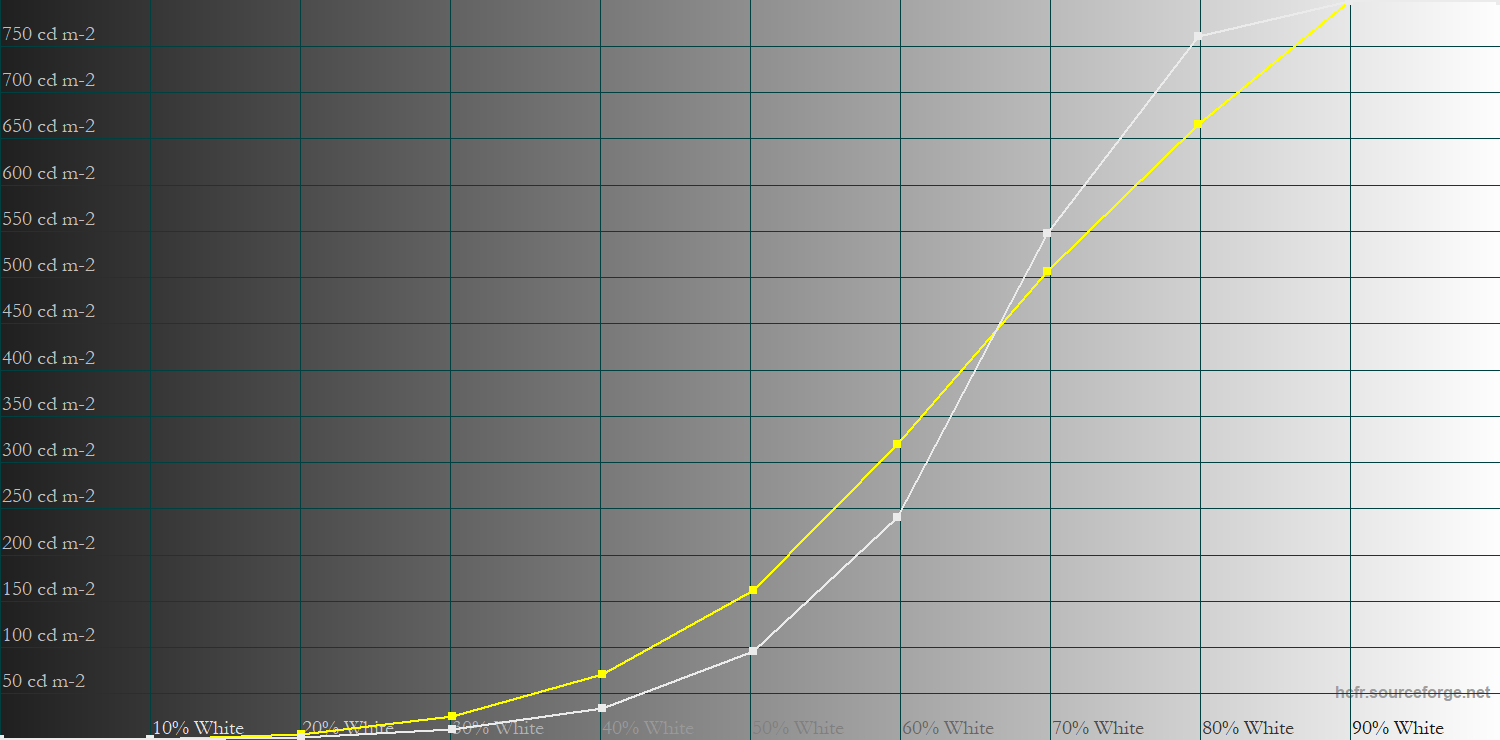
Here’s how they compare when it comes to EOTF tracking. The gray line is the target brightness, while the yellow line represents the monitor’s brightness.
DisplayHDR
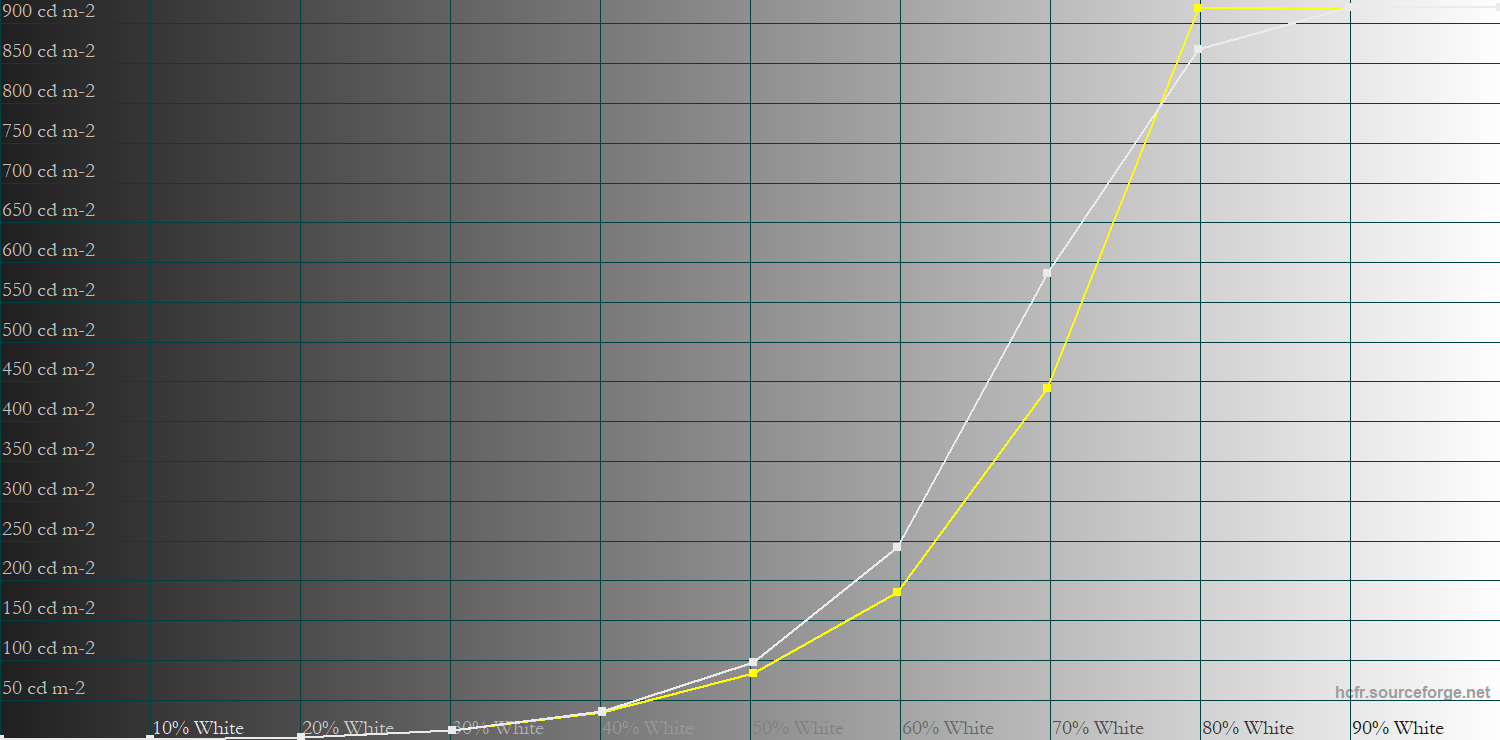
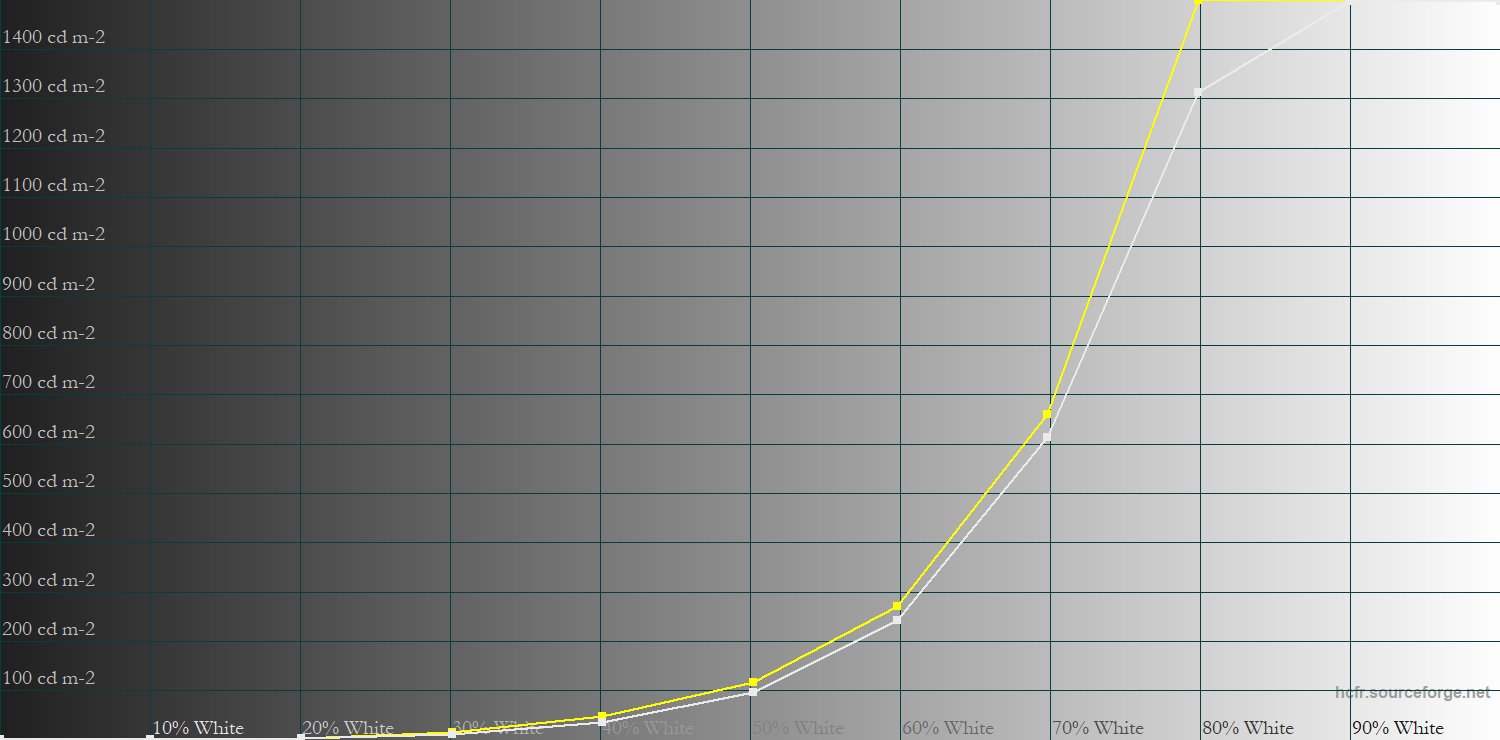
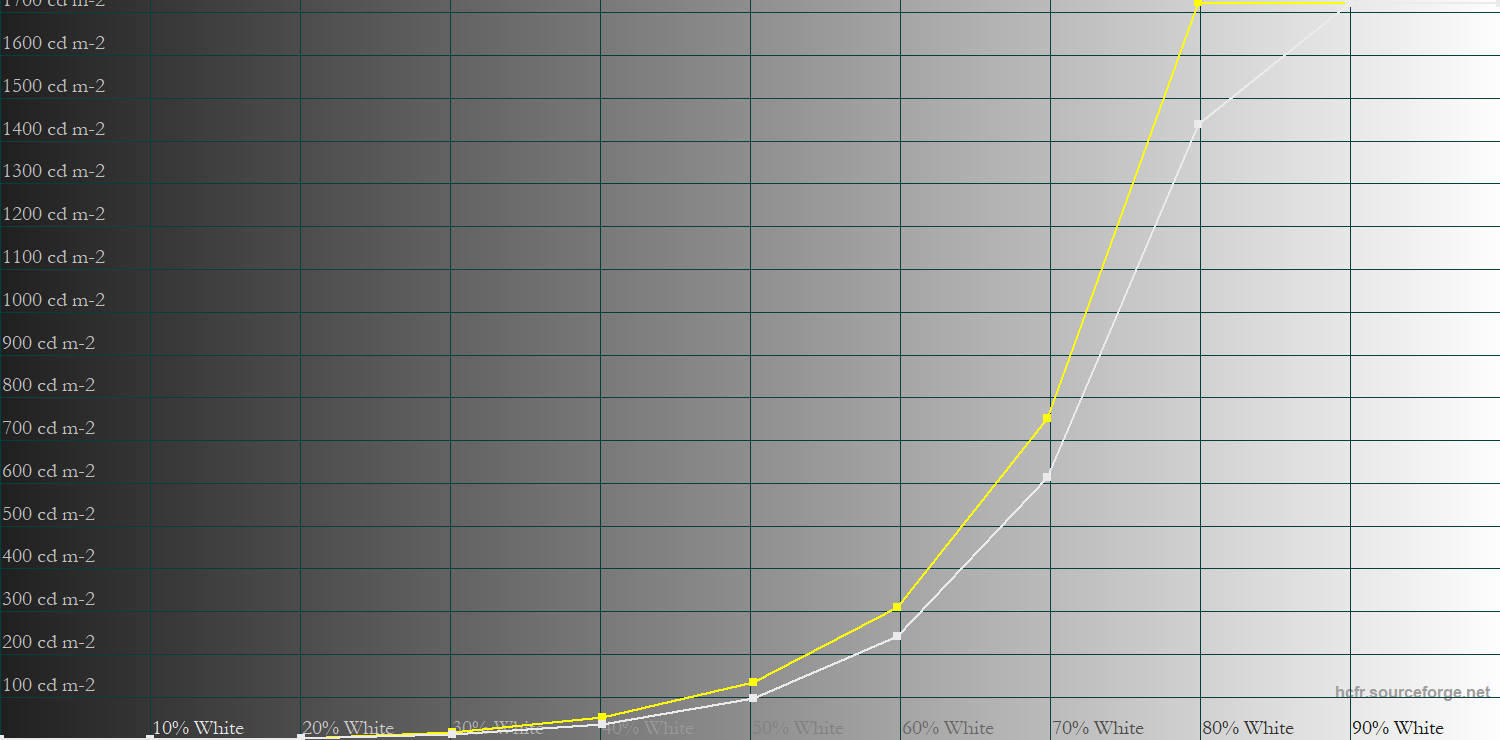
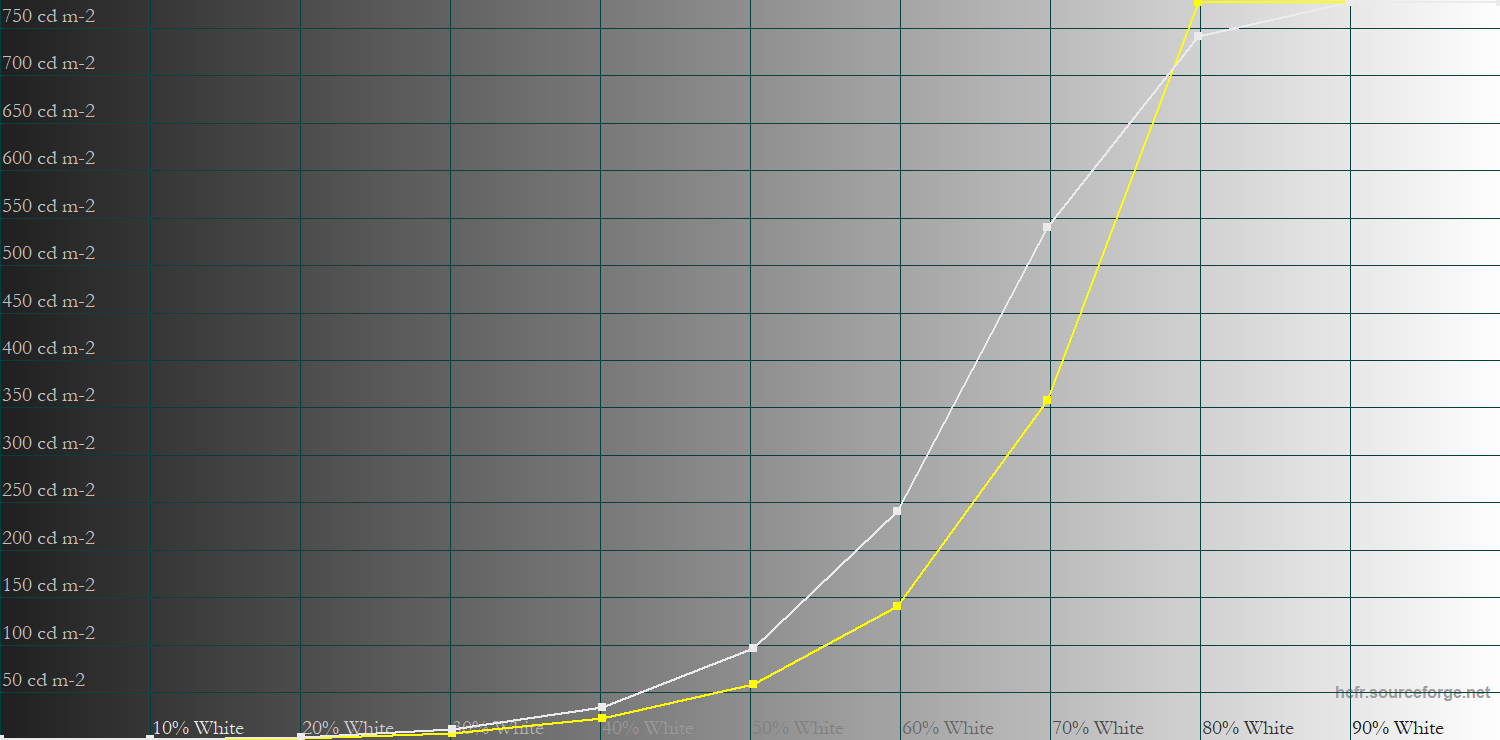
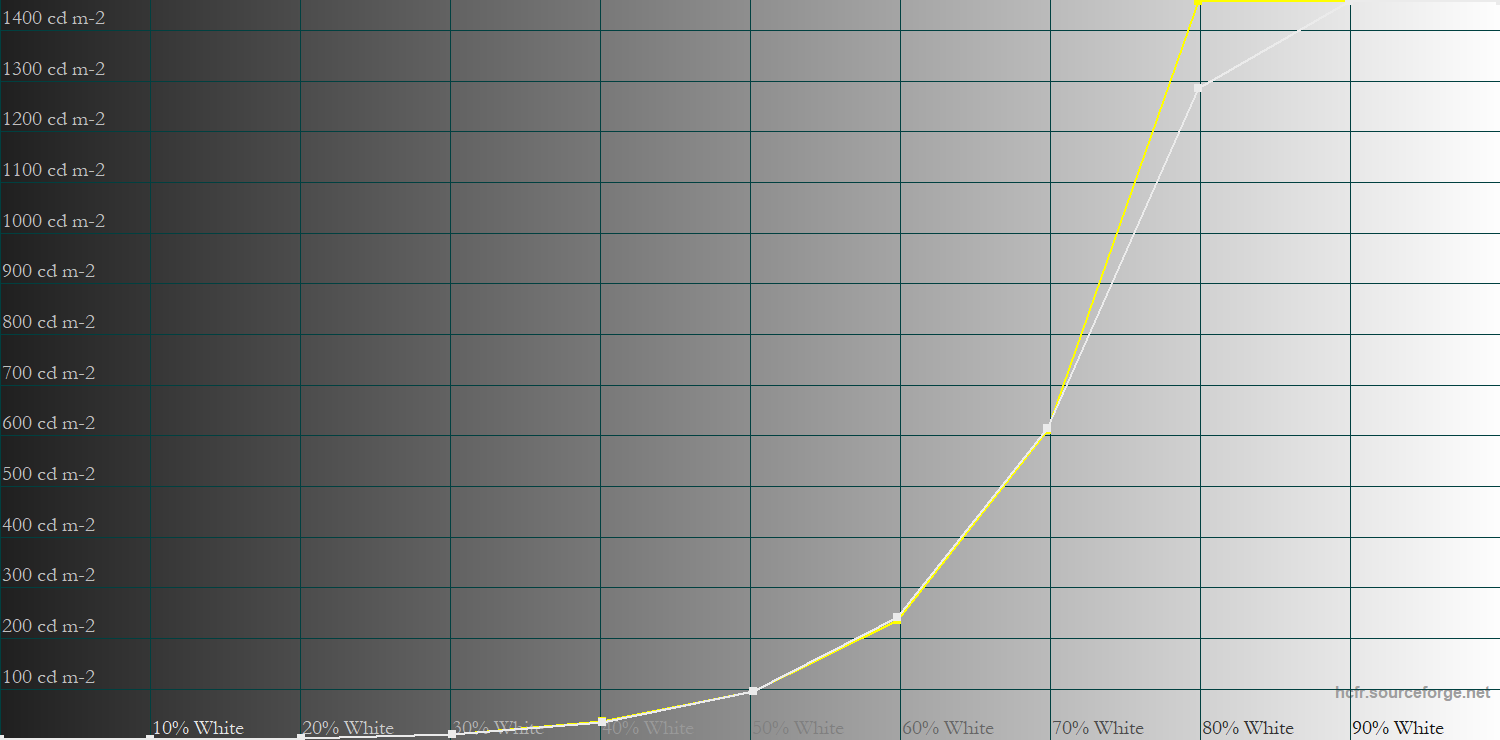
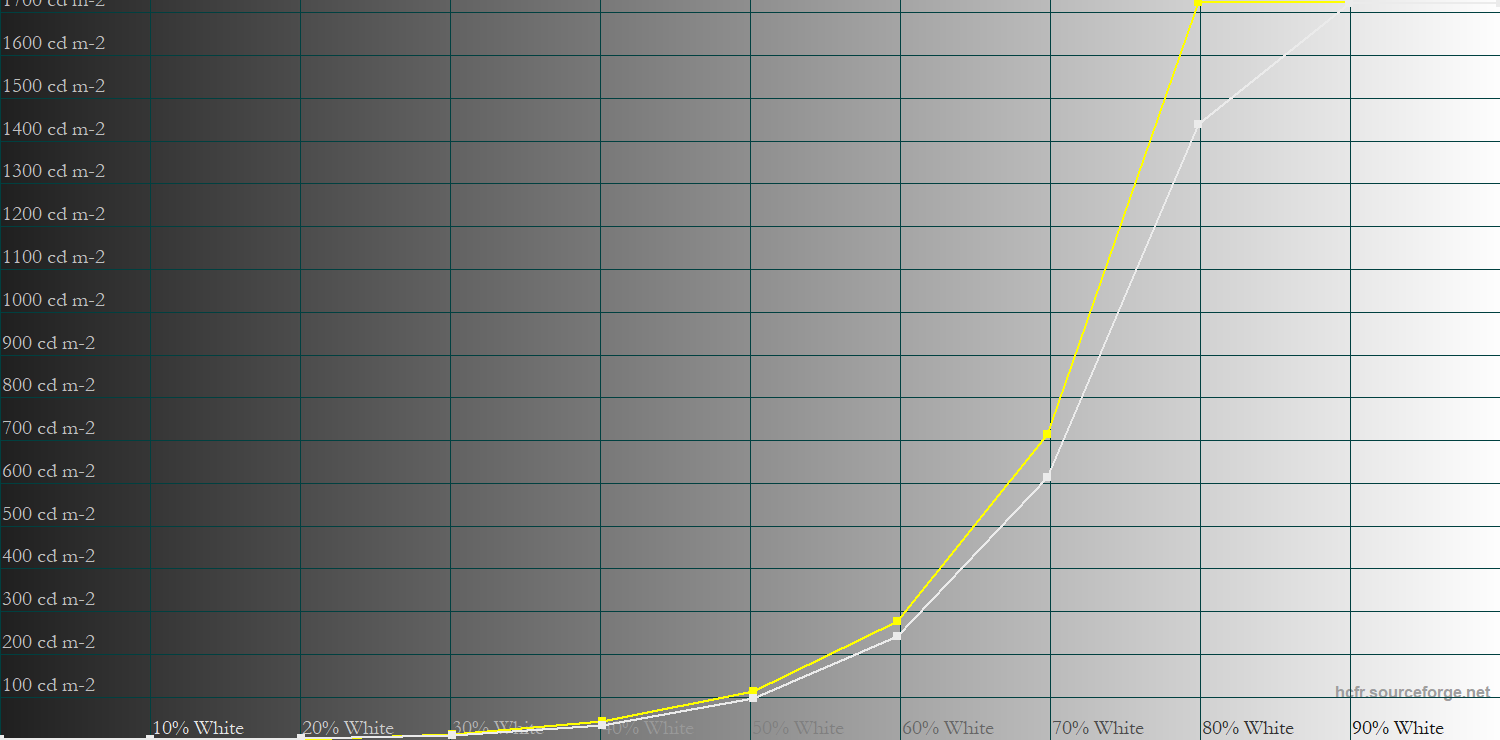
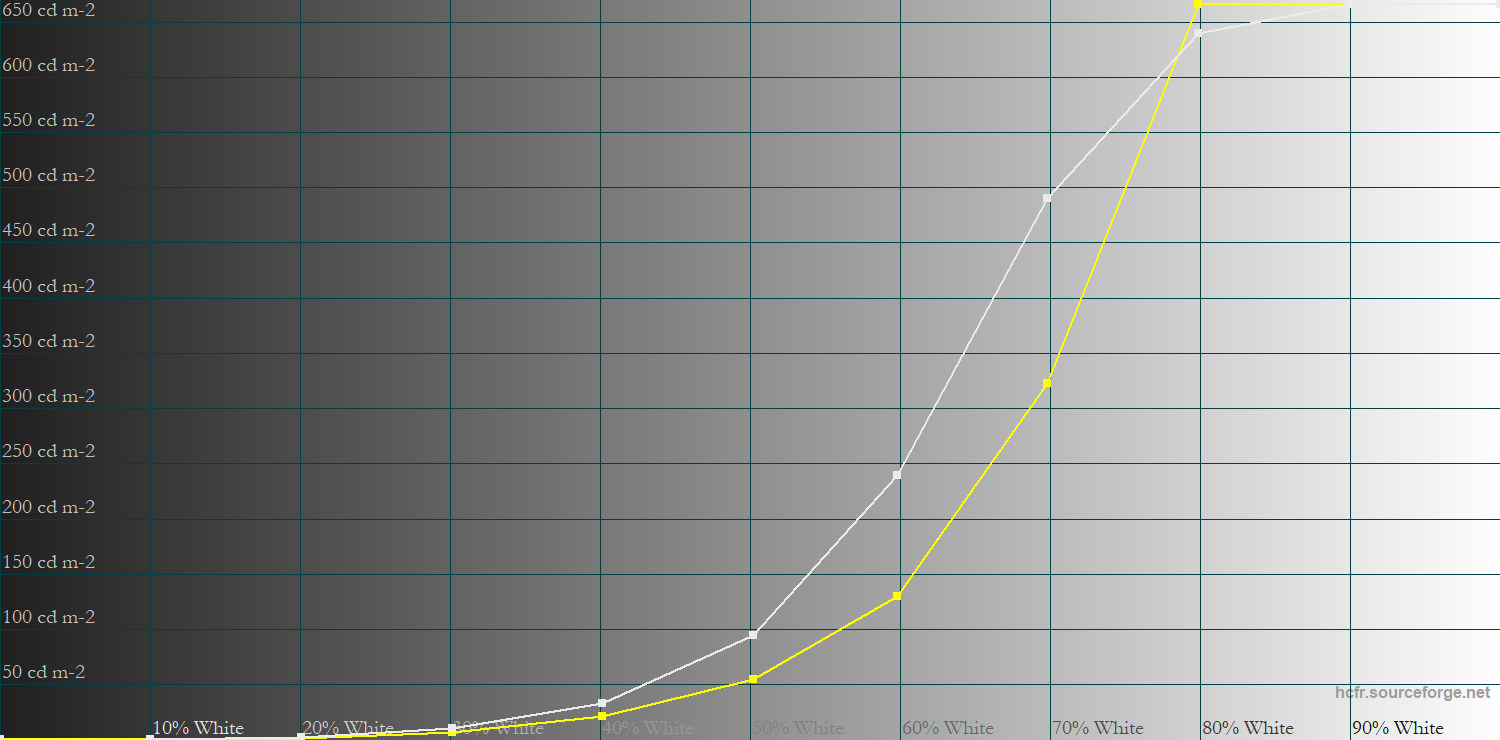
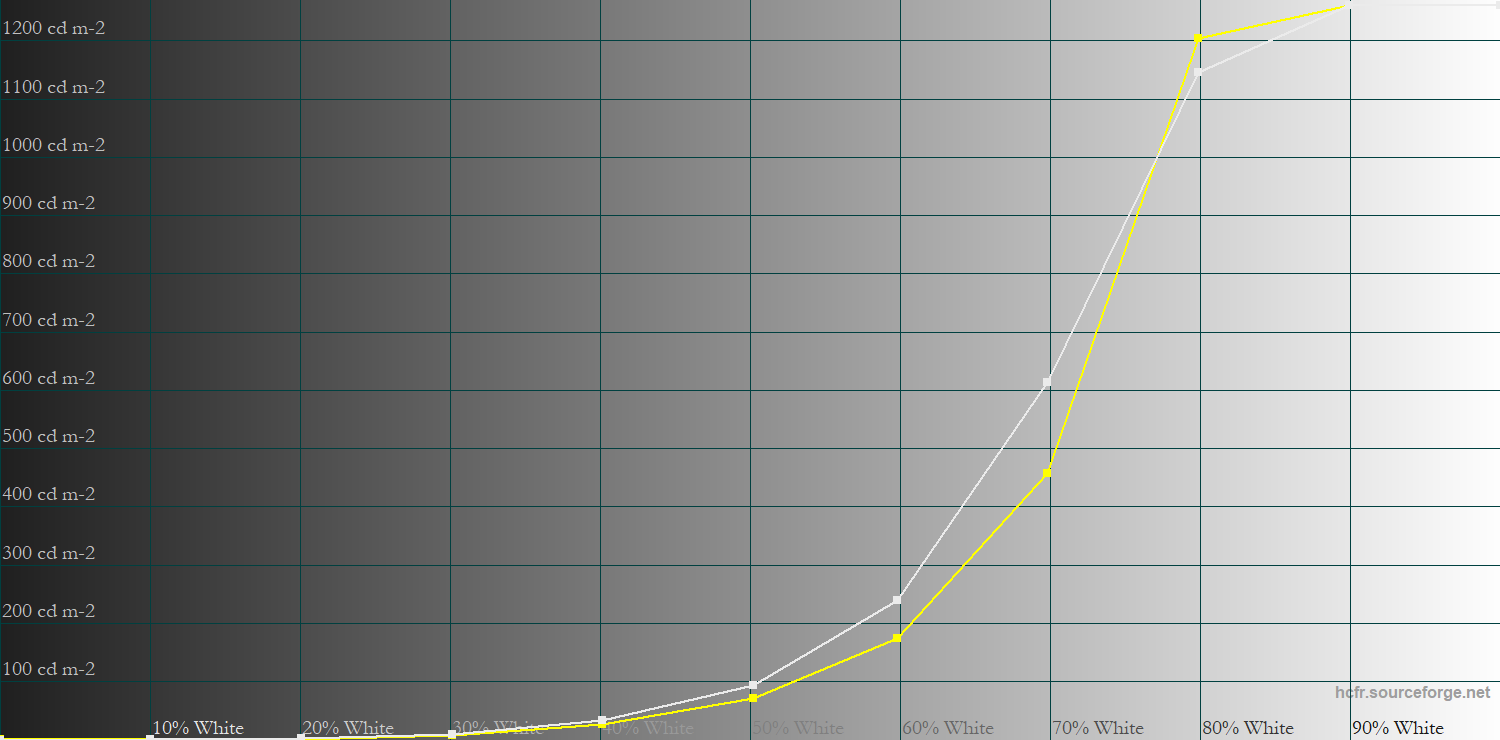
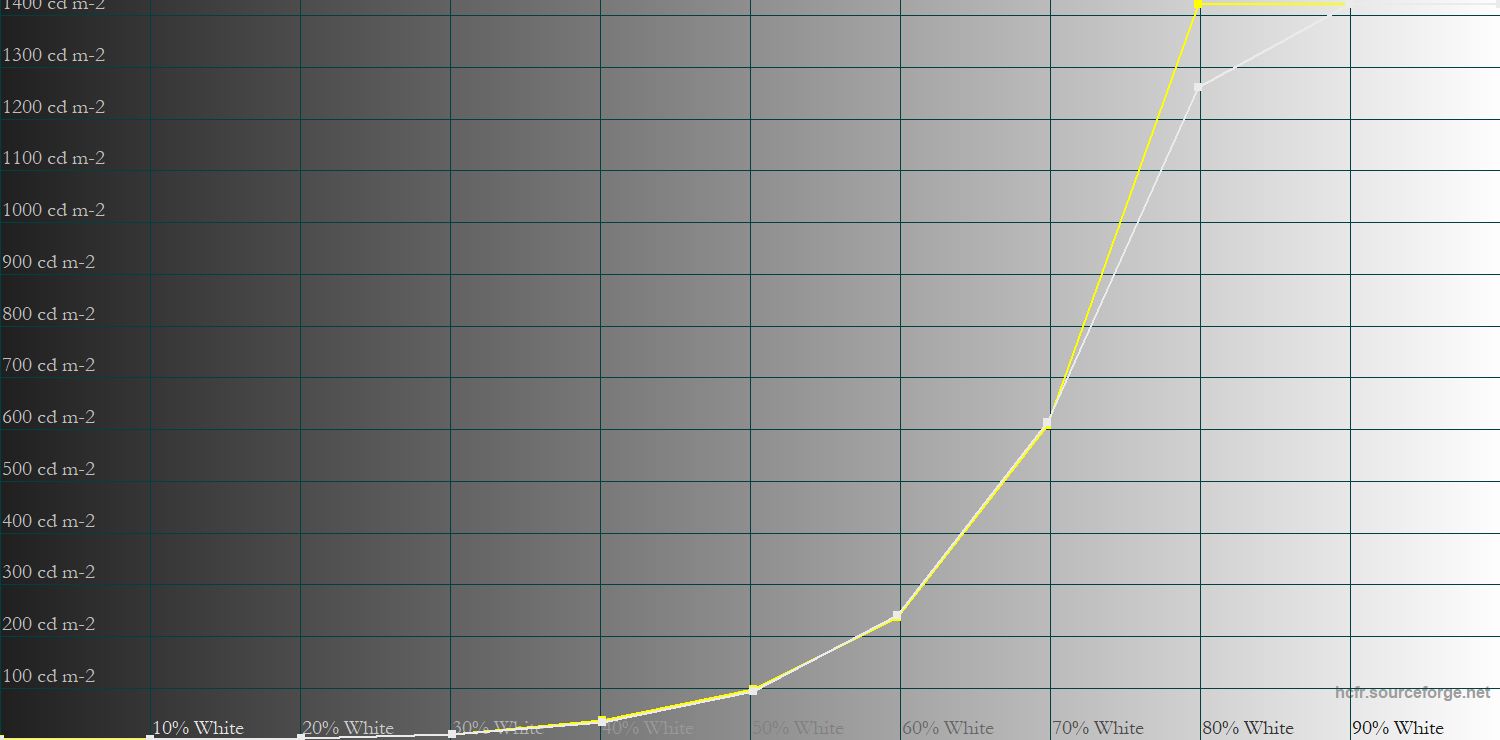
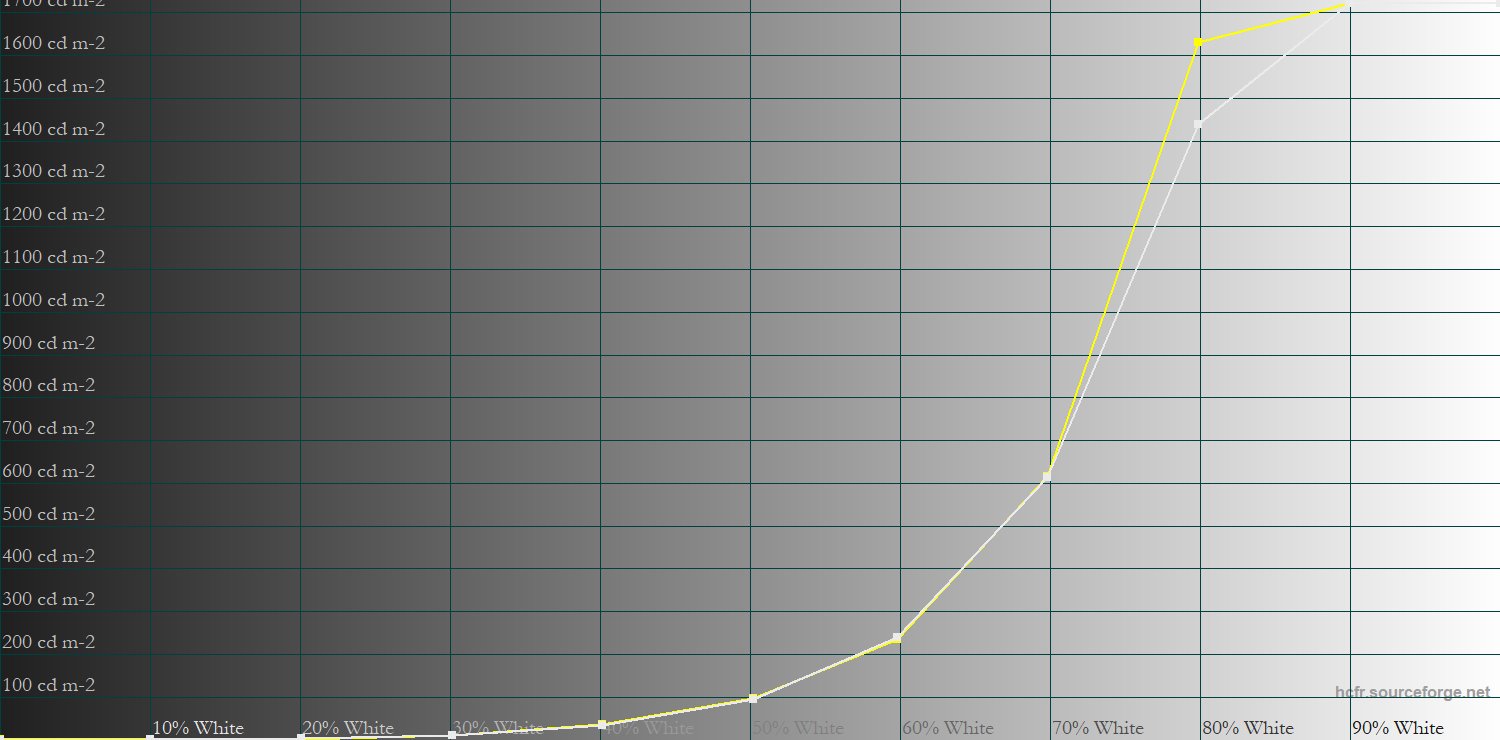
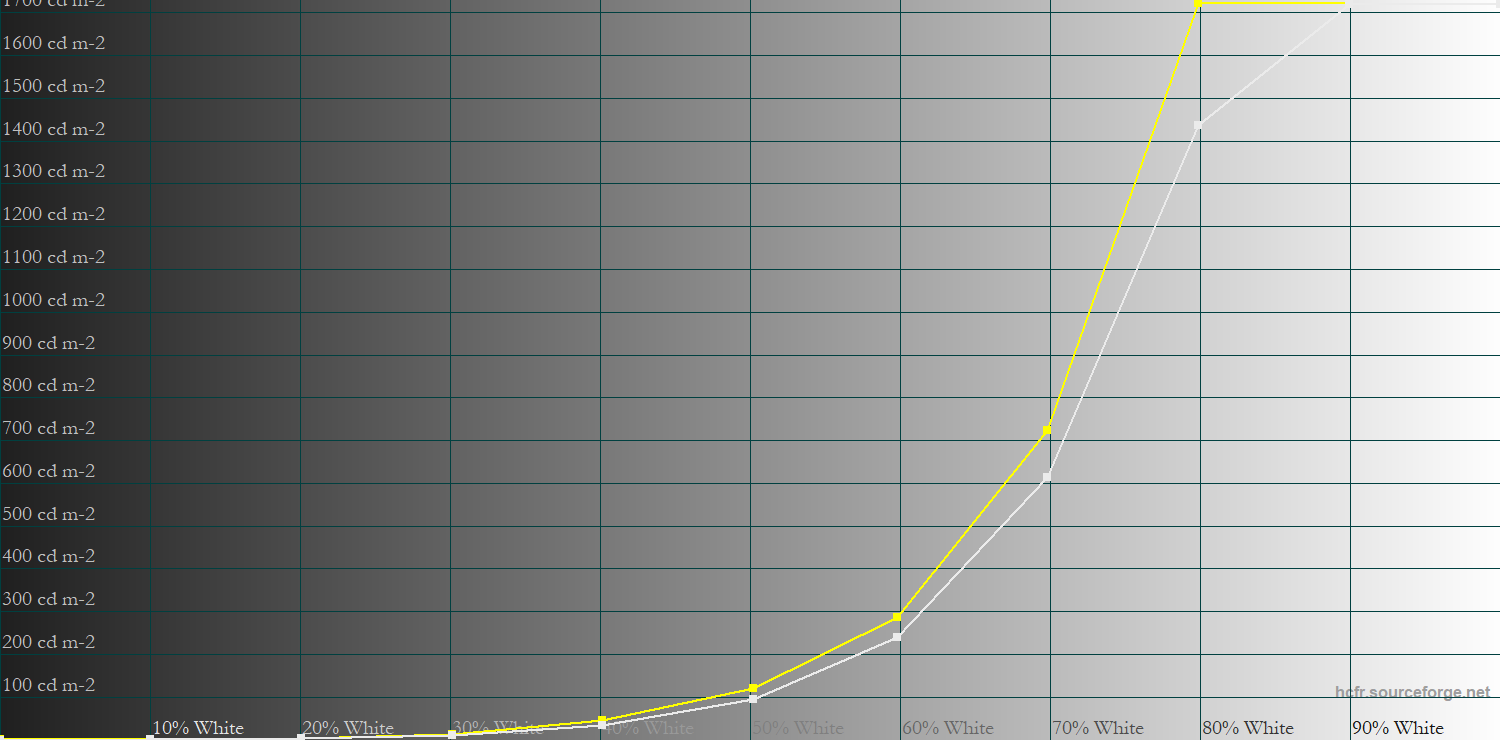
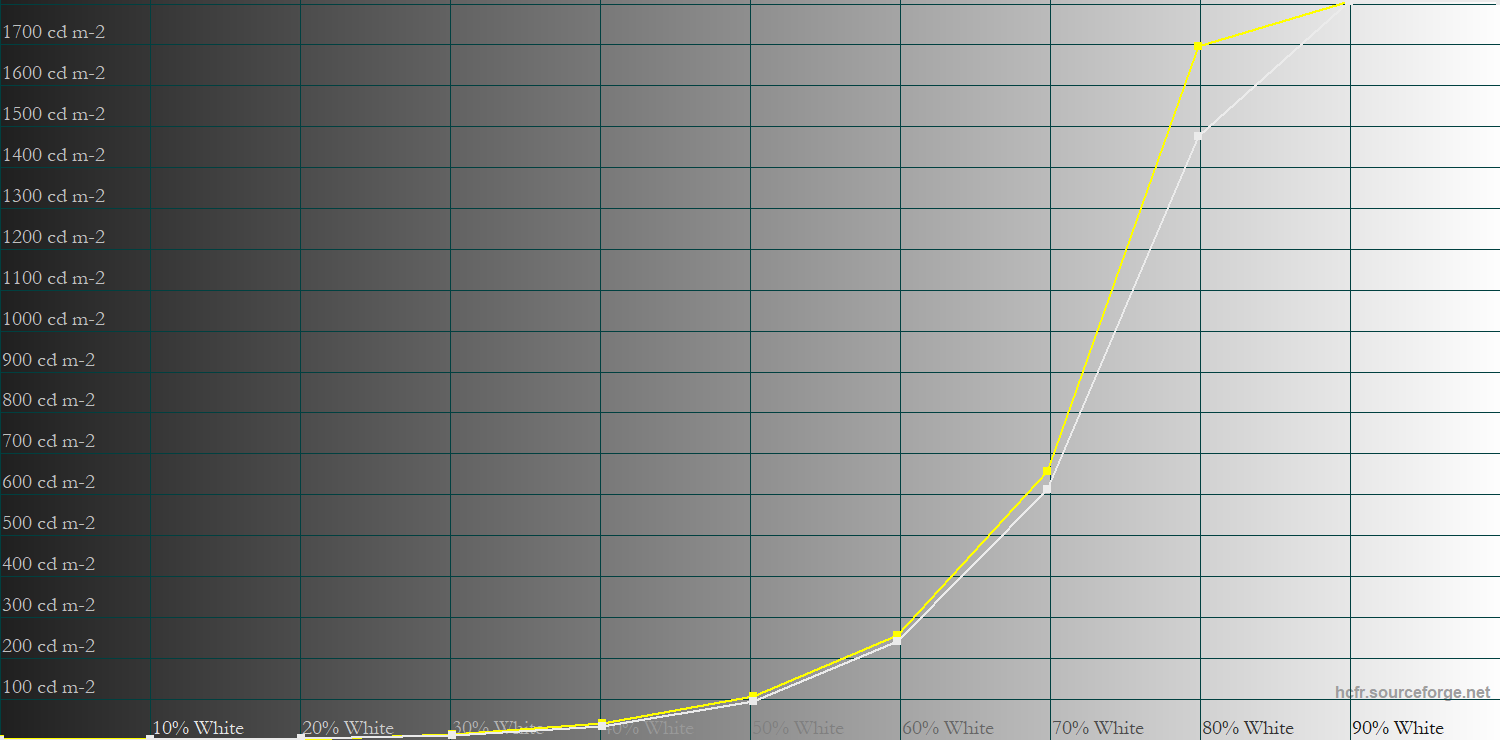
The DisplayHDR mode is the most accurate. As you can see, there’s not much difference between the different local dimming modes. All three modes are fairly accurate, being slightly brighter than intended at 50% APL and a bit dimmer than intended at 1% APL, while 10% APL tracking is the most accurate.
The main difference is in near-black tracking for small APLs.
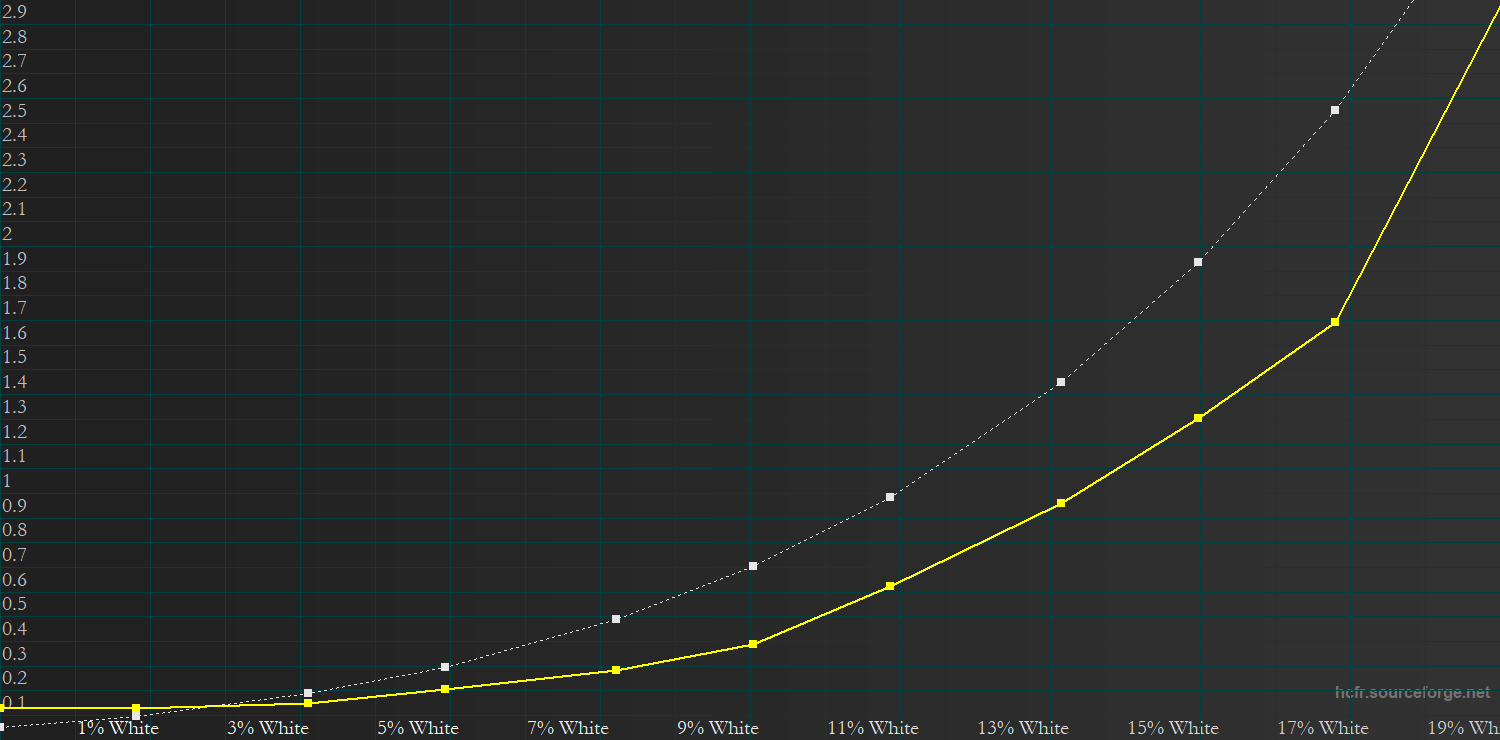
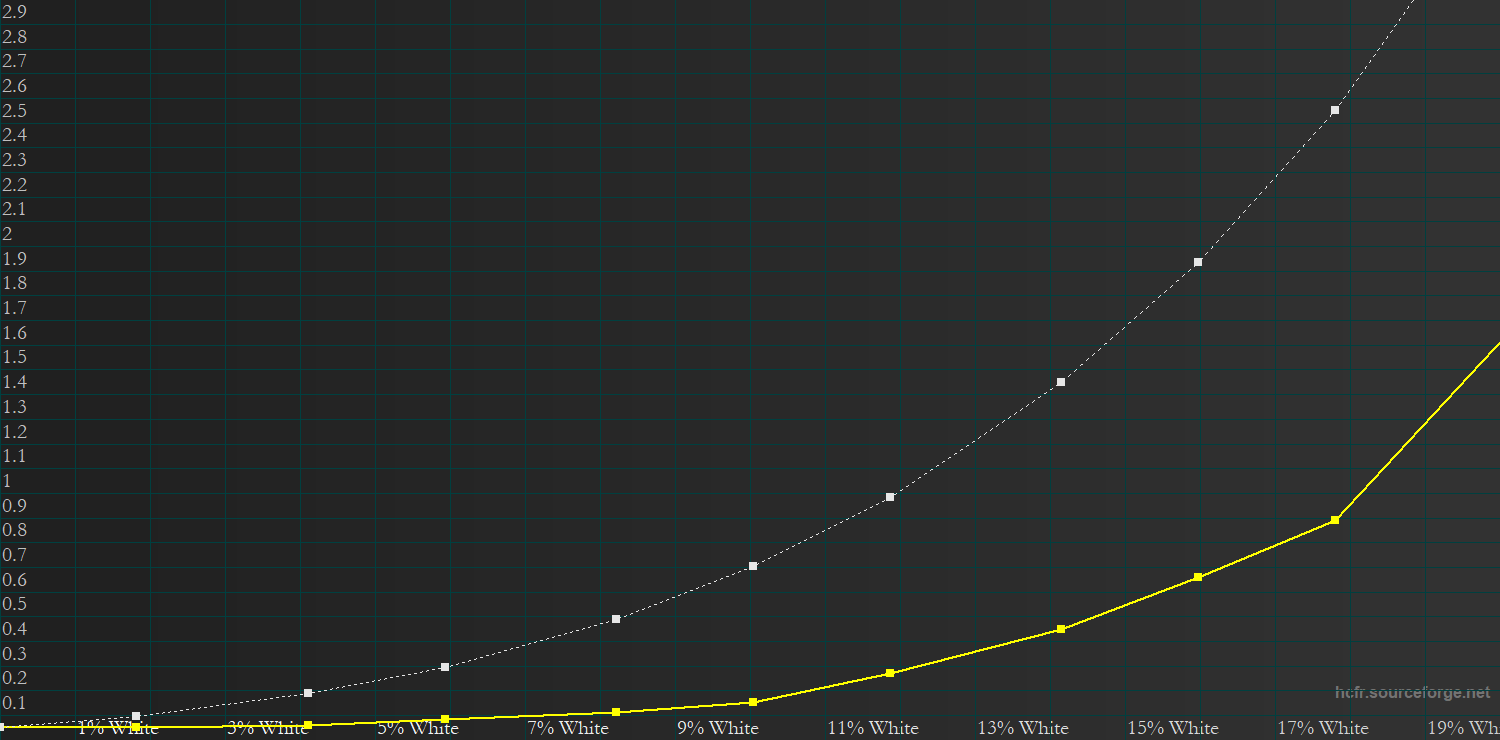
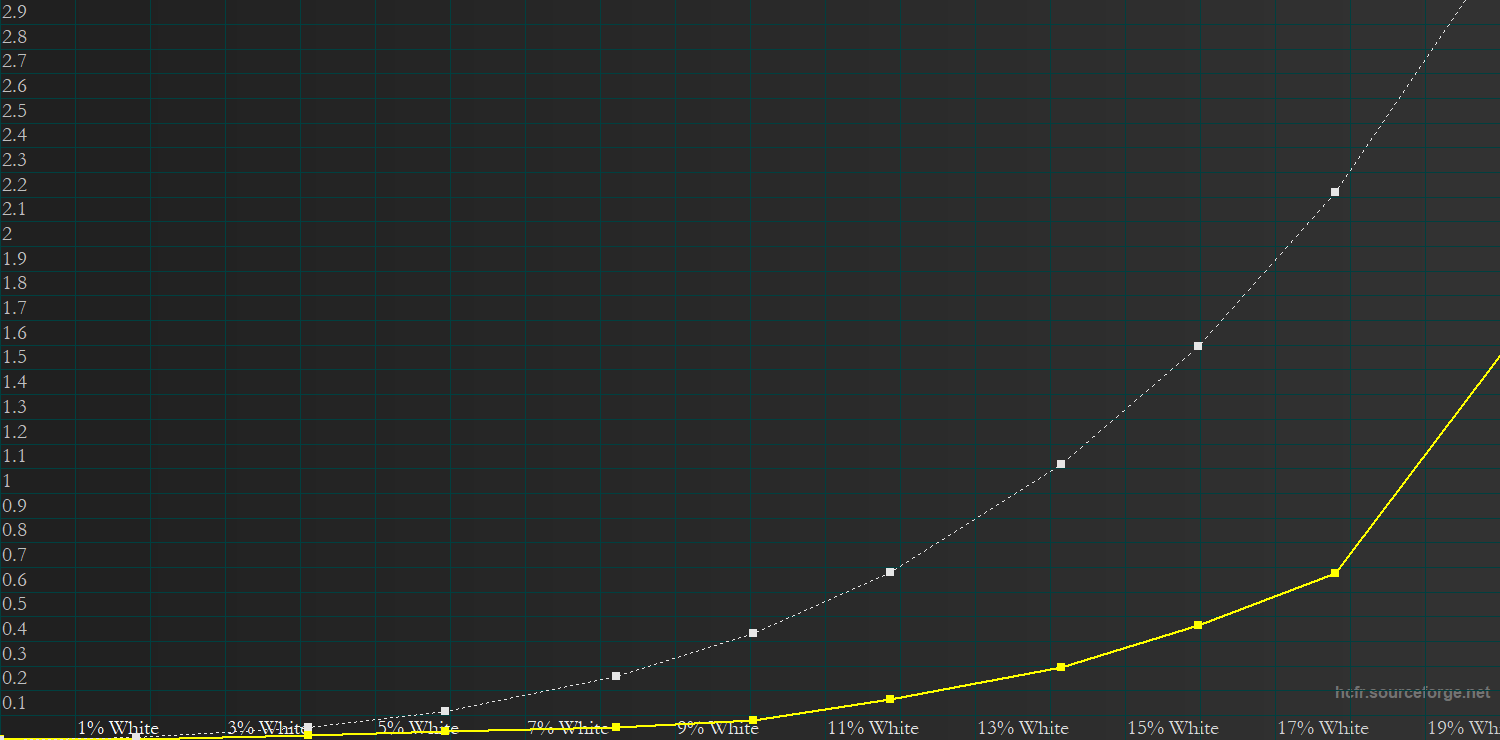
The High mode is the only one that dims all the way down to 0 nits for black, but it’s also the darkest overall. The Low mode, meanwhile, is brighter than intended up to 1% white, but becomes more accurate as it approaches 19% white.
HDR Game
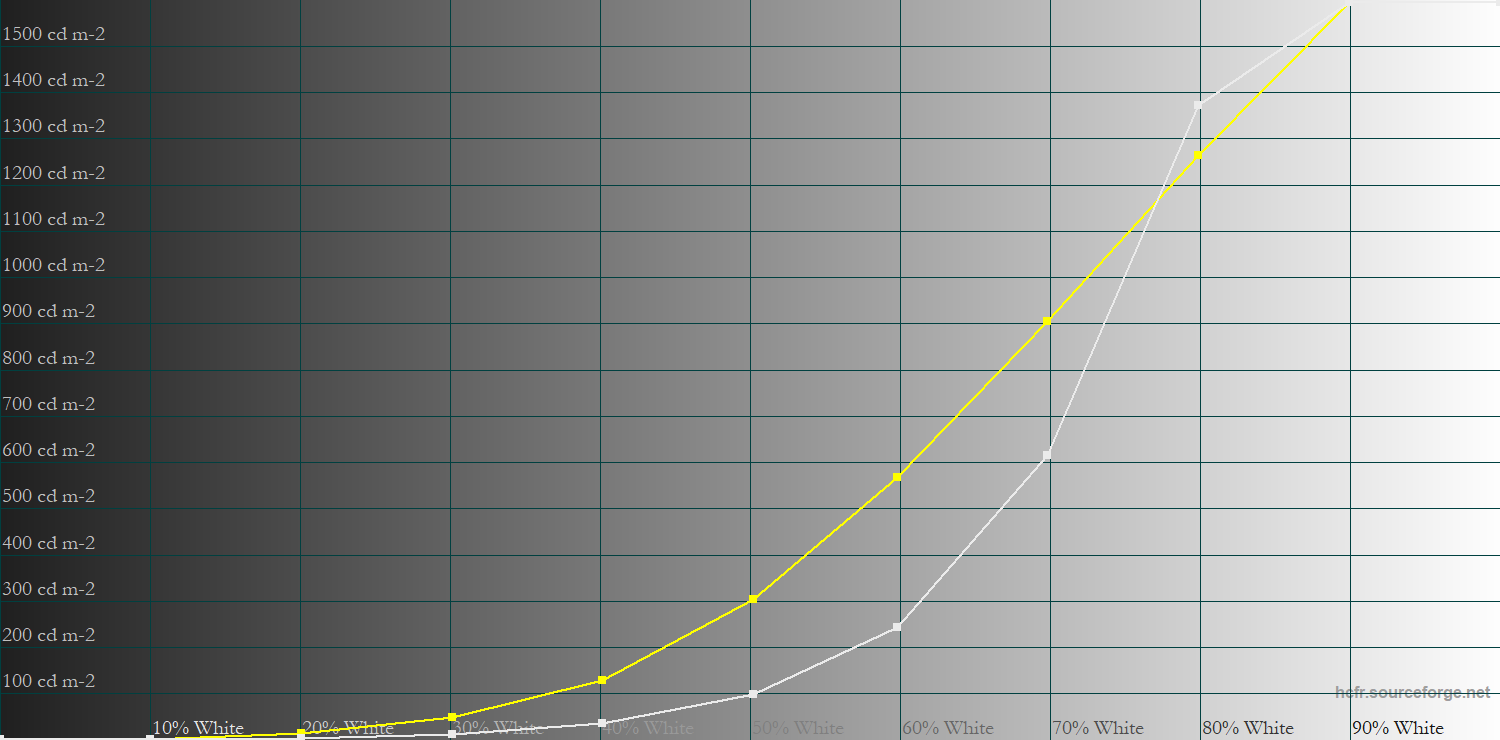
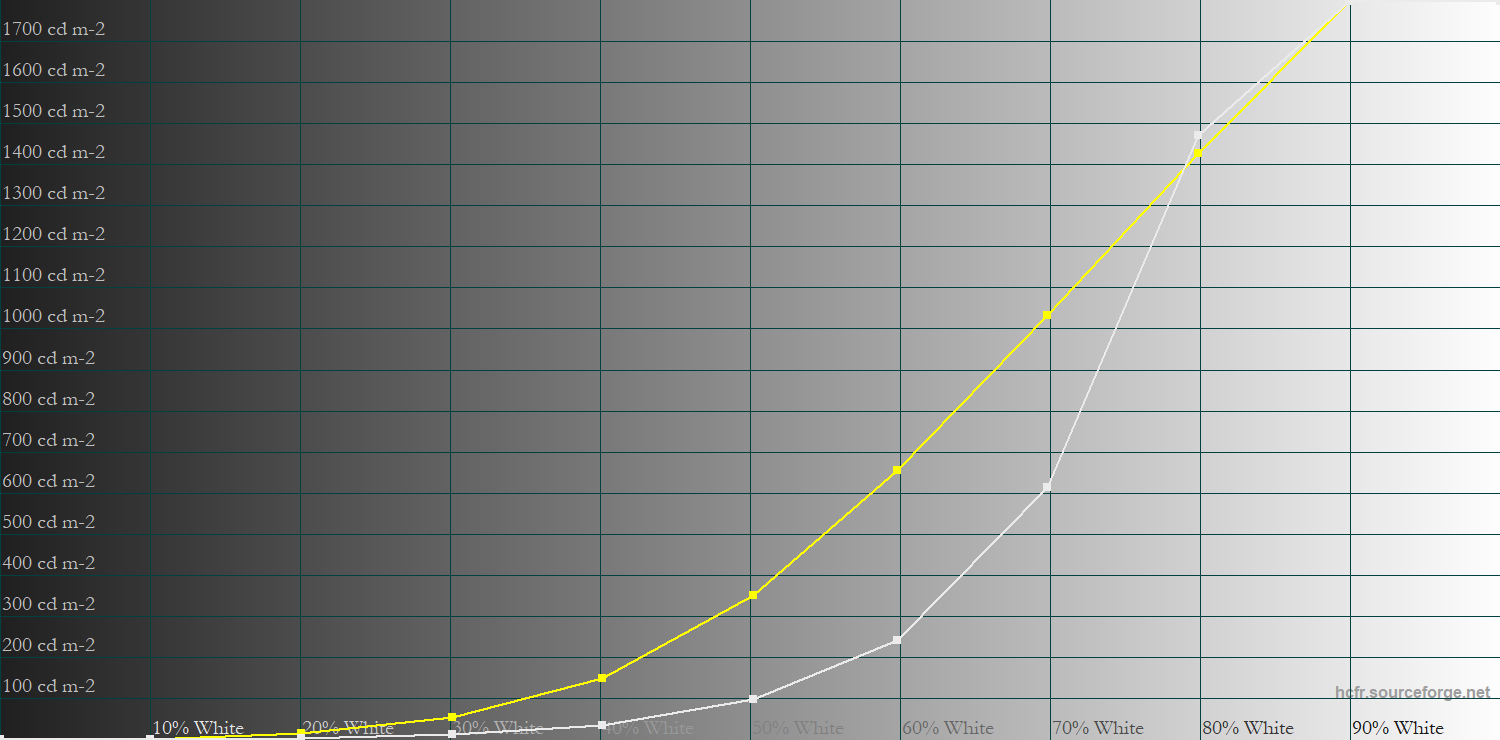
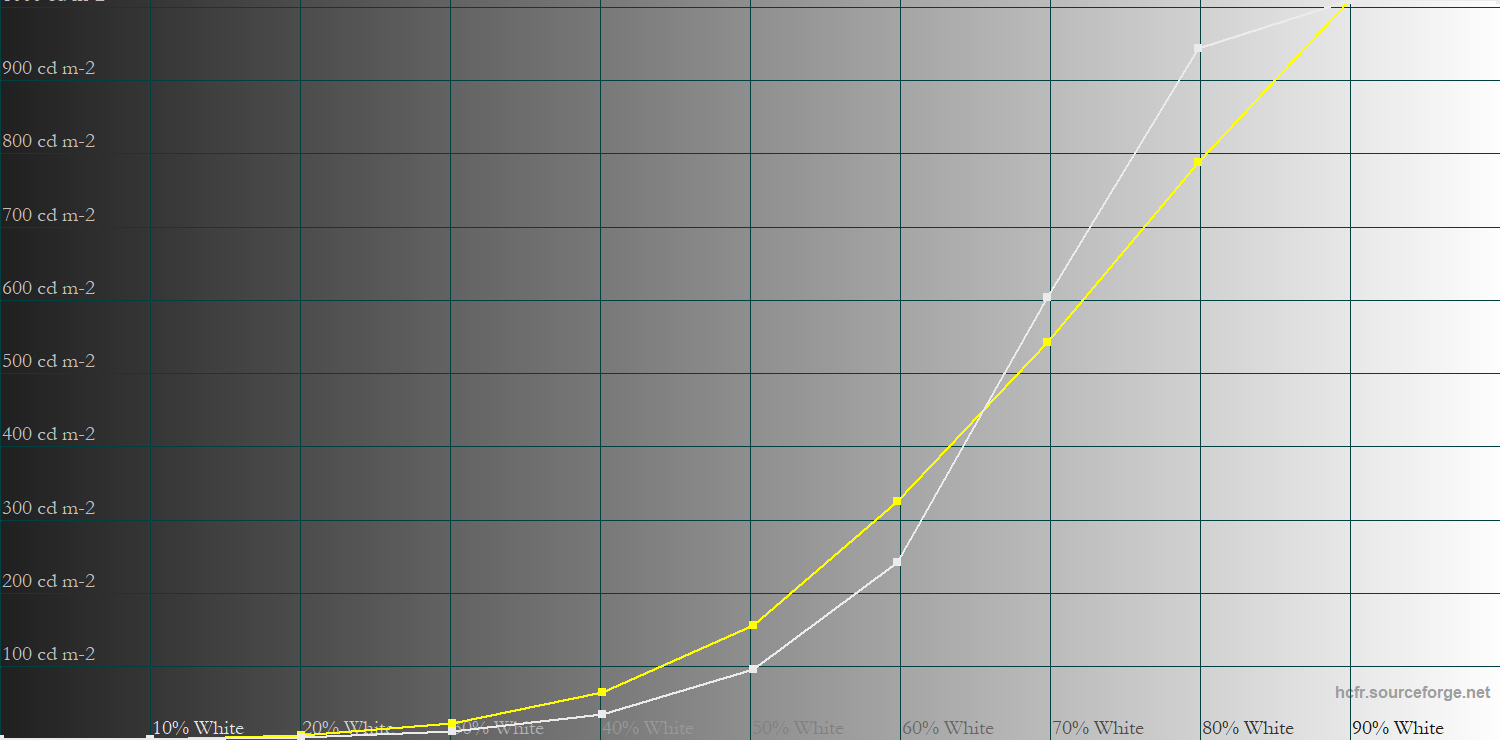
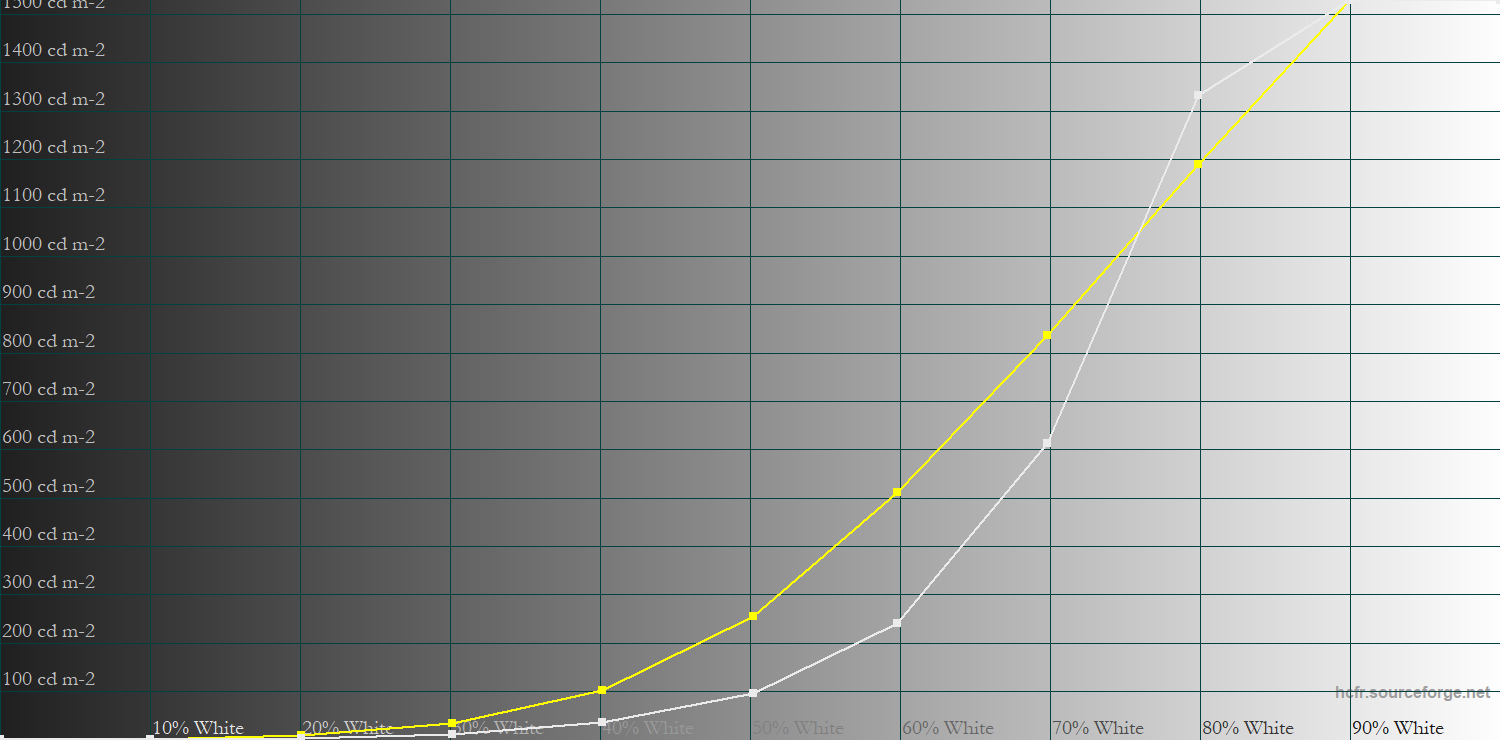
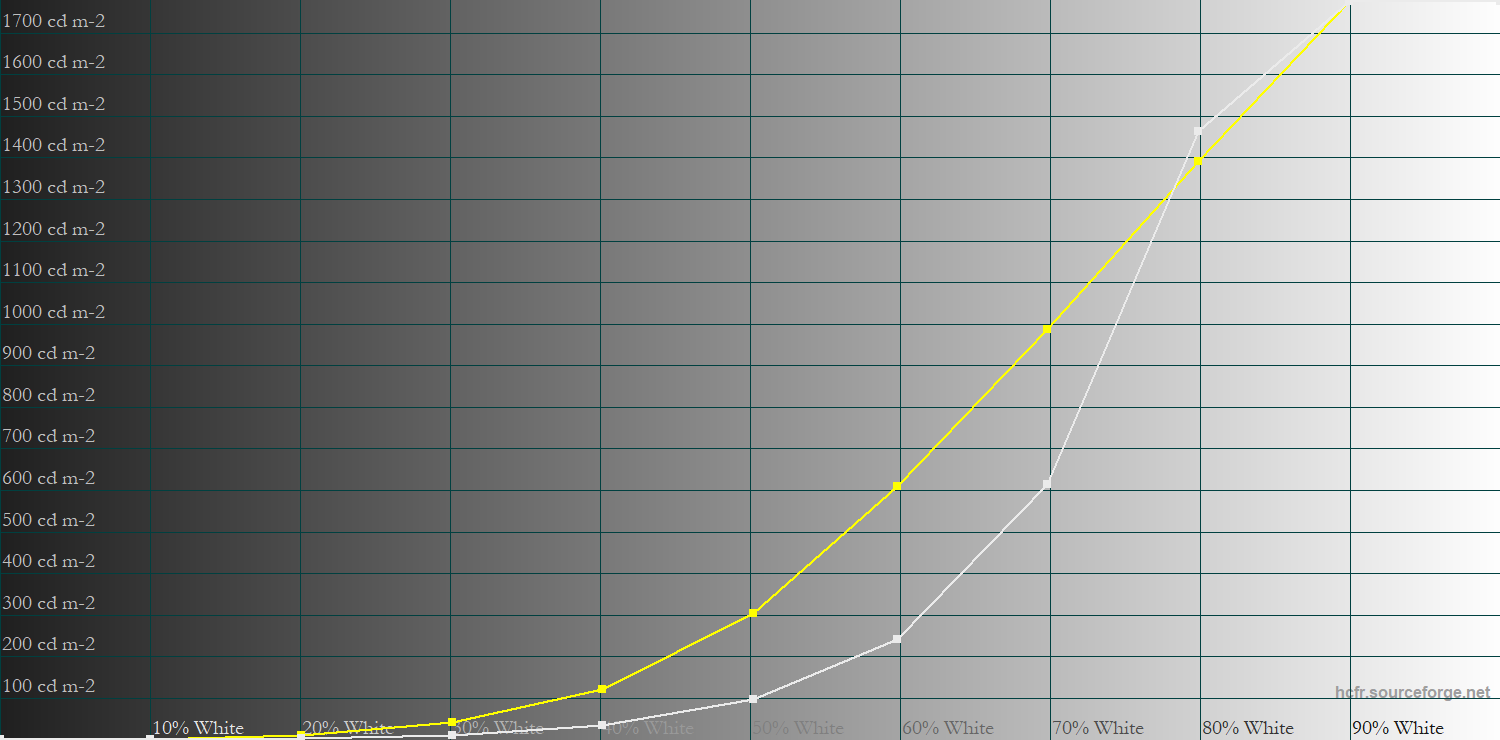
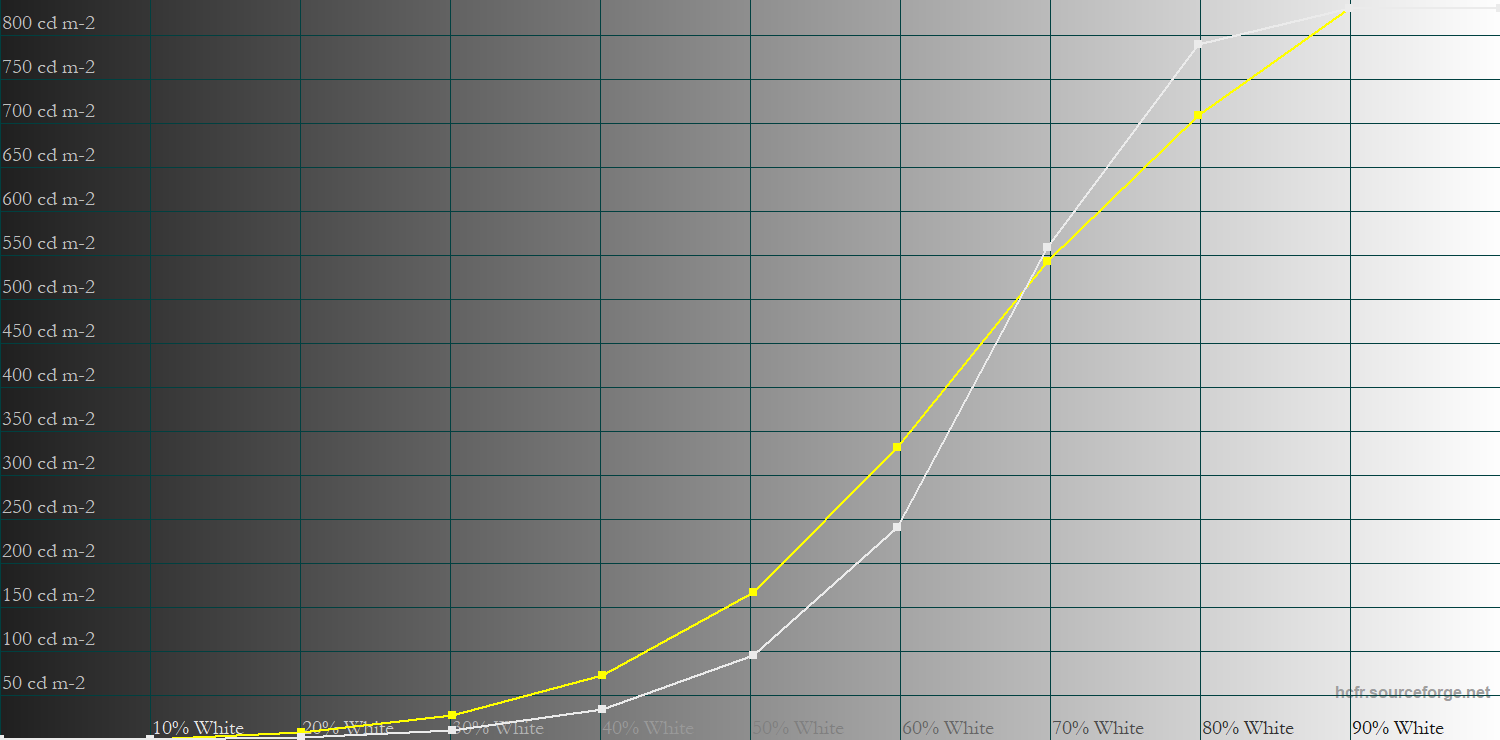
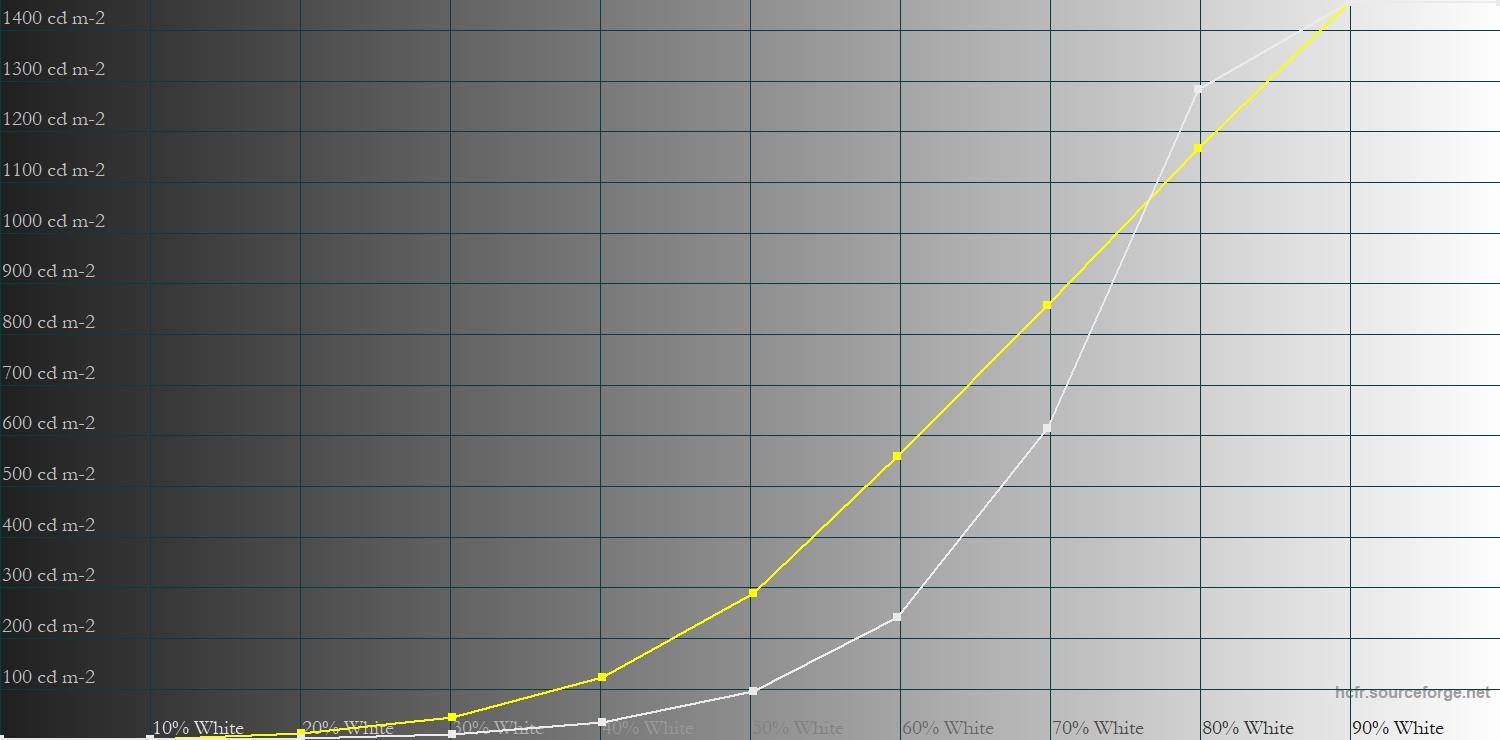
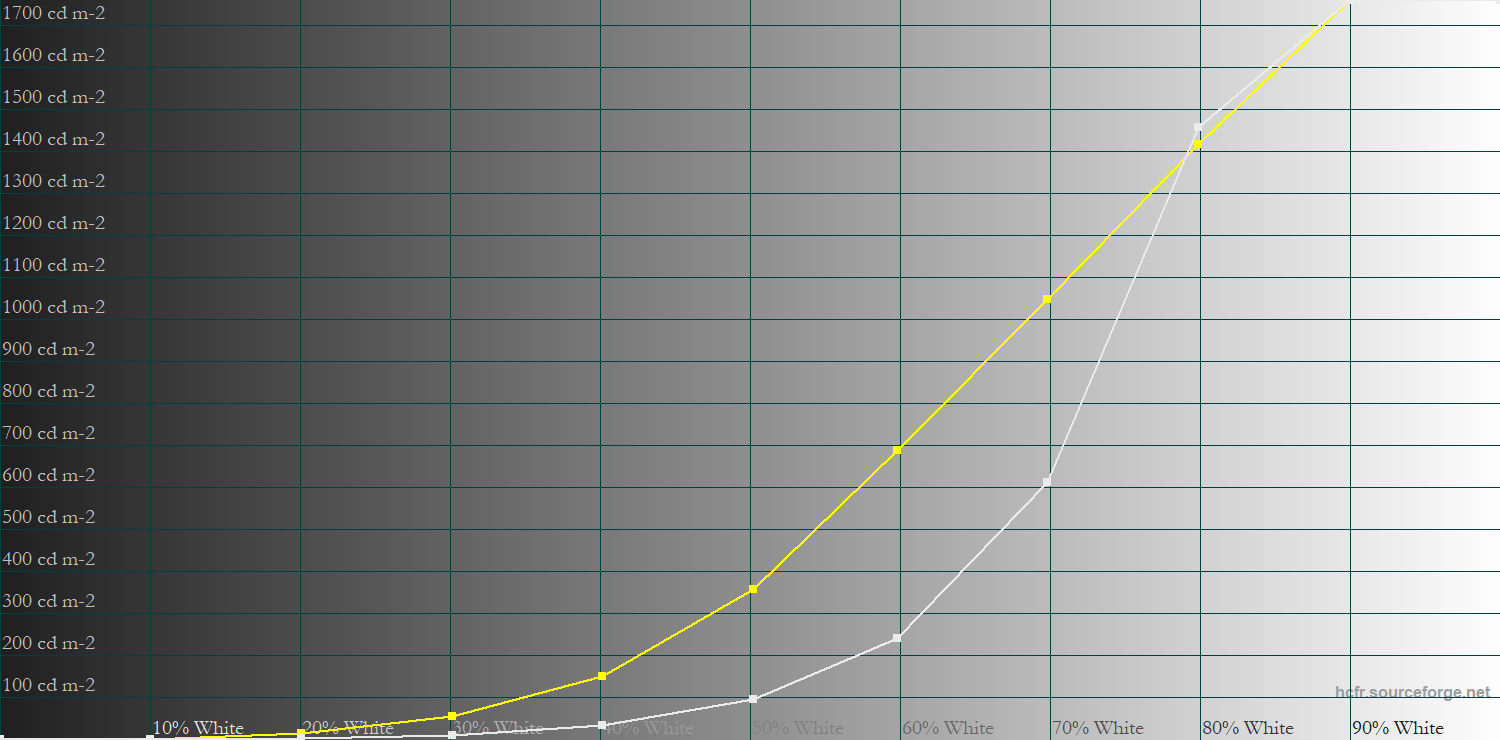
The HDR Game mode is less accurate, causing considerably brighter than intended midtones with 10% and 50% APLs.
HDR Cinema
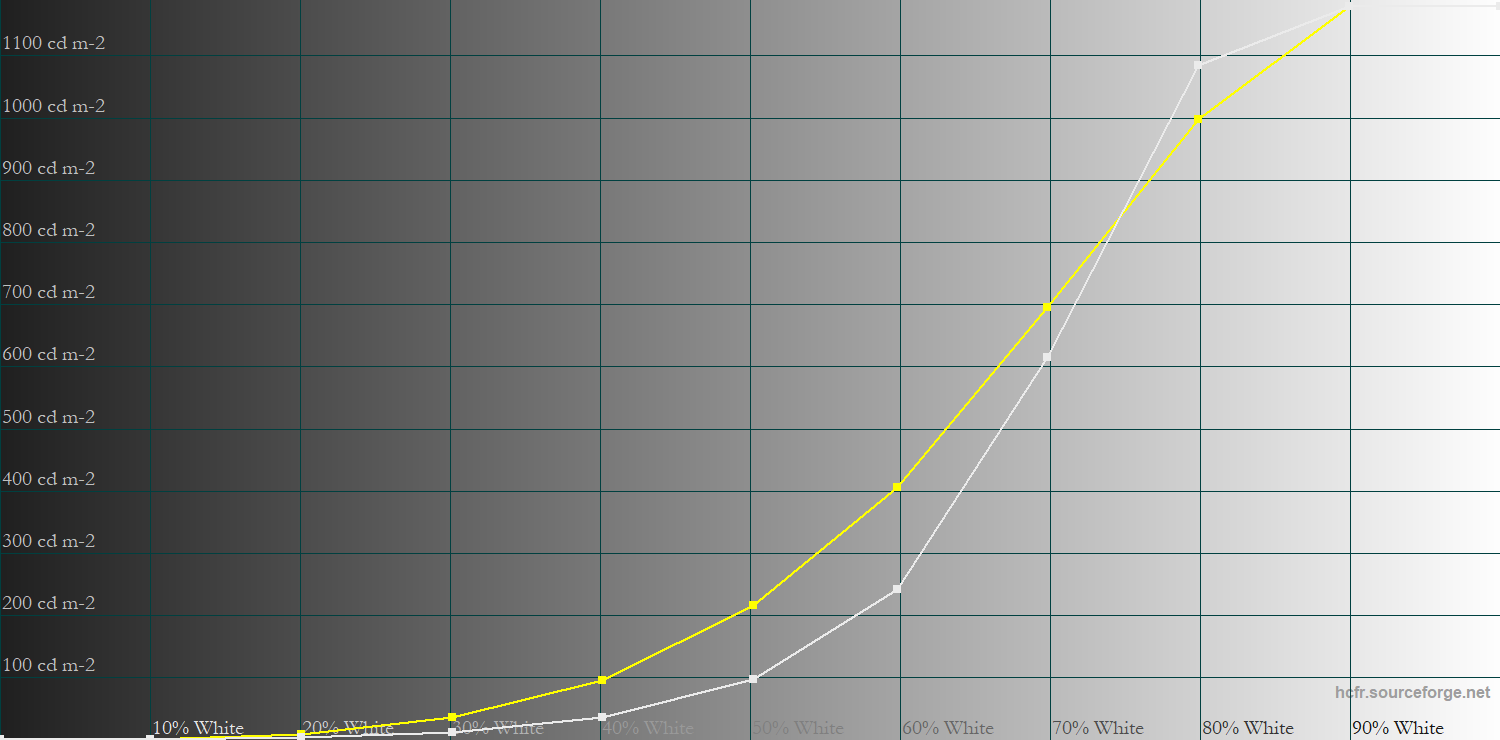
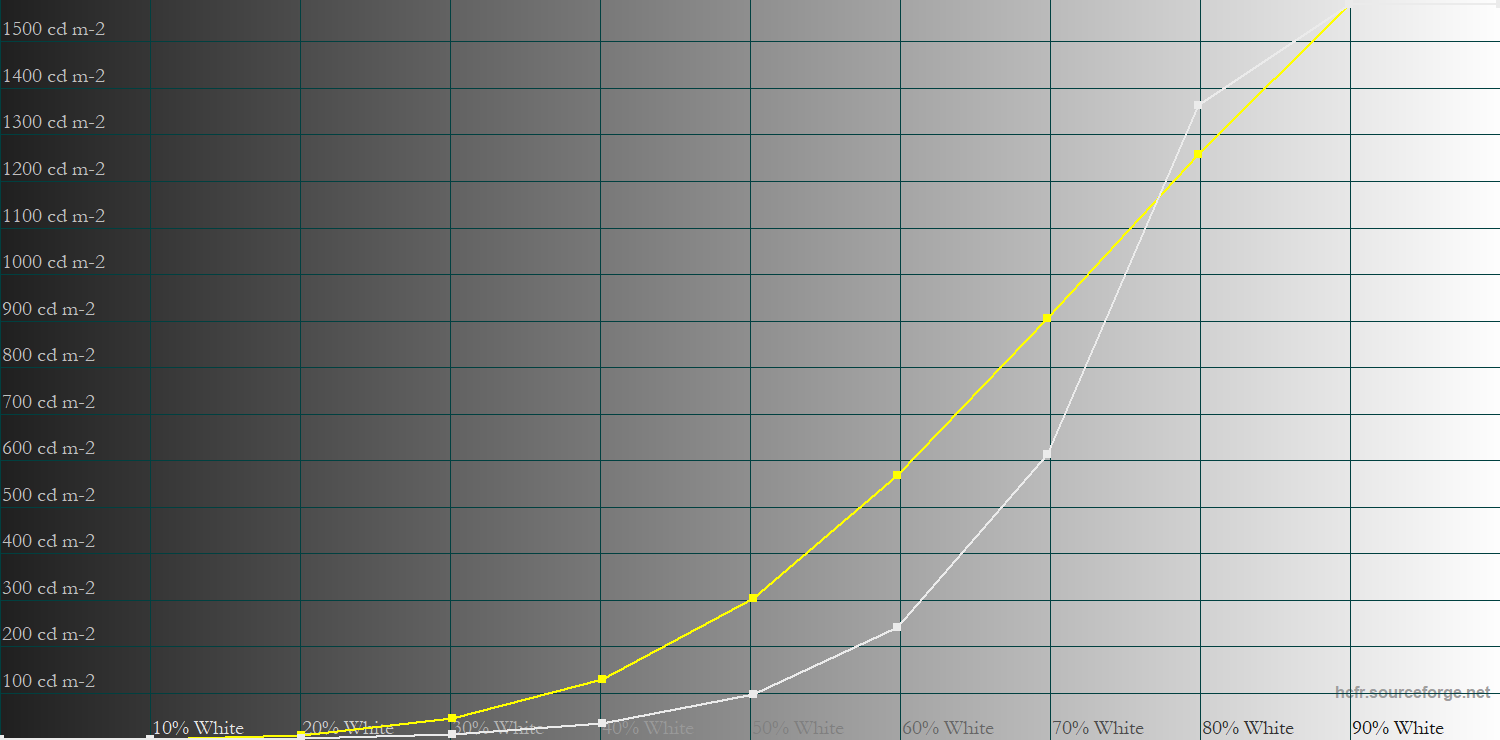
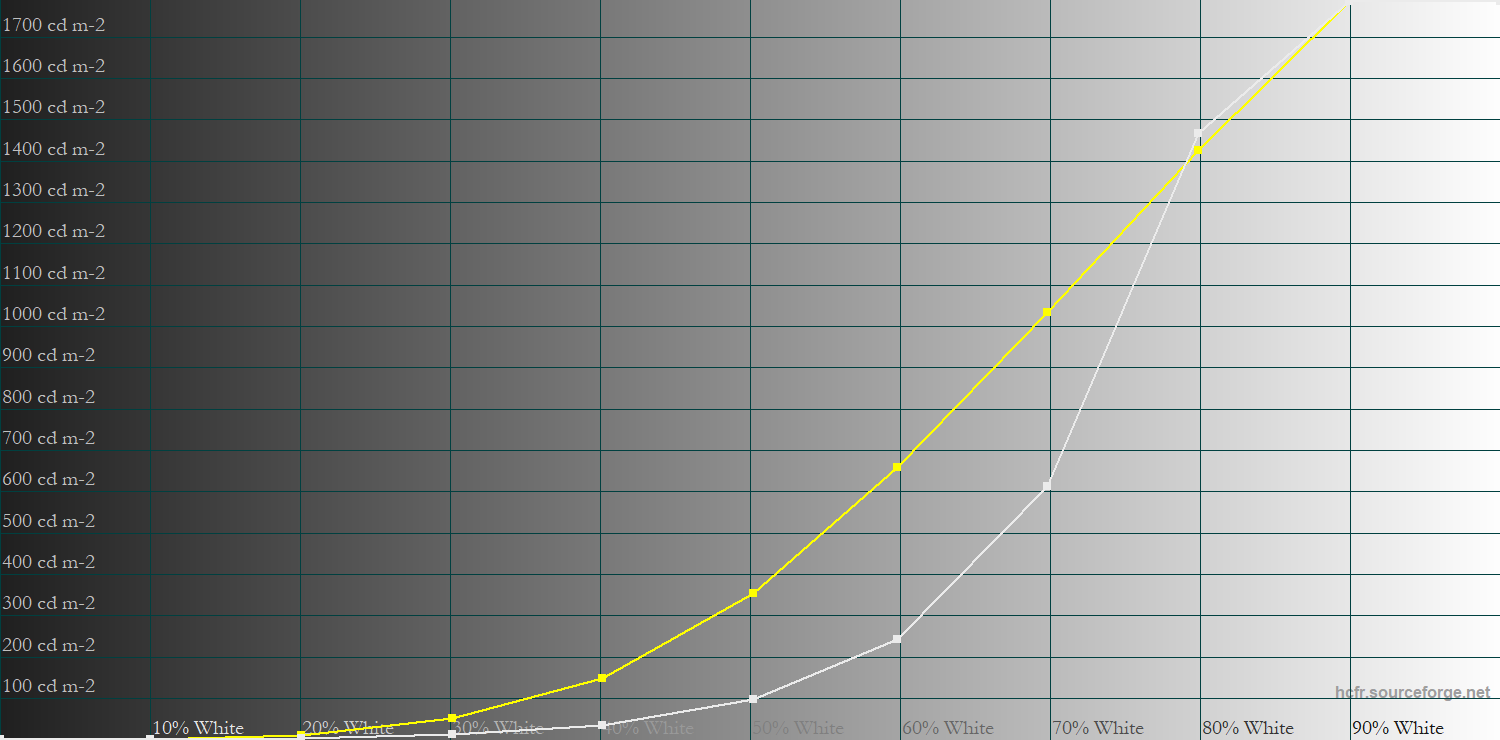
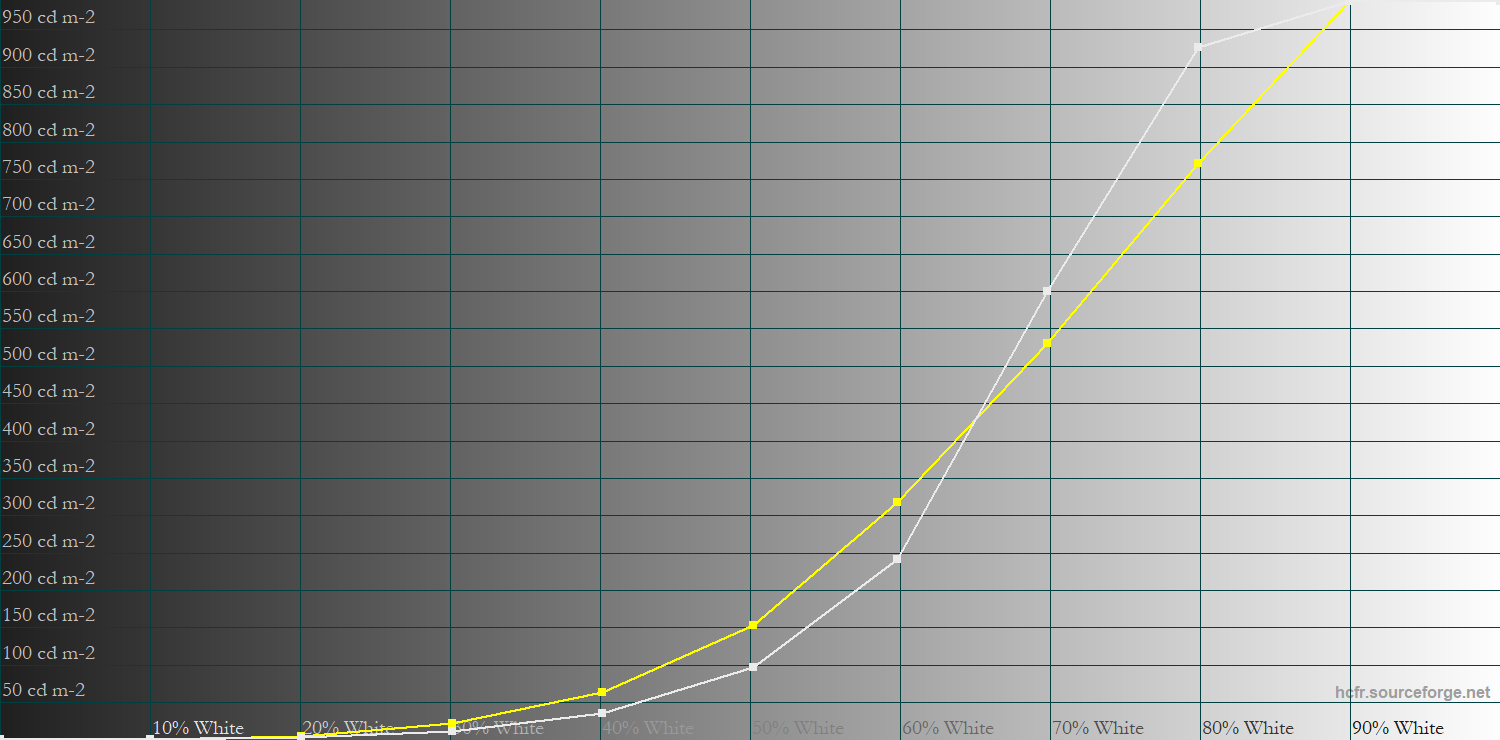
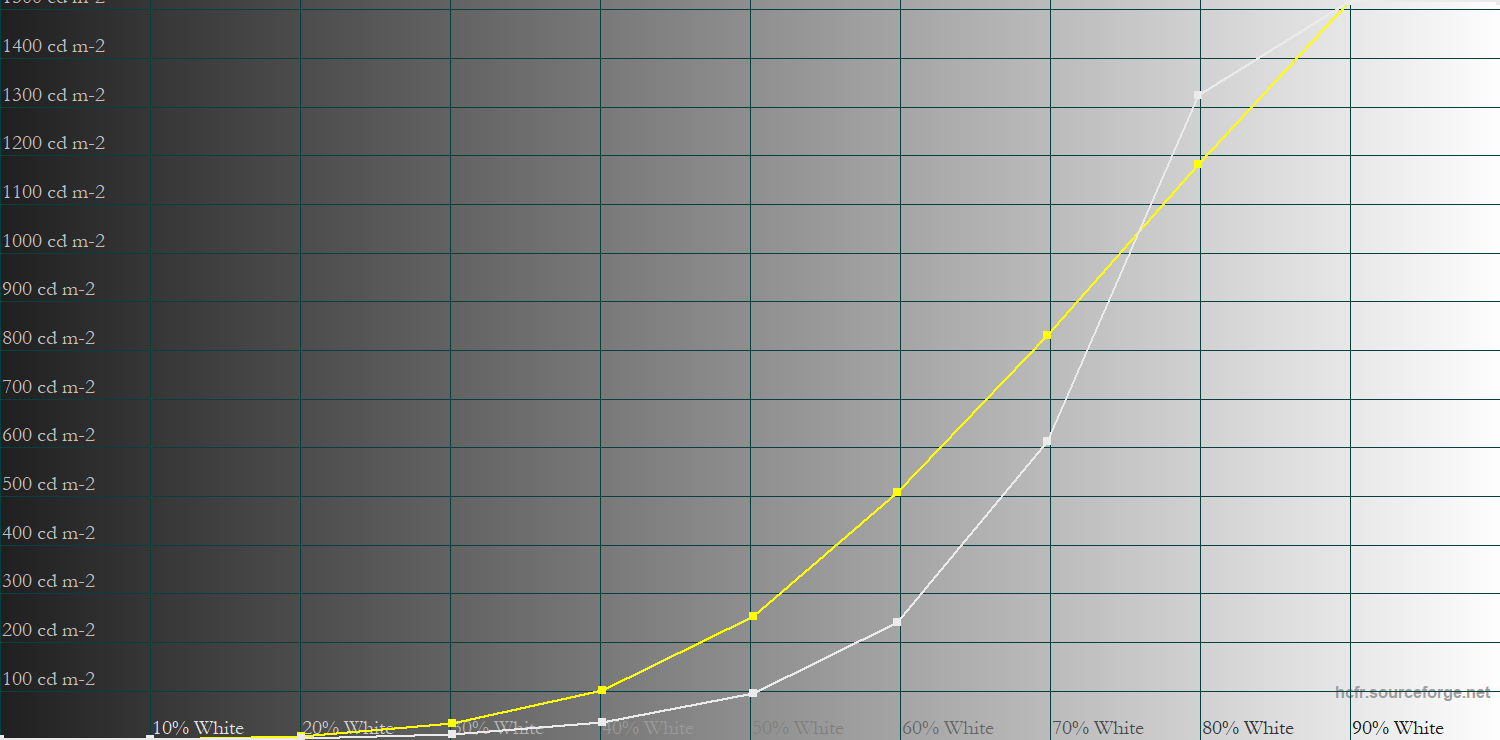
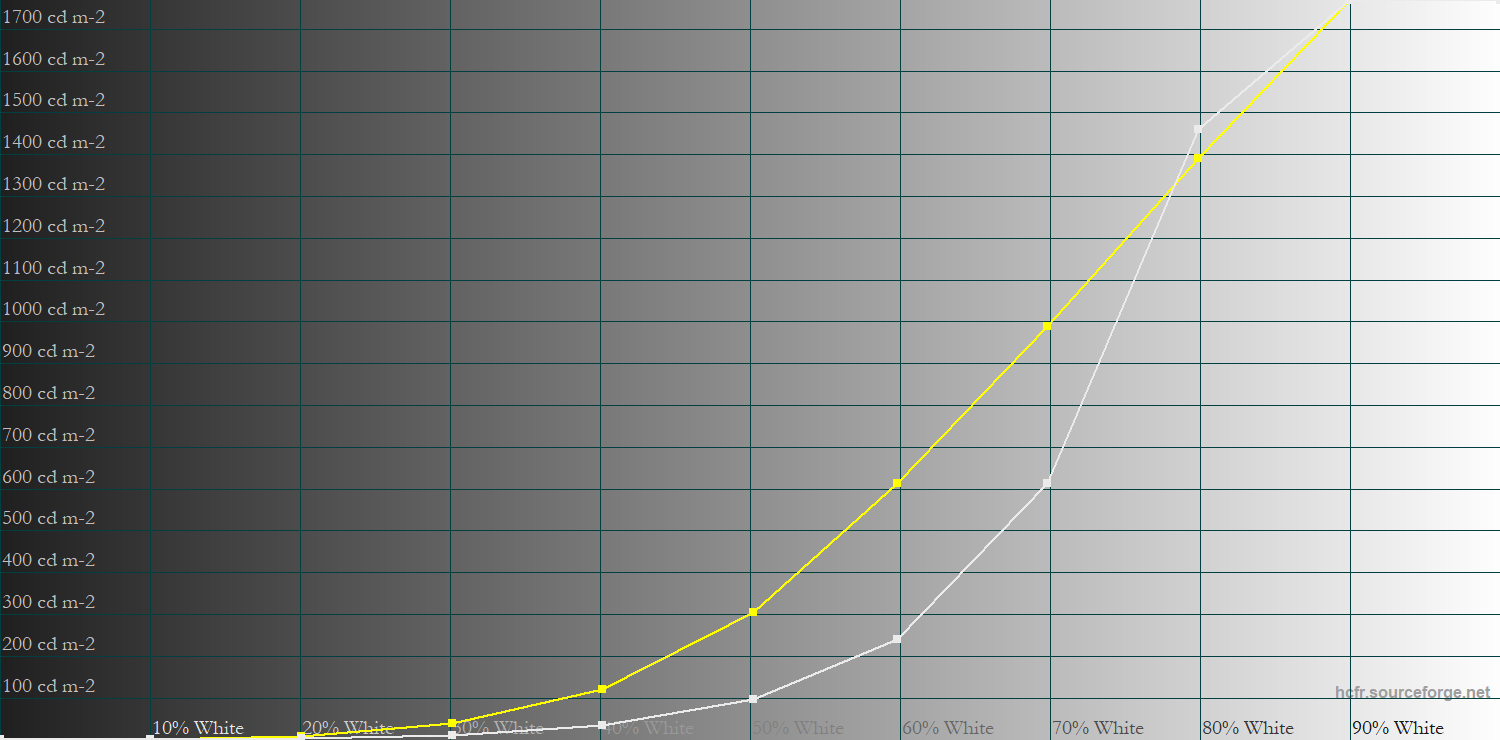
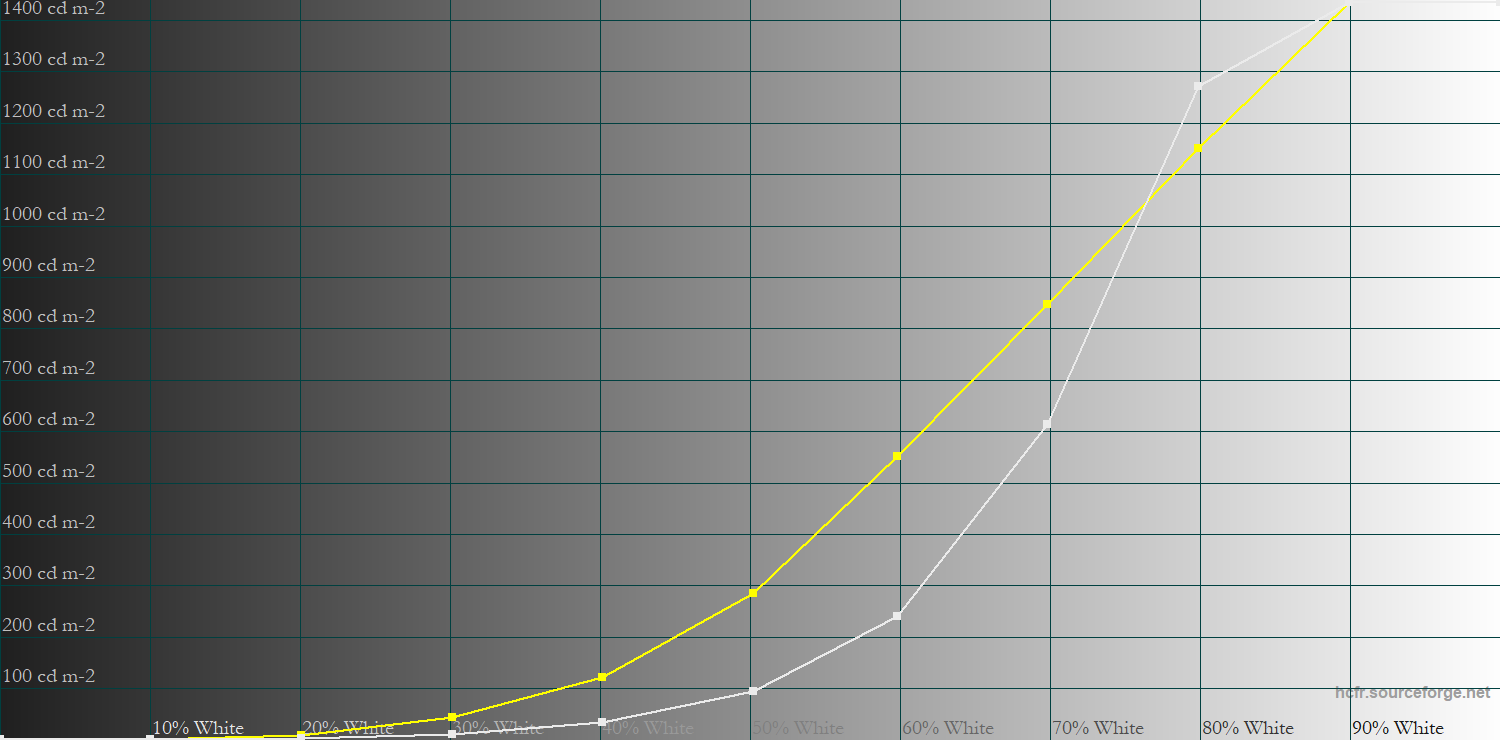
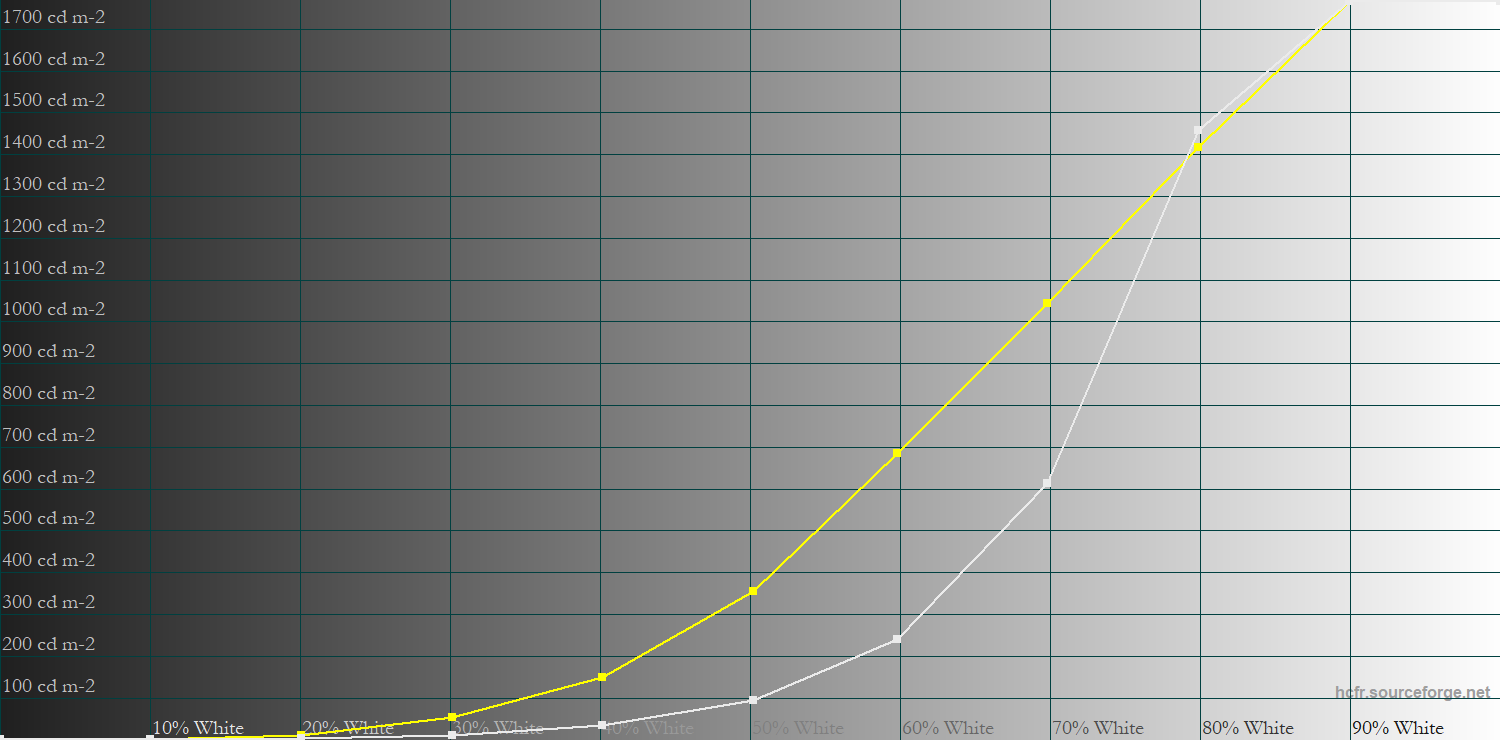
The HDR Cinema mode is the same as HDR Game when it comes to EOTF tracking.
HDR-600
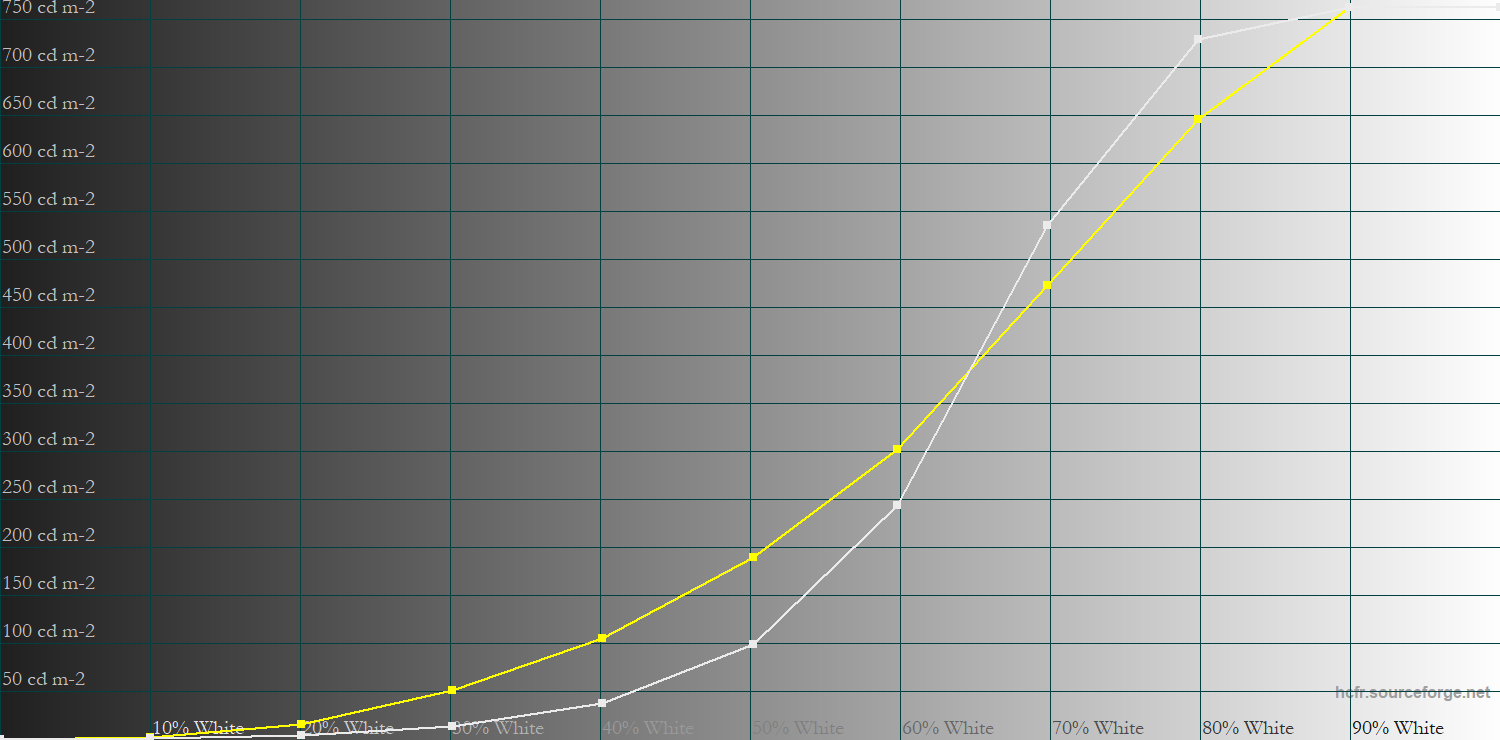
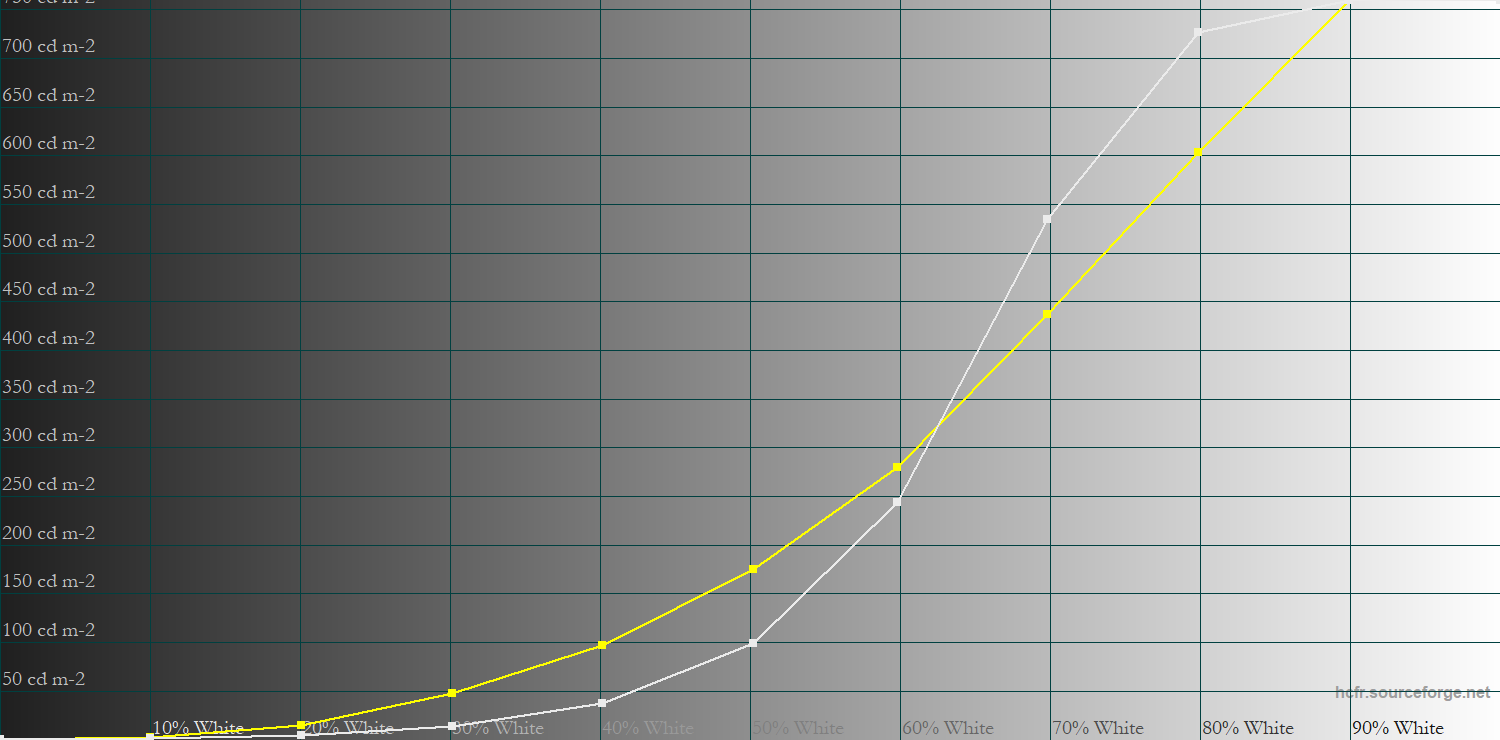
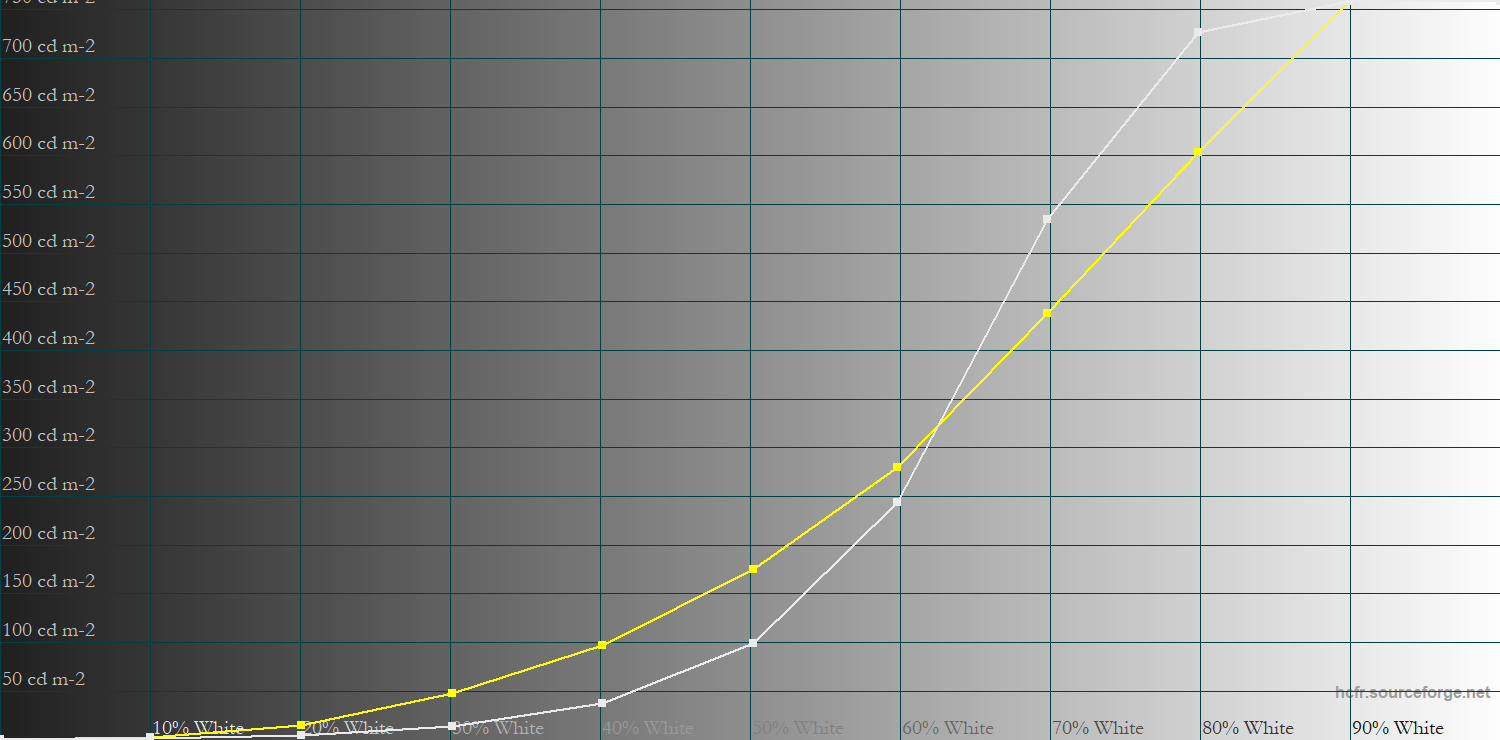
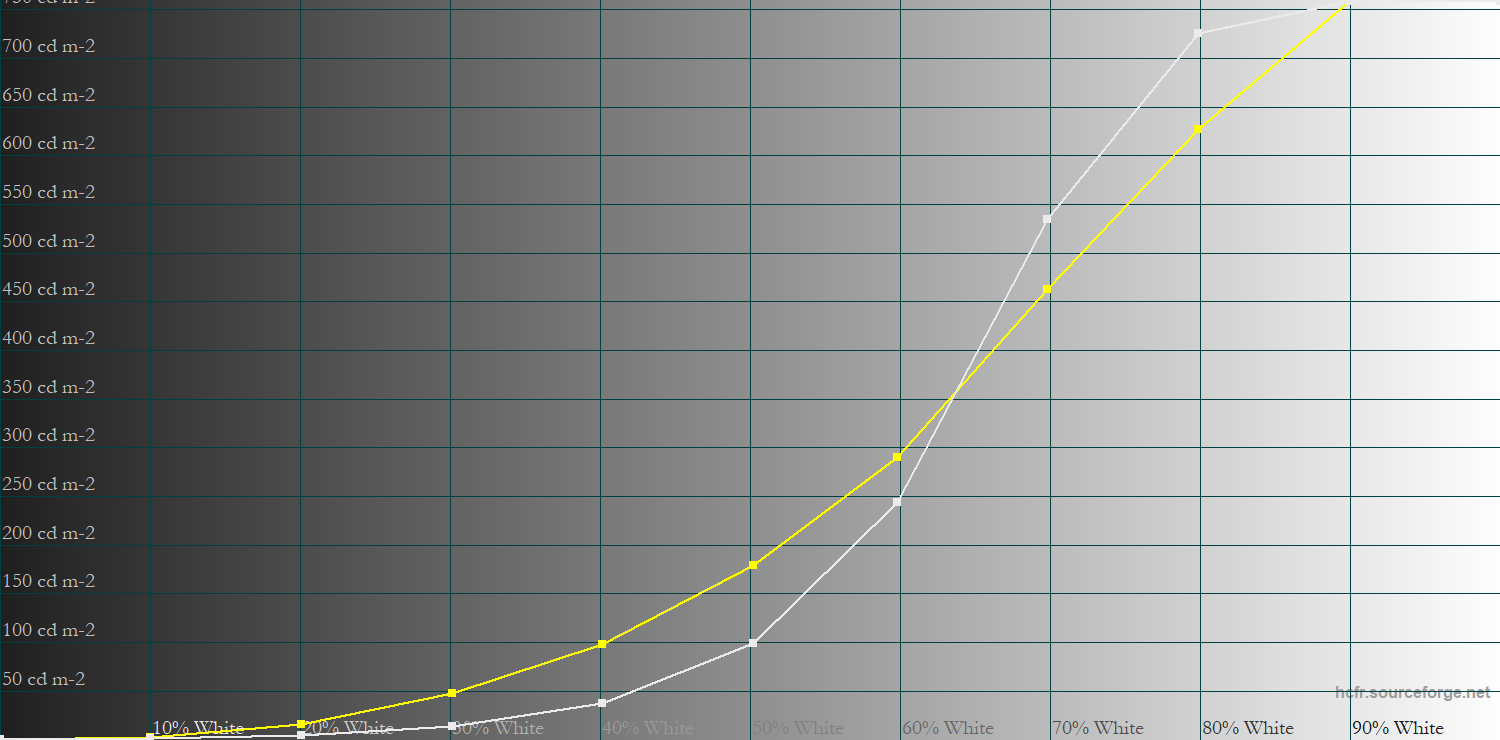
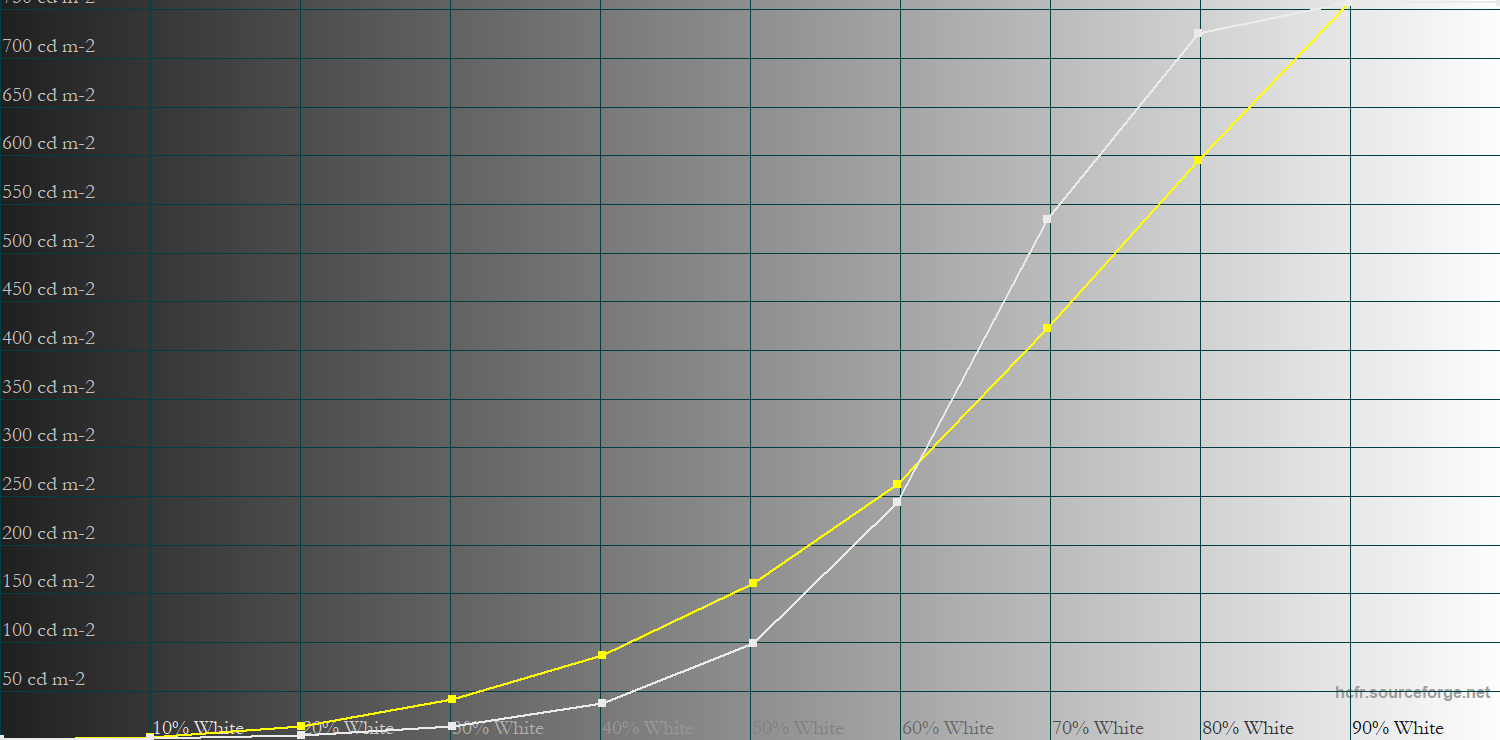
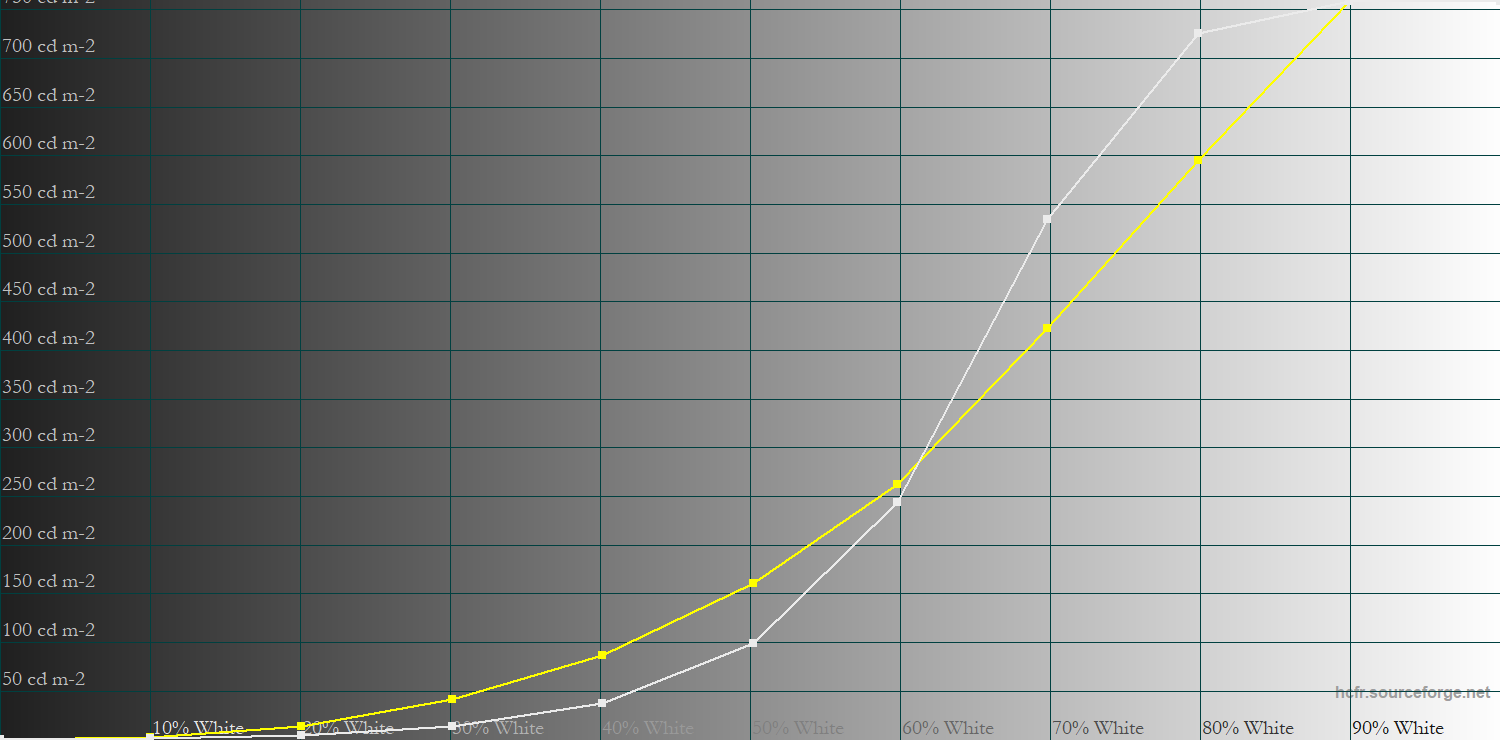
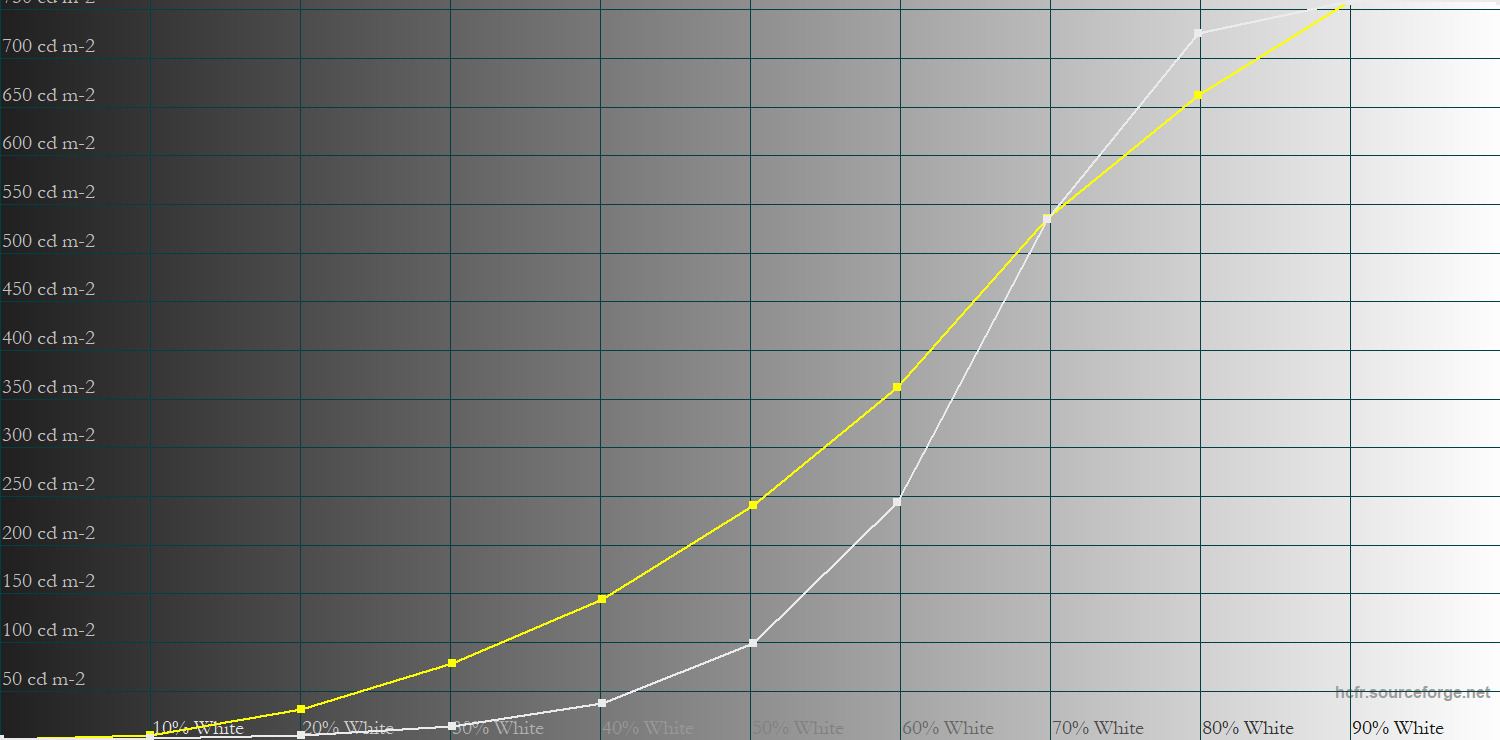
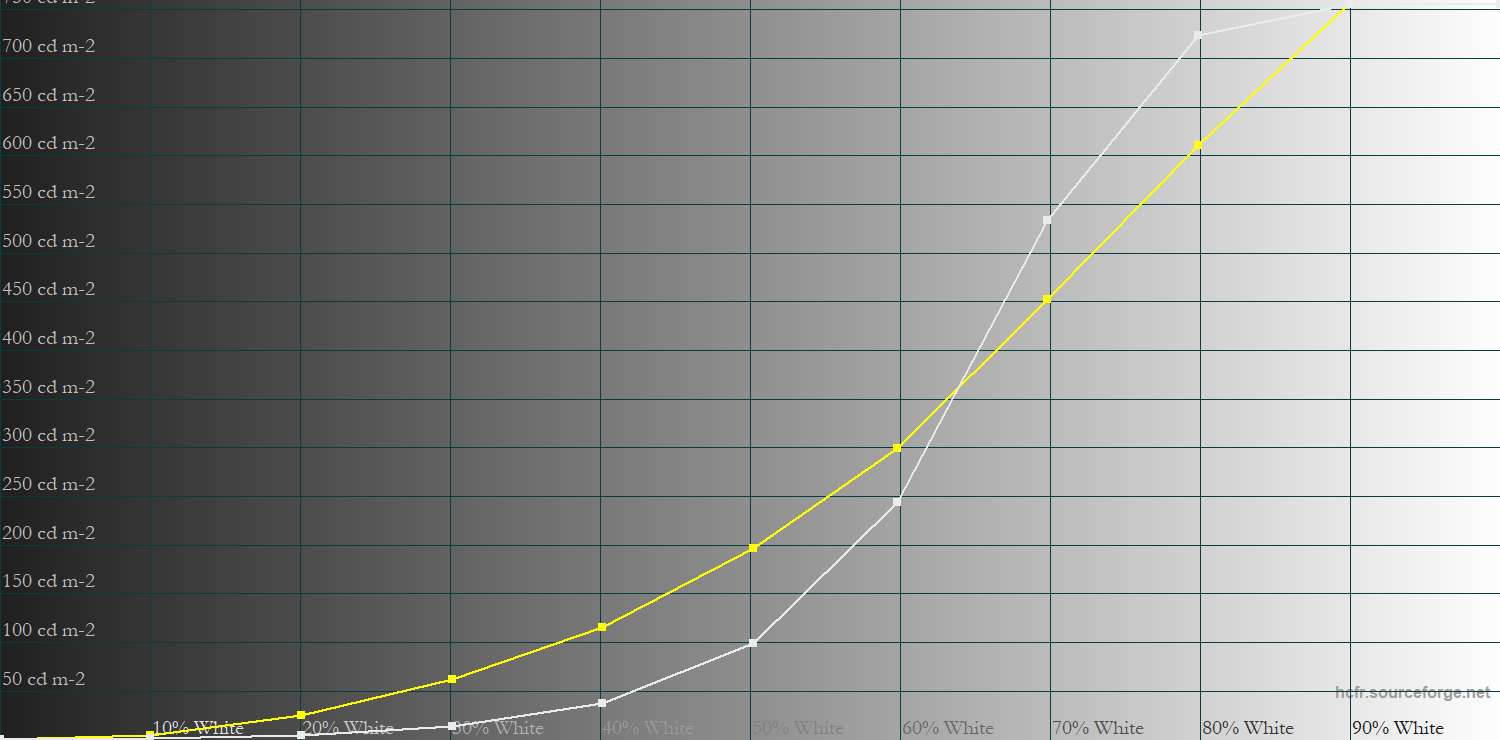
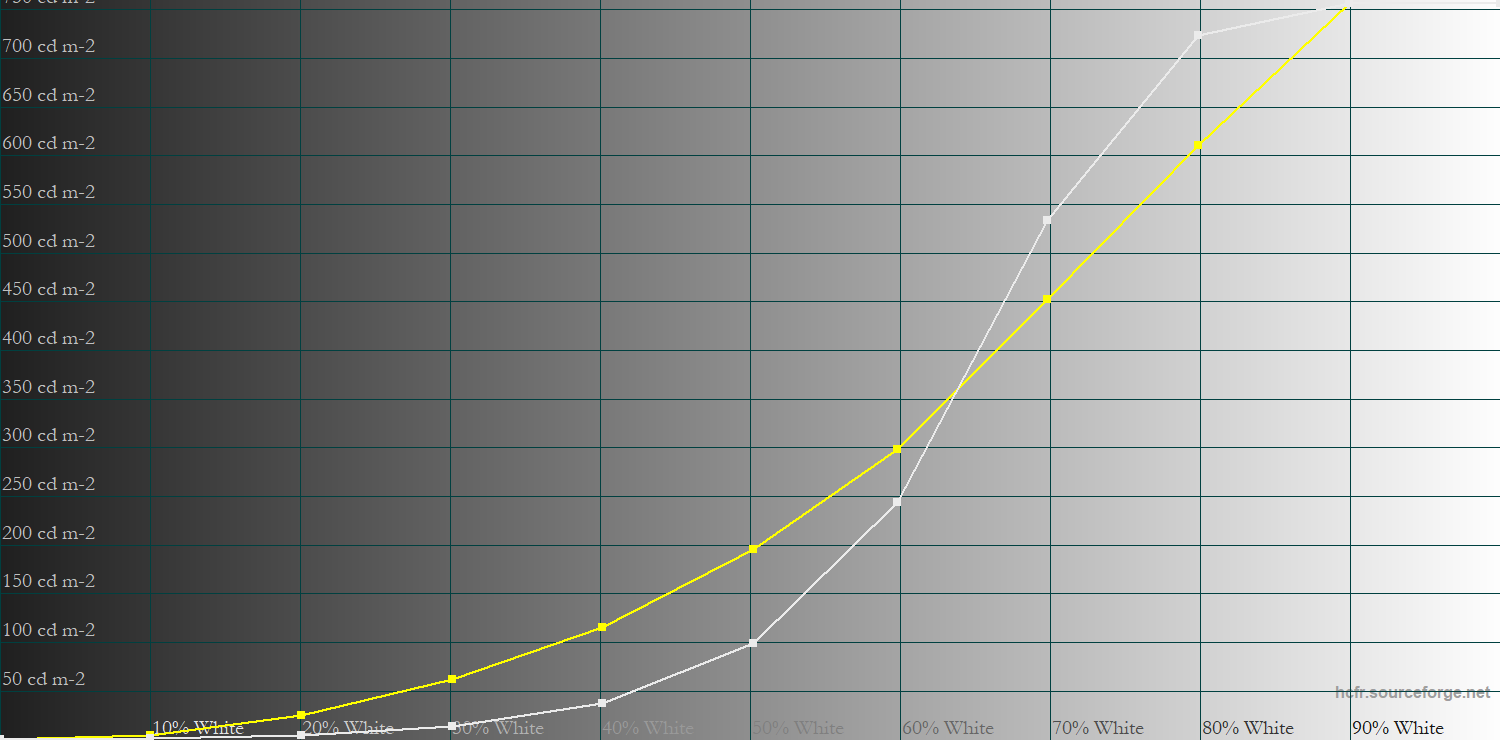
The HDR-600 mode caps the brightness at 763 nits and has the same EOTF tracking regardless of APL or local dimming mode.
Sustained Brightness Test
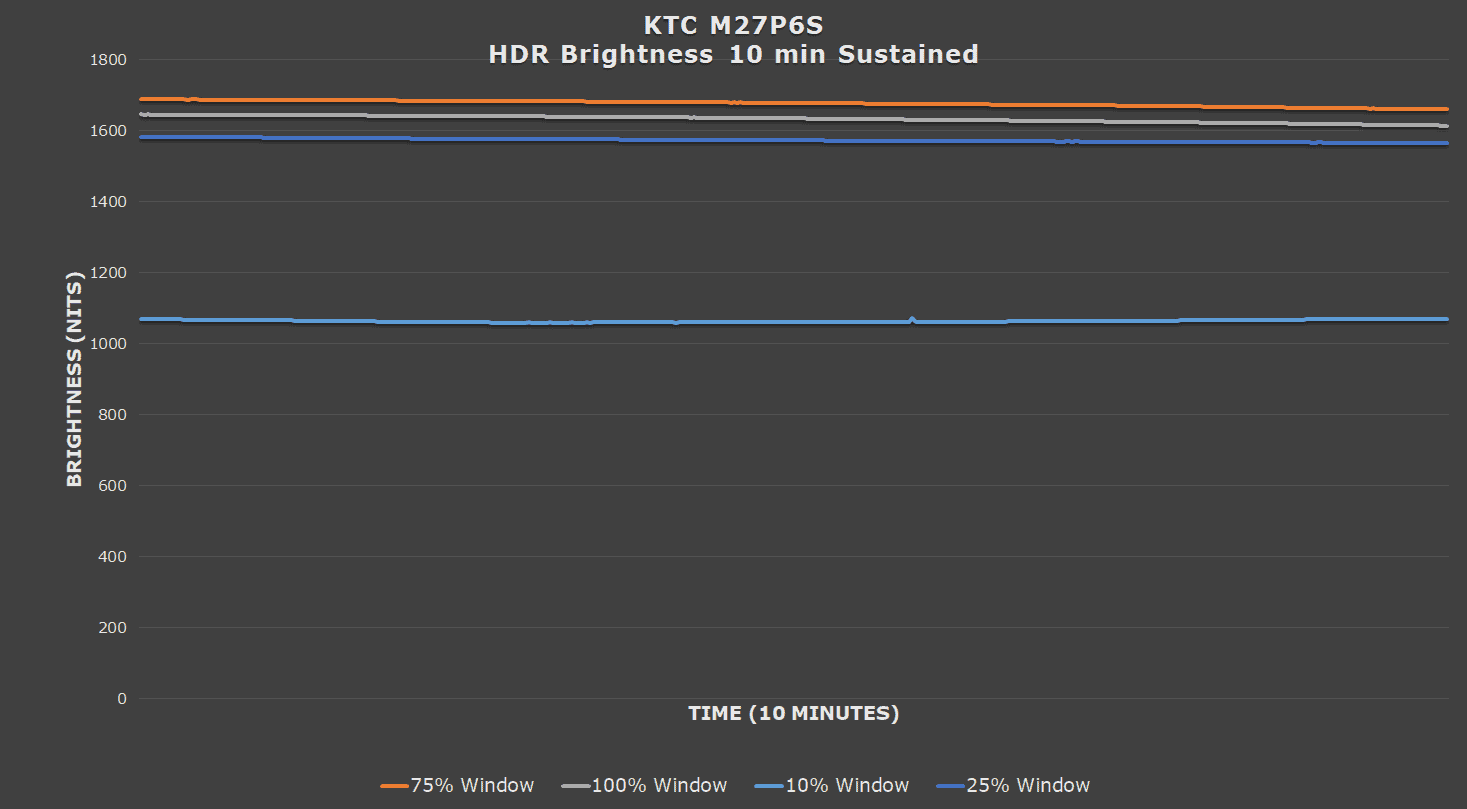
Usually, KTC’s mini LED monitors start reducing brightness immediately after detecting a static image, for up to 5 minutes, to help manage power consumption and thermals, but the brightness returns to normal as soon as the image starts moving.
On the KTC M27P6S, brightness doesn’t decrease even after a 10-minute stress test with a static white window.
HDR Saturation & Color Temperature
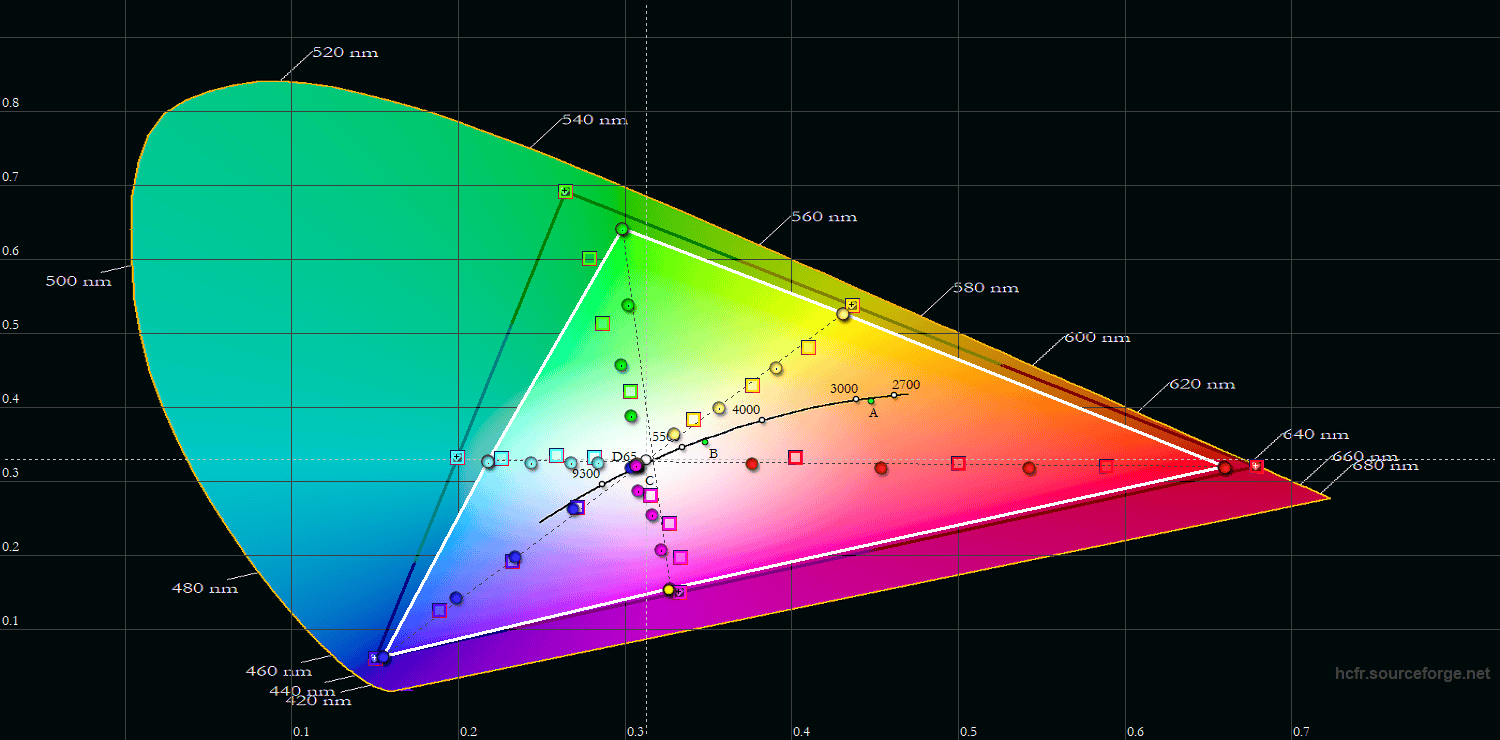
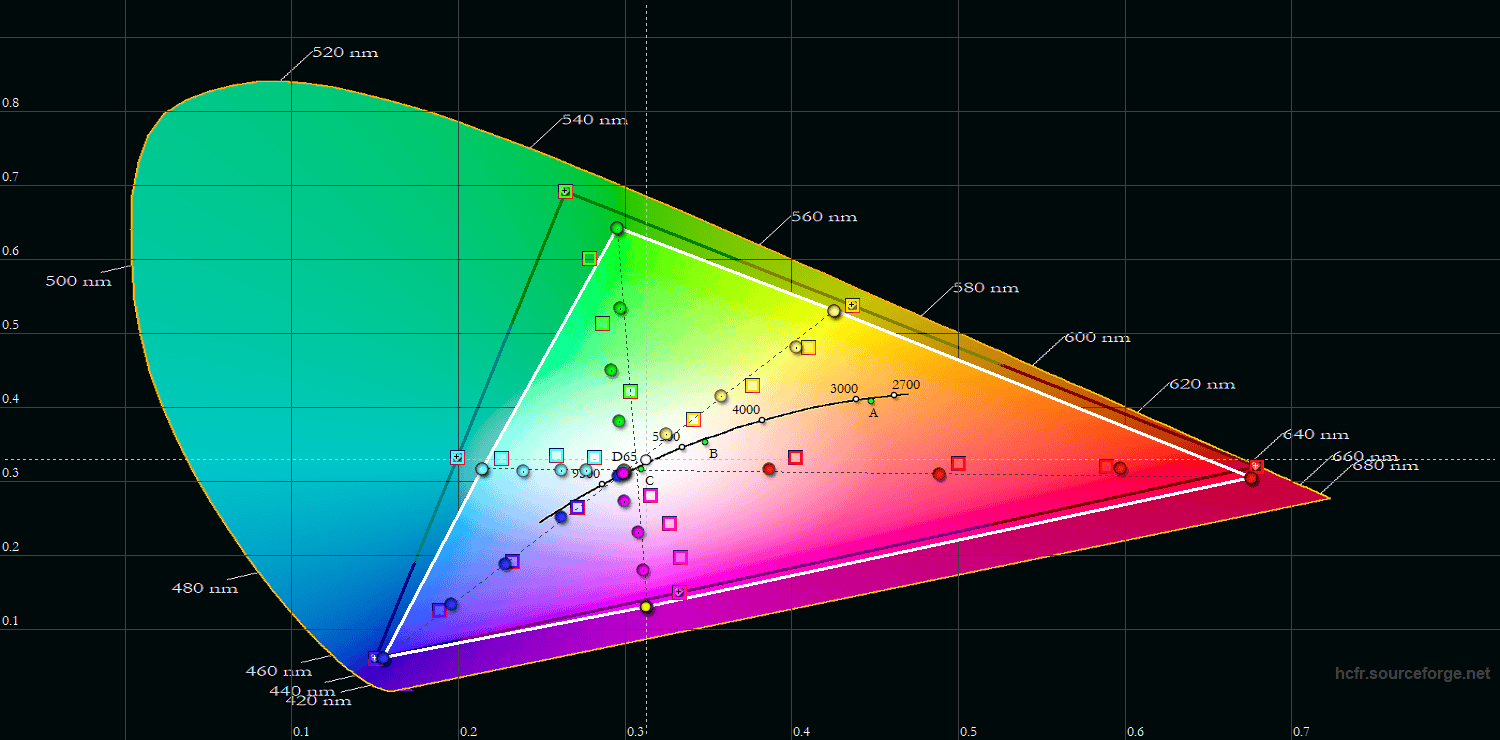
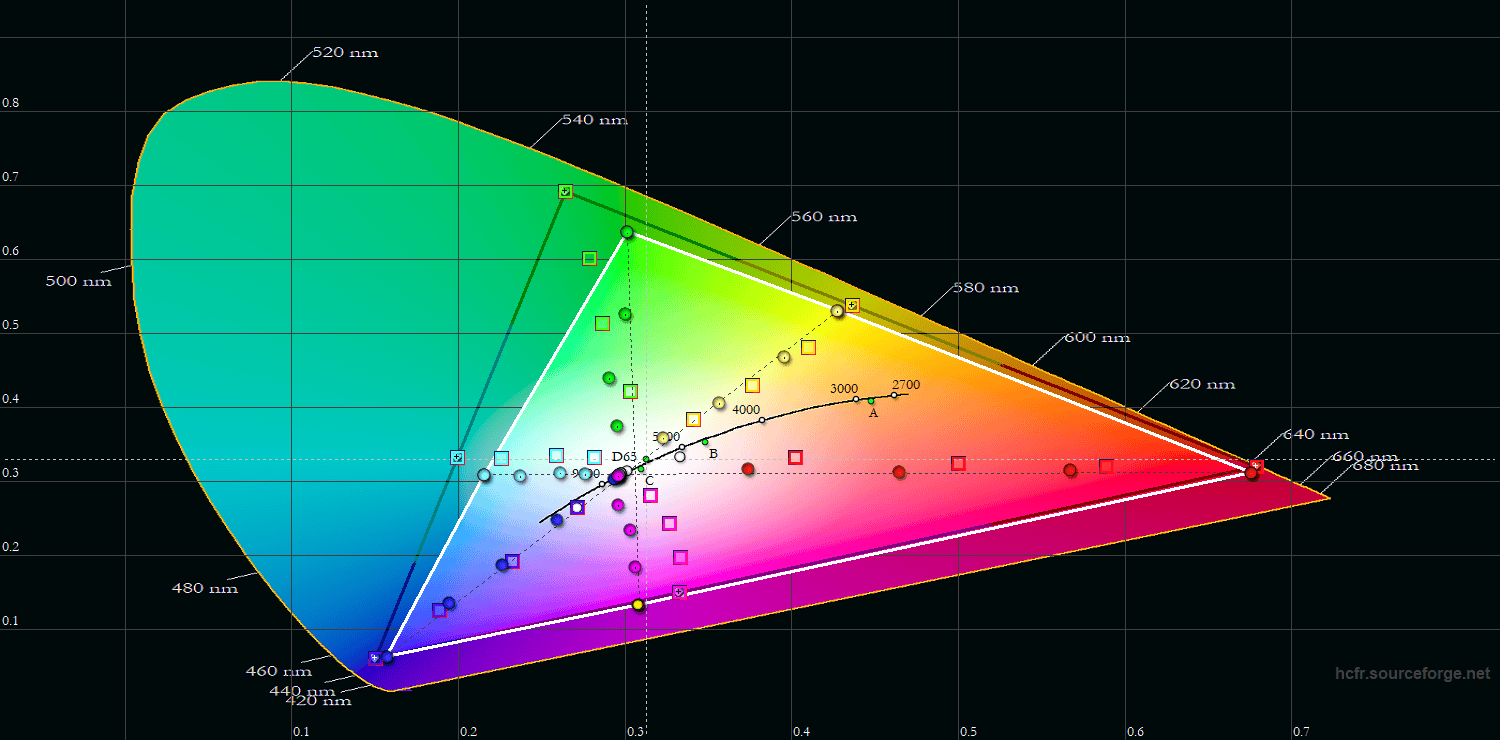
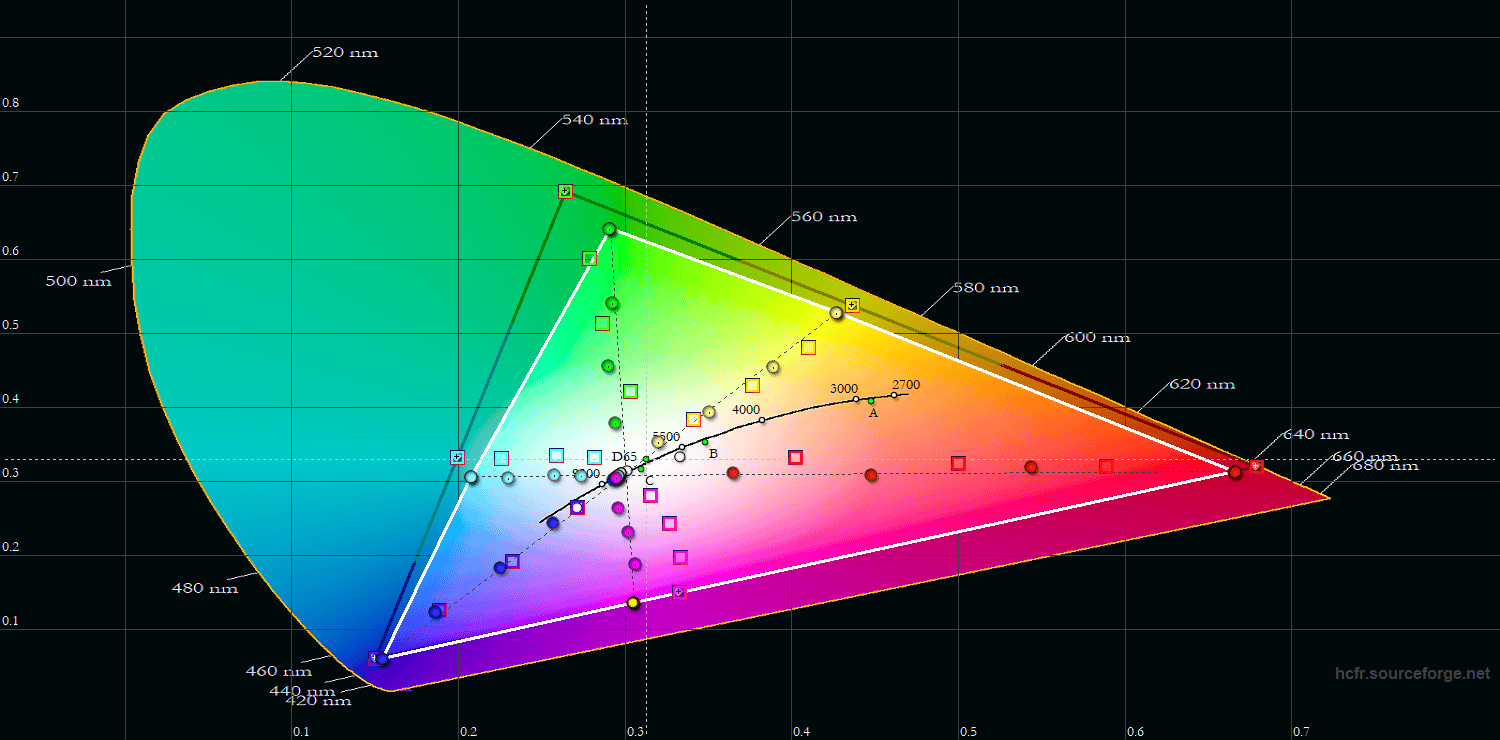
When it comes to HDR color accuracy, all four modes fall short of full DCI-P3 coverage, particularly in the green range. Most colors are also either undersaturated or noticeably skewed.
The HCFR software reports that the DisplayHDR mode is the most accurate, with an average Delta E of 6.39 and a maximum Delta E of 8.23, including primary and secondary colors as well as saturation sweep tests. The other modes have notably higher Delta E values of over 20.
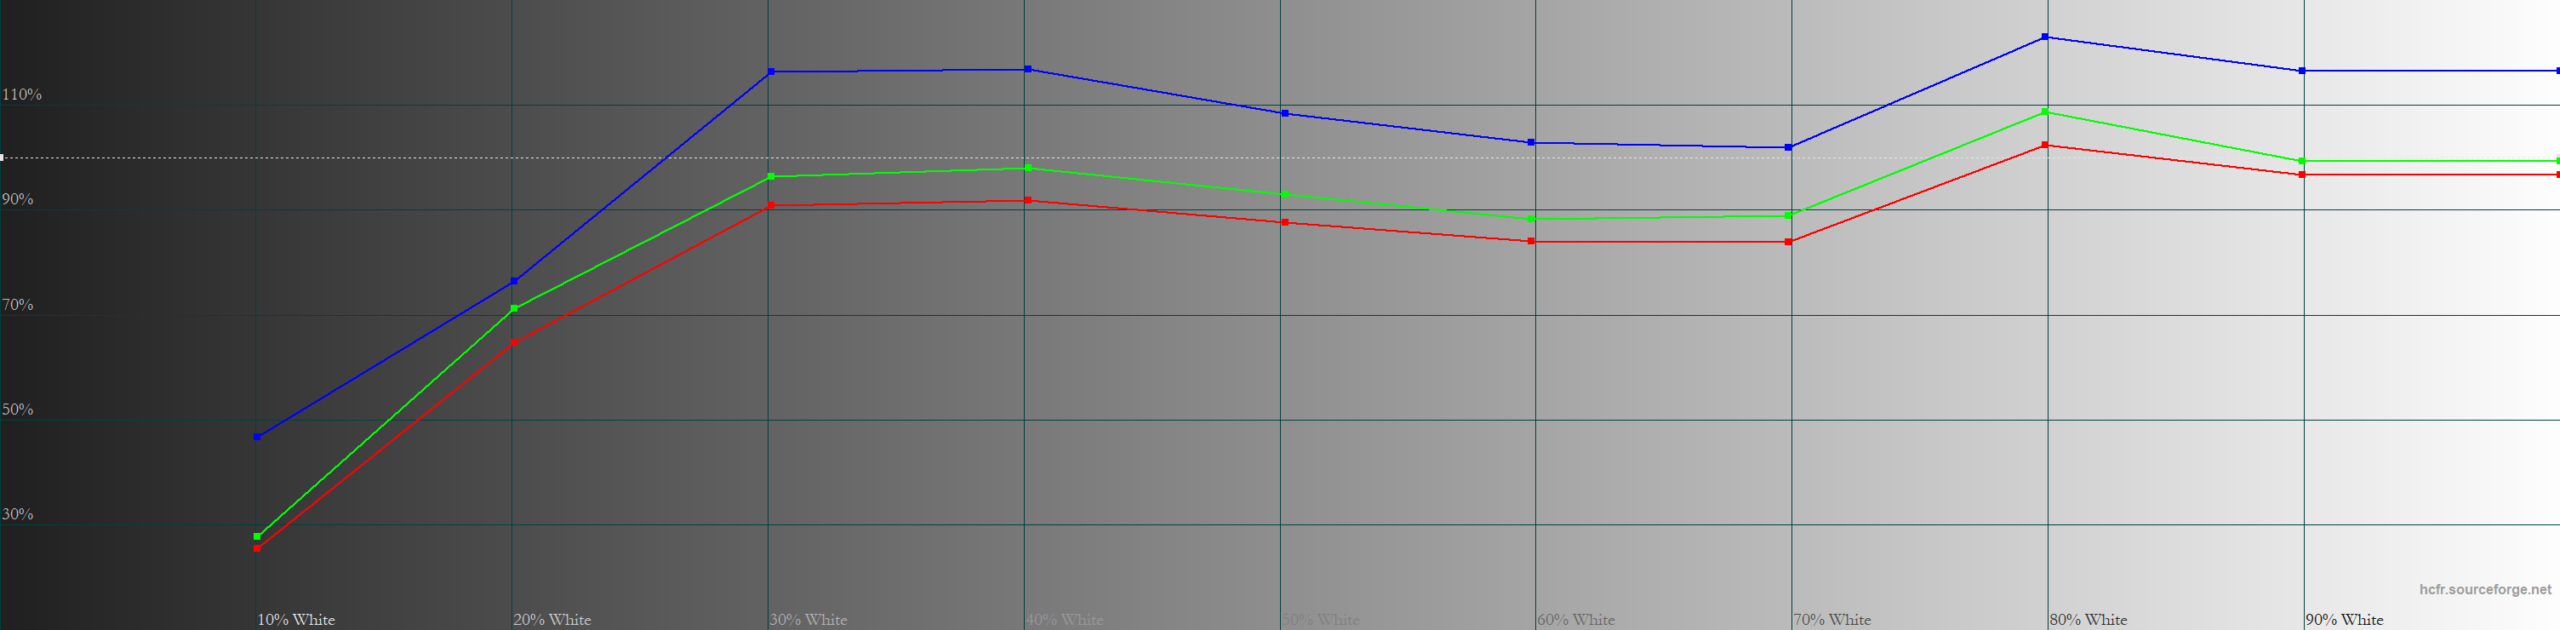
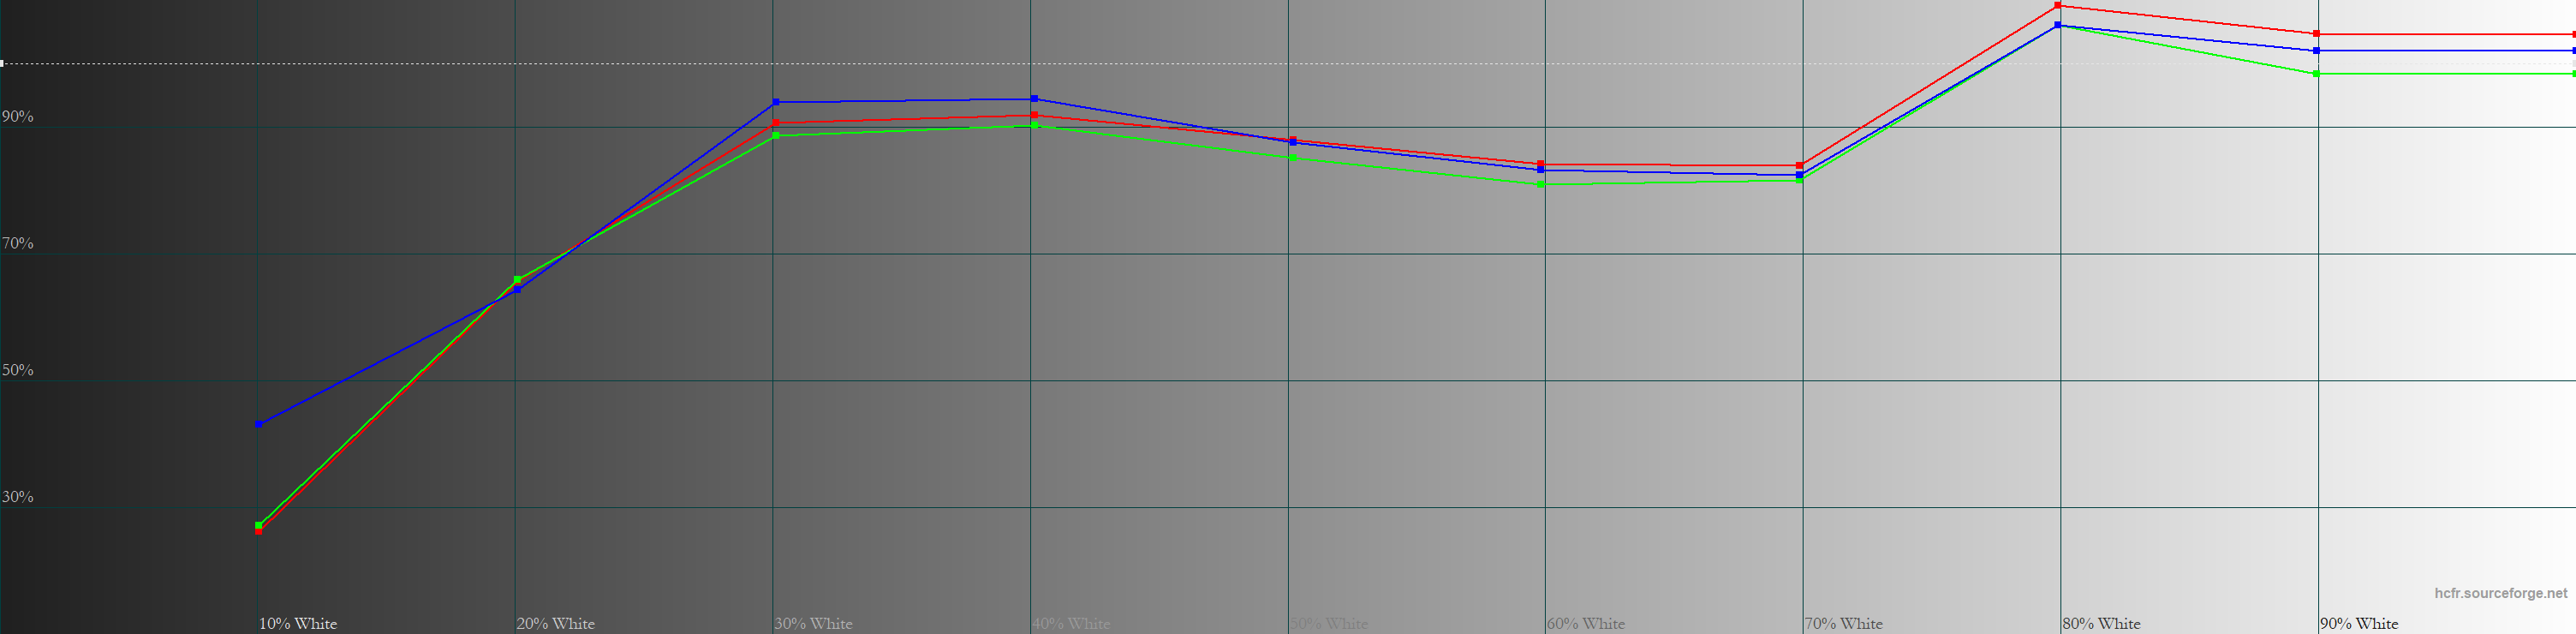
Color temperature is another issue. Even with the most accurate ‘Warm’ color temperature preset, we’re getting a high color temperature of 8689K on average across different APLs, causing a minor bluish tint to the whitepoint.
Luckily, you can use the ‘User’ color temperature mode to improve this, but since the brightness varies across different APLs, you can’t achieve consistent results.
For example, setting the red, green, and blue channels to 50, 48 and 42, respectively, results in a color temperature of 6768K at 10% APL, which is a significant improvement over the 8435K measured with ‘Warm’.
However, it drops to 6026K at 100% APL (7480K in ‘Warm’) and rises to 8646K at 1% APL (11865K with ‘Warm’). Additionally, reducing the color channels lowers brightness by around 7% across the board, but you get a more accurate color temperature of around 6870K on average, down from 8689K in ‘Warm’.
Real Scene Tests
Sunlight in ‘A Perfect Planet’ | Small flash from ‘Chasing The Light’ | Large flash from ‘Chasing The Light’ | Lightning in ‘A Perfect Planet’ | Solar flare in ‘A Perfect Planet’ | Sunlight in‘ A Perfect Planet’ | |
| MSI MPG 341QR X36 (QD-OLED) True Black 500 | 466 | 500 | 389 | 499 | 210 | 221 |
| MSI MPG 341QR X36 (QD-OLED) Peak 1300 nits | 647 | 1228 | 400 | 545 | 112 | 129 |
| MSI MPG 341QR X36 (QD-OLED) EOTF Boost FW.014 | 765 | 1295 | 409 | 760 | 129 | 137 |
| KTC G27P6S (W-OLED MLA+) | 317 | 739 | 313 | 602 | 183 | 216 |
| KTC M27P6 (Mini LED IPS) DisplayHDR, High | 669 | 1268 | 1758 | 523 | 322 | 318 |
| KTC M27P6S (Mini LED IPS) Display HDR, High | 664 | 1043 | 1678 | 487 | 335 | 364 |
| KTC M27P6S (Mini LED IPS) Display HDR, Low | 633 | 1115 | 1670 | 425 | 279 | 305 |
| KTC M27T6 (Mini LED VA) Display HDR, High | 1114 | 1393 | 1750 | 1048 | 690 | 784 |
| BenQ EX321UX (Mini LED IPS) | 792 | 1140 | 1440 | 579 | 309 | 317 |
From the real-scene tests, we can see that the KTC M27P6S has a very similar brightness performance to the M27P6. The BenQ EX321UX is also not far off.
The KTC M27T6 is significantly brighter in some scenes, but it has raised midtones, making the image brighter than intended, which reduces perceived contrast and depth.
In comparison to OLED displays, mini LED LCDs are brighter in scenes with large bright elements, but dimmer when there are many small bright objects, such as scenes with fireworks, stars in the night sky, city lights at night, etc.
KTC M27P6 vs KTC M27P6S
Keep in mind that these videos can only provide a rough comparison and won’t accurately represent how the HDR monitors look in real use. The footage is captured through a camera, processed and encoded by video editing software, compressed again by YouTube, and finally displayed on your own screen, where the image still depends on your device, browser, display settings and viewing conditions.
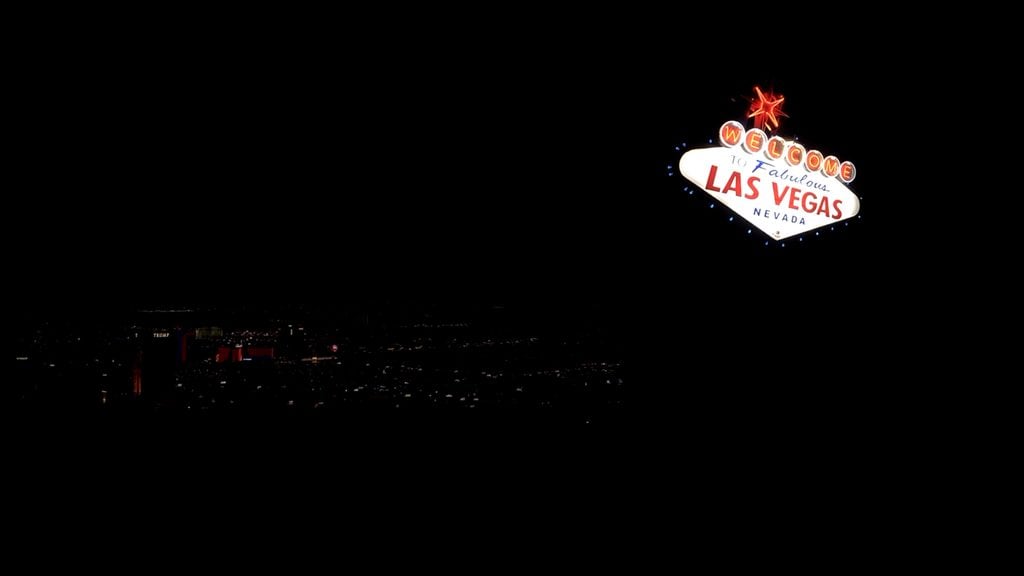
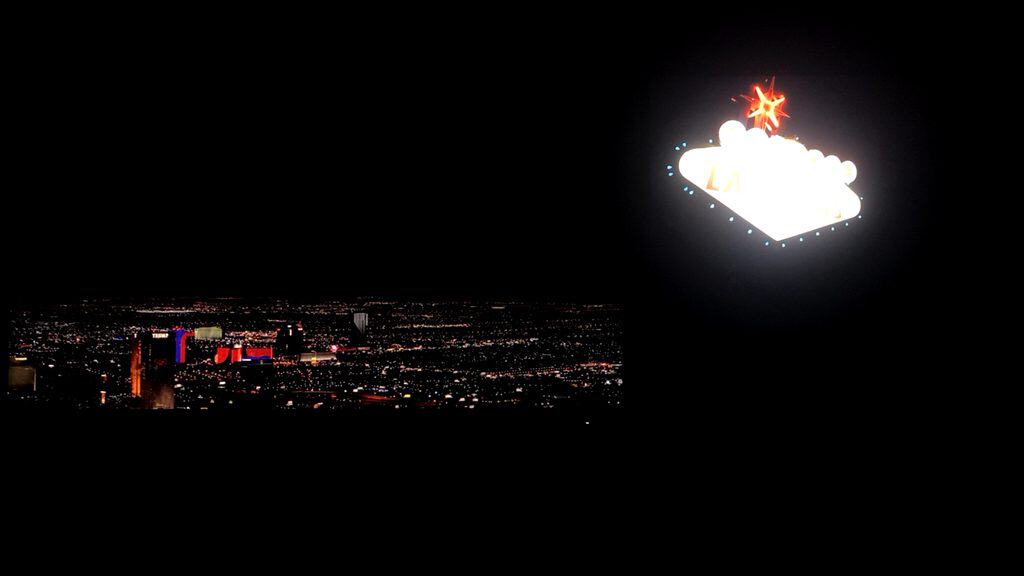
Both monitors use the DisplayHDR mode and High local dimming.
As you can see, the older M27P6 is a bit brighter and has more vibrant colors since the M27P6S is missing some DCI-P3 color space coverage as measured in HCFR.
However, the M27P6S exhibits less blooming. We weren’t able to capture this properly in the video above due to the low ISO setting, but the images below provide a better representation of the difference.
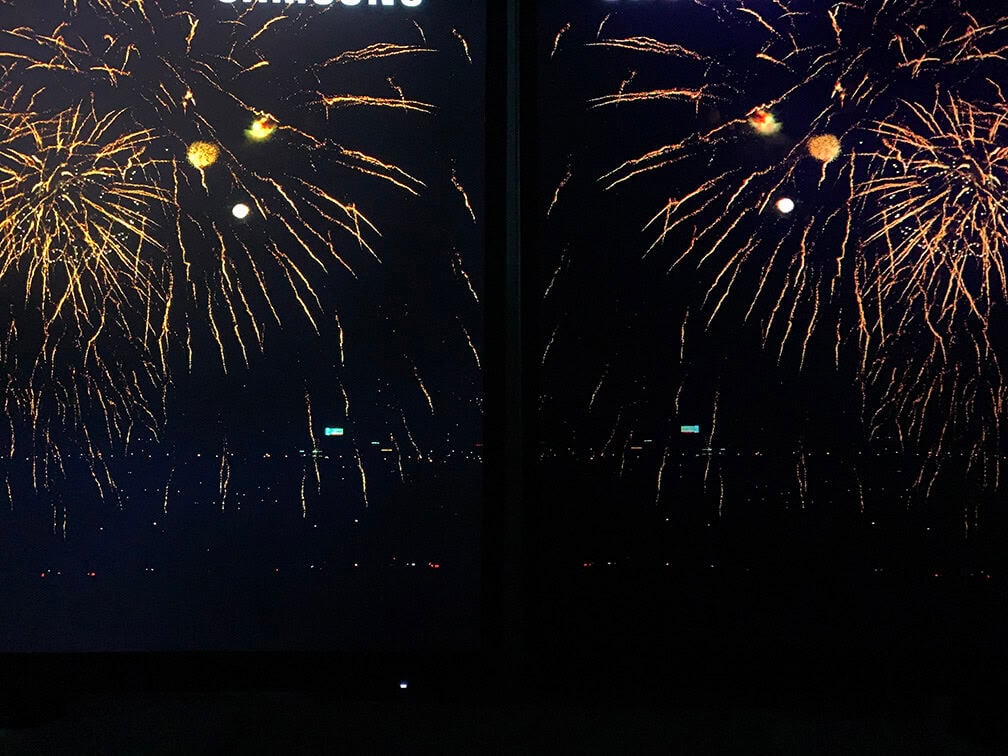
The difference in blooming is especially noticeable when viewing the screen at an angle.
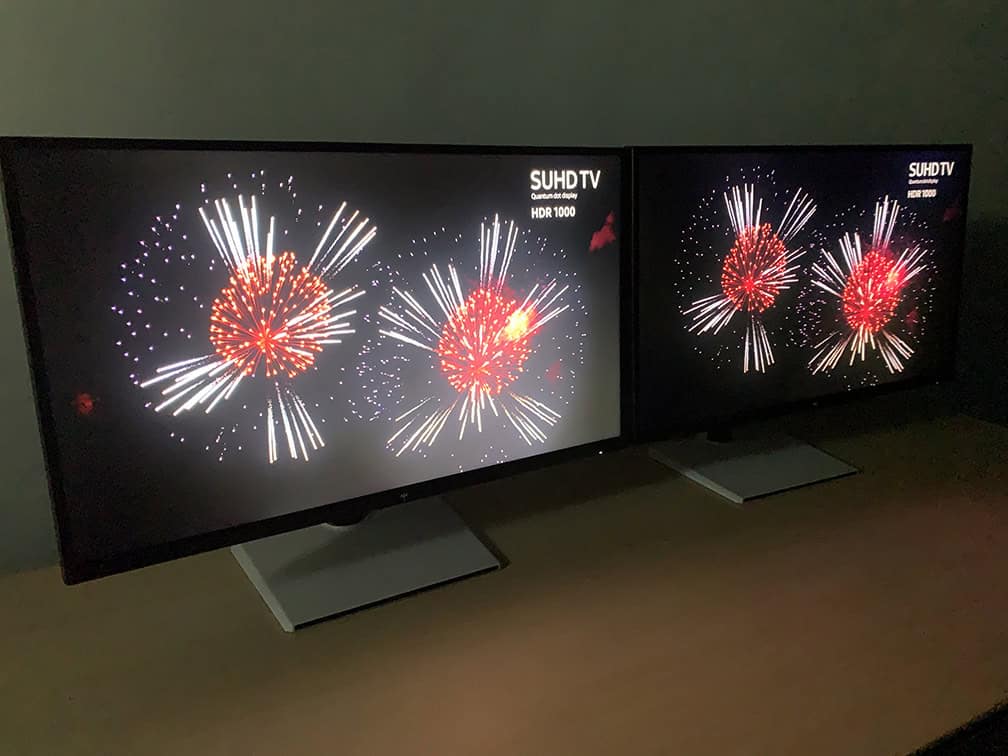
The KTC M27P6S uses BOE’s STW polarizer, which (similar to LG’s more popular A-TW polarizer) helps improve black levels and contrast at an angle by reducing IPS glow and blooming artifacts.
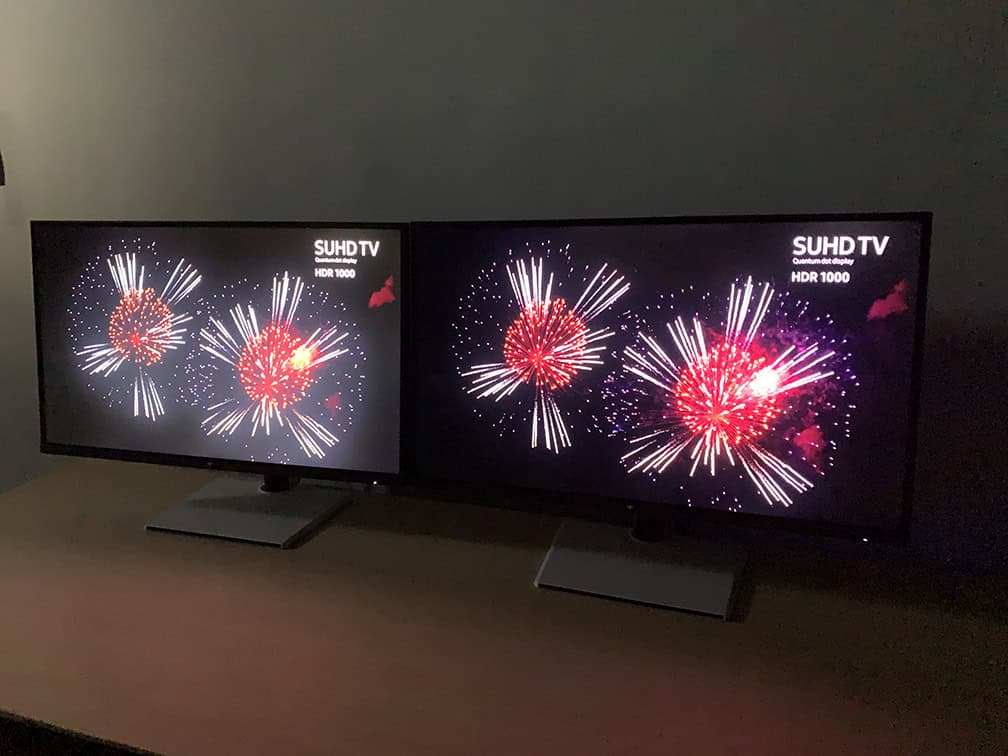
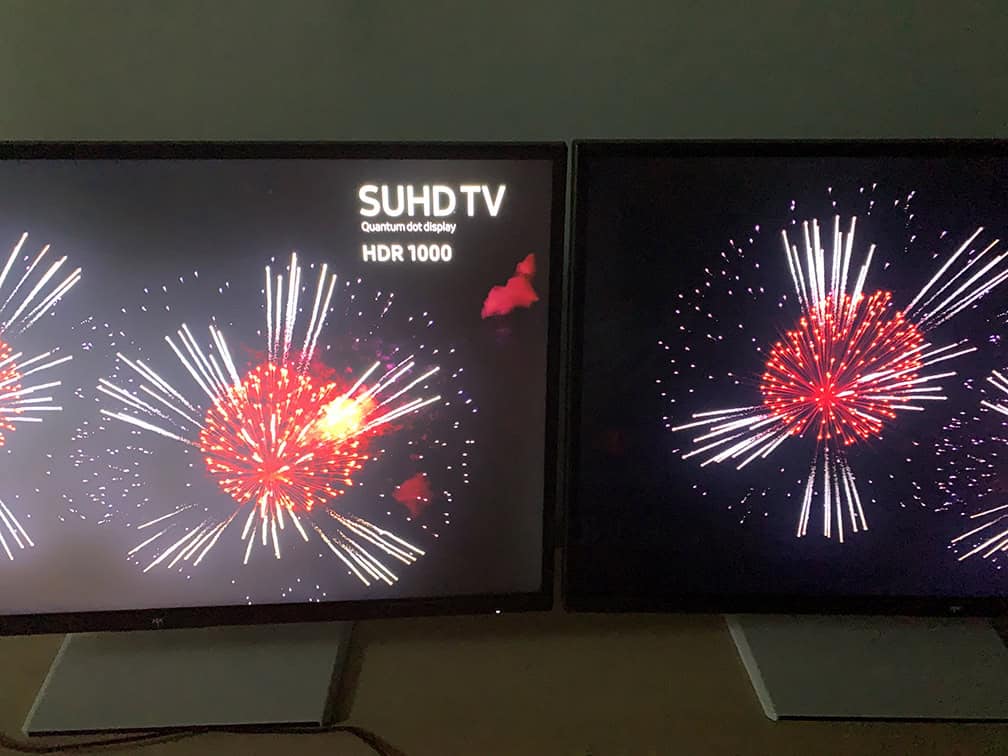
Again, this is with increased ISO, so the blooming isn’t this noticeable in real use. These photos are included mainly to illustrate how the M27P6S has less blooming than the M27P6.
The M27P6S also didn’t have the subtle flickering in the scenes with flying flamingos from around 6:49 in the video, which is common on most mini LED IPS monitors we tested, including the M27P6.
MSI MPG 271QR QD-OLED X50 vs KTC M27P6S
Next, here’s how the M27P6S compares to a QD-OLED monitor.
We’re also using a low ISO setting here, so a lot of shadow detail that’s visible in real use isn’t captured in the video. The M27P6S isn’t actually this dim in real use, the video is mainly meant to illustrate how much brighter the MSI MPG 271QR QD-OLED is, particularly in the dark Las Vegas scenes.
In the later scenes featuring more nature and brighter scenery, however, the M27P6S trades blows with the OLED and can actually look better in high-APL scenes.
Another obvious difference is that the 271QR X50 has more vibrant colors, mainly because the M27P6S has subpar HDR color calibration.
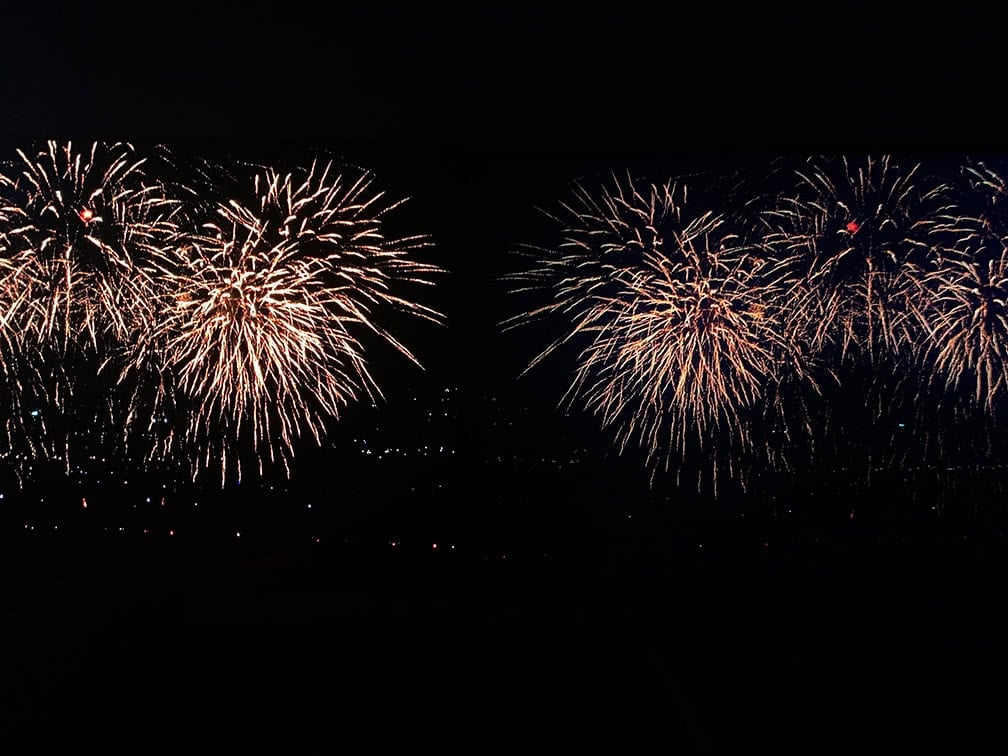
Here’s a closer look at the fireworks scene with a higher ISO setting. Of course, this is a bit of a nitpicked example, as these types of scenes play to the strengths of OLED displays while being among the most challenging for mini LED LCDs.
KTC M27P6S vs KTC M27T6
Finally, here’s a comparison with the KTC M27T6 with a 1152-zone mini LED VA panel and DisplayHDR 1400.
Again, we’re using low ISO to avoid overexposure, so a lot of details in shadows aren’t visible. The main purpose of this video is to showcase that an IPS with 2304 zones and a VA with 1152 zones can have a similar image quality.
The M27T6 appears brighter in some scenes, but it also tends to be brighter than intended in others. The most noticeable difference here is due to EOTF tracking, as the M27T6 has lifted midtones, leading to compressed highlights, most obvious in scenes from 3:03 to 3:12.
In the images below with increased ISO, you can see that the M27P6S has a bit more noticeable blooming, especially when local dimming is set to Low or Standard. While it has twice the local dimming zone count, the M27T6S has up to 3.5x higher contrast ratio thanks to its VA panel.
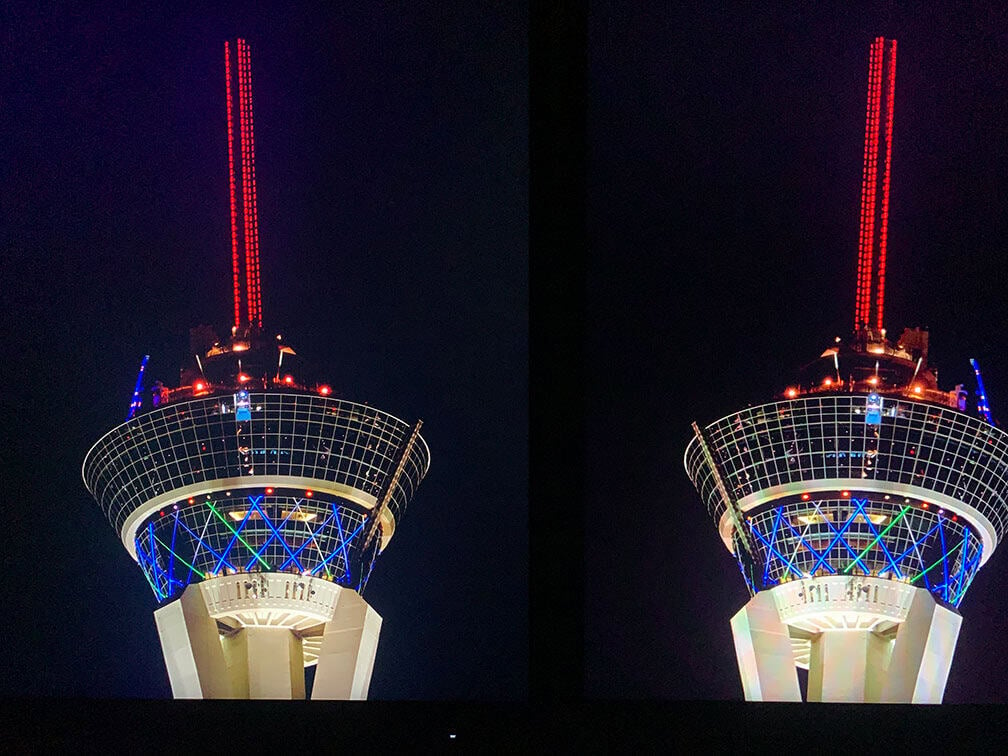
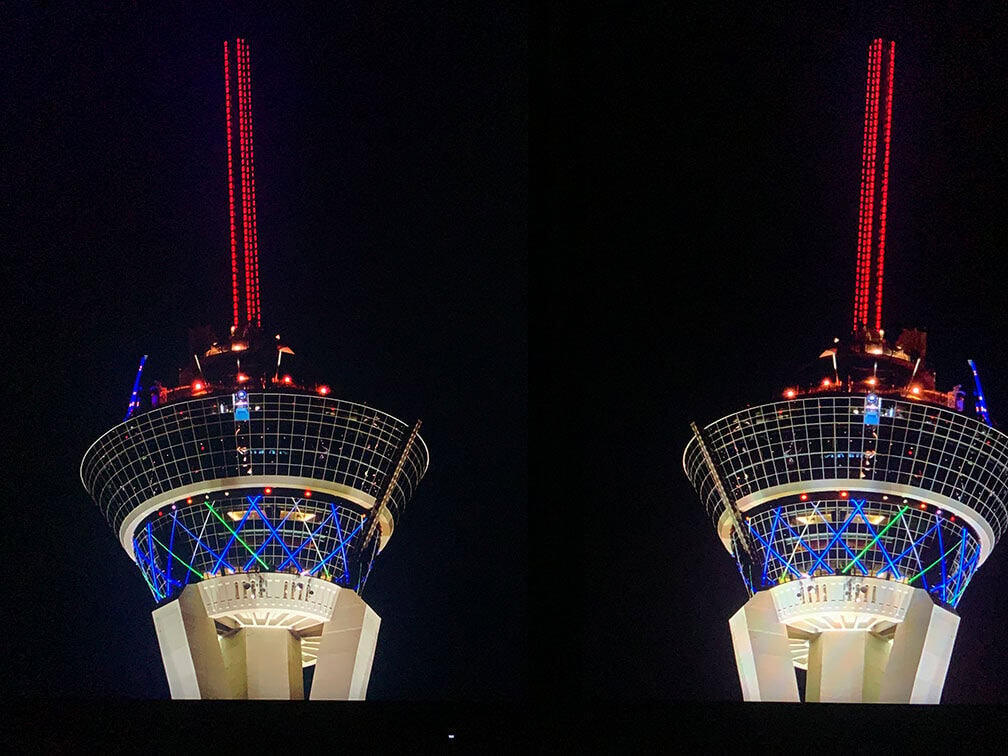
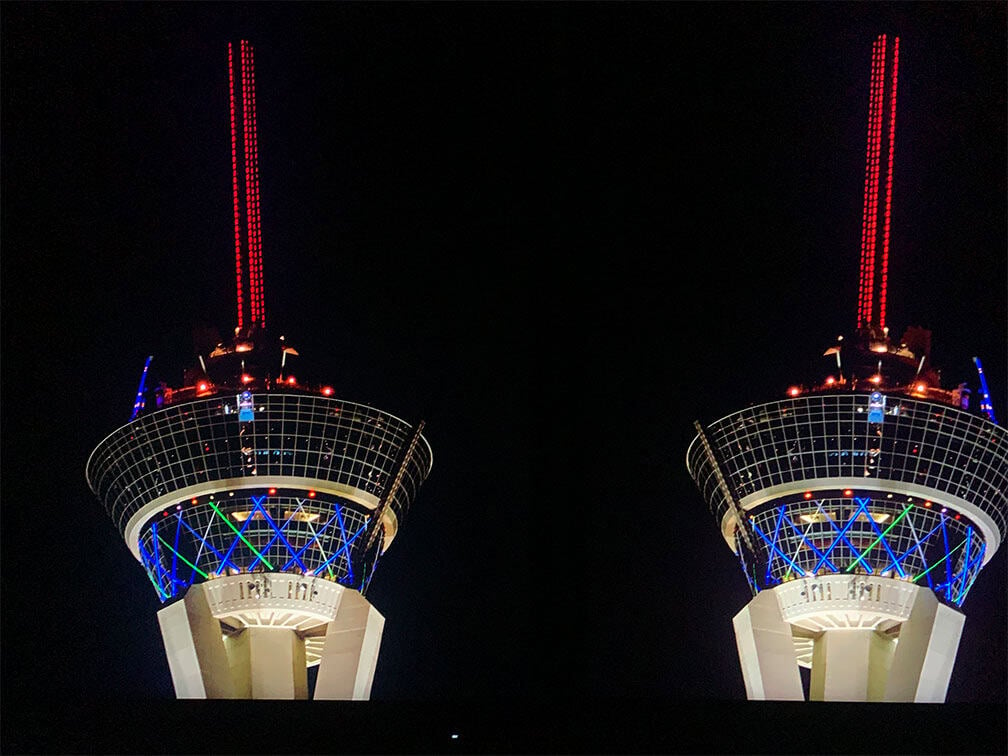
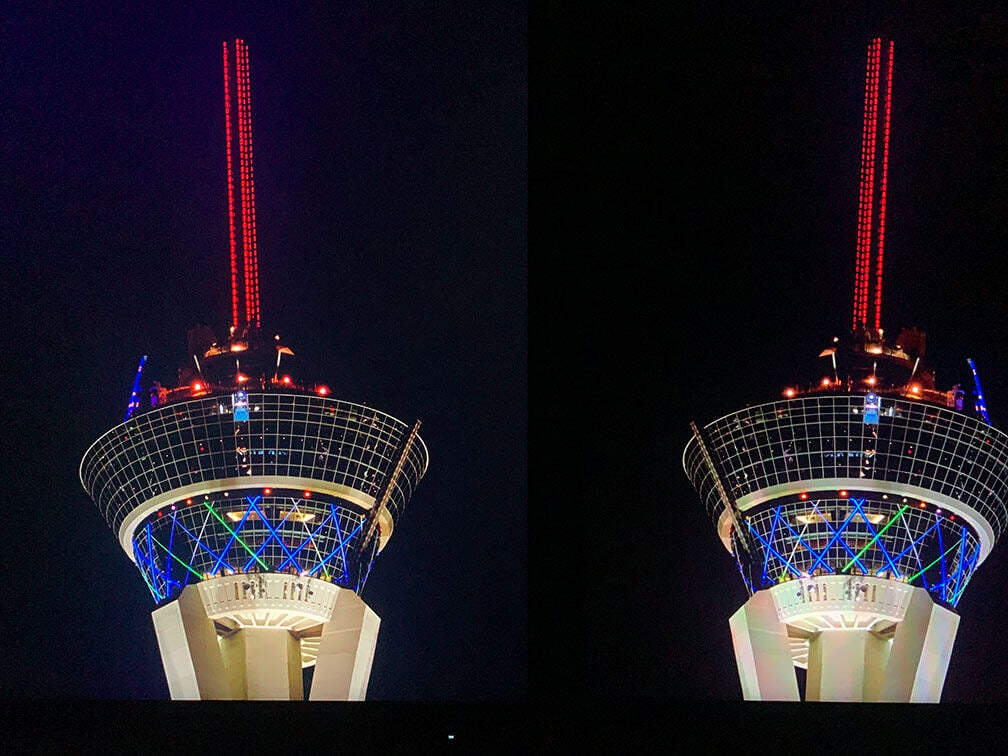
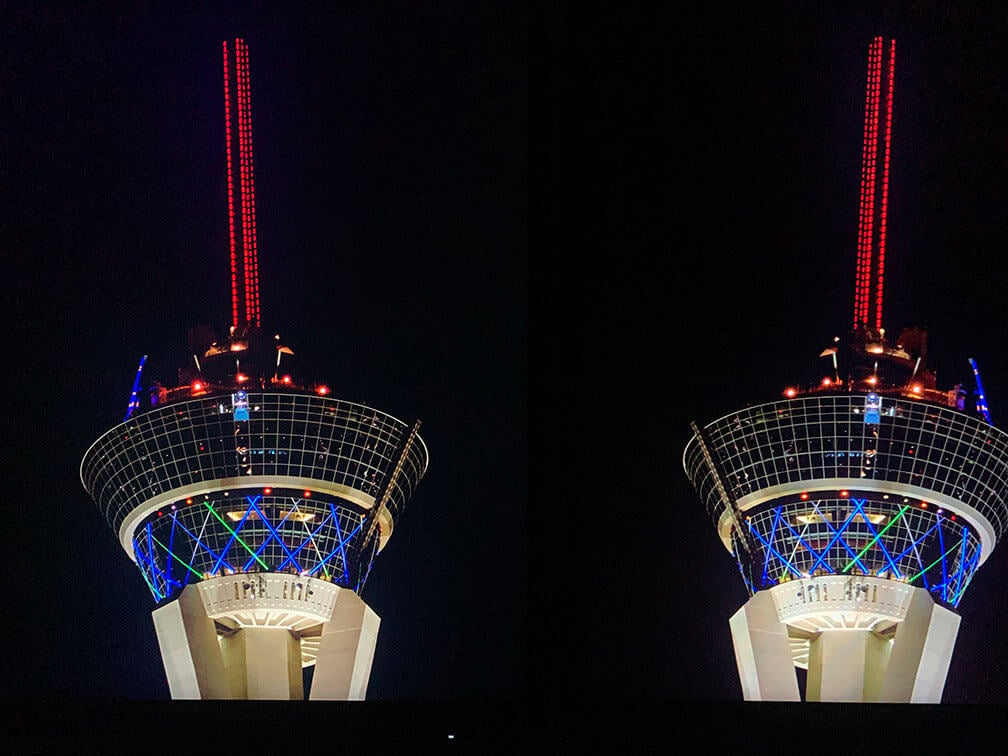
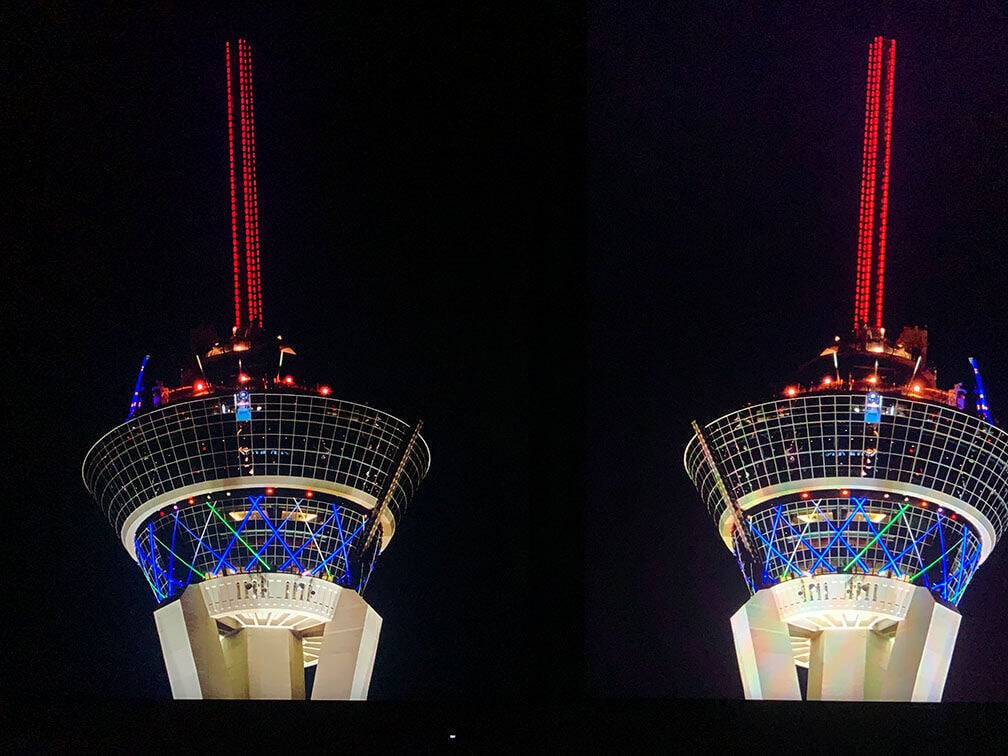
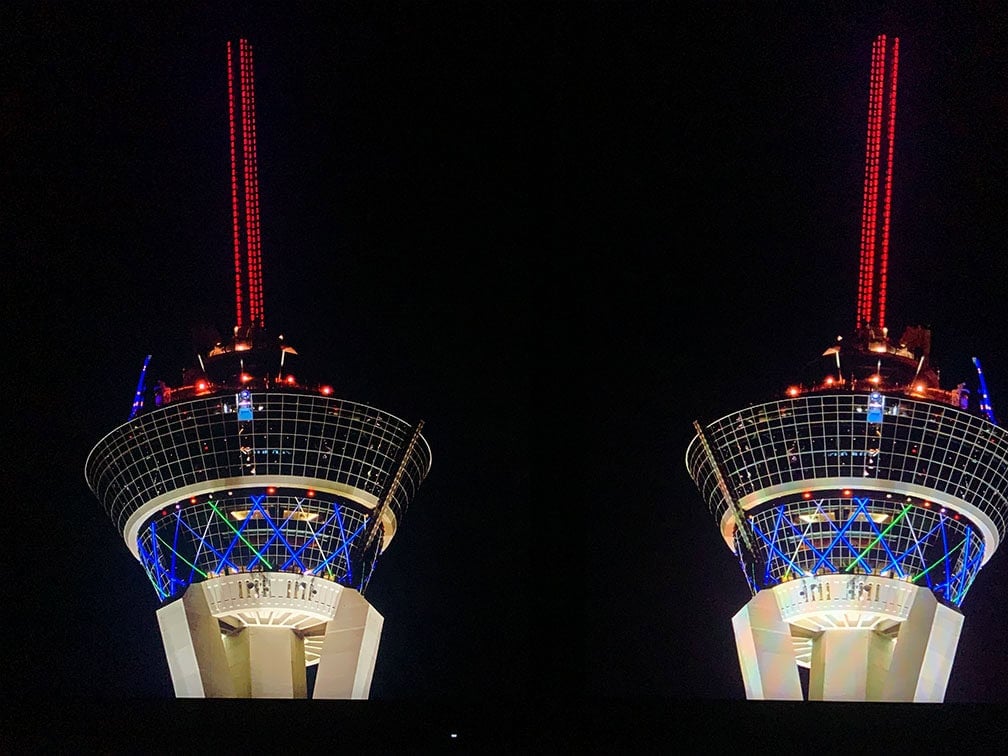
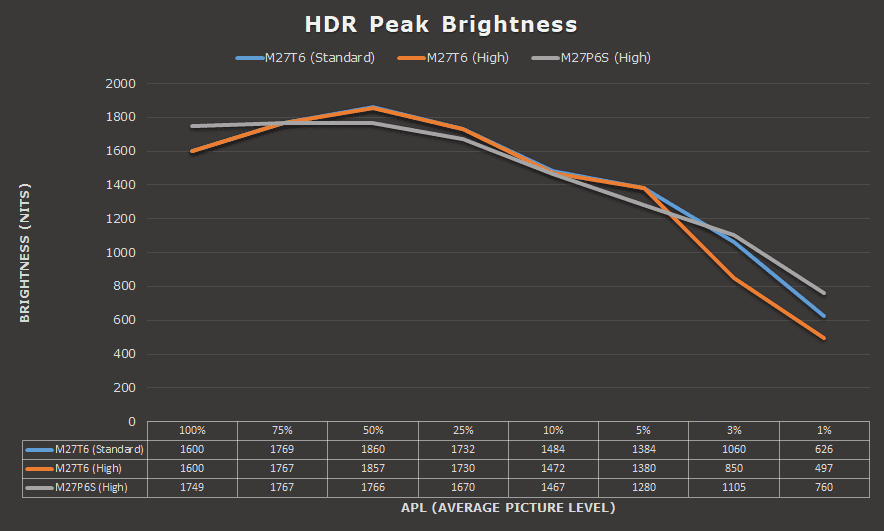
The M27P6S, on the other hand, has its own advantages thanks to its IPS panel, such as smooth VRR performance, faster response time with no dark level smearing and more consistent image quality with wider viewing angles.
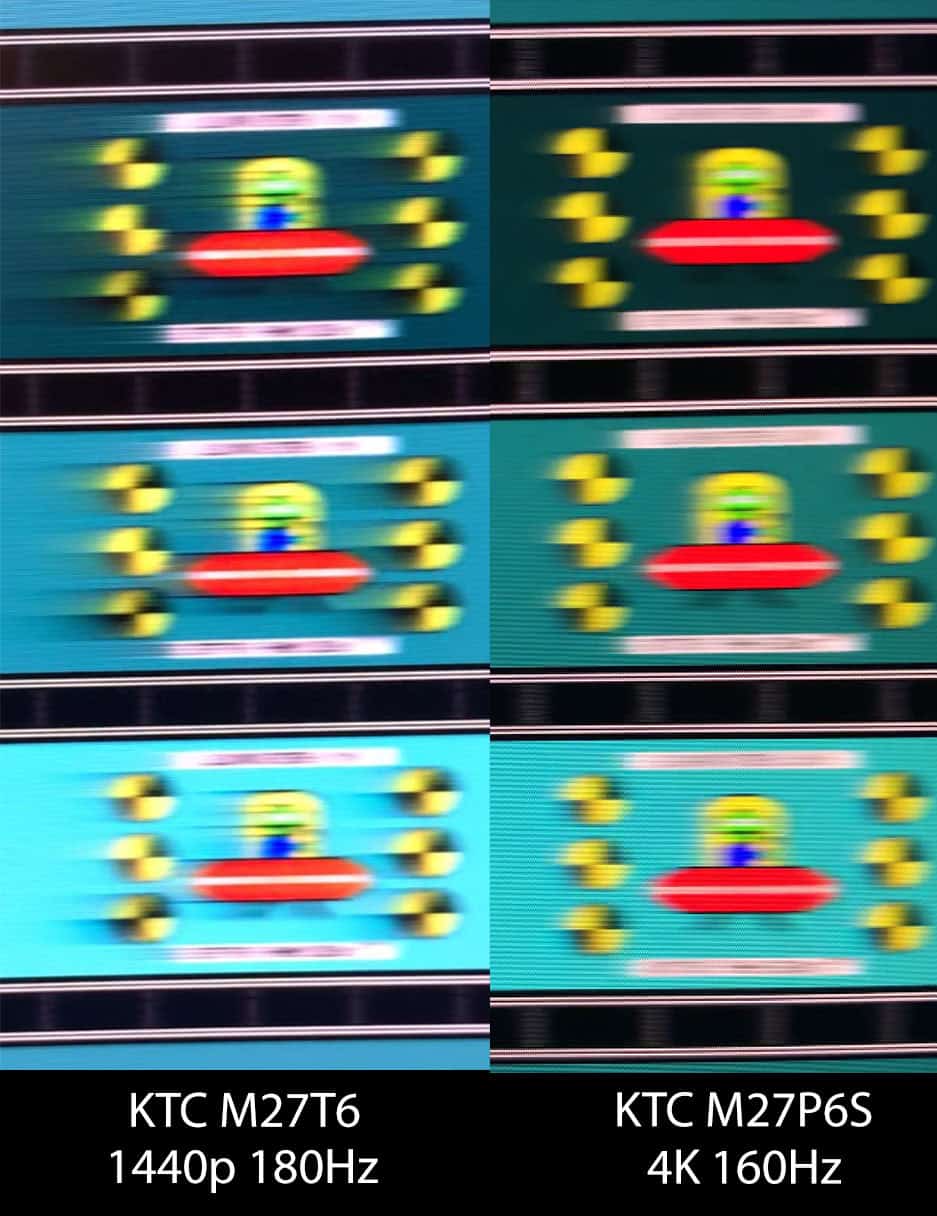
FALD Flicker Test
With KTC’s mini LED IPS monitors, there’s a subtle flicker during some dark-to-bright scene transitions. You may notice this at 60Hz during everyday use, but at higher refresh rates, it isn’t noticeable. Here’s slow-motion footage (240FPS videos below).
QD-OLED vs W-OLED vs Mini LED
Here’s how the monitor’s brightness compares to a few other HDR displays we tested.
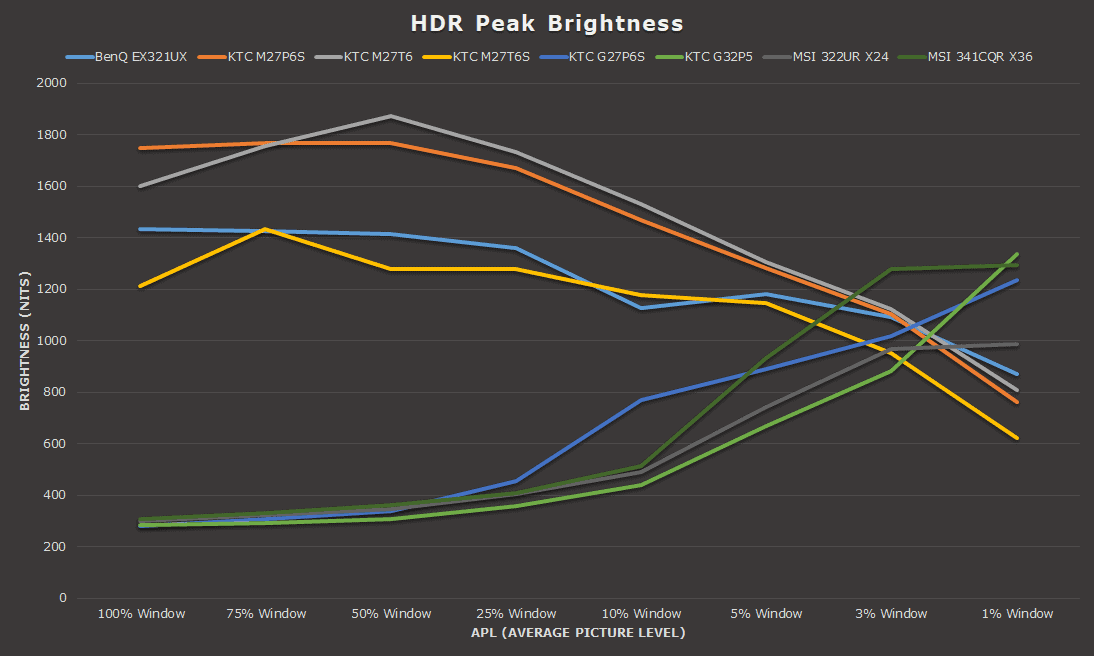
As you can see, mini LED monitors are a lot brighter than OLED displays for large APLs, but for 3% and smaller APLs, OLED monitors provide a lot punchier small highlights, while mini LED displays try to minimize blooming.
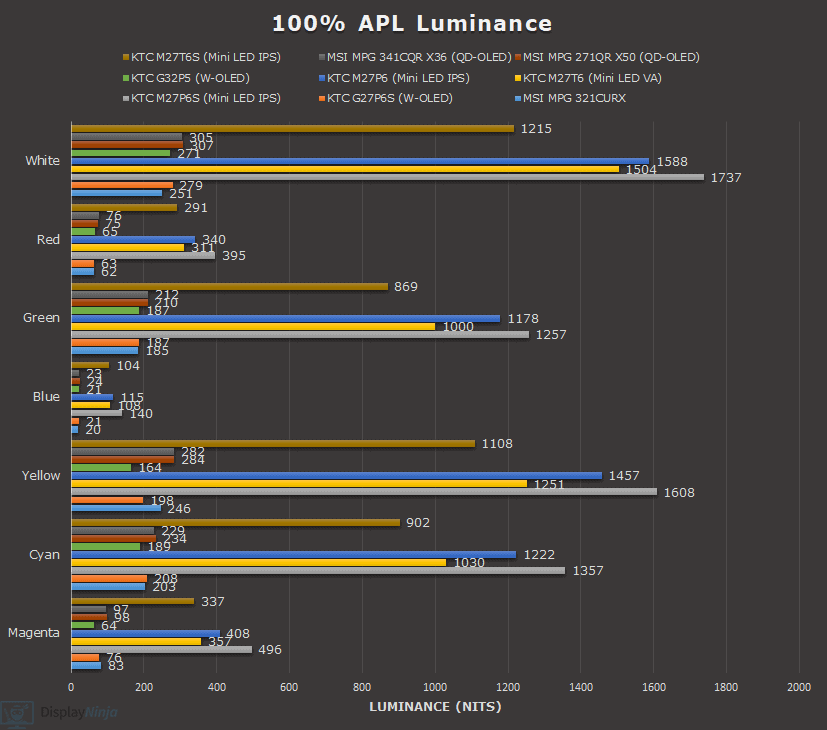
The chart above only includes white luminance. Here are the color luminance charts.
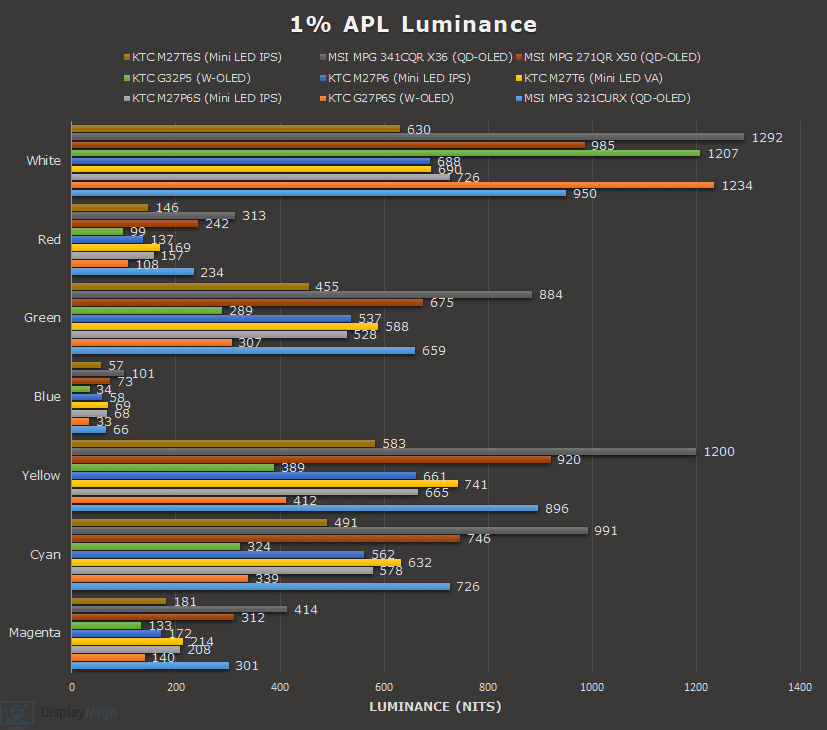
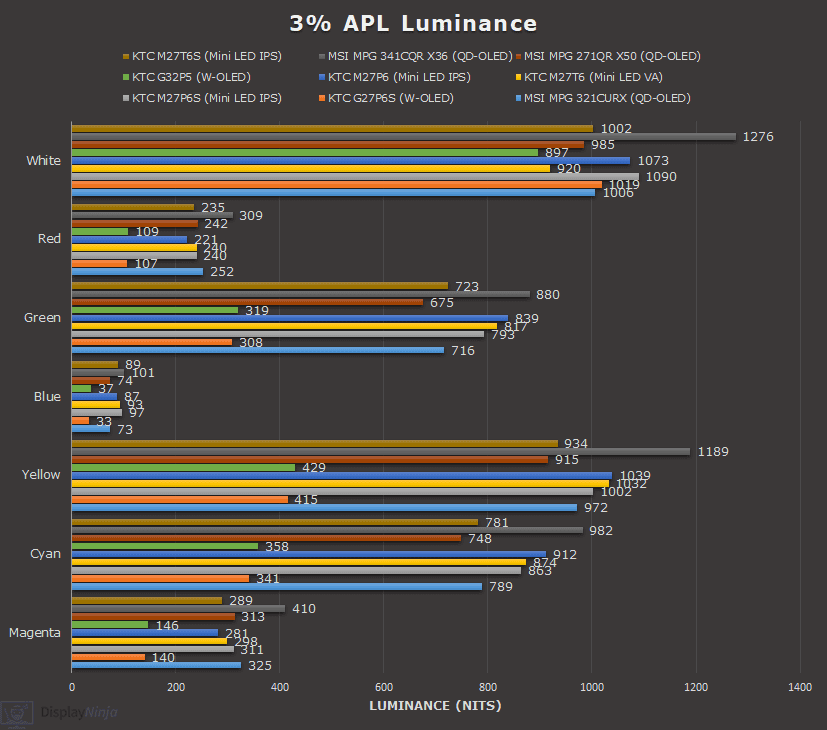
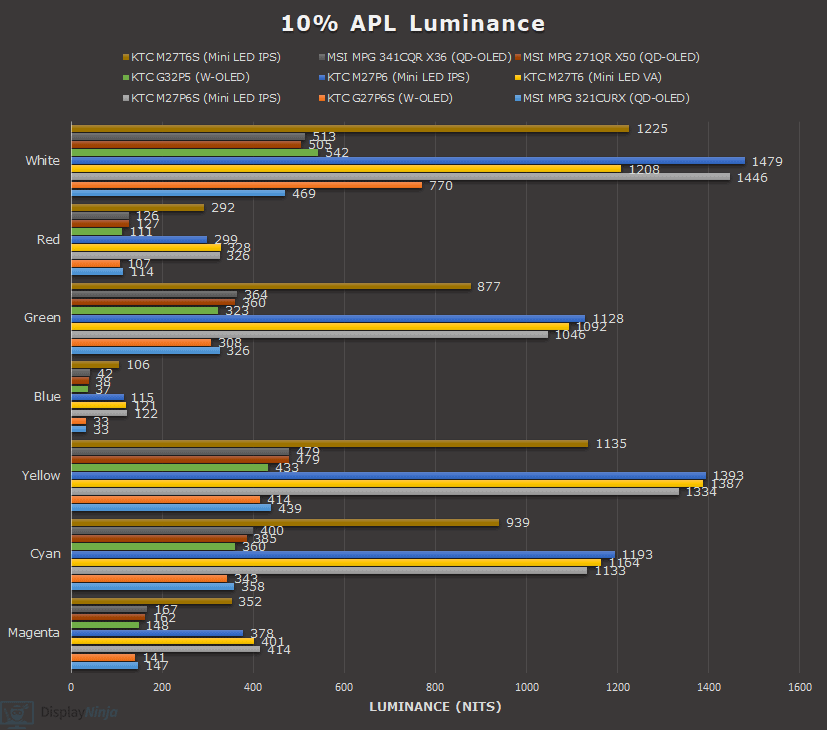
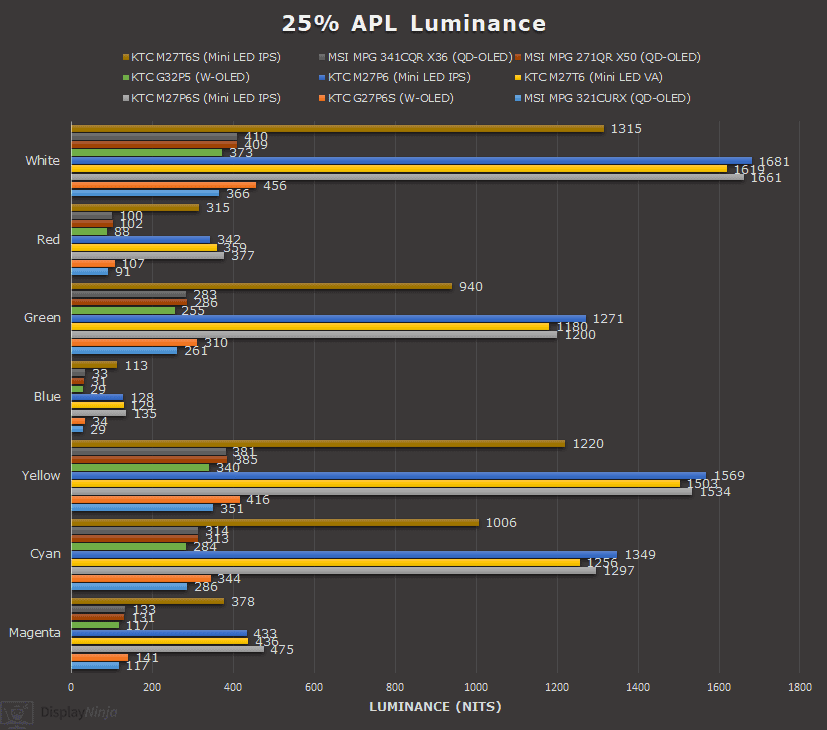
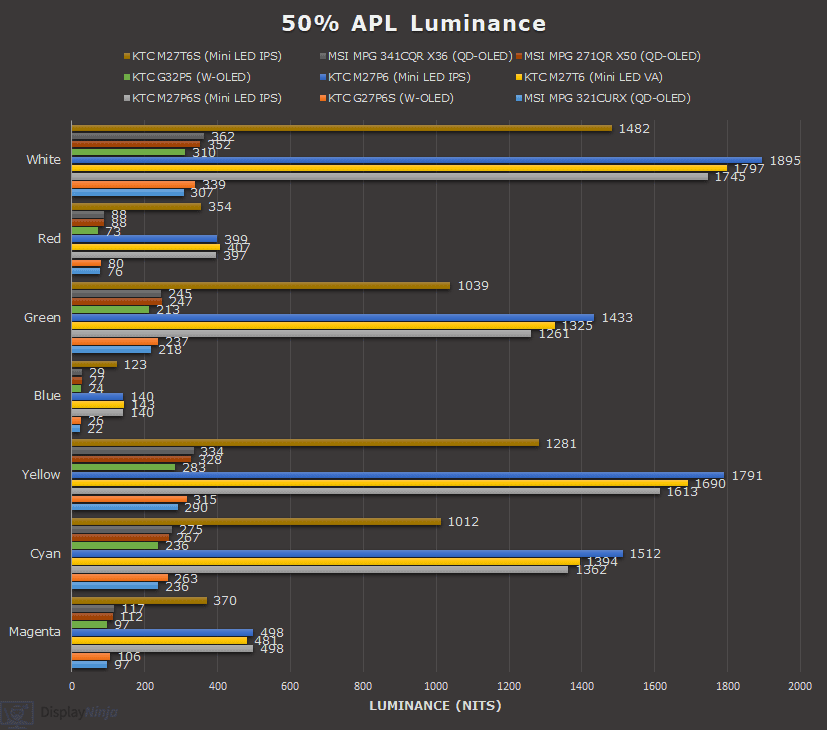
Local Dimming in SDR
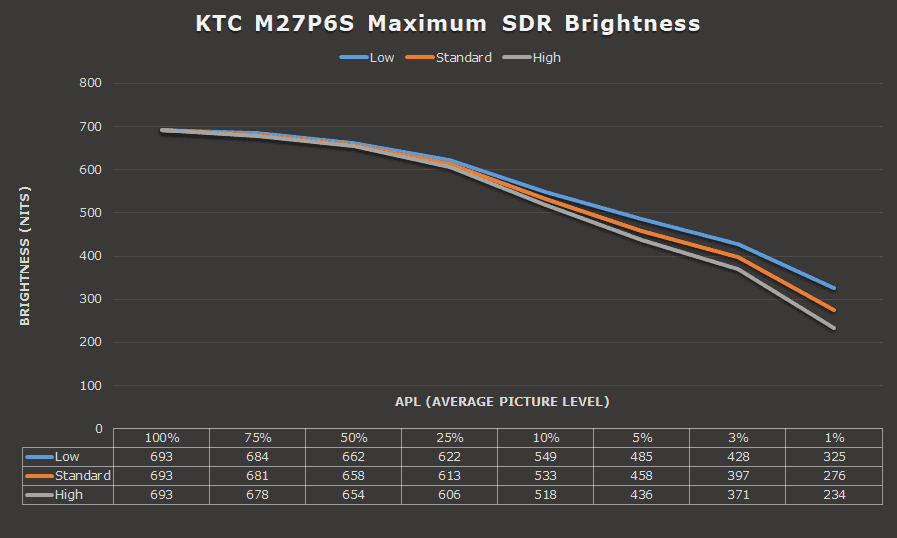
You can also enable local dimming in SDR. However, while you can get deeper blacks, brightness performance is limited, especially for small APLs, as it drops from 693 nits for 100% APL down to 234 nits for 1% APL when using the High local dimming mode.
Even if you enable HDR in Windows to view SDR content and max out the ‘HDR/SDR brightness balance’ slider, the brightness doesn’t increase. In fact, it’s a bit lower with a 533 nits 100% APL and 218 nits 1% APL peak in High mode.
Further, once you enable HDR, the colors are mapped to the sRGB color space far too aggressively, reducing sRGB gamut coverage/volume to just 84% and resulting in undersaturated colors.
So, if you want to watch non-HDR content with local dimming enabled, it’s best to disable HDR in Windows. For the most accurate image, use the sRGB mode for SDR content, as this matches the creators’ intended colors. Alternatively, use the Native mode if you prefer more saturated colors.
Performance
The KTC M27P6S has a maximum refresh rate of 160Hz at its native 4K UHD resolution, providing you with a huge boost in motion clarity as opposed to the standard 60-75Hz displays.
It can also switch to 320Hz at 1080p for an additional boost in responsiveness.
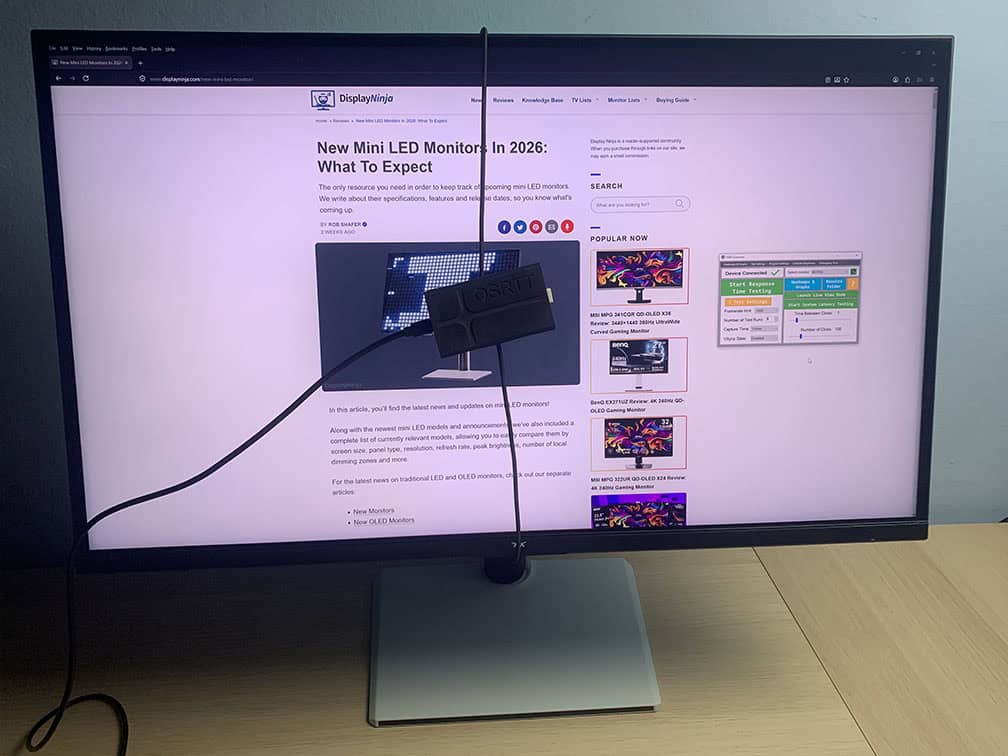
For response time and latency testing, we’re using OSRTT.
Response Time
The KTC M27P6S has five response time overdrive modes: Off, Standard, Advanced, Ultra Fast and Dynamic Overdrive.
Here’s how the monitor performs at 160Hz, 120Hz and 60Hz at 4K UHD.
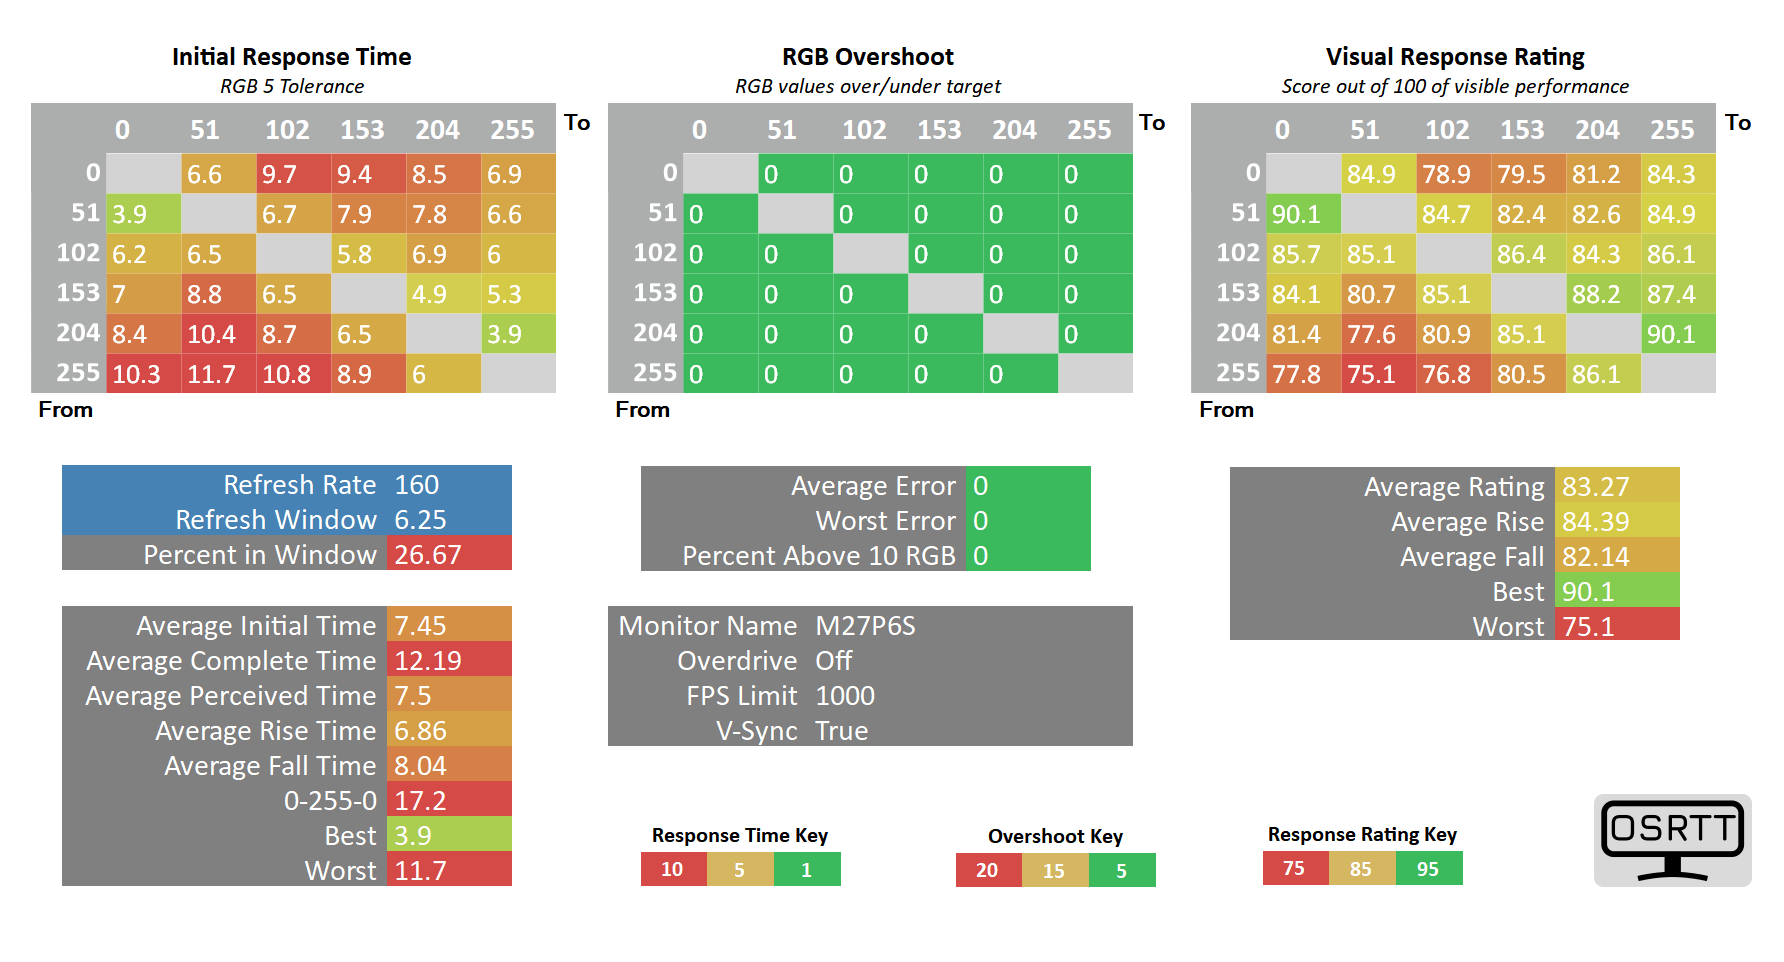
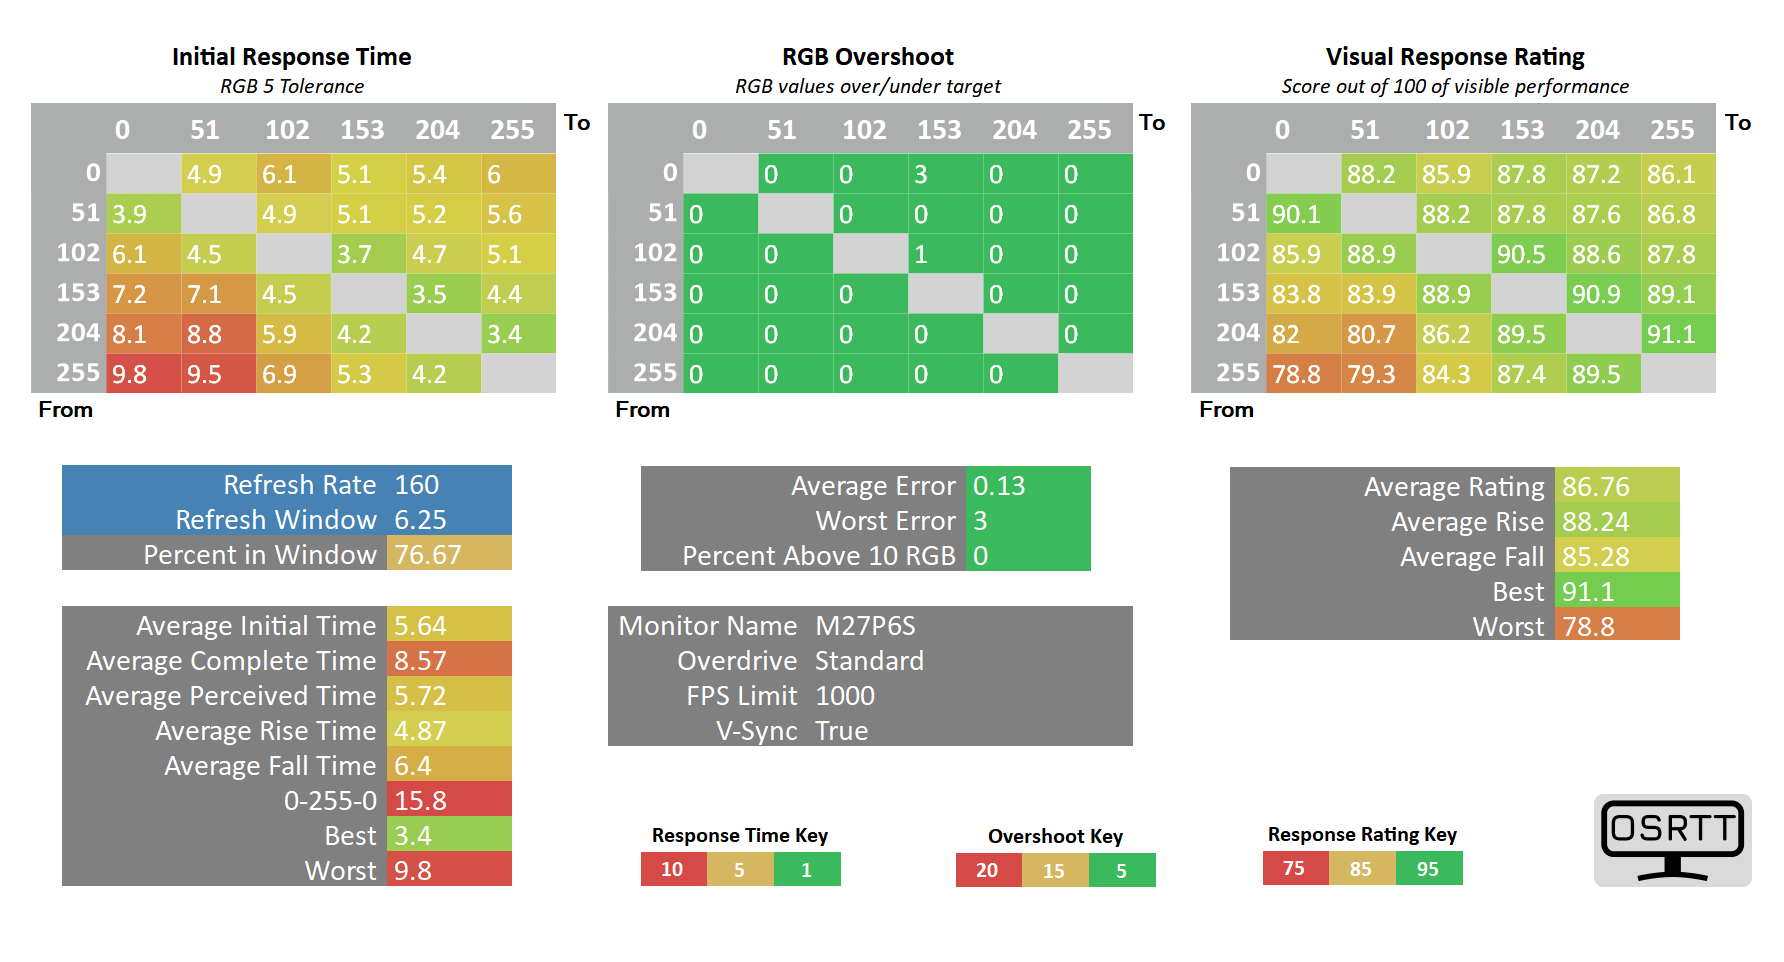
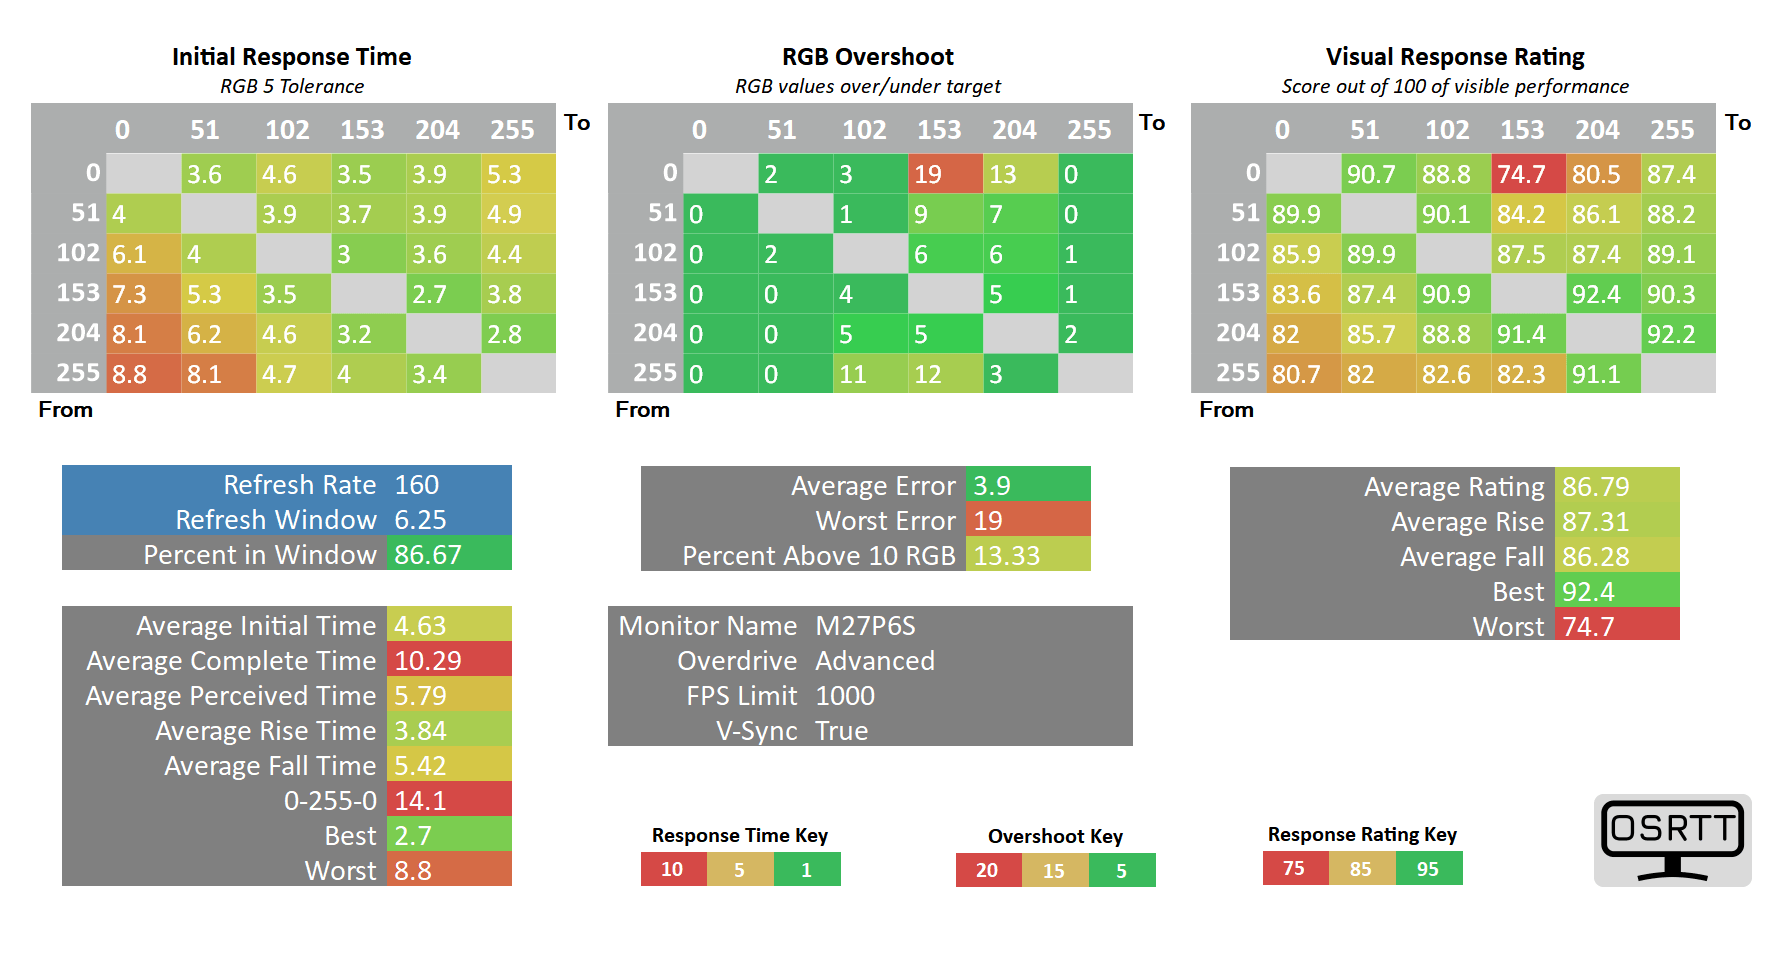
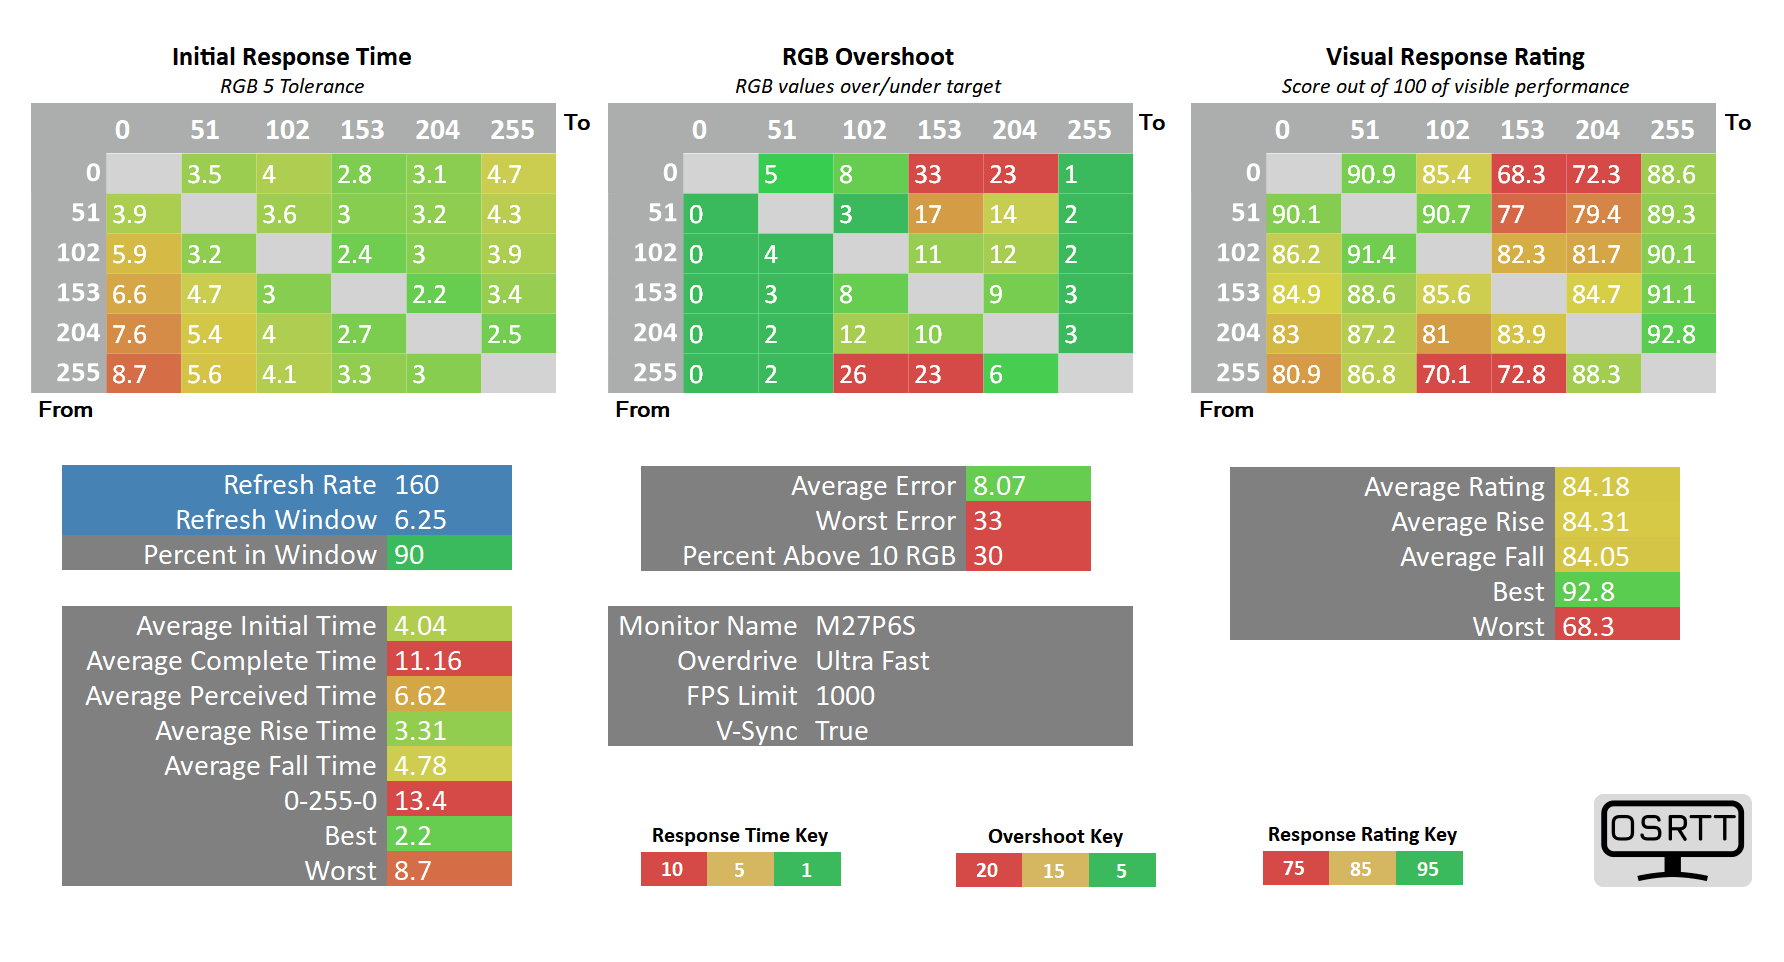
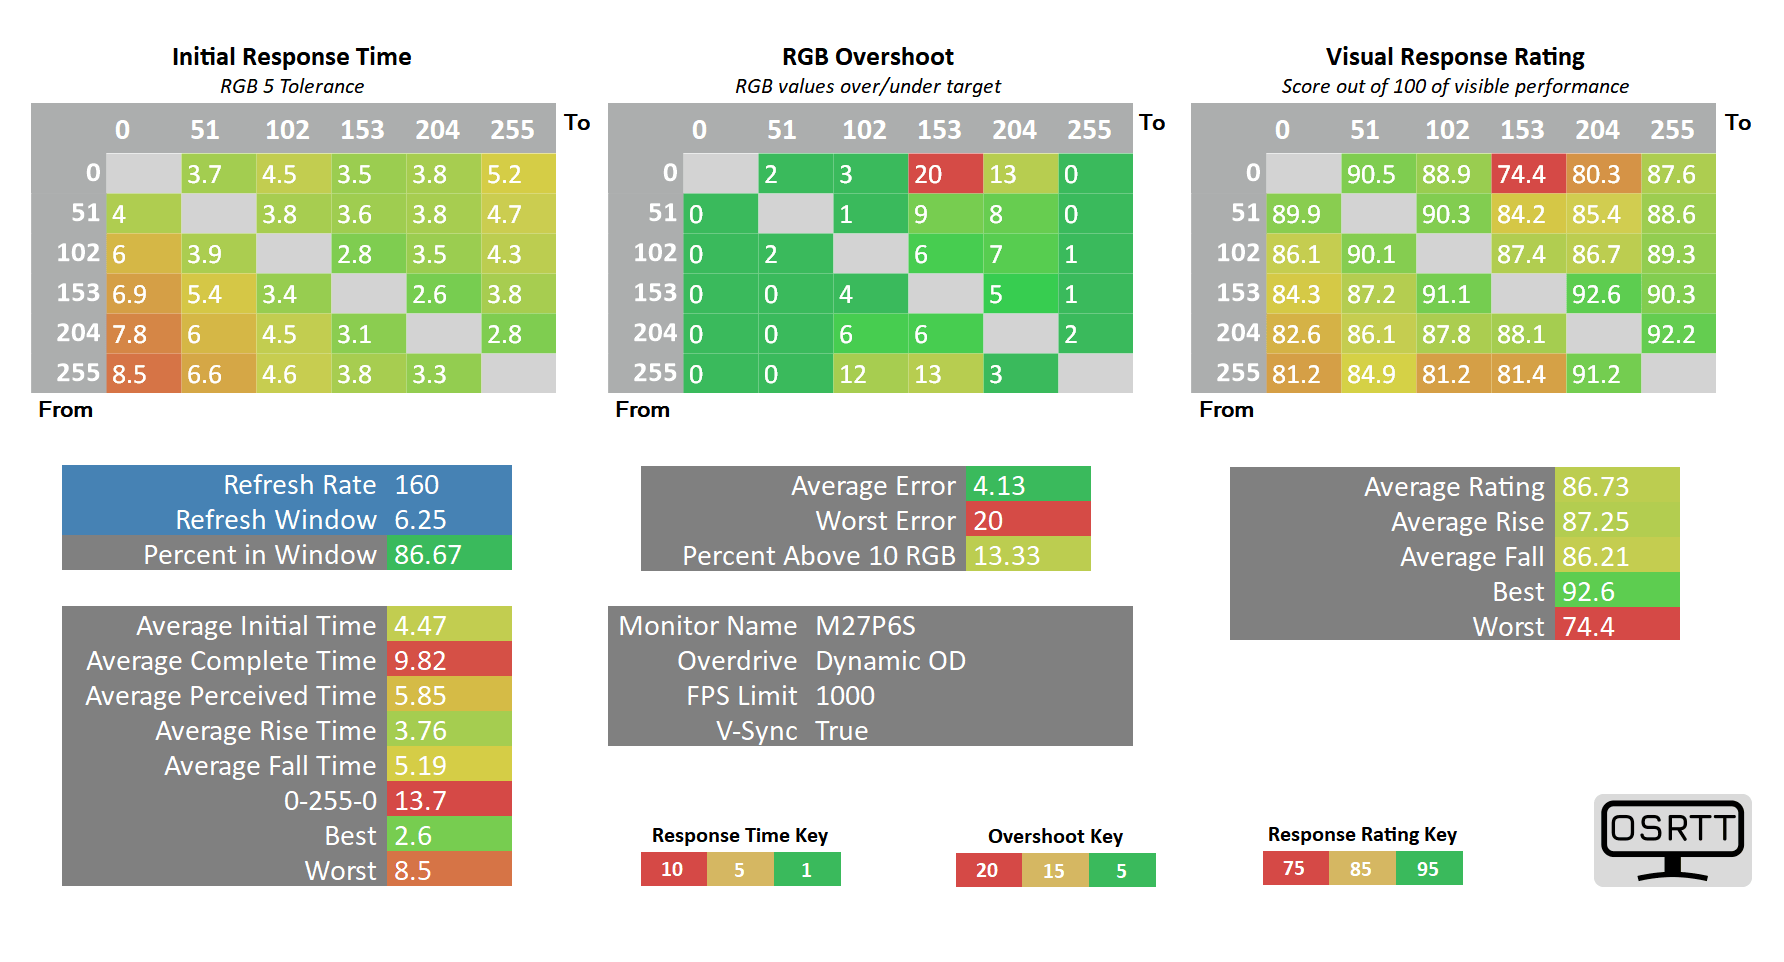
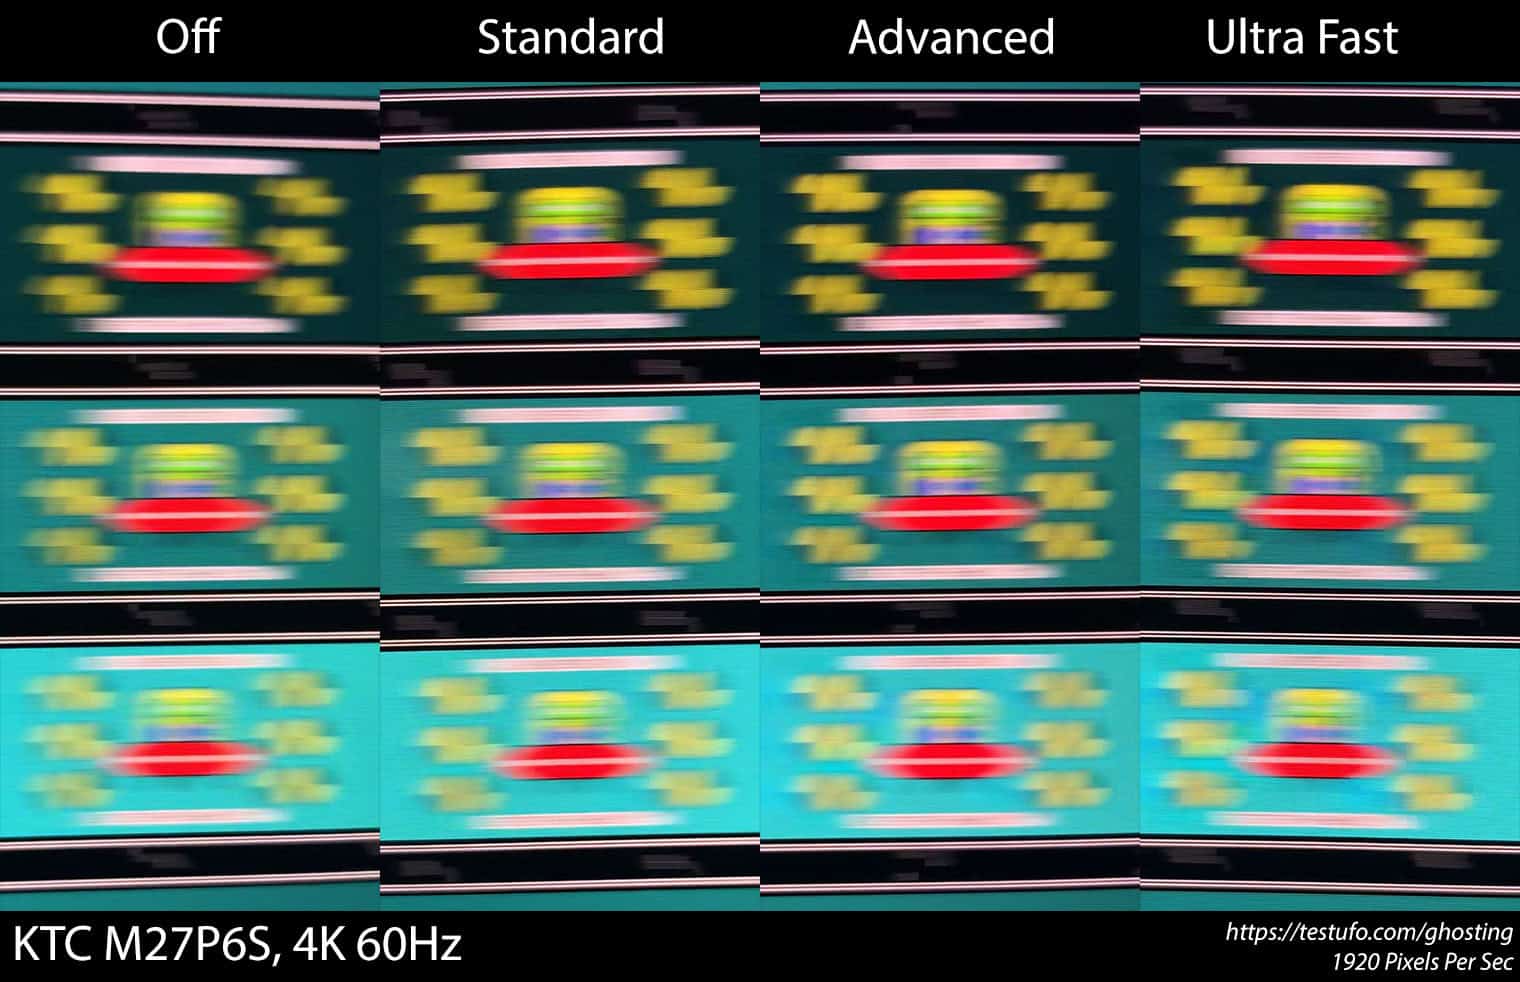
At 160Hz, we recommend using the Advanced mode. It has a fast 4.63ms GtG pixel response time with low 3.9% average overshoot error and excellent 86.67% refresh rate compliance.
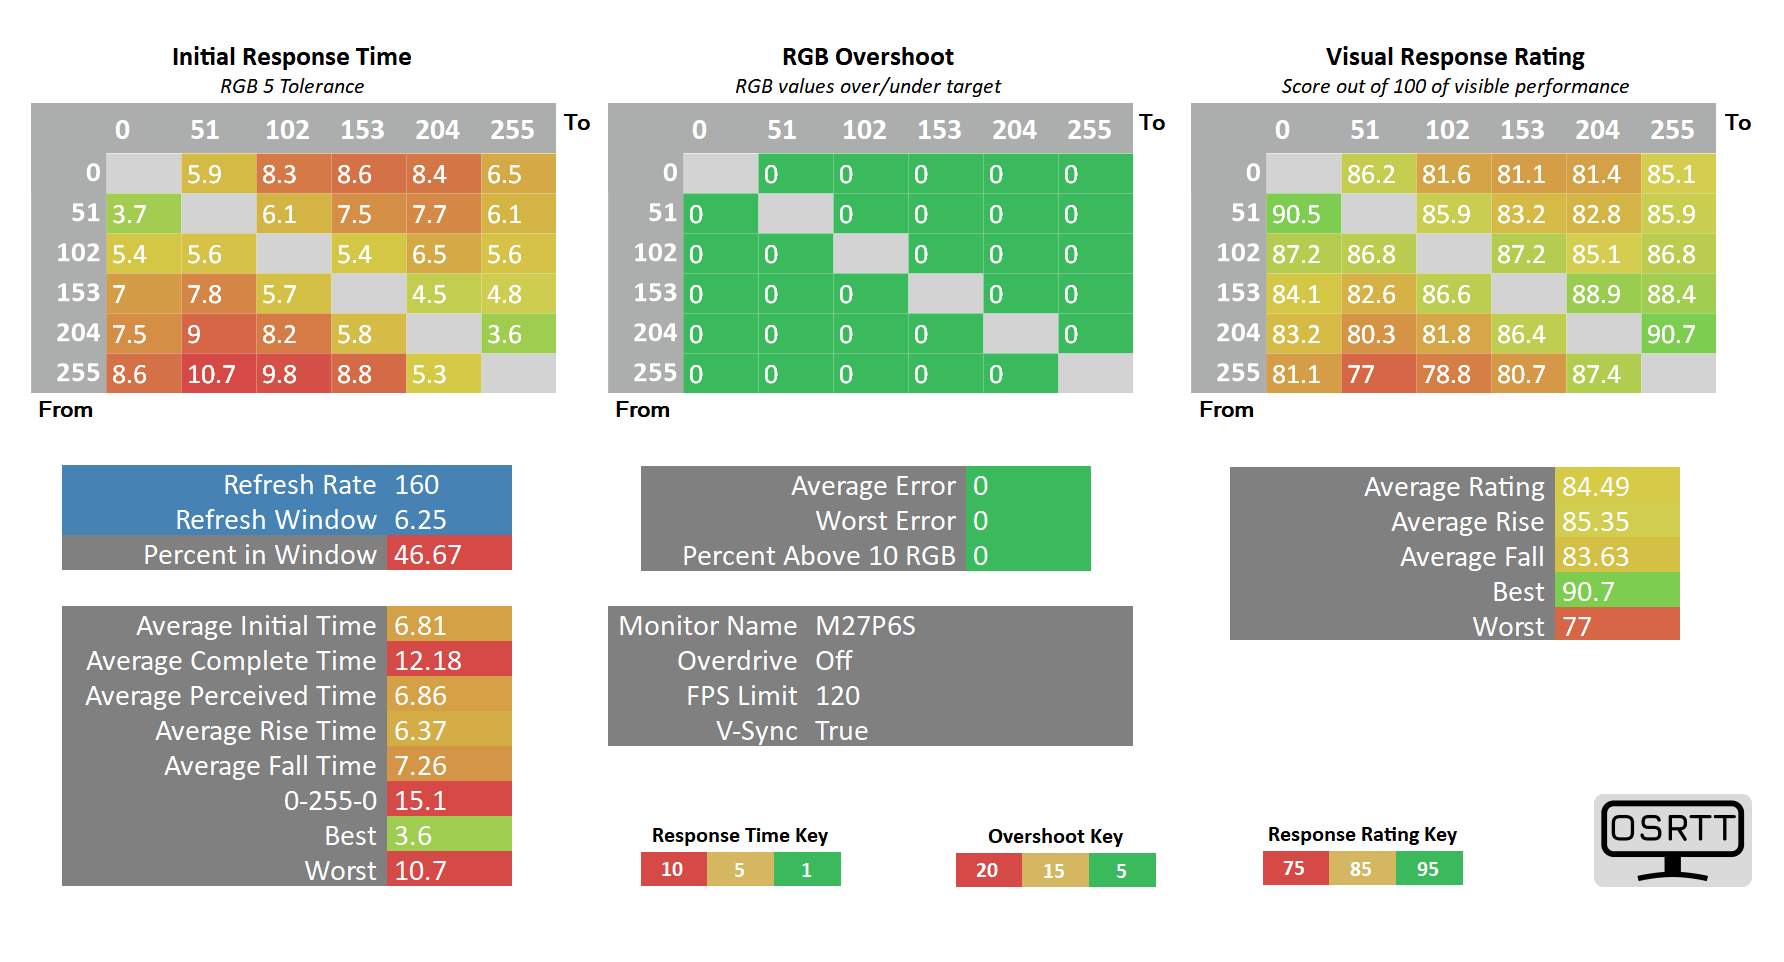
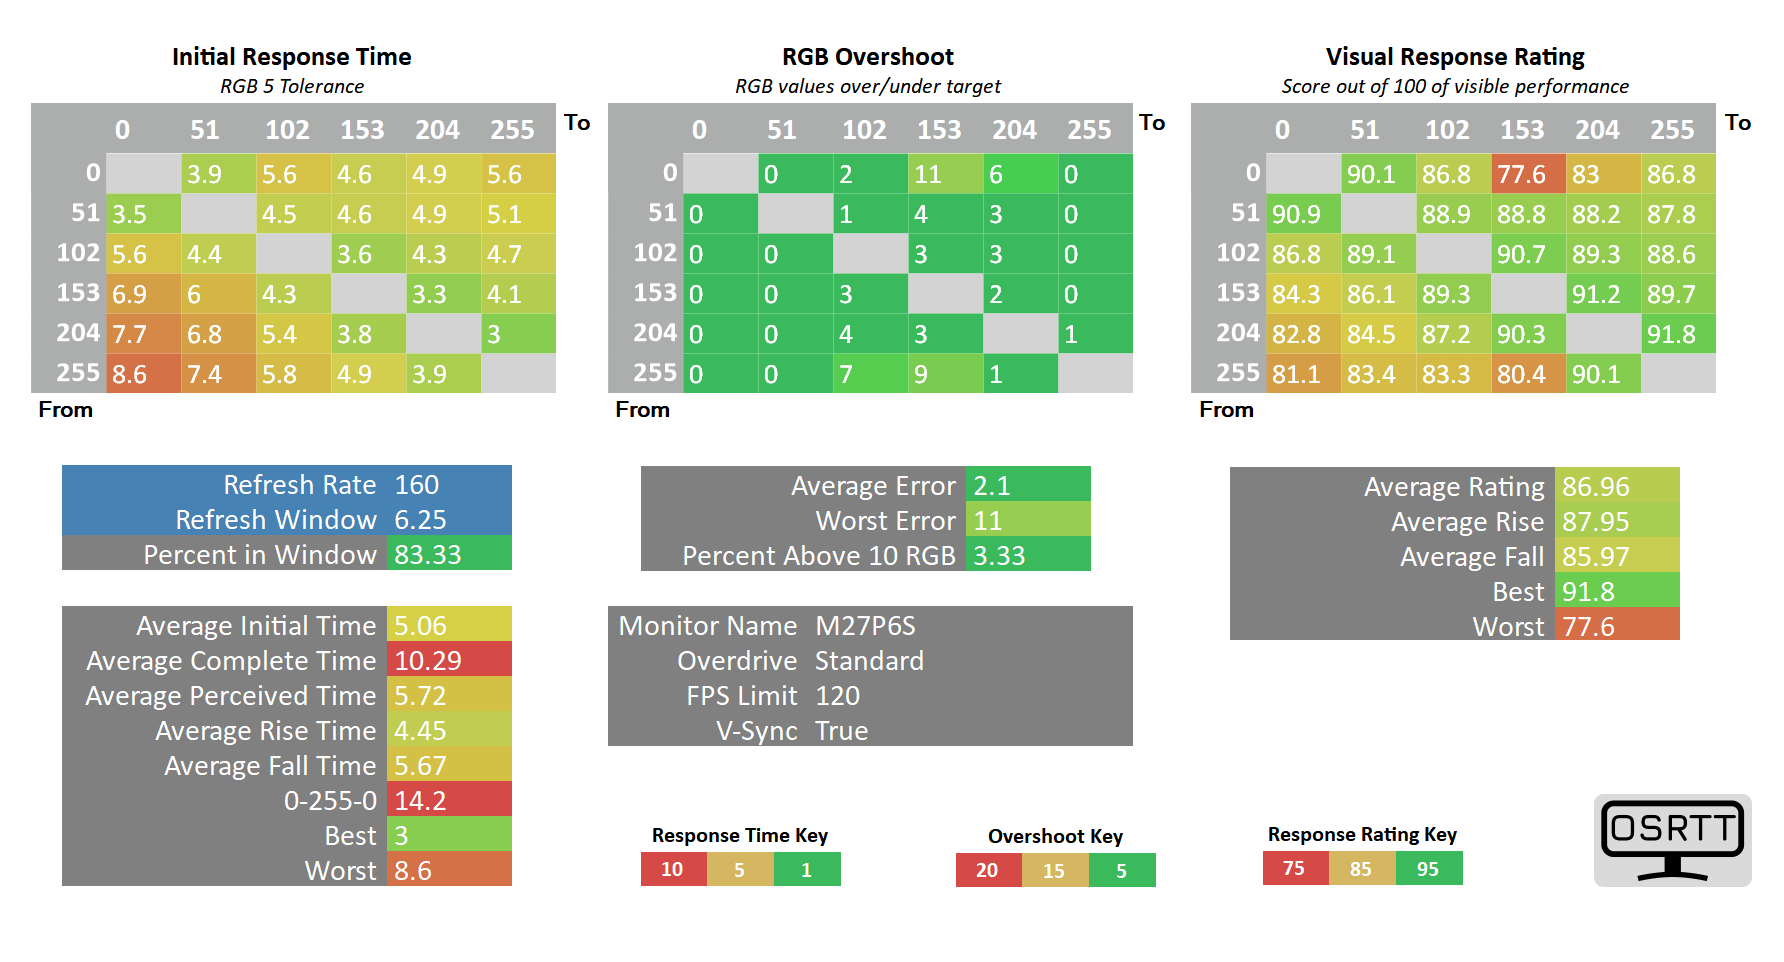
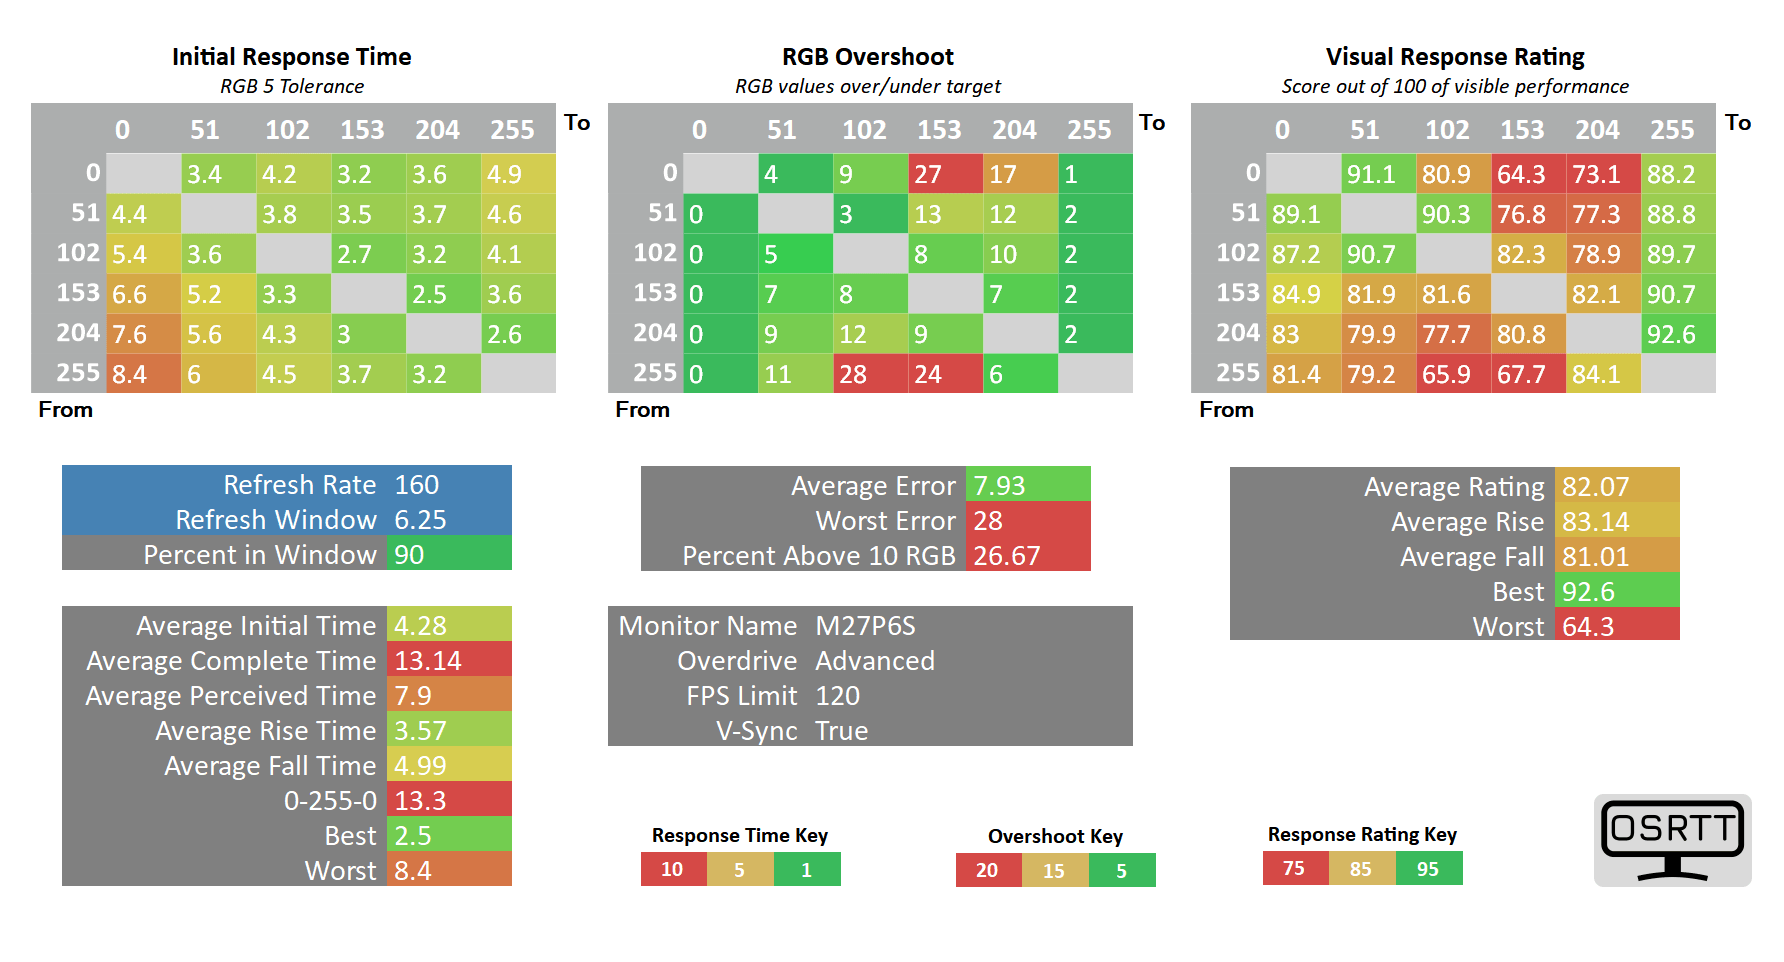
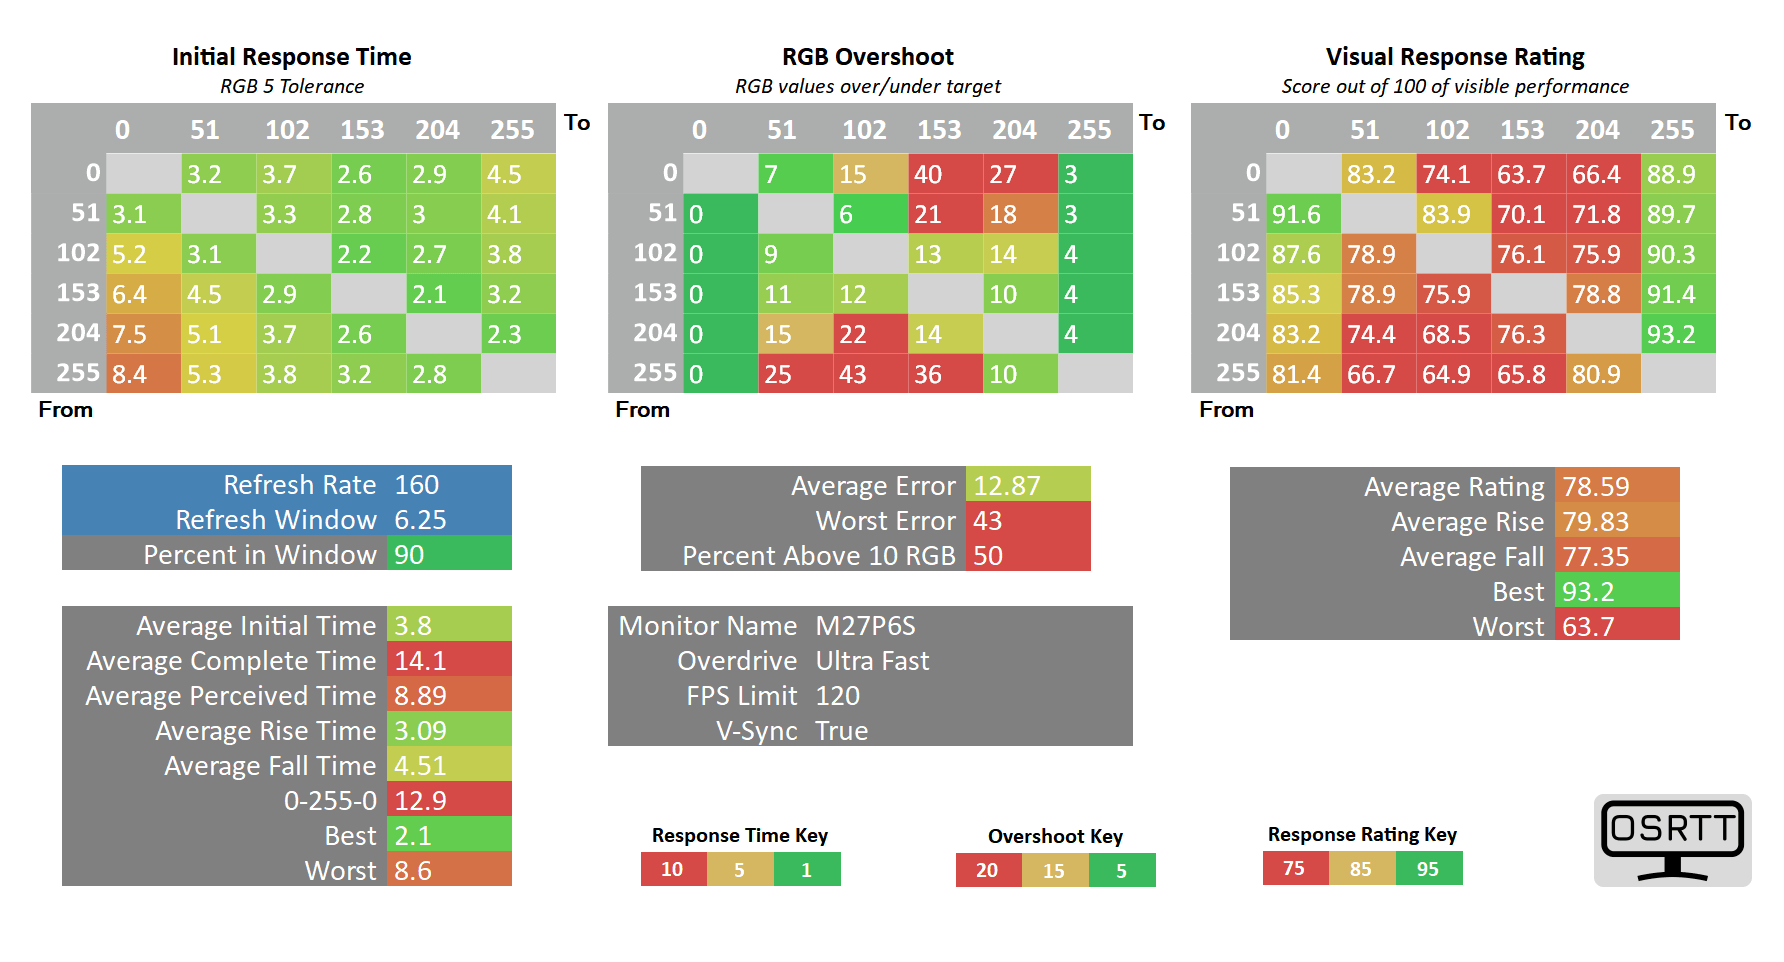
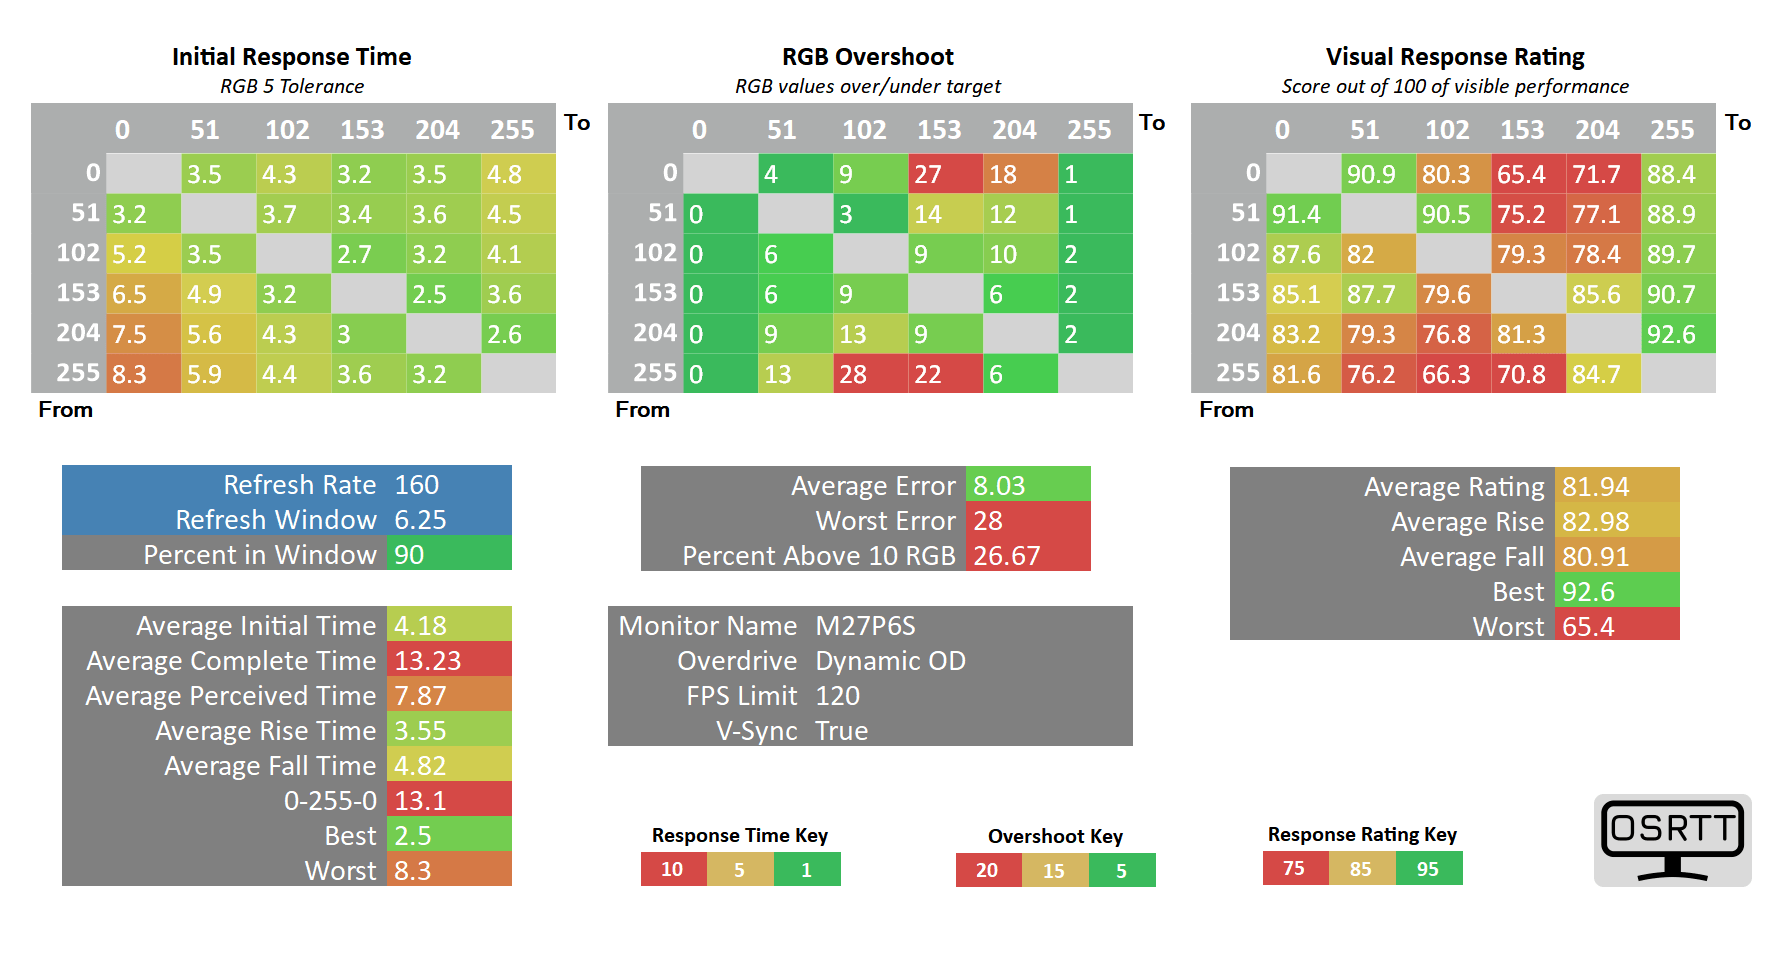
At 120Hz, you can dial it back to Standard to avoid overshoot with 2.1% average error, a similar 5.06ms GtG response time, and 96.7% refresh rate compliance.
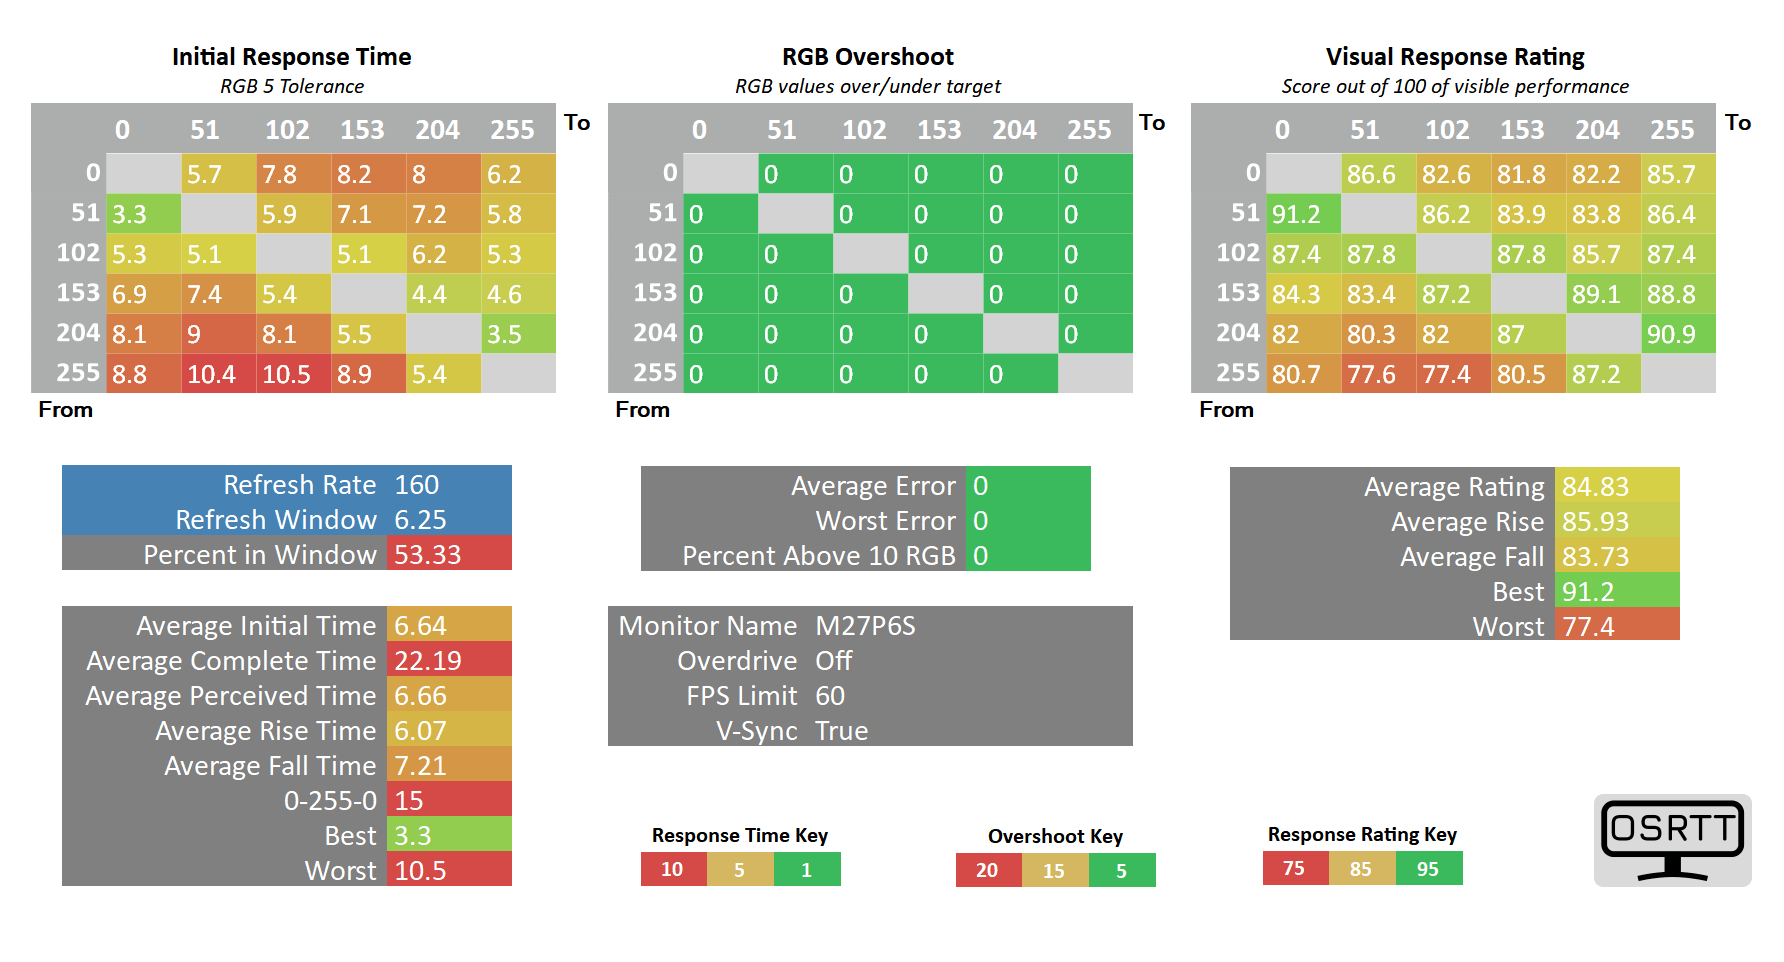
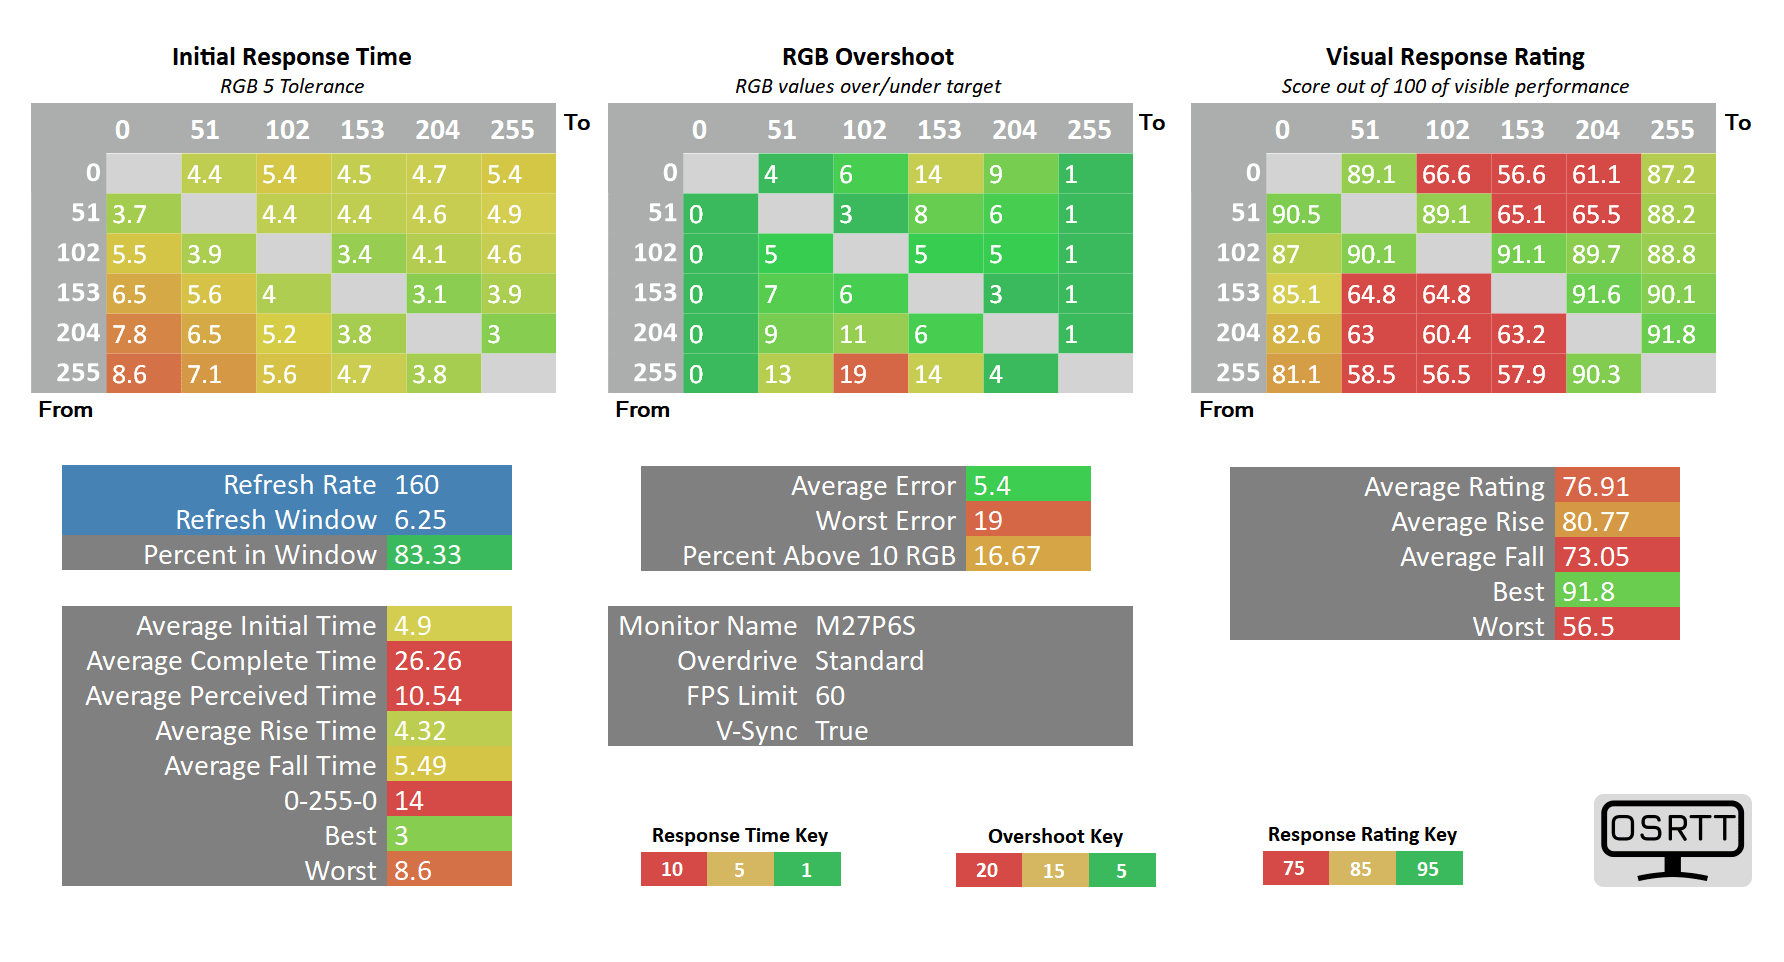
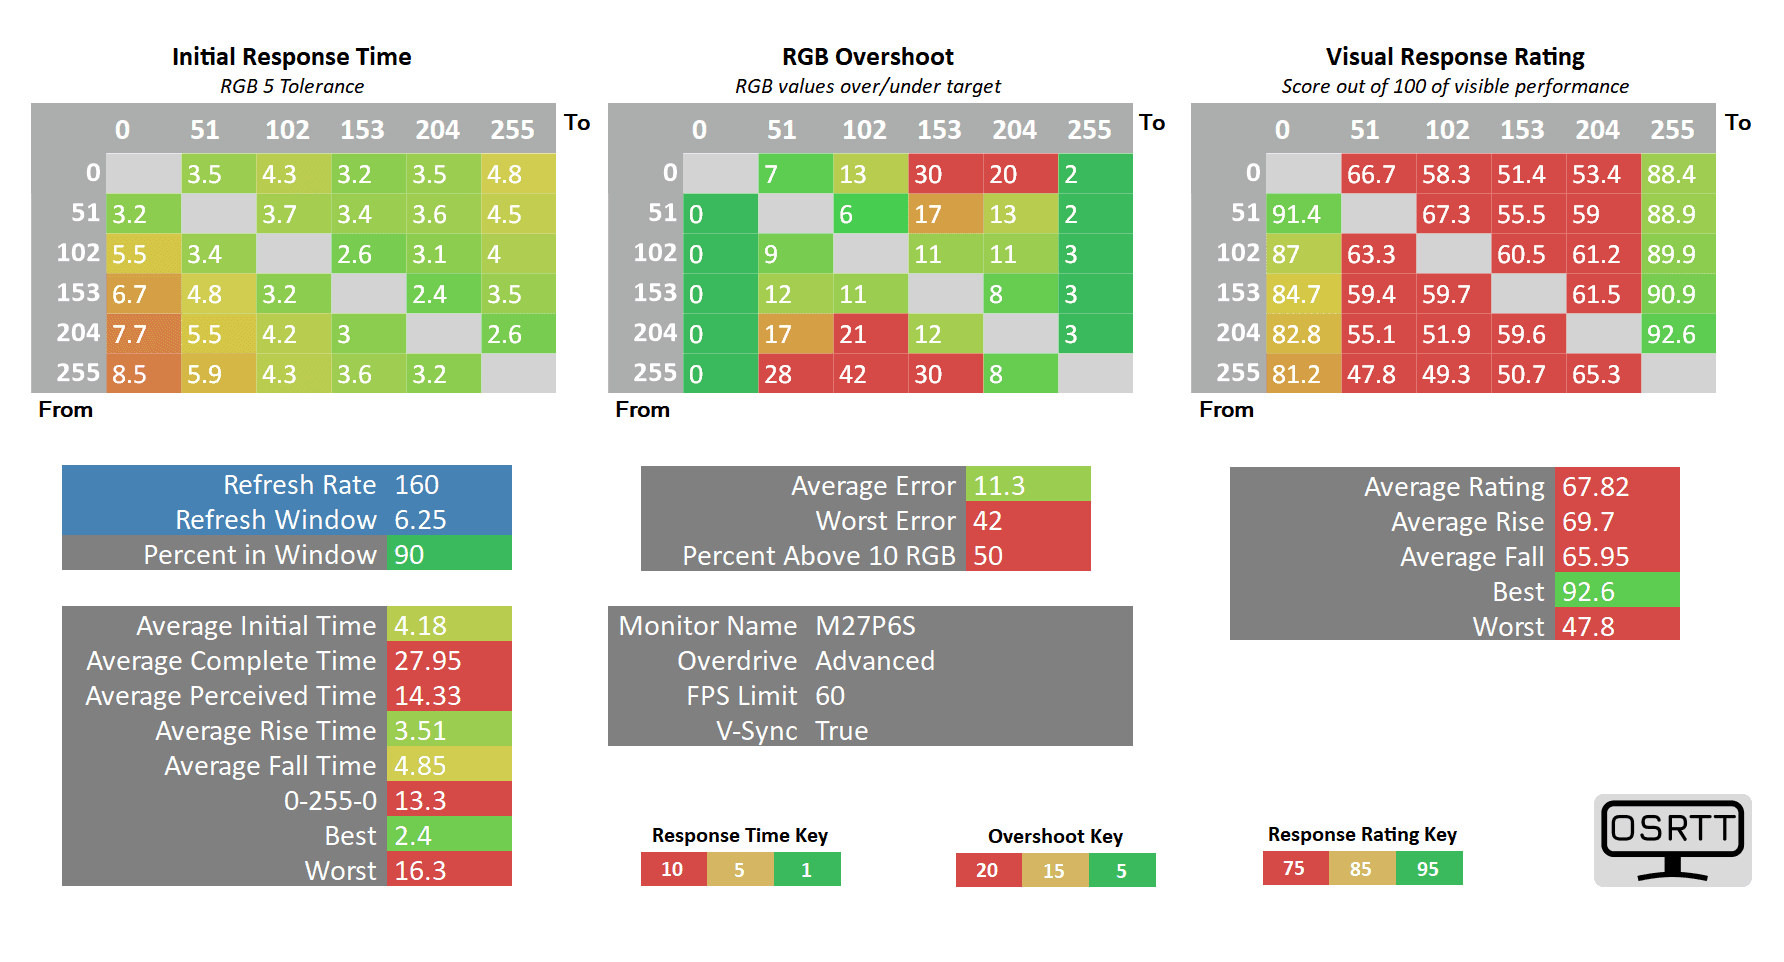
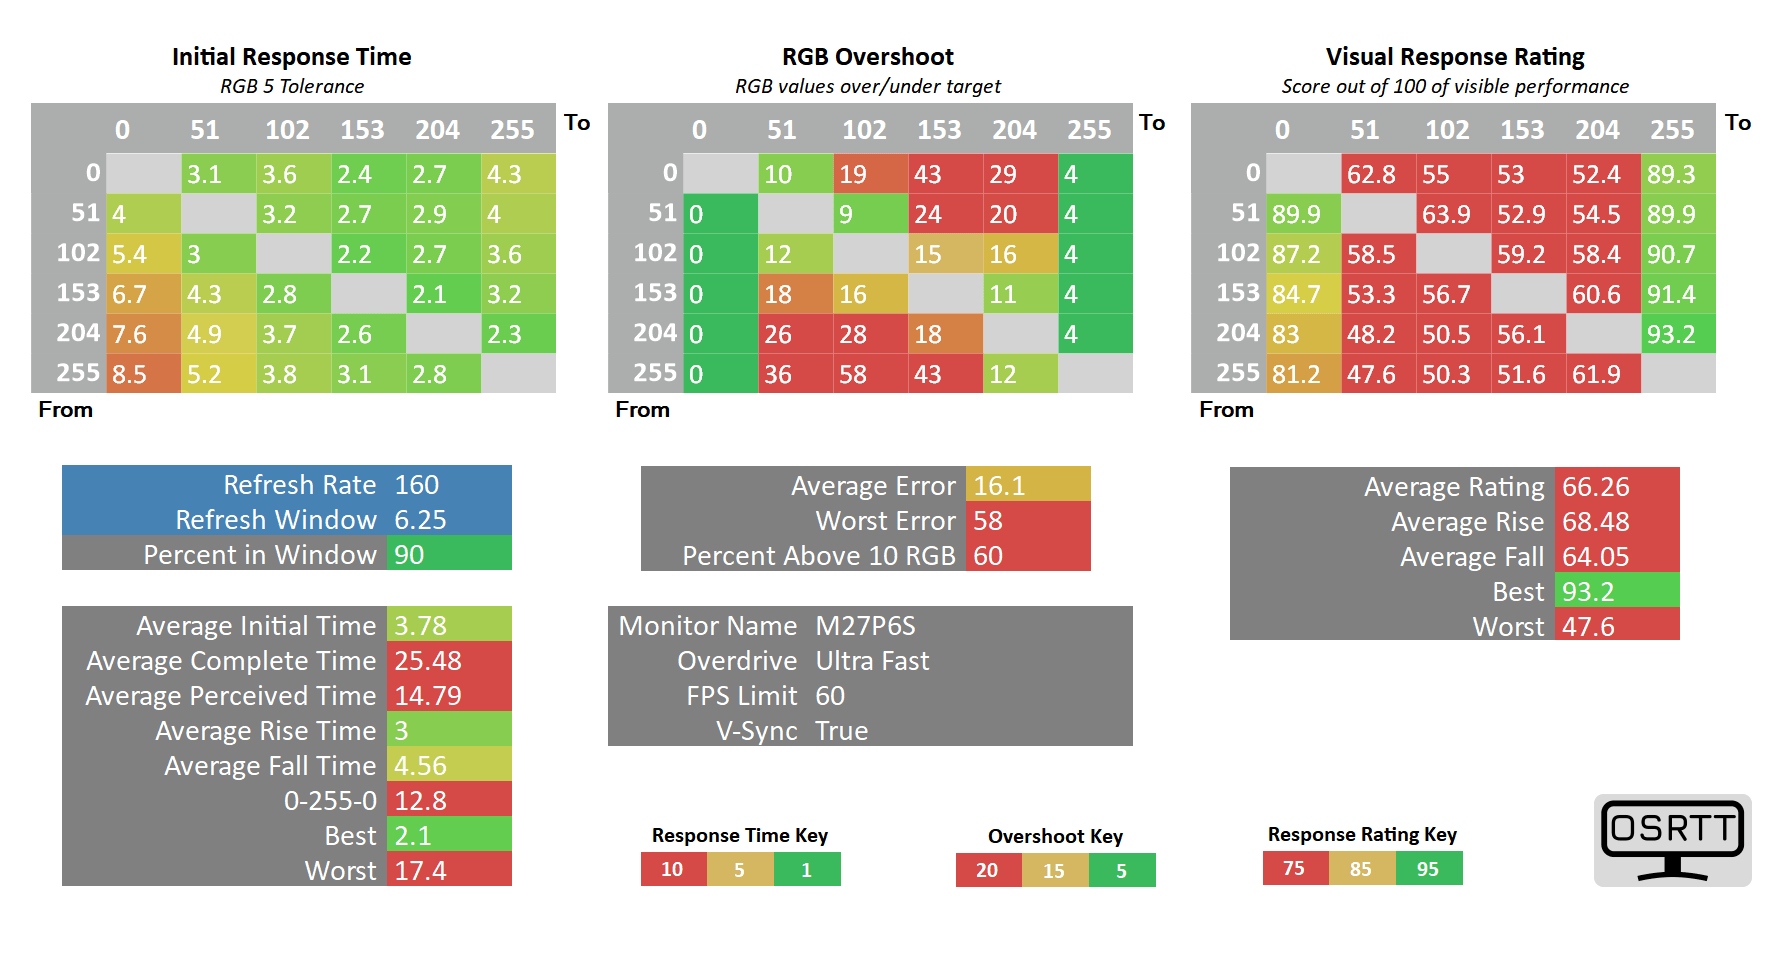
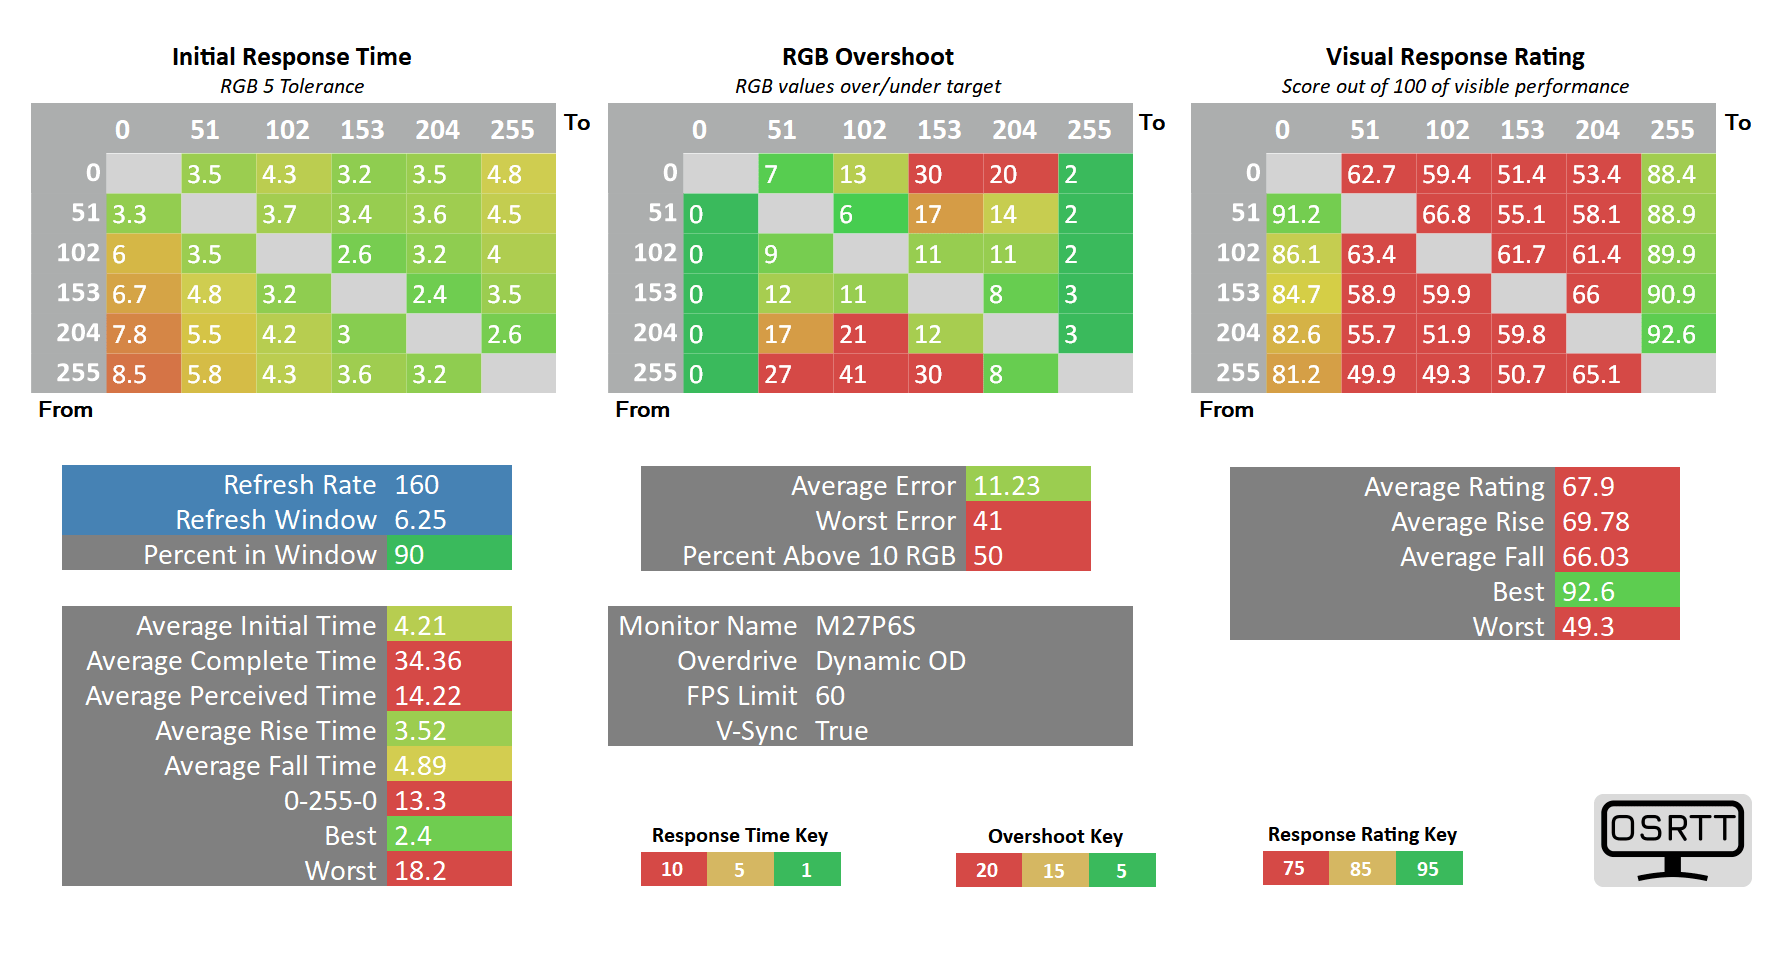
At 60Hz, the Standard mode works great with 100% refresh rate compliance, 4.9ms GtG average and 5.4% overshoot.
Next up, here are the results in the 1080p 320Hz mode.
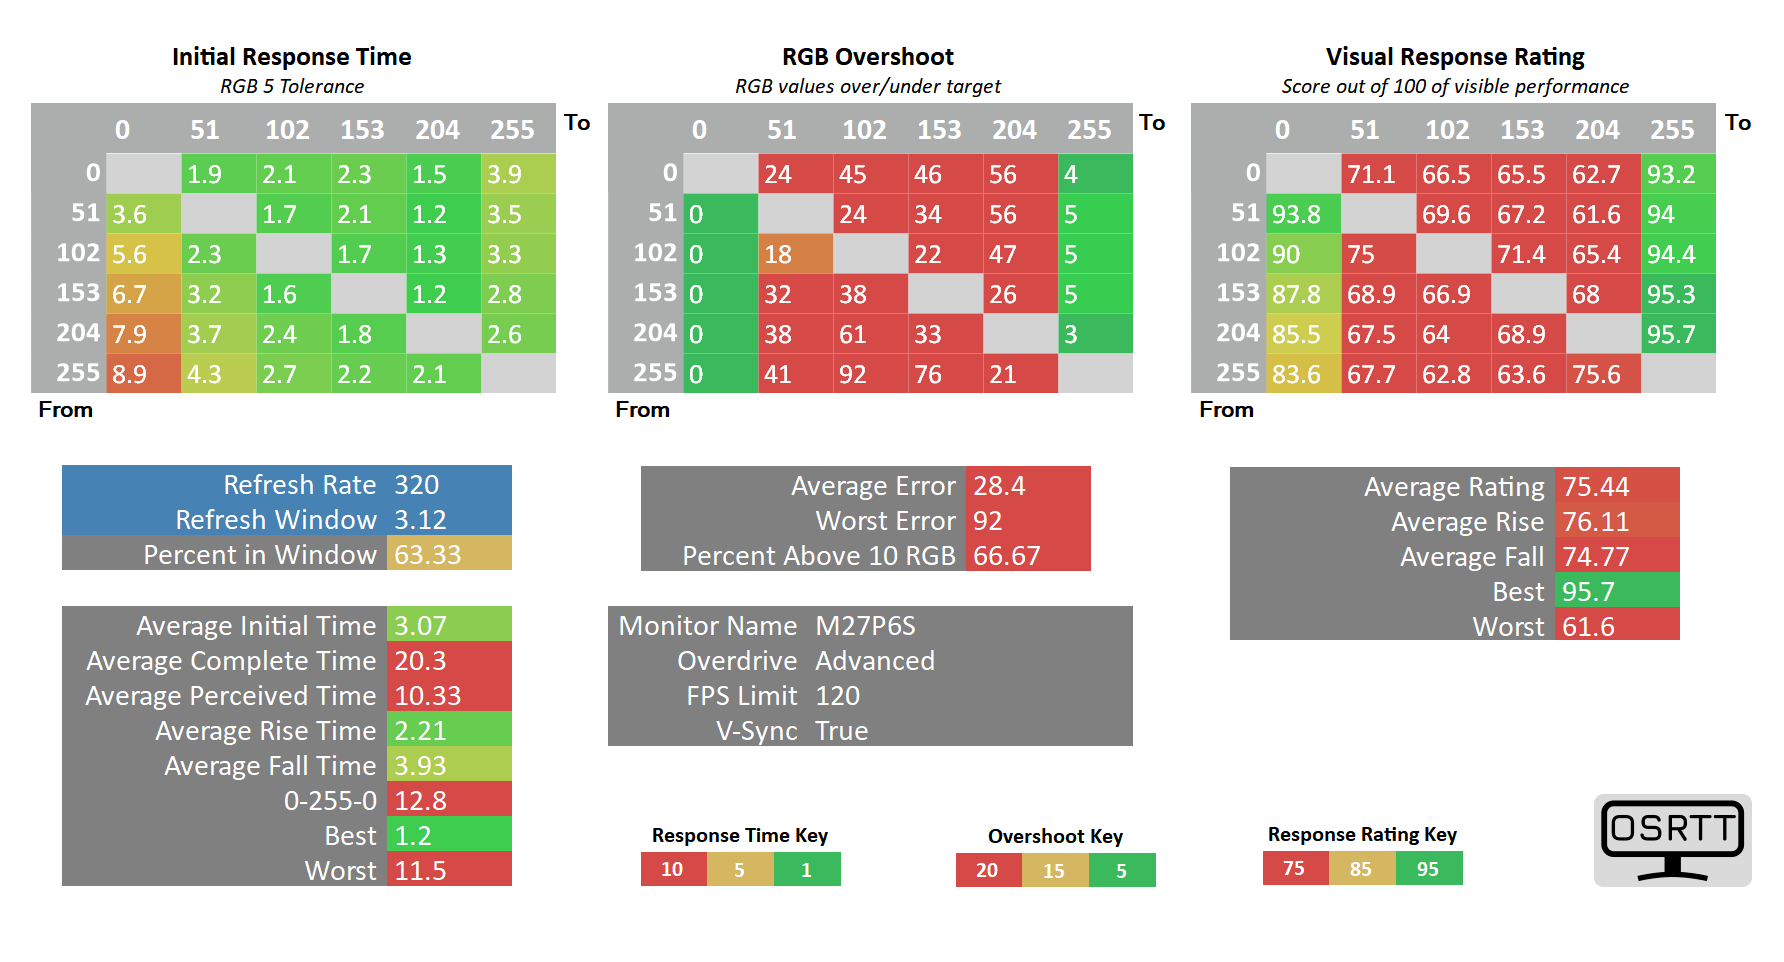
There’s a bug where overdrive is locked to ‘Off’ at 1080p 320Hz. Luckily, you can change the overdrive in KTC’s Monitor Command Centre desktop application.
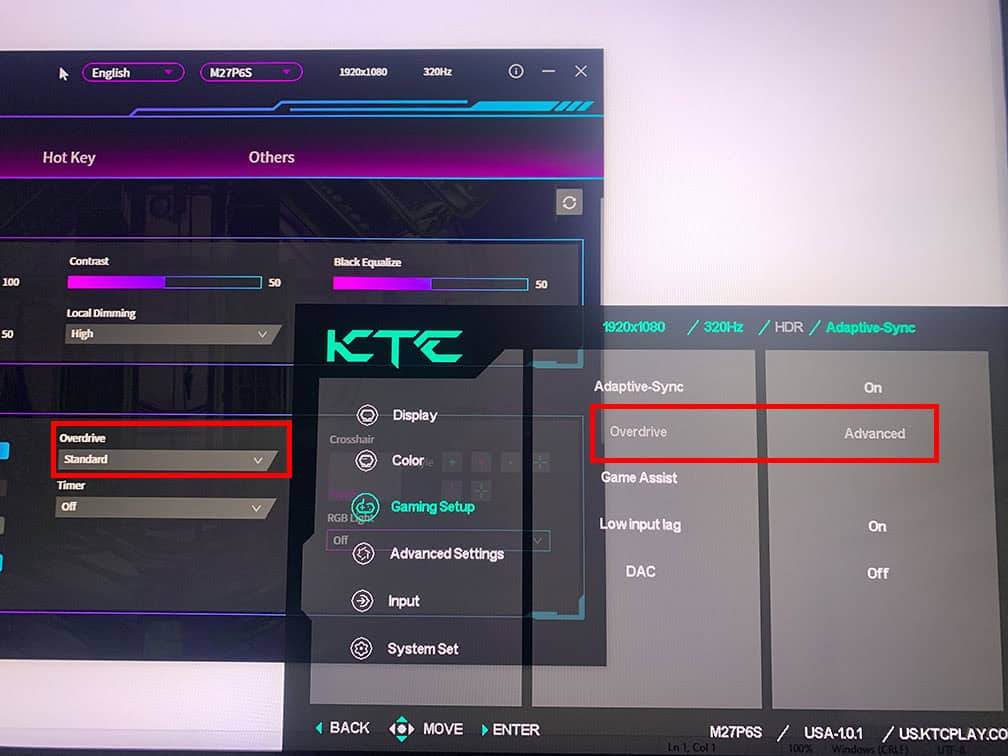
Note that selecting a mode in the app actually activates the next tier up on the monitor, so choosing ‘Standard’ in the app will set the monitor to ‘Advanced’.
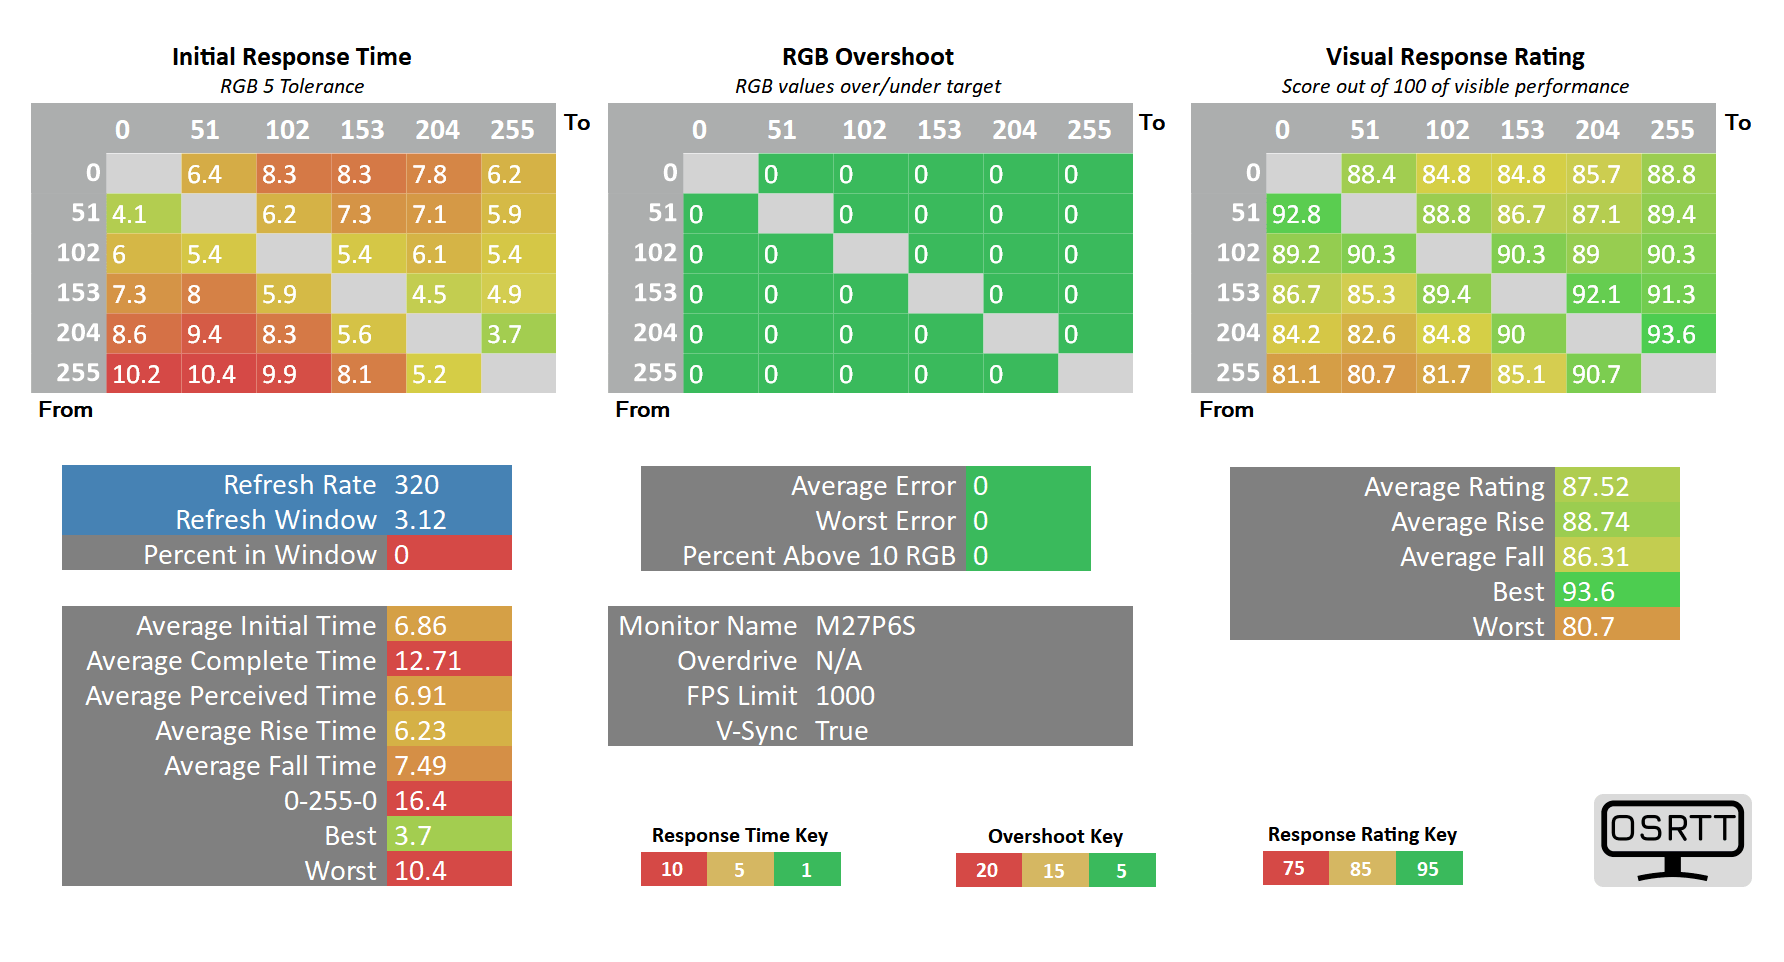
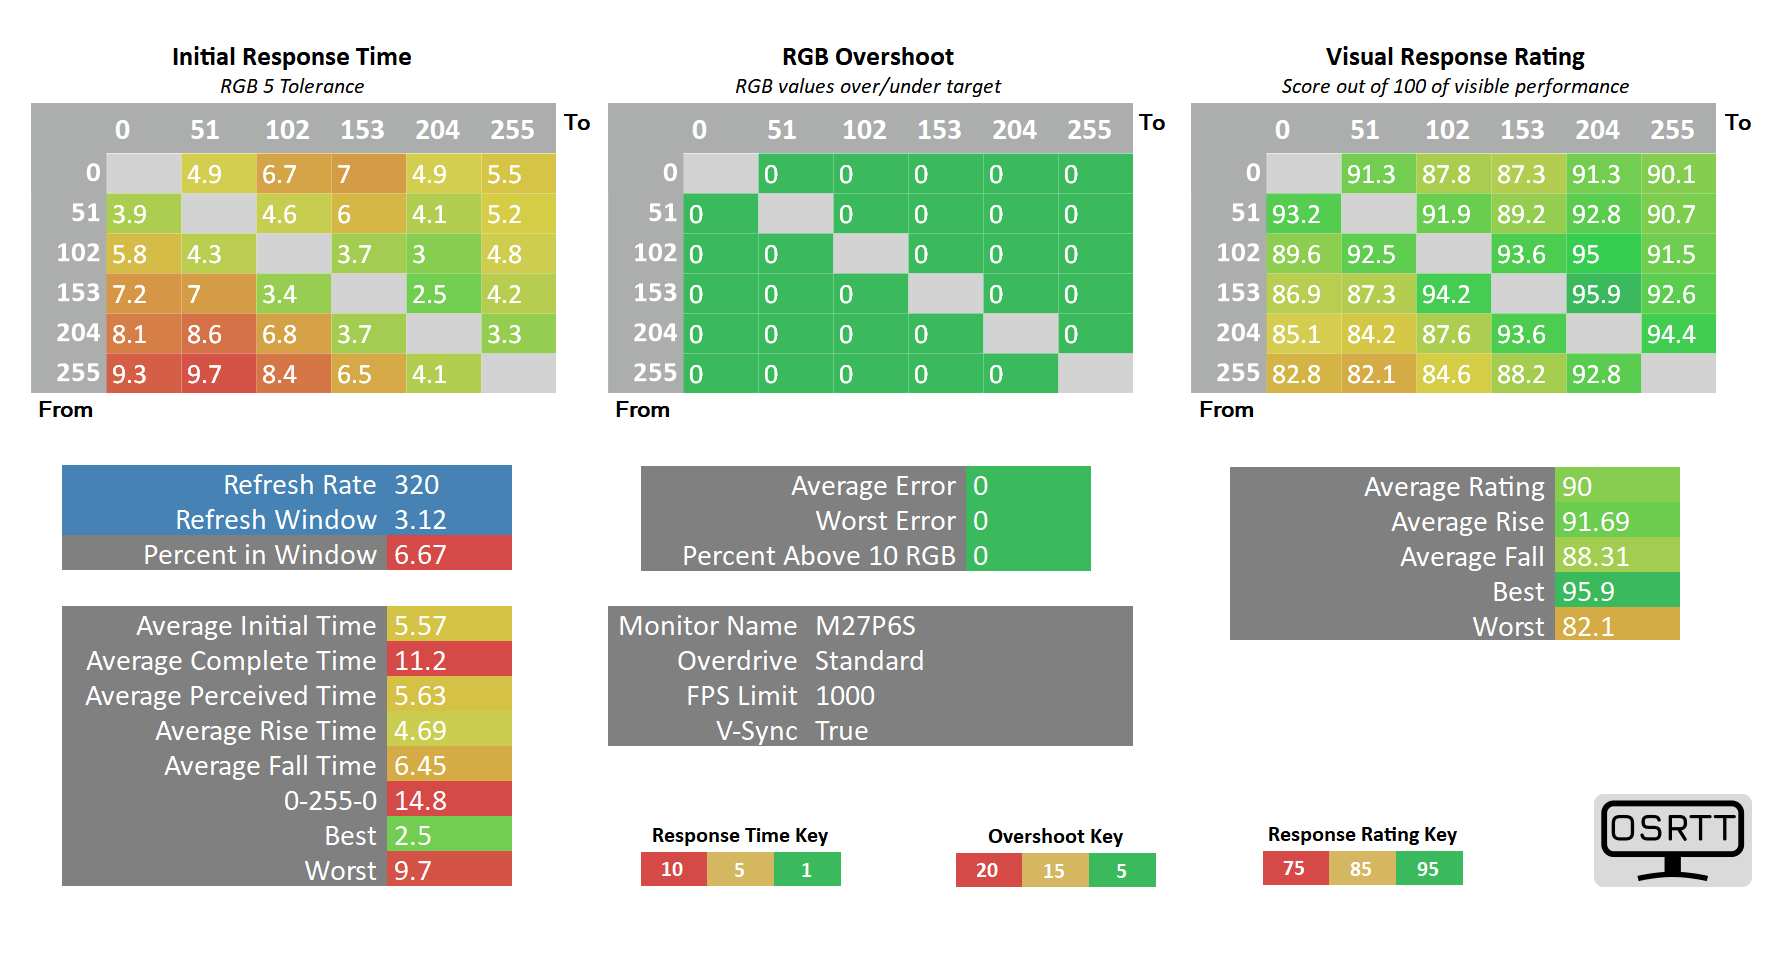
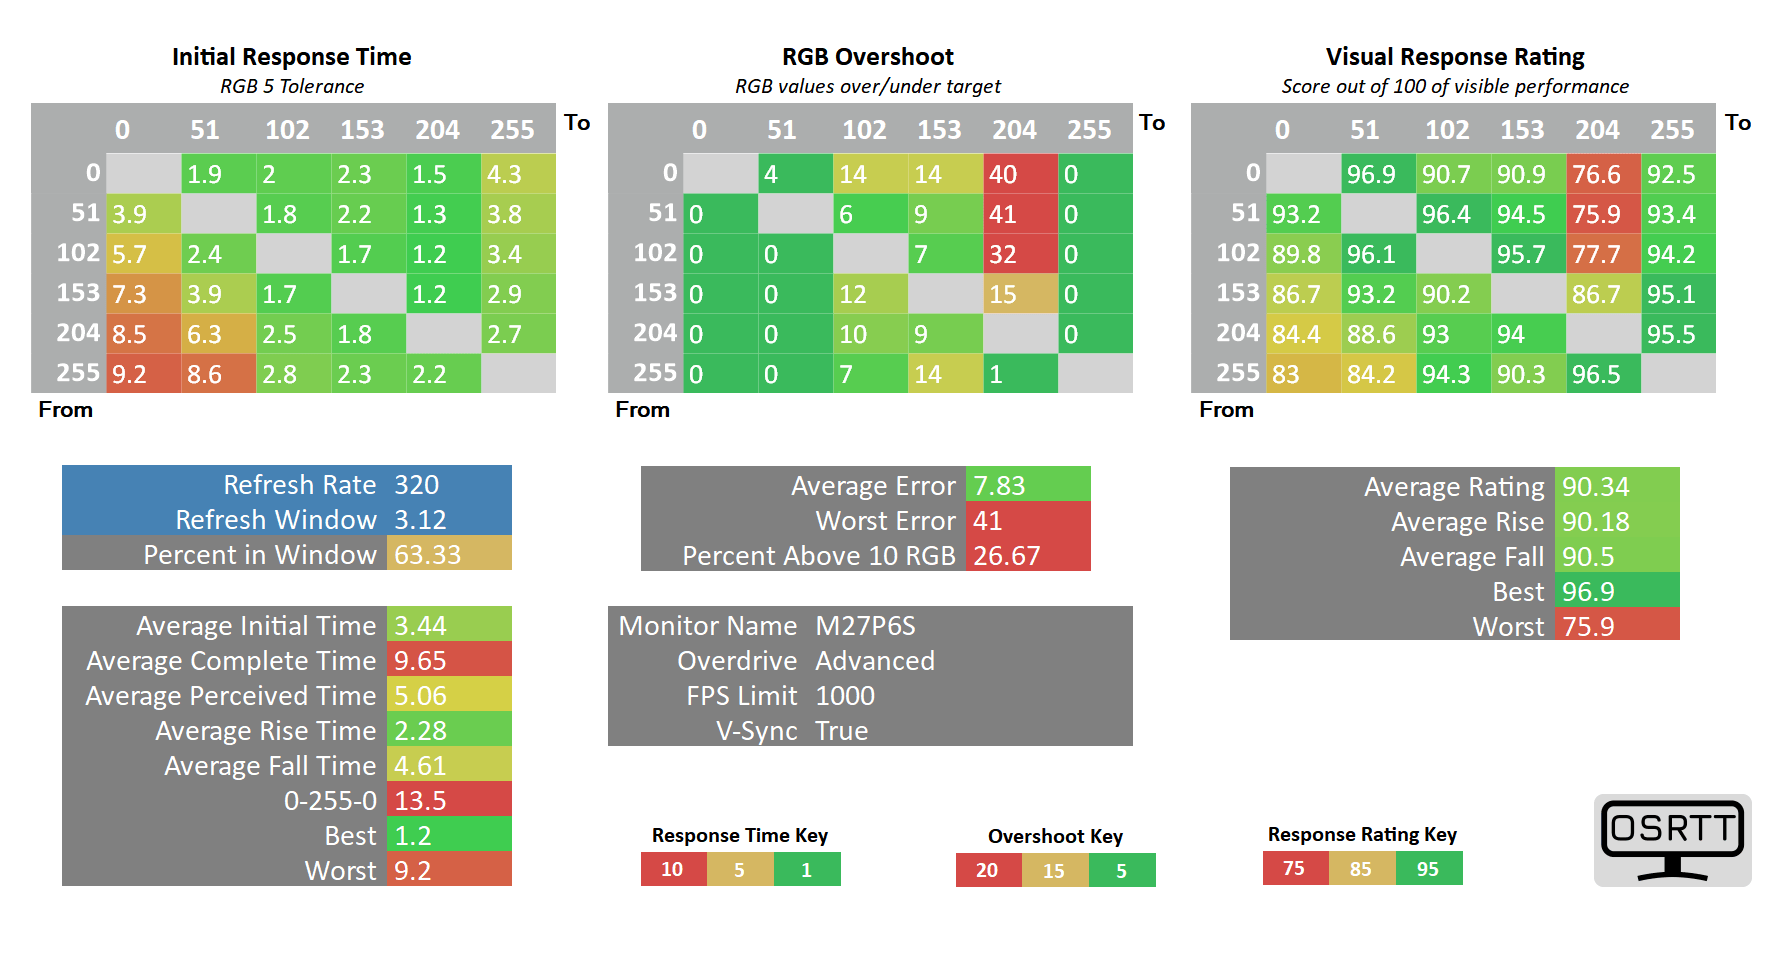
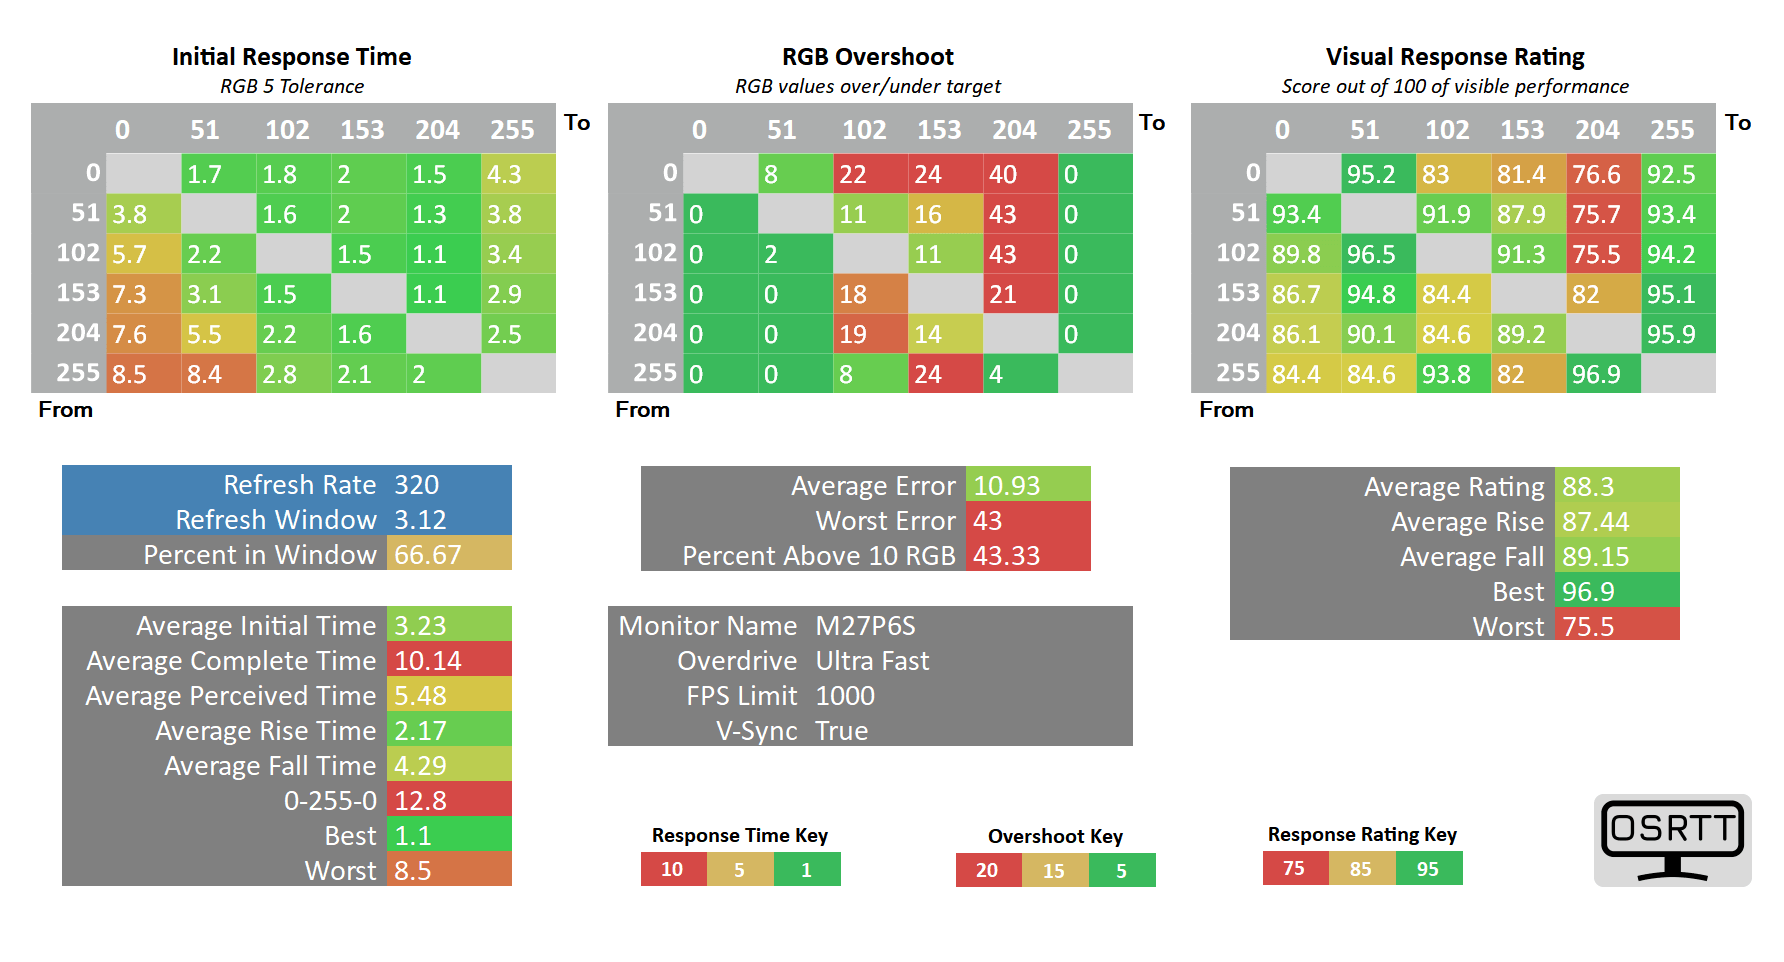
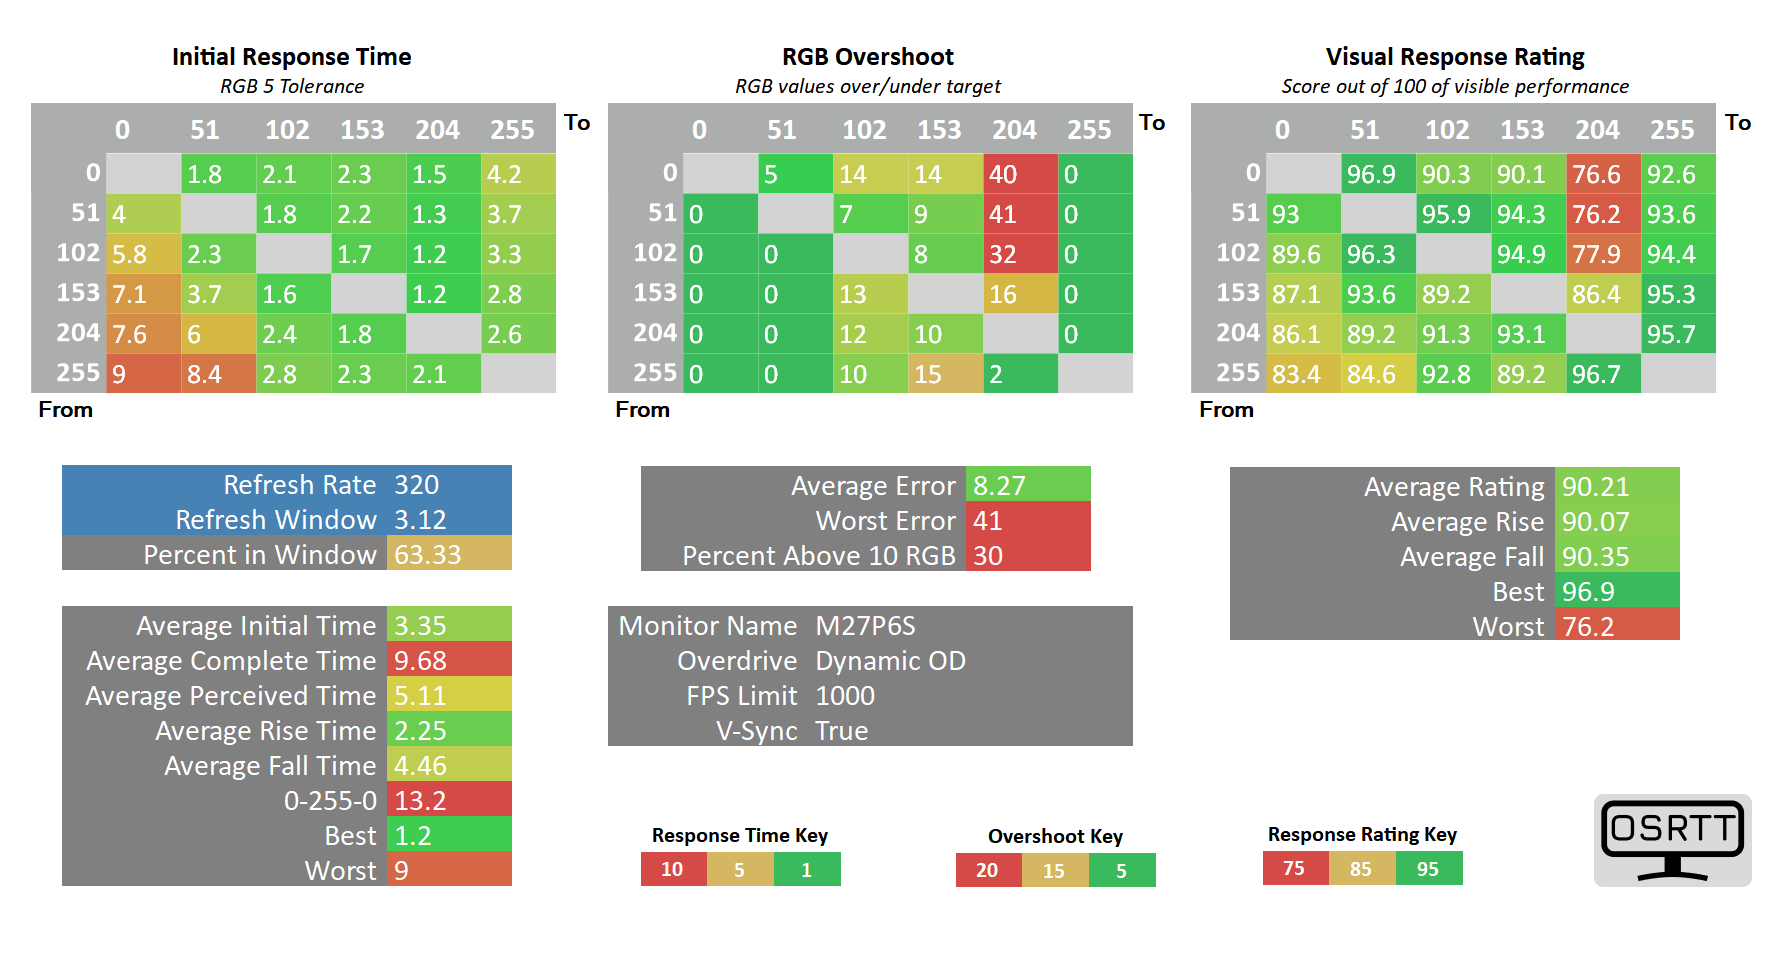
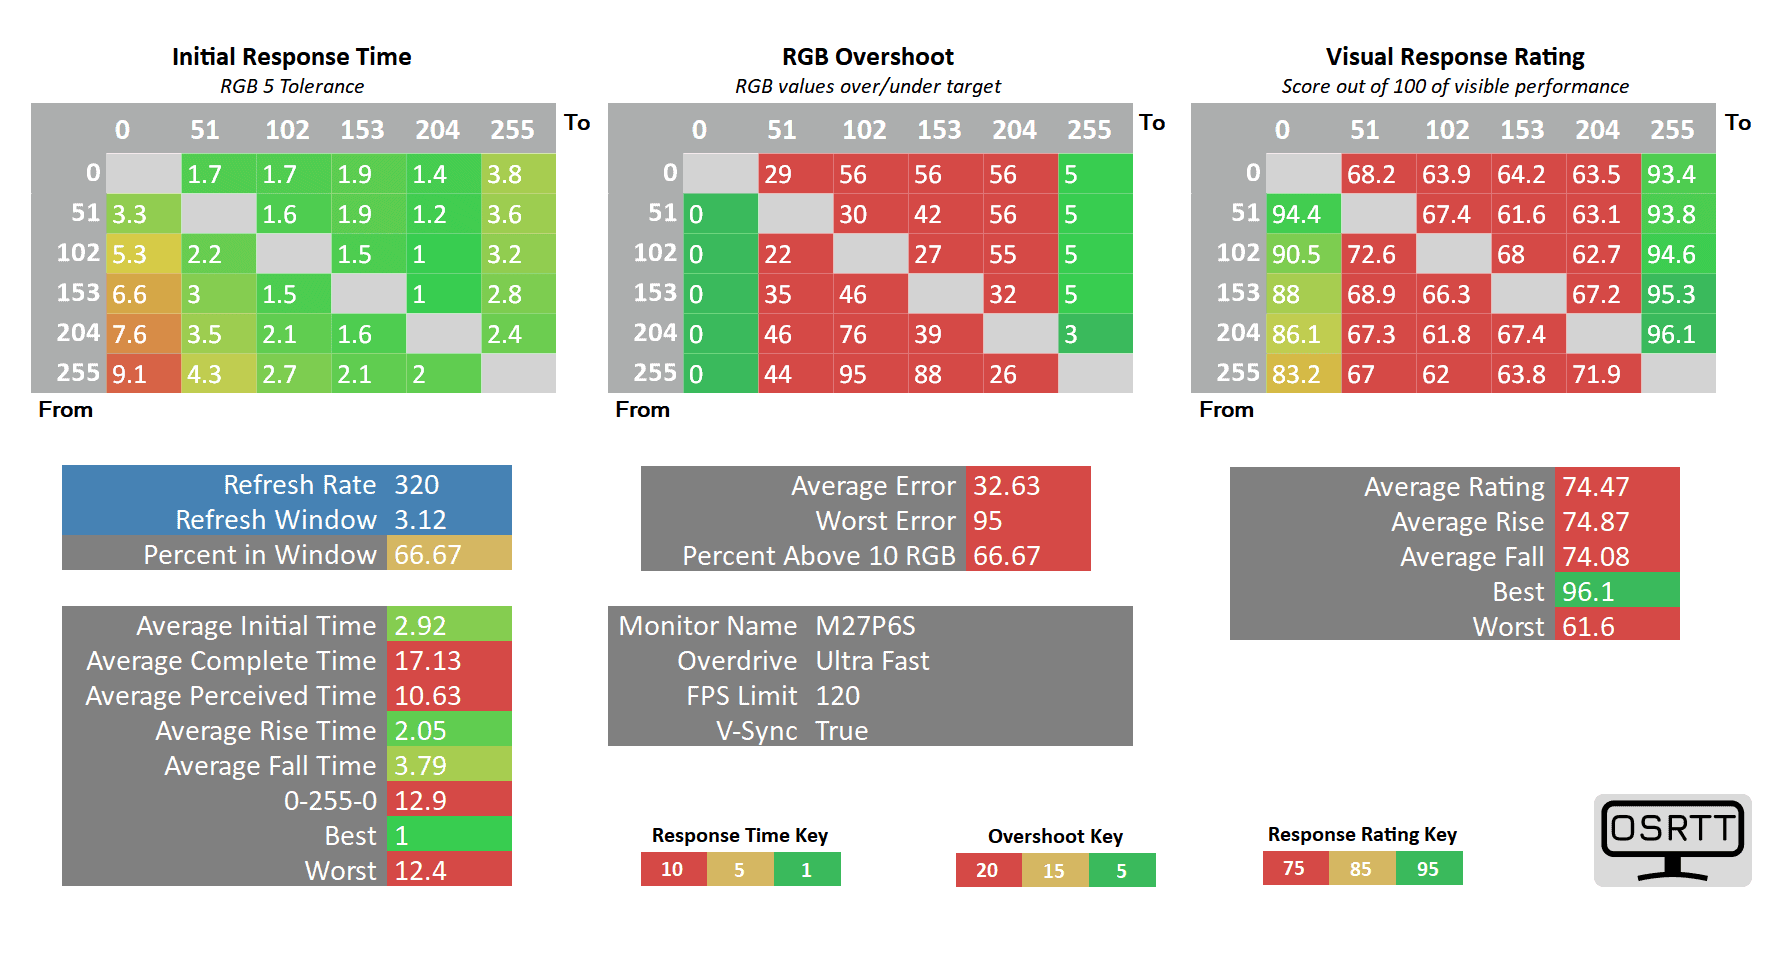
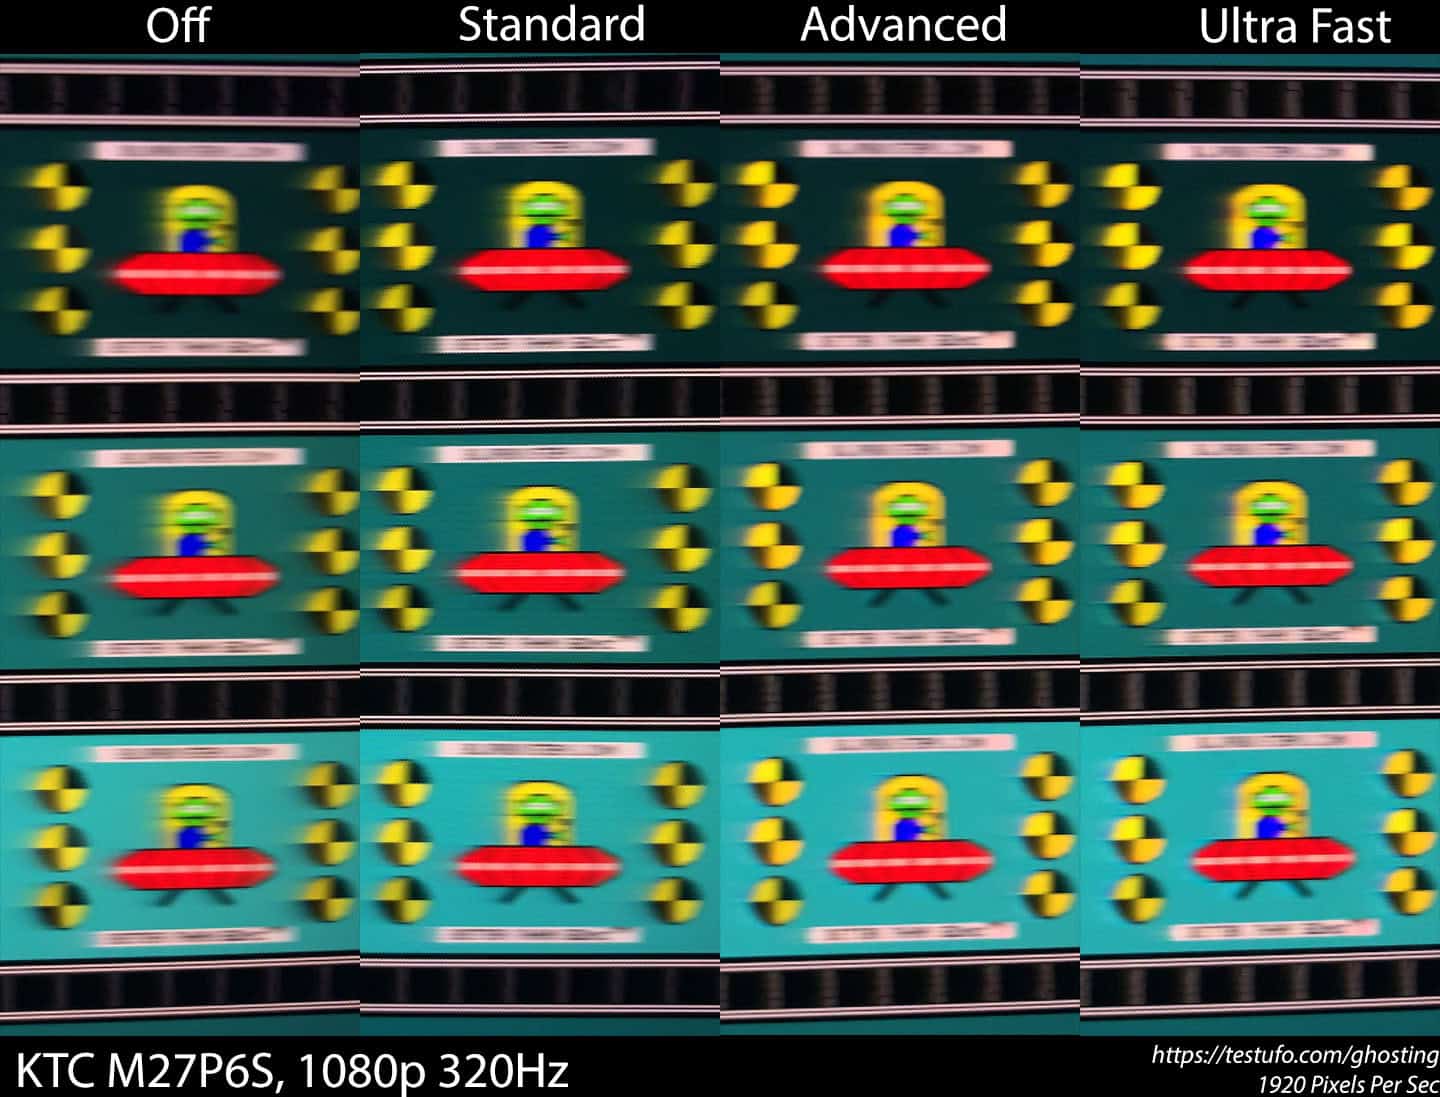
In the 1080p mode at max refresh rate, Advanced is the best mode to use with a 3.44ms GtG response time, 63.33% refresh rate compliance, and 7.83% overshoot error.
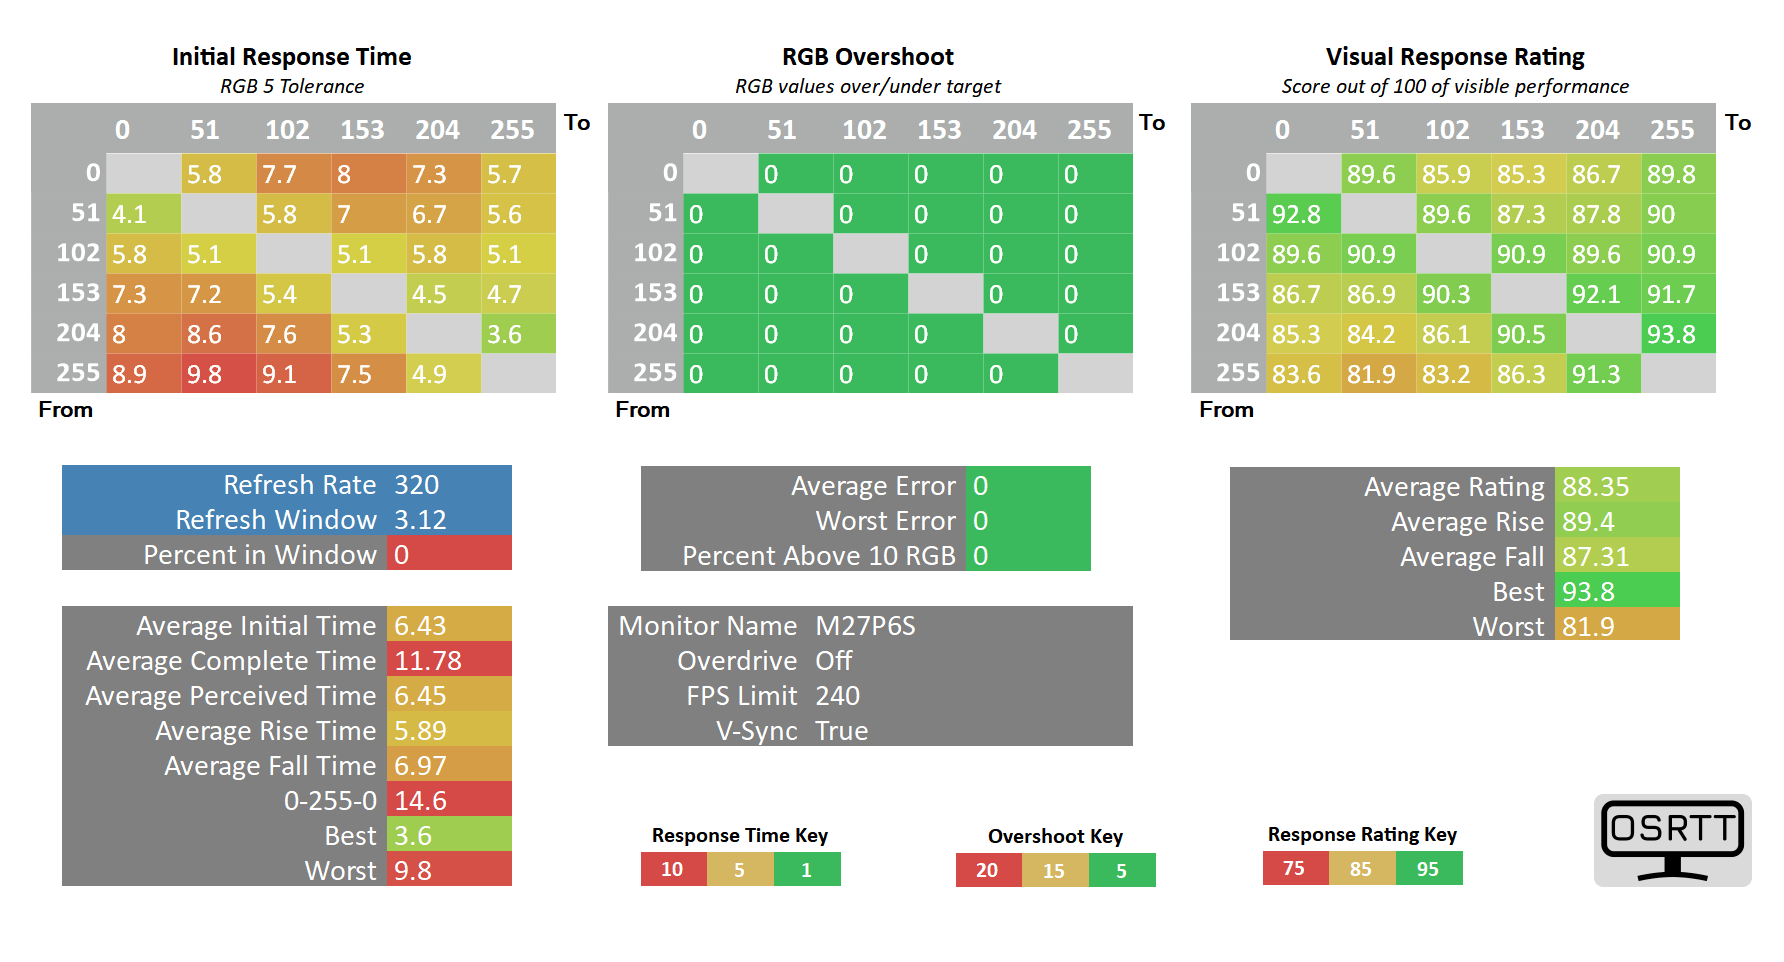
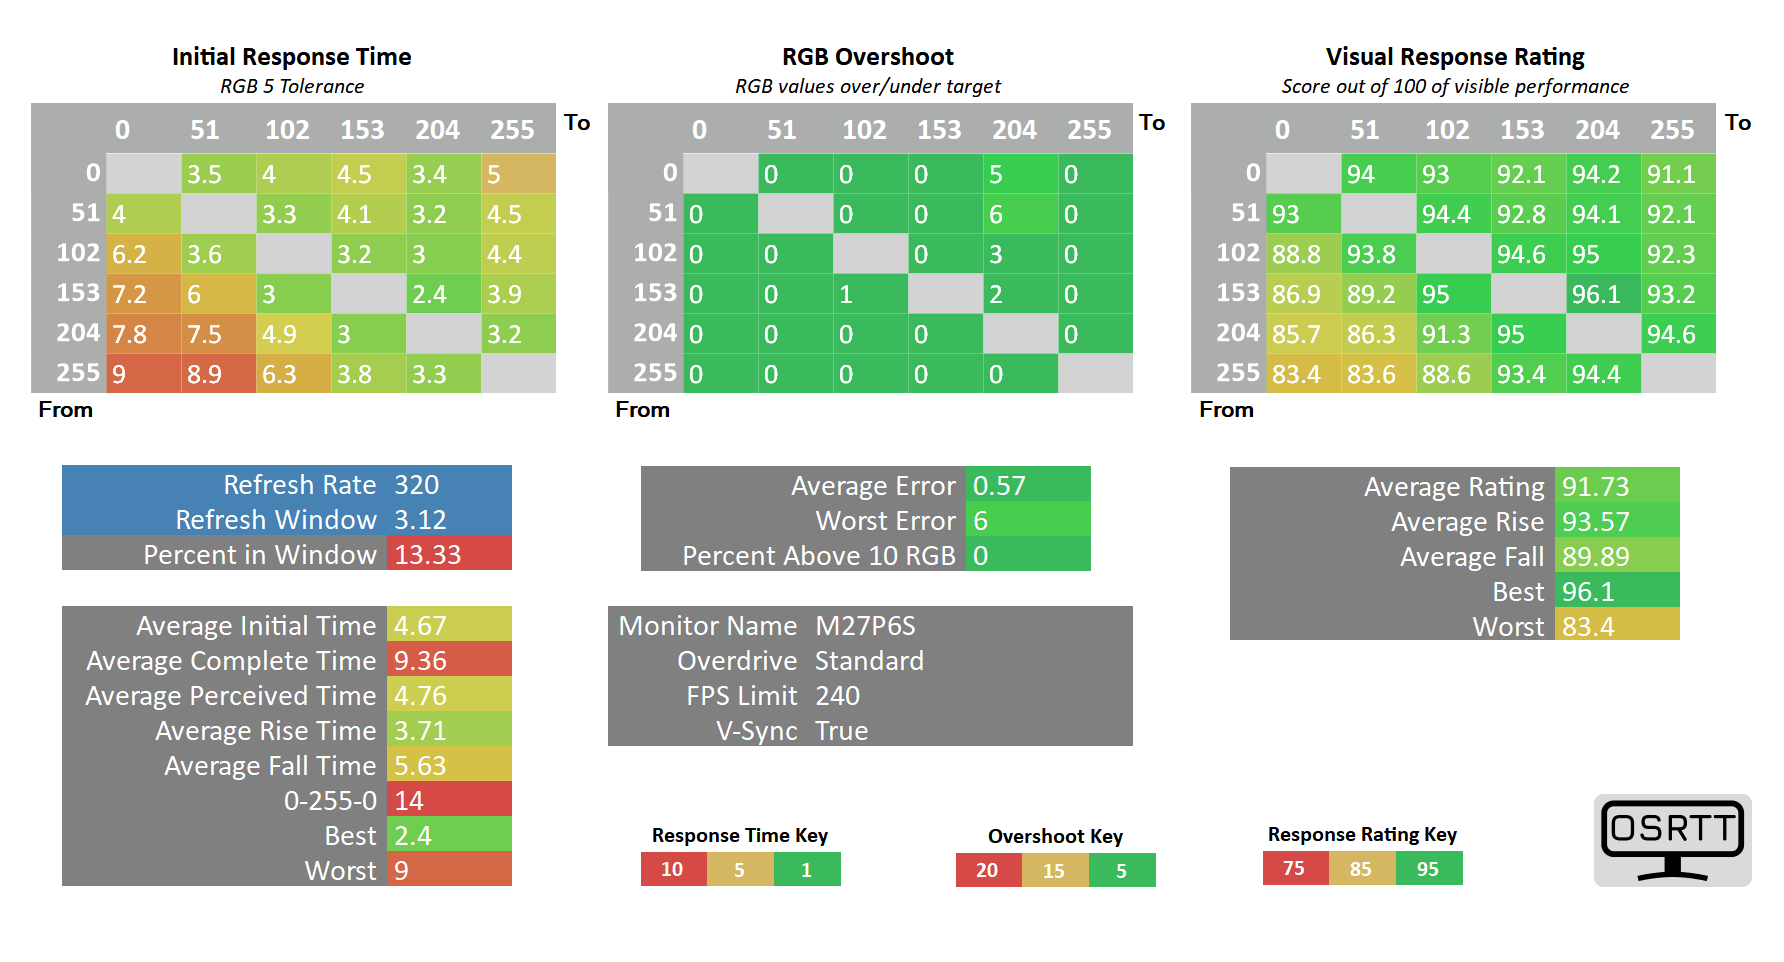
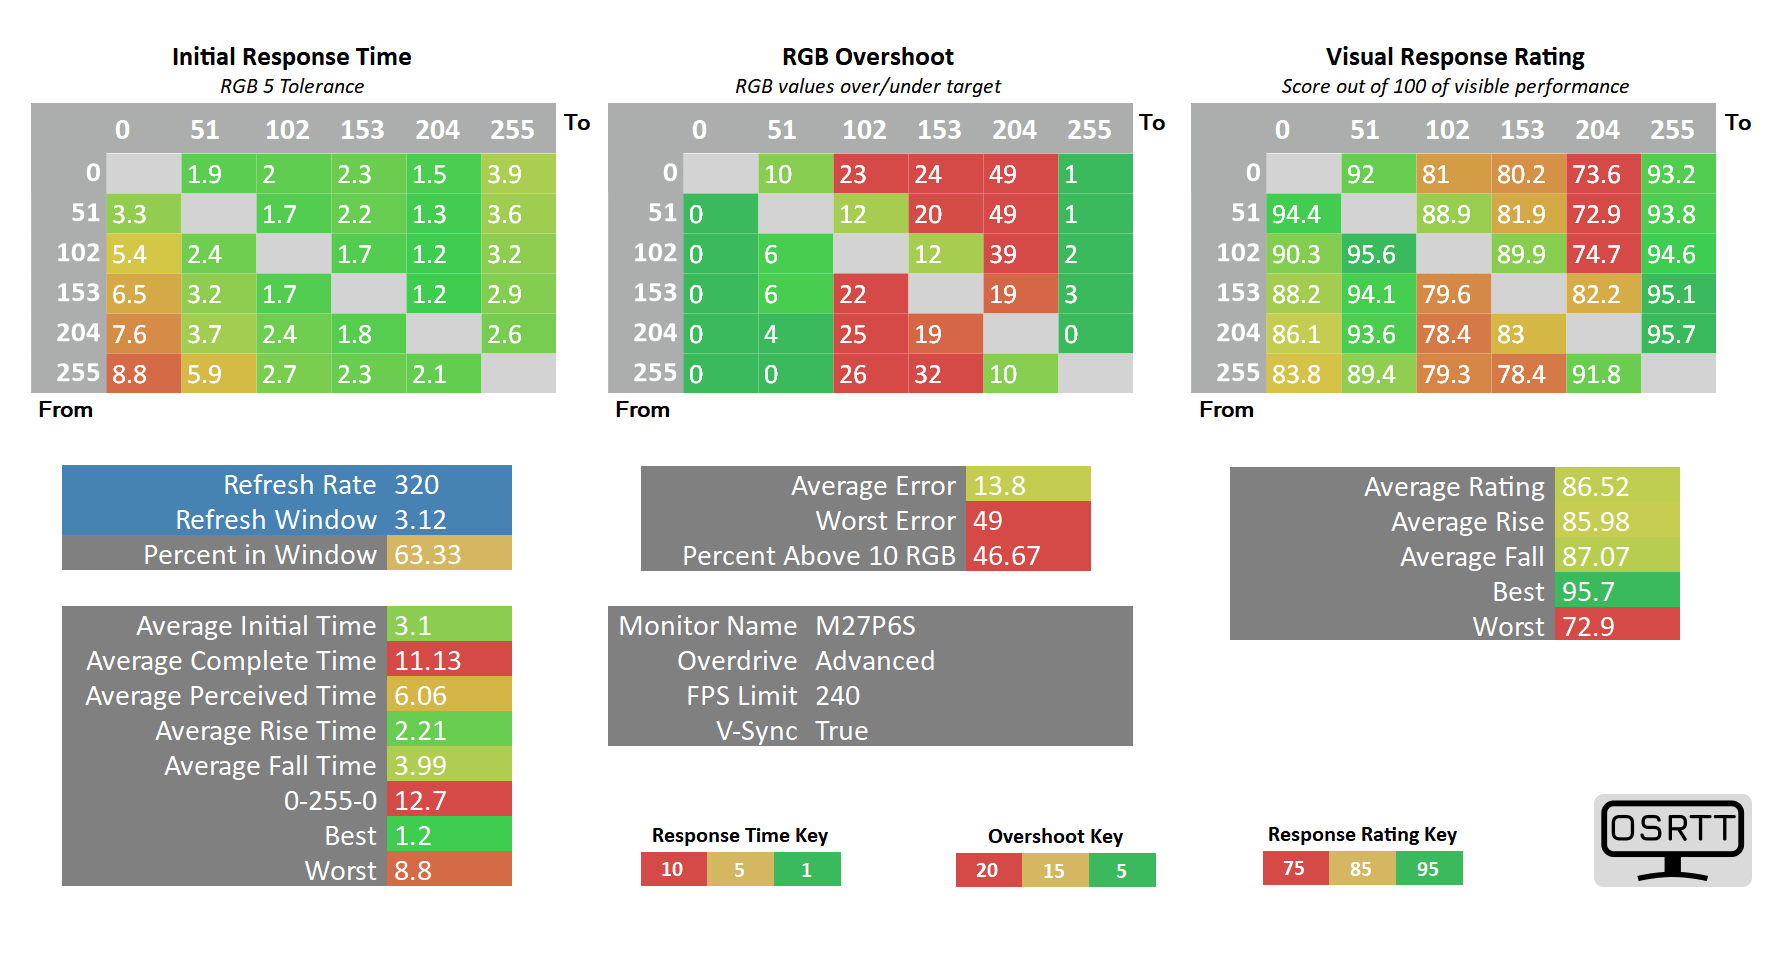
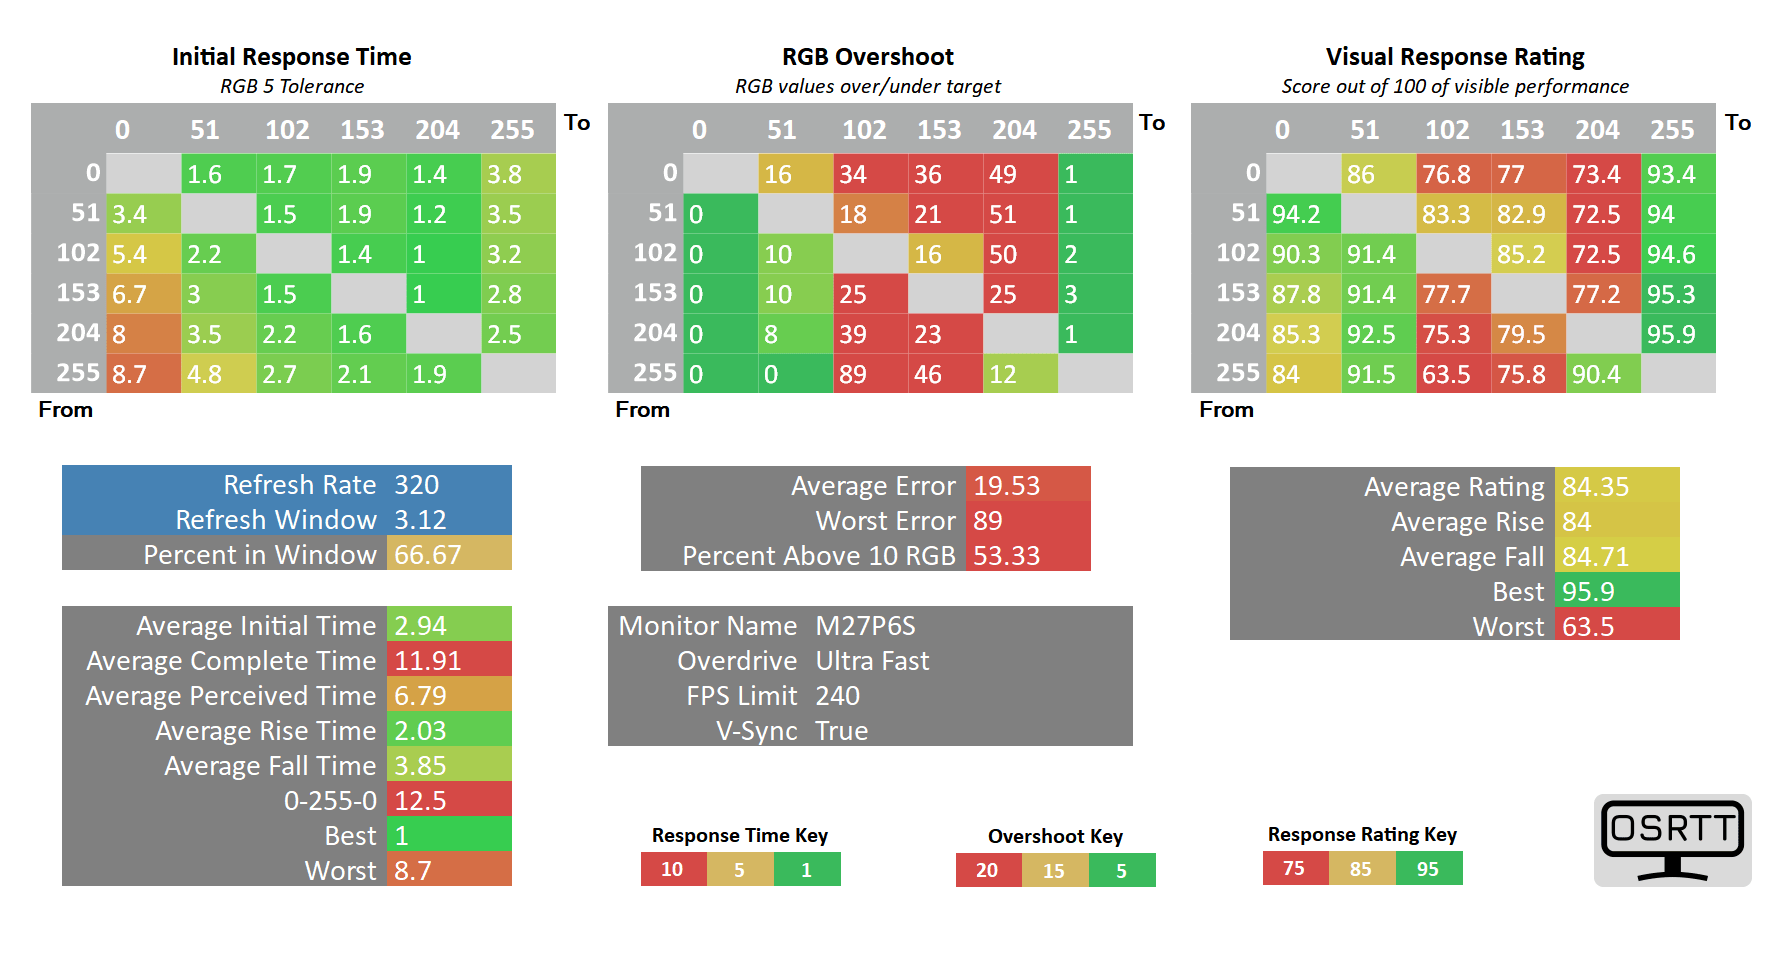
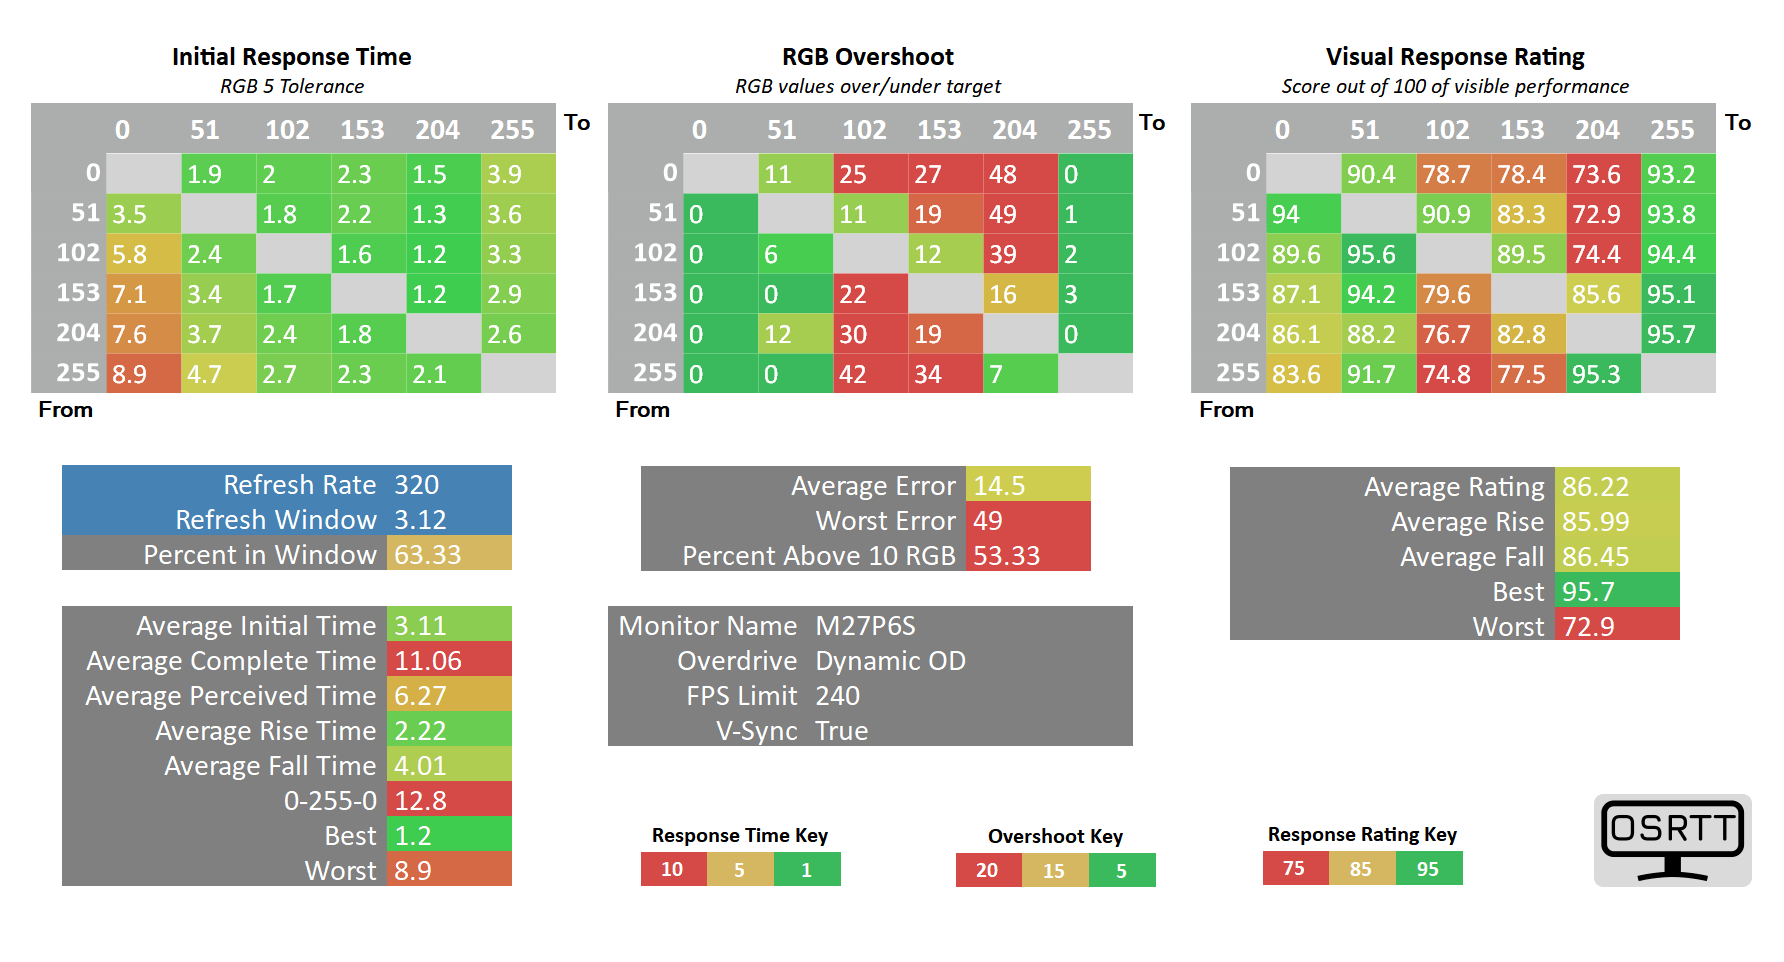
Around 240FPS, Advanced starts to introduce visible overshoot, so we recommend dialing it back to Standard with 4.67ms GtG average, 0.57% overshoot and 56.7% refresh rate compliance.
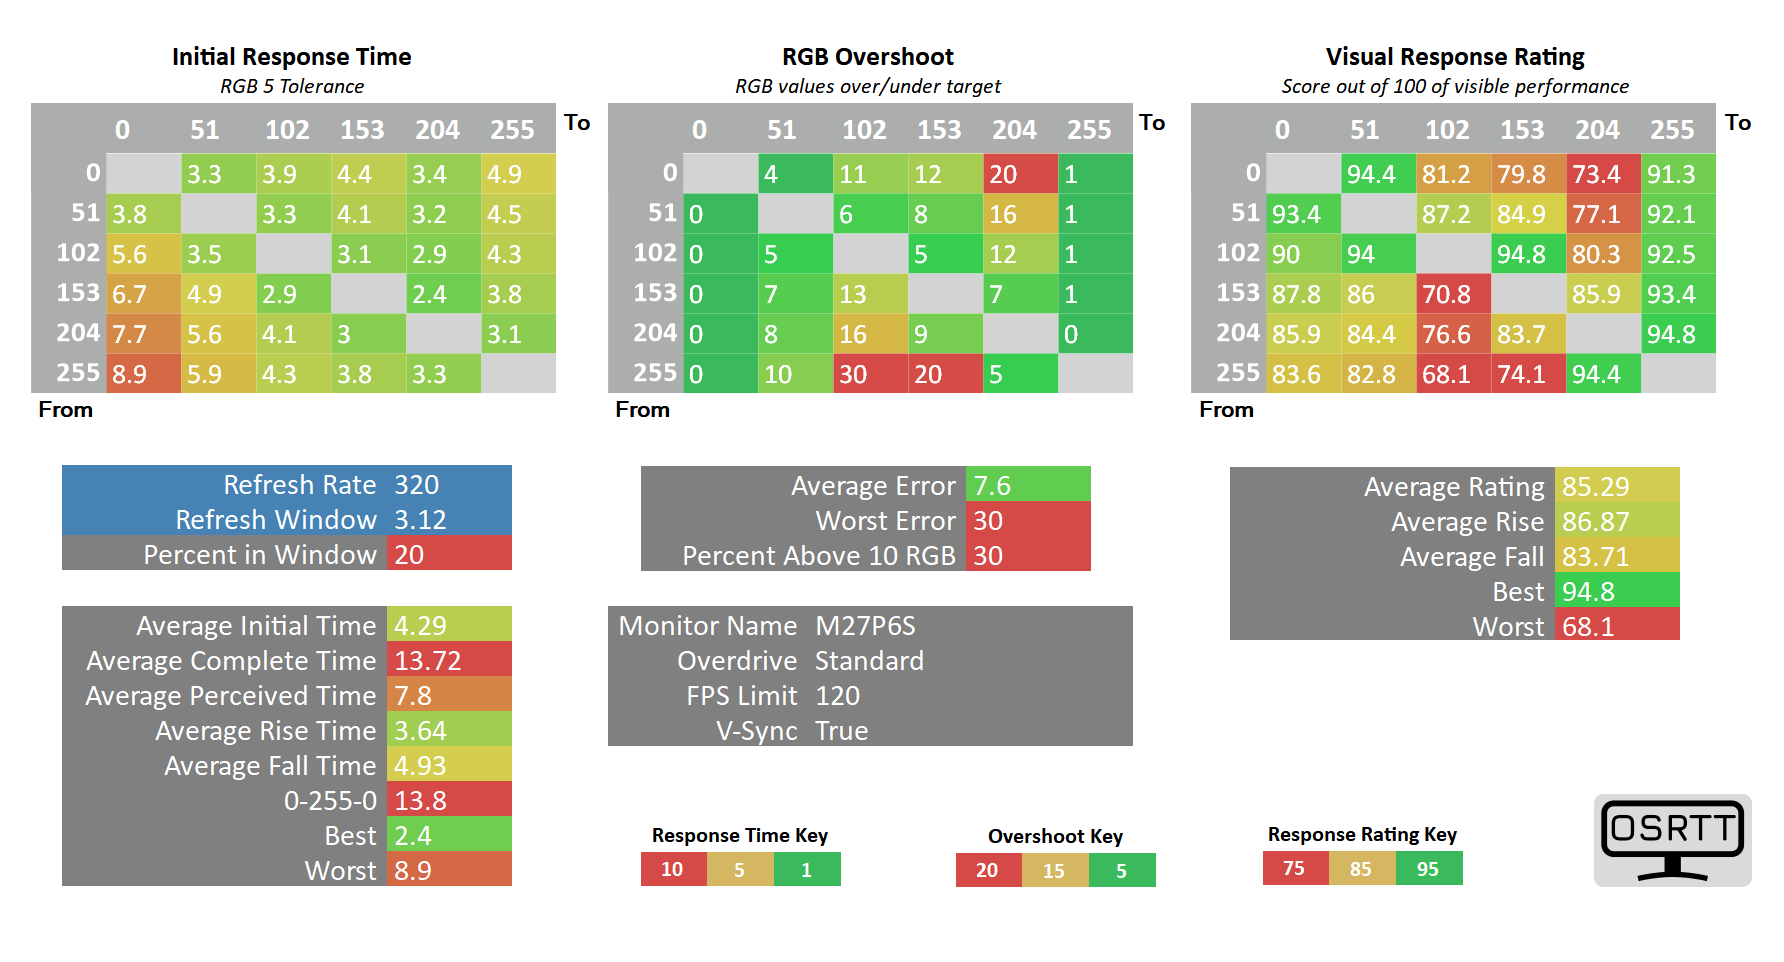
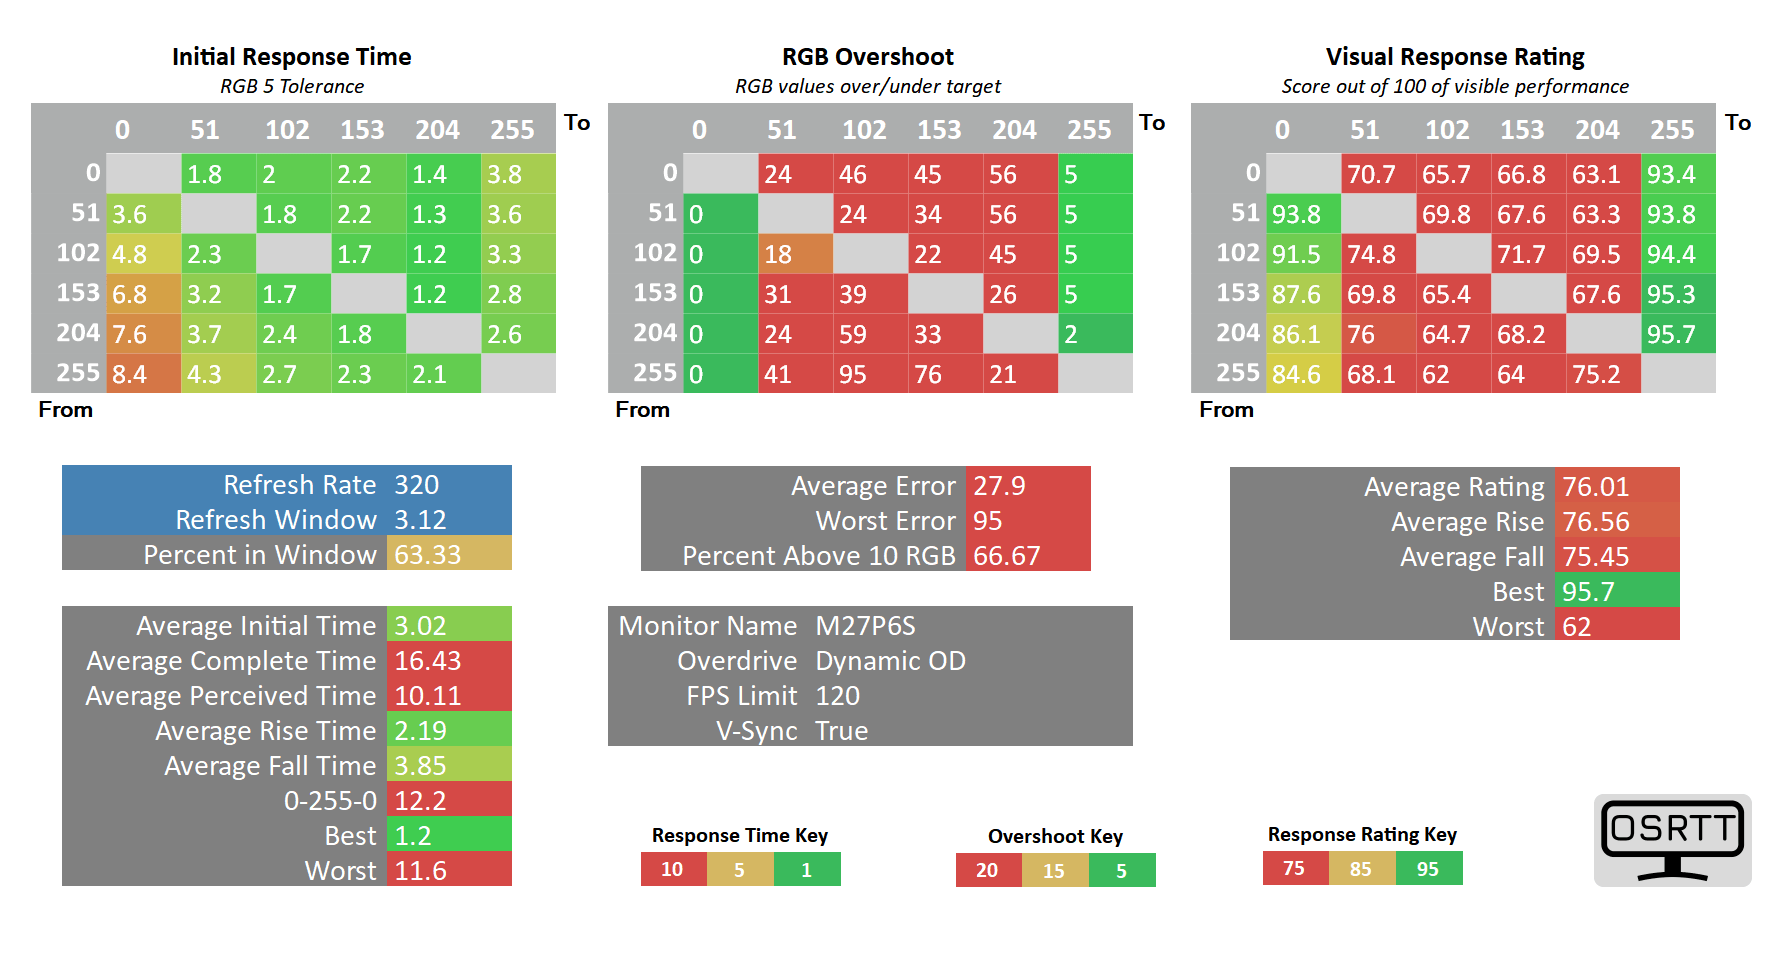
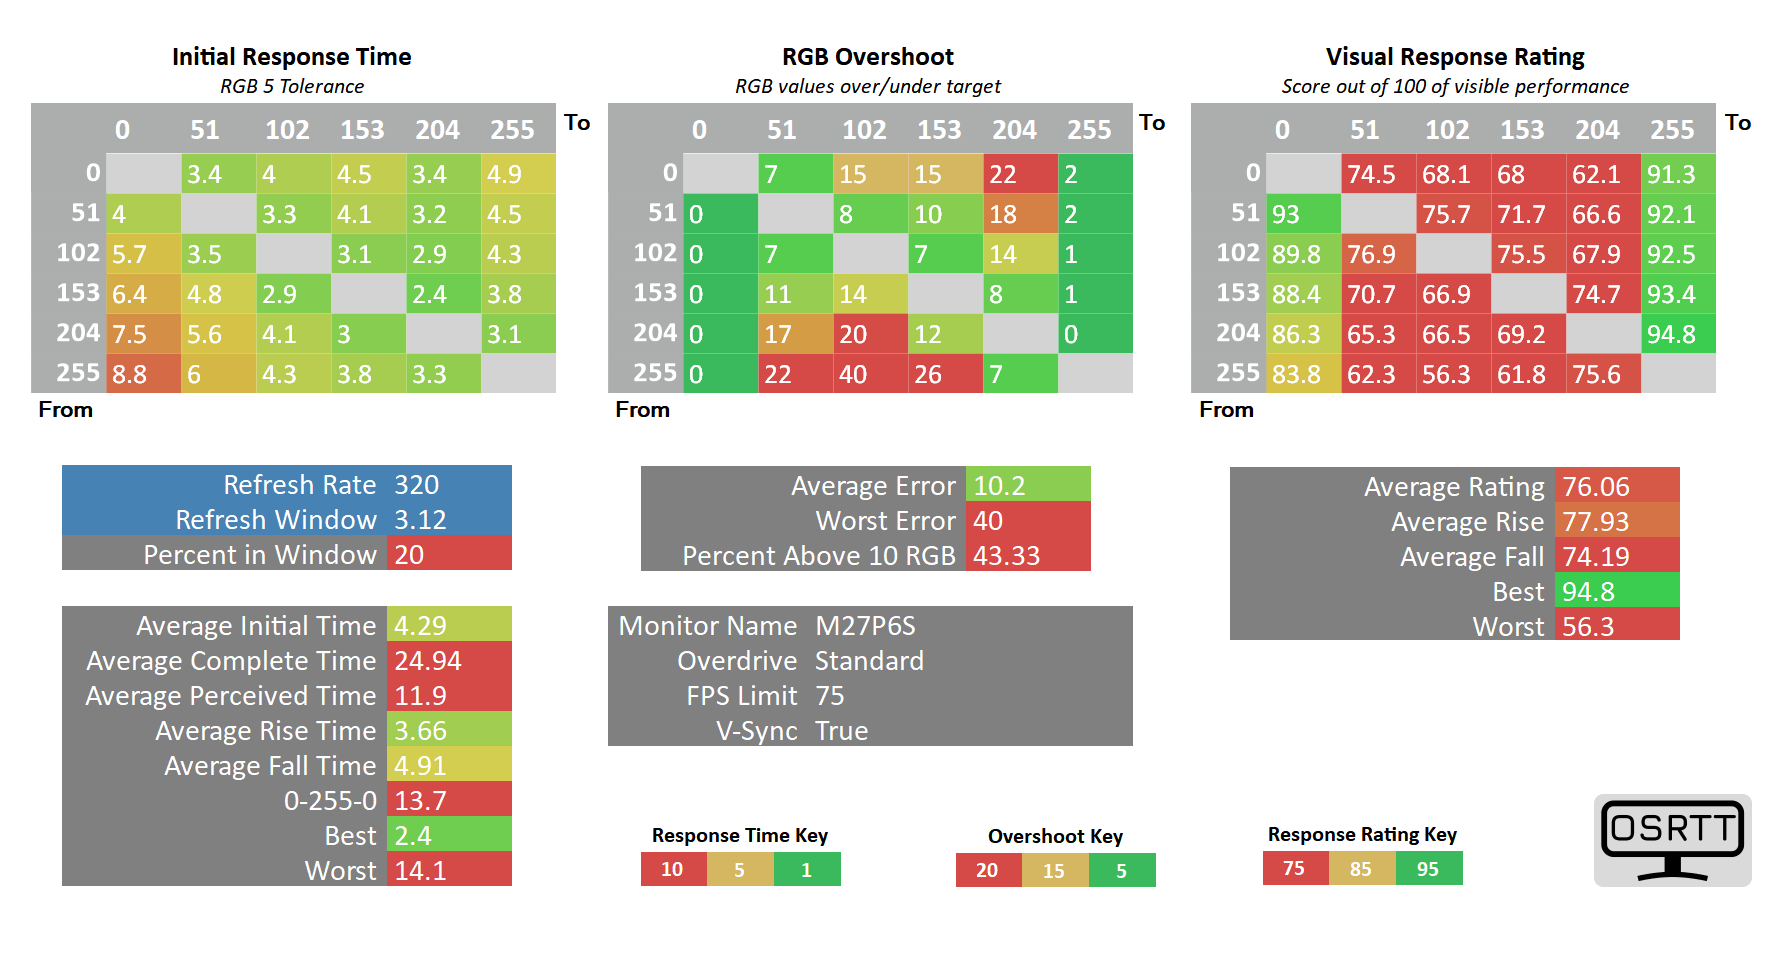
At 120FPS, Standard can show some overshoot in certain transitions, but it’s noticeably faster than ‘Off’, so we recommend sticking with it. You get 4.29ms GtG average, 7.6% overshoot error and 96.7% refresh rate compliance.
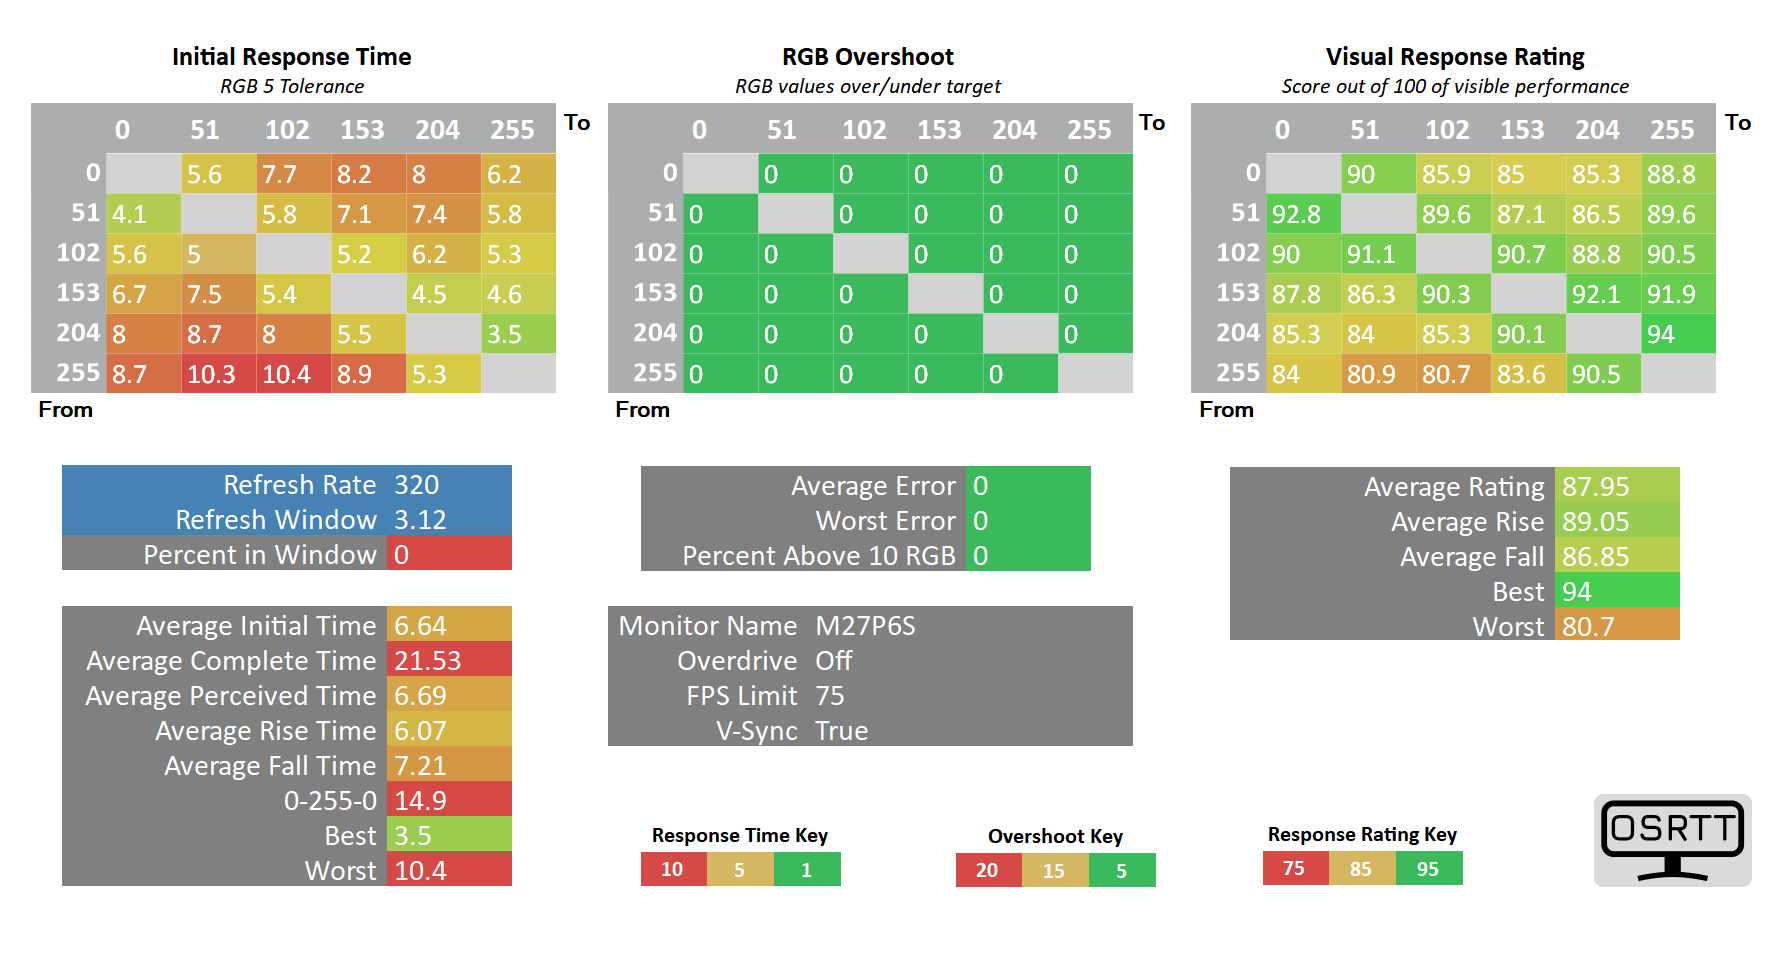
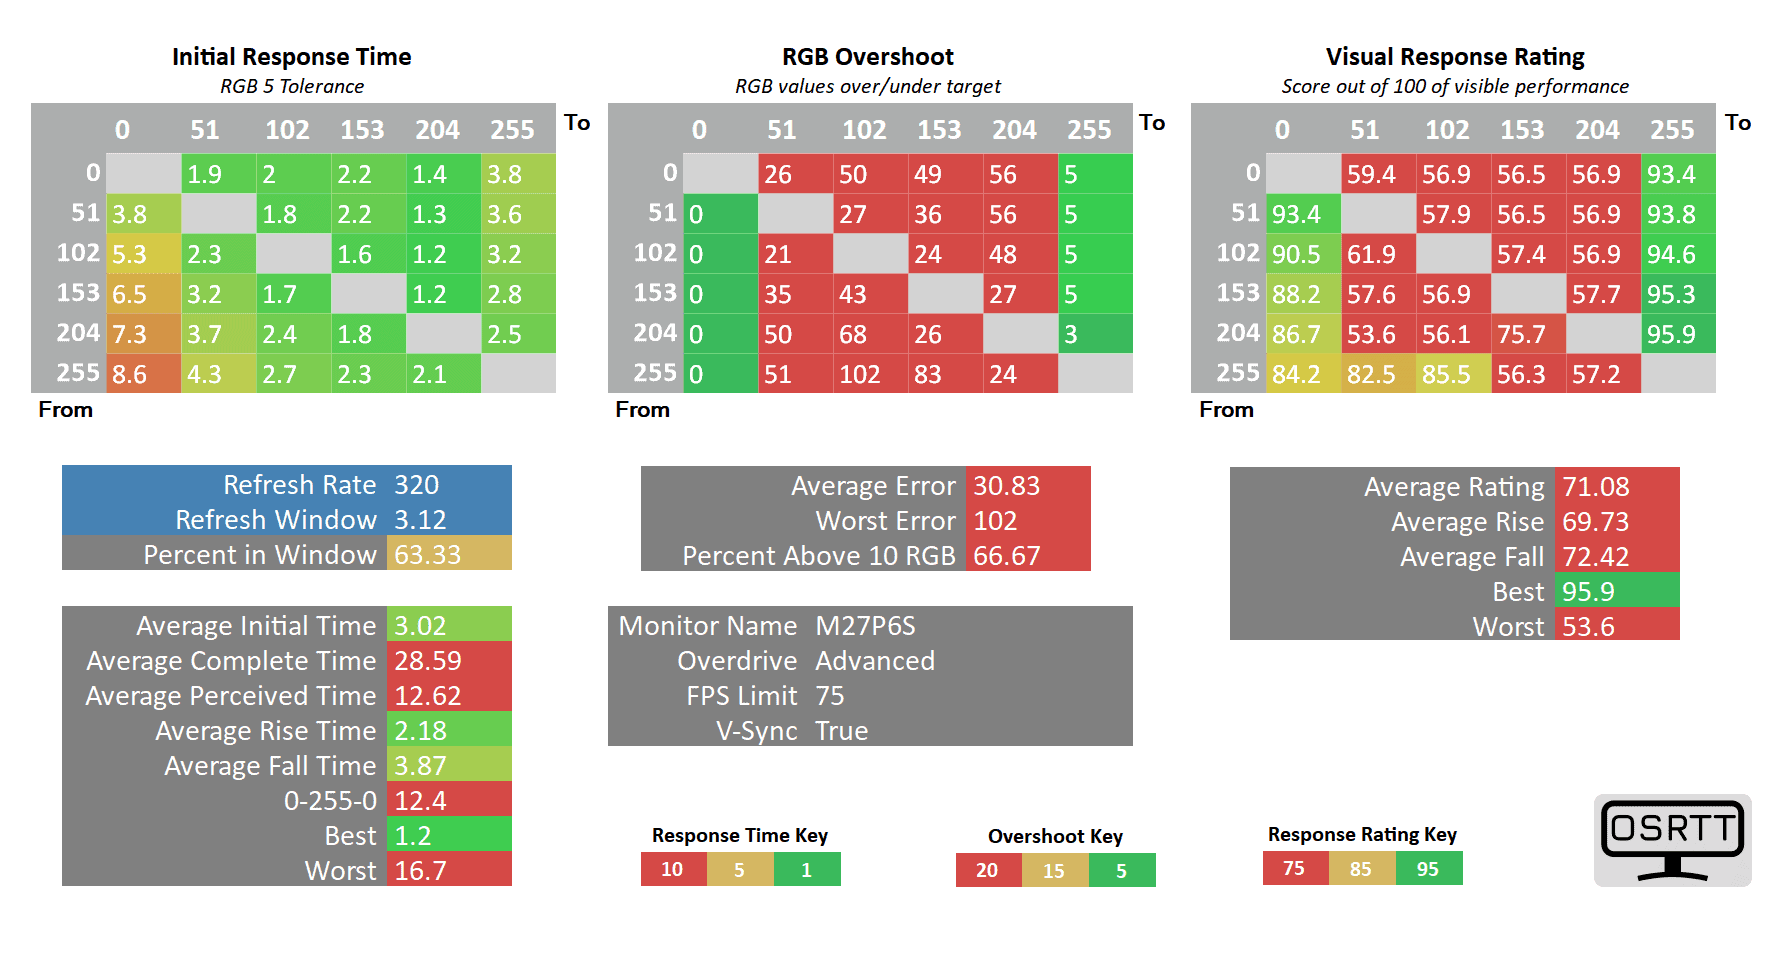
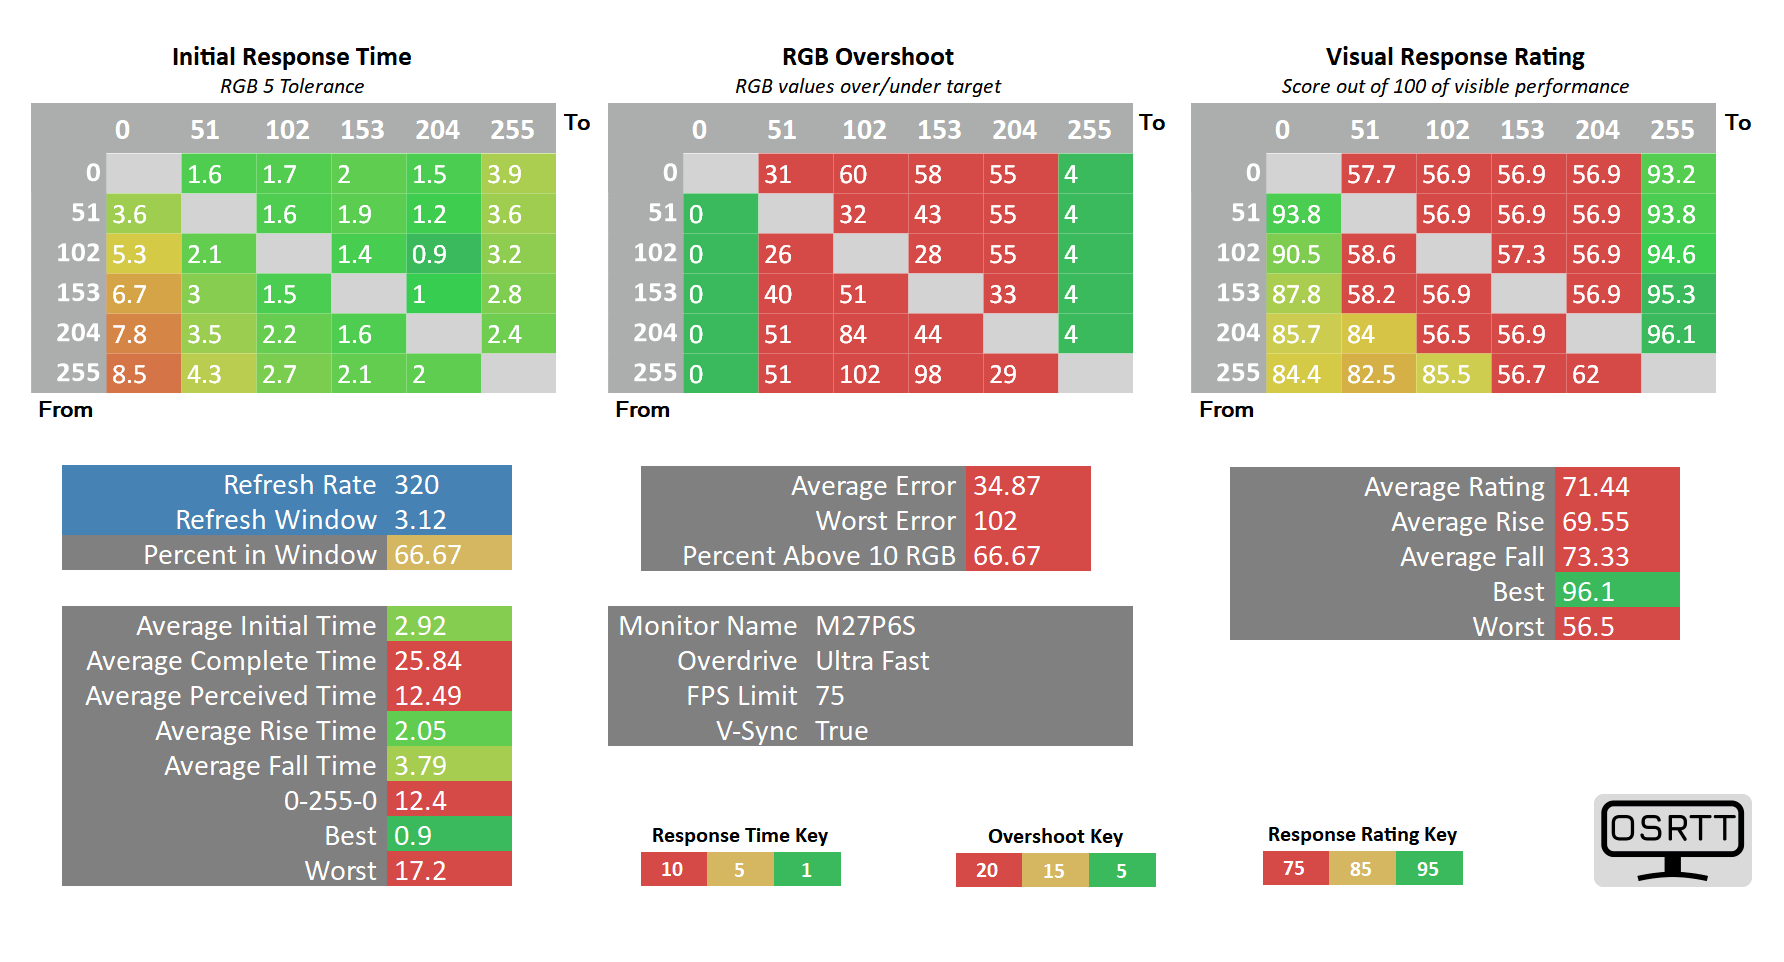
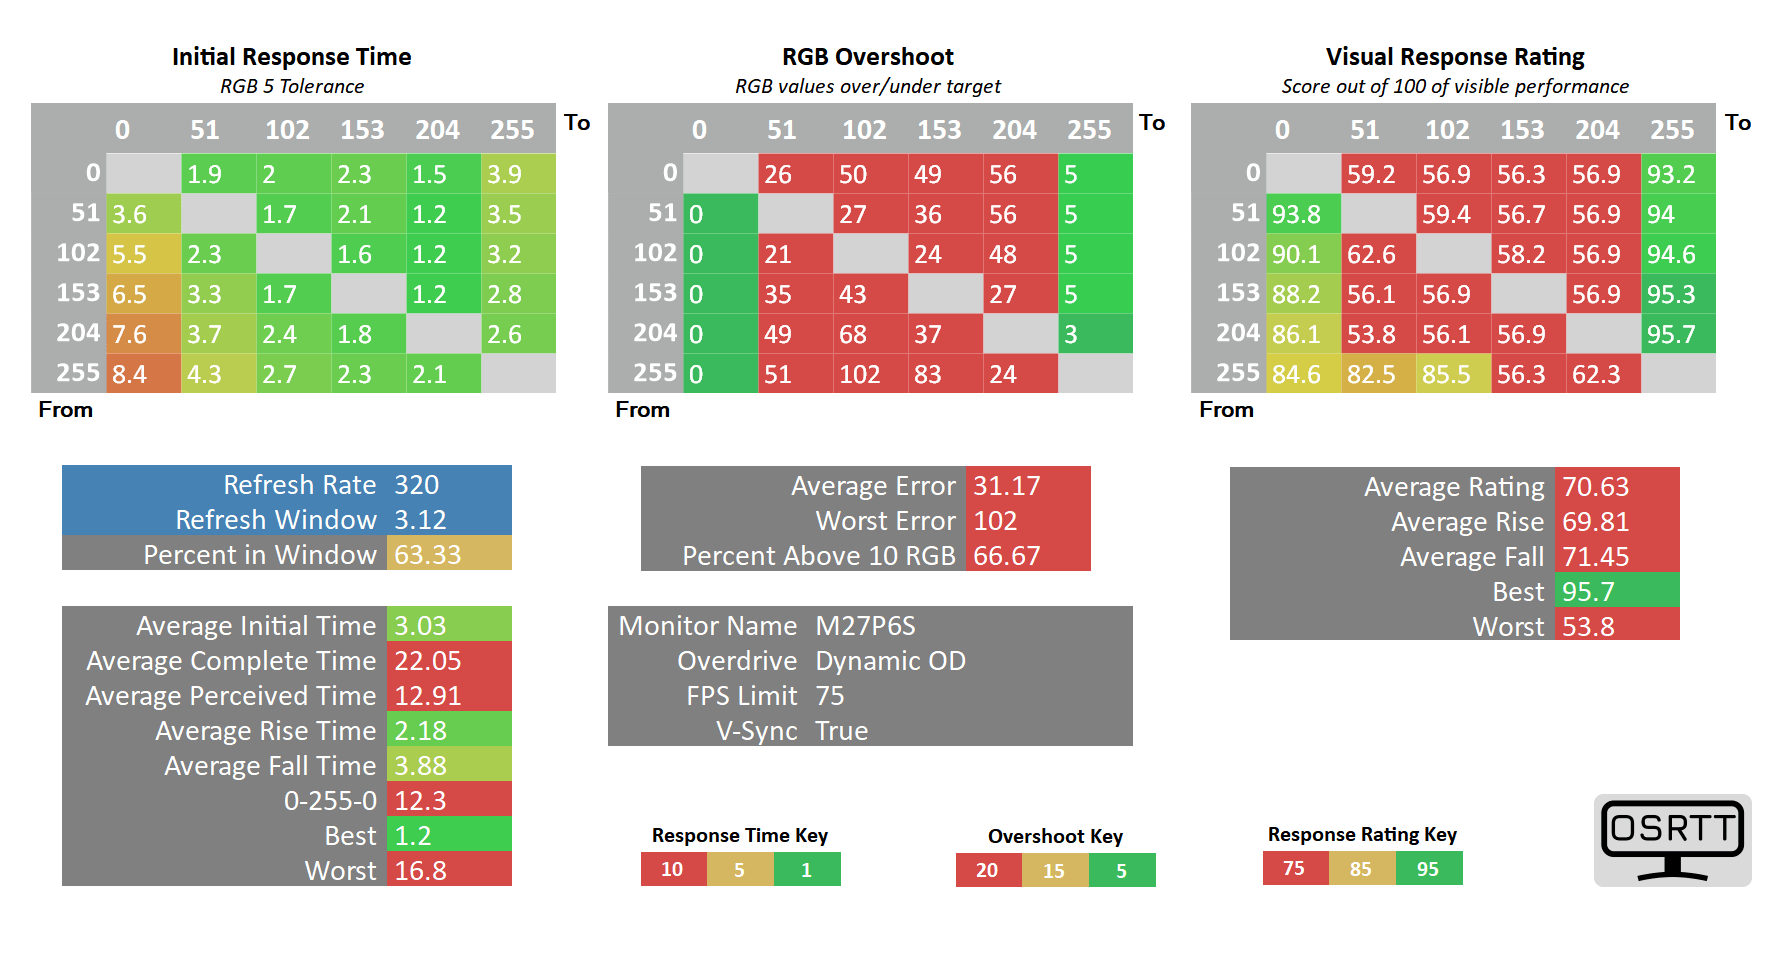
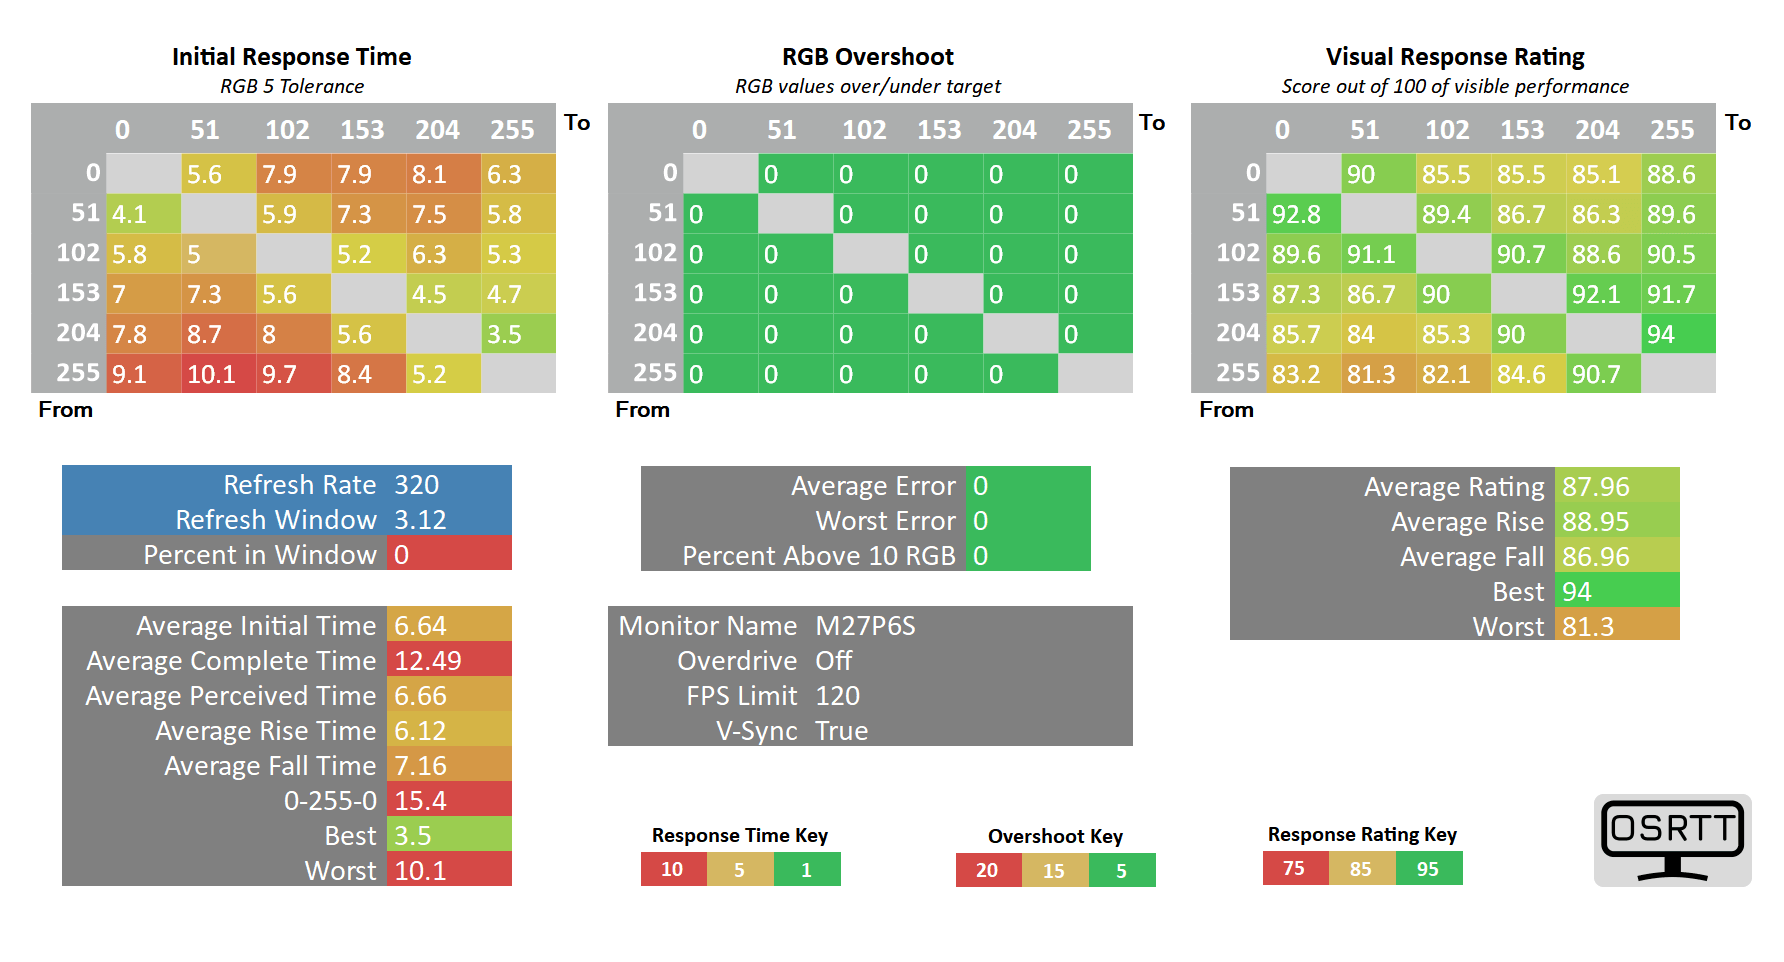
At 60FPS, the monitor would run at 120Hz due to LFC, so we tested at 75FPS instead. At lower frame rates, Off mode is fast enough to prevent ghosting without adding overshoot like ‘Standard’ does, so it’s the best mode to use with 6.64ms GtG average, 0% overshoot and 100% refresh rate compliance.
Overall, the response time performance is very good. There’s no particularly noticeable ghosting behind fast-moving objects and no dark-level smearing that’s usually associated with VA panels.
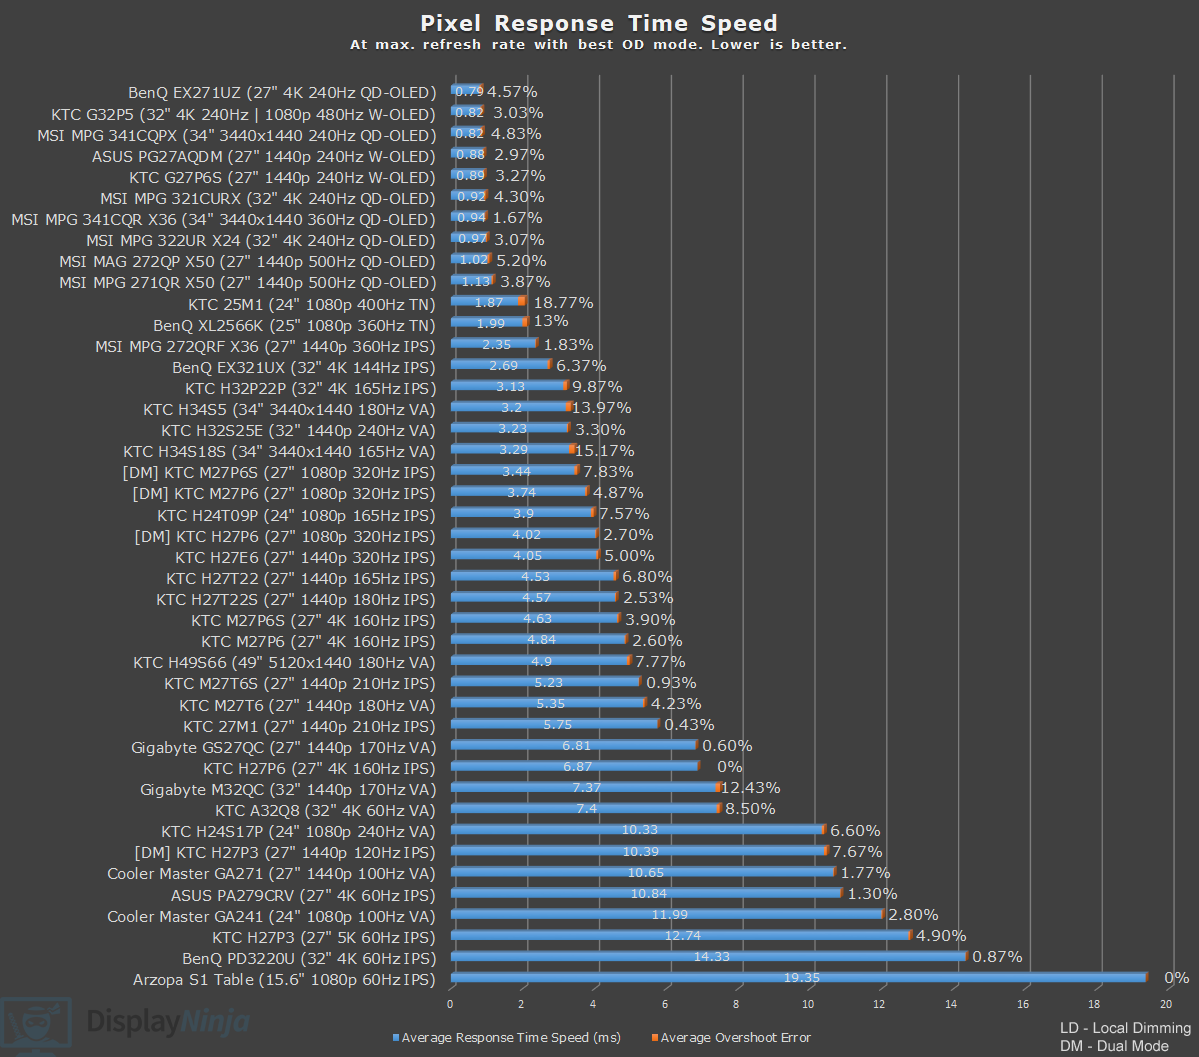
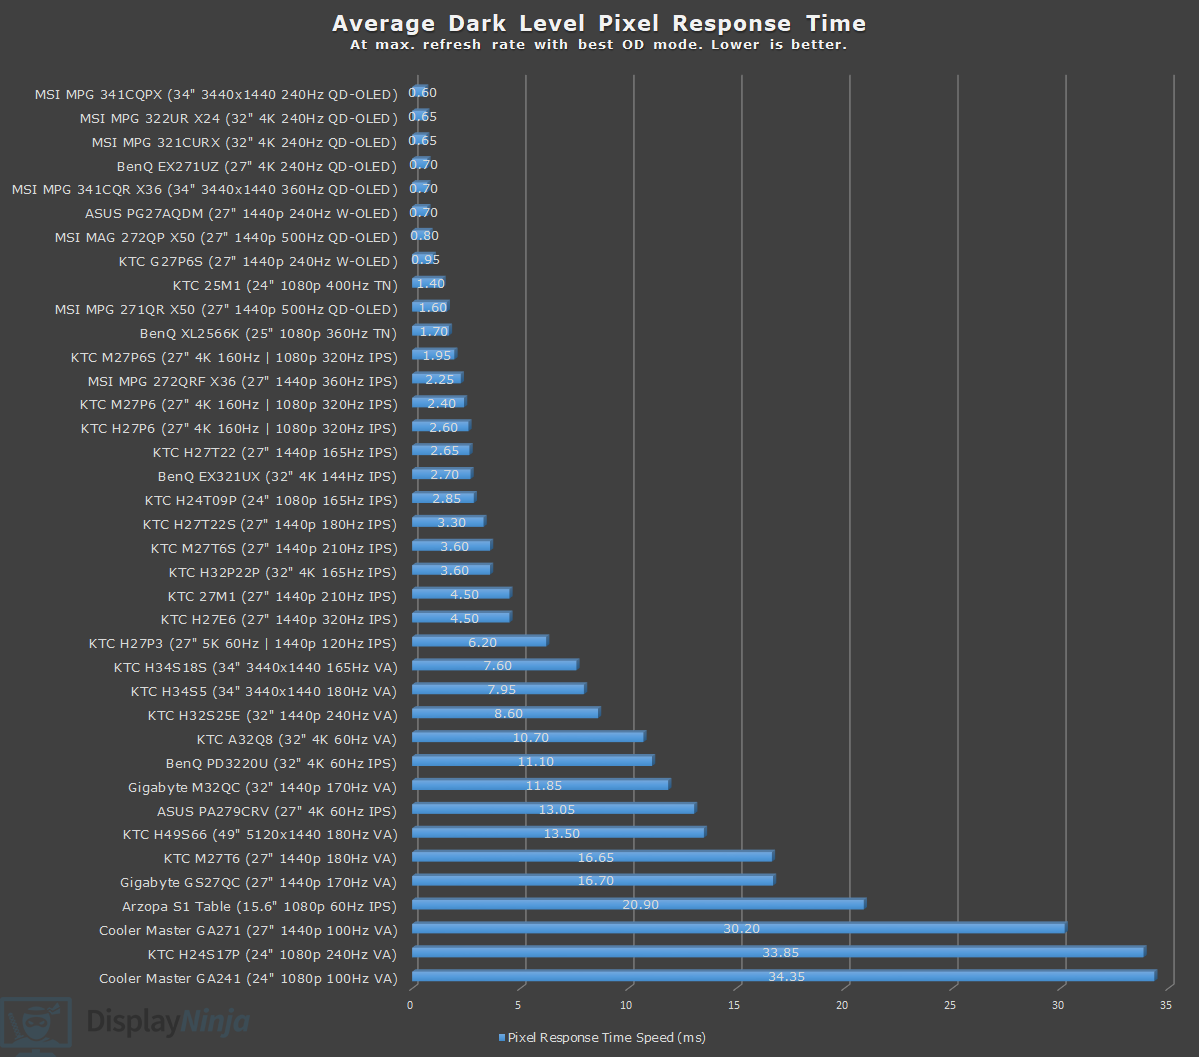
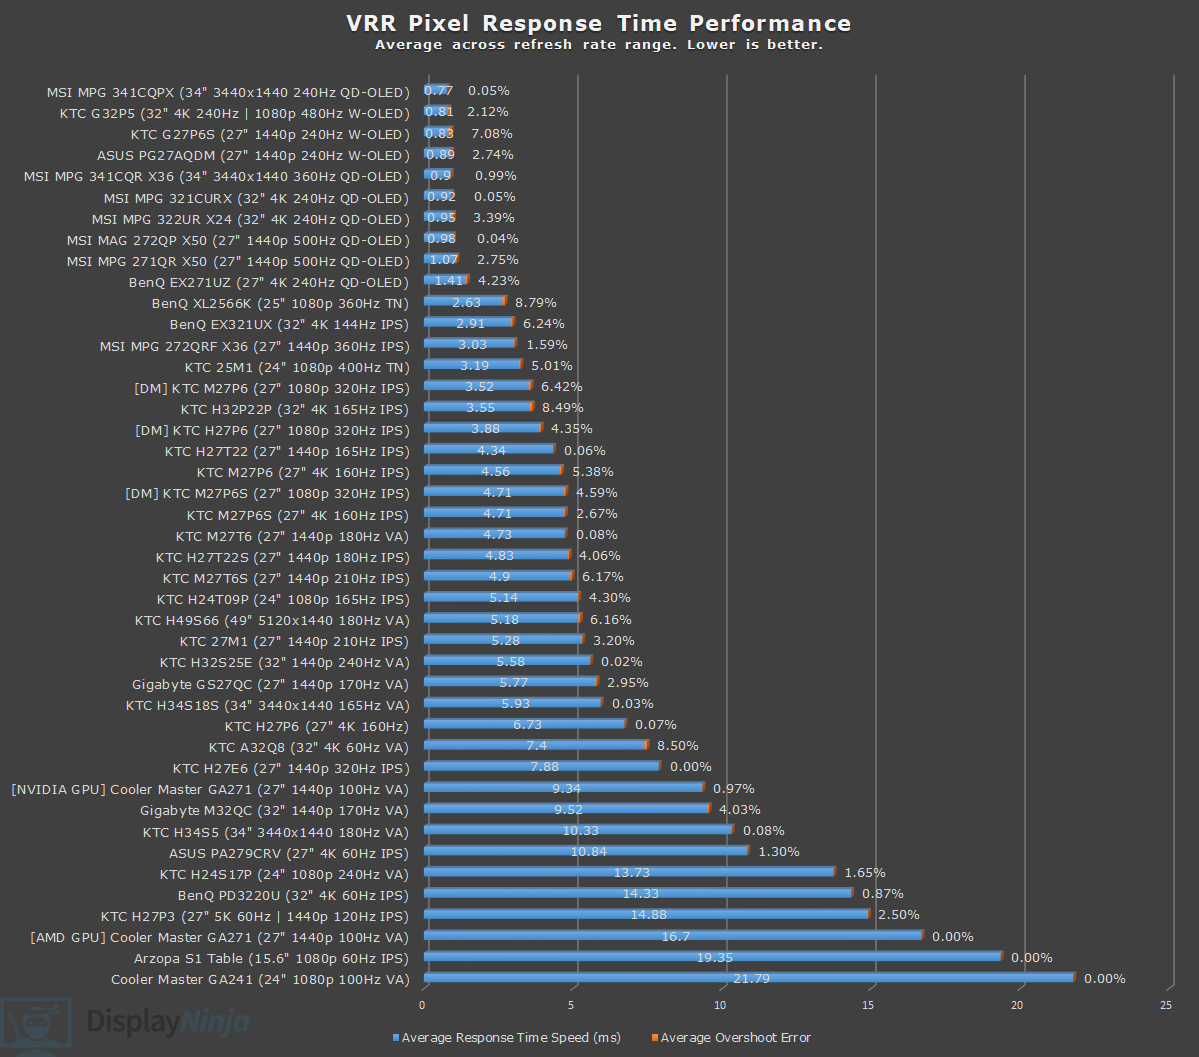
Sadly, there’s no variable overdrive or a single overdrive mode to use across the entire refresh rate range. The Dynamic Overdrive is supposed to do that, but it just works as ‘Advanced’ when VRR is enabled.
With VRR disabled, Dynamic OD uses different modes at different fixed refresh rates, but the point is that it changes with variable refresh rates. If you have to pick one mode to use, Standard will work best for that.
Otherwise, use Advanced at 4K 160Hz and 1080p 320Hz, and Off at 60 – 75Hz/FPS.
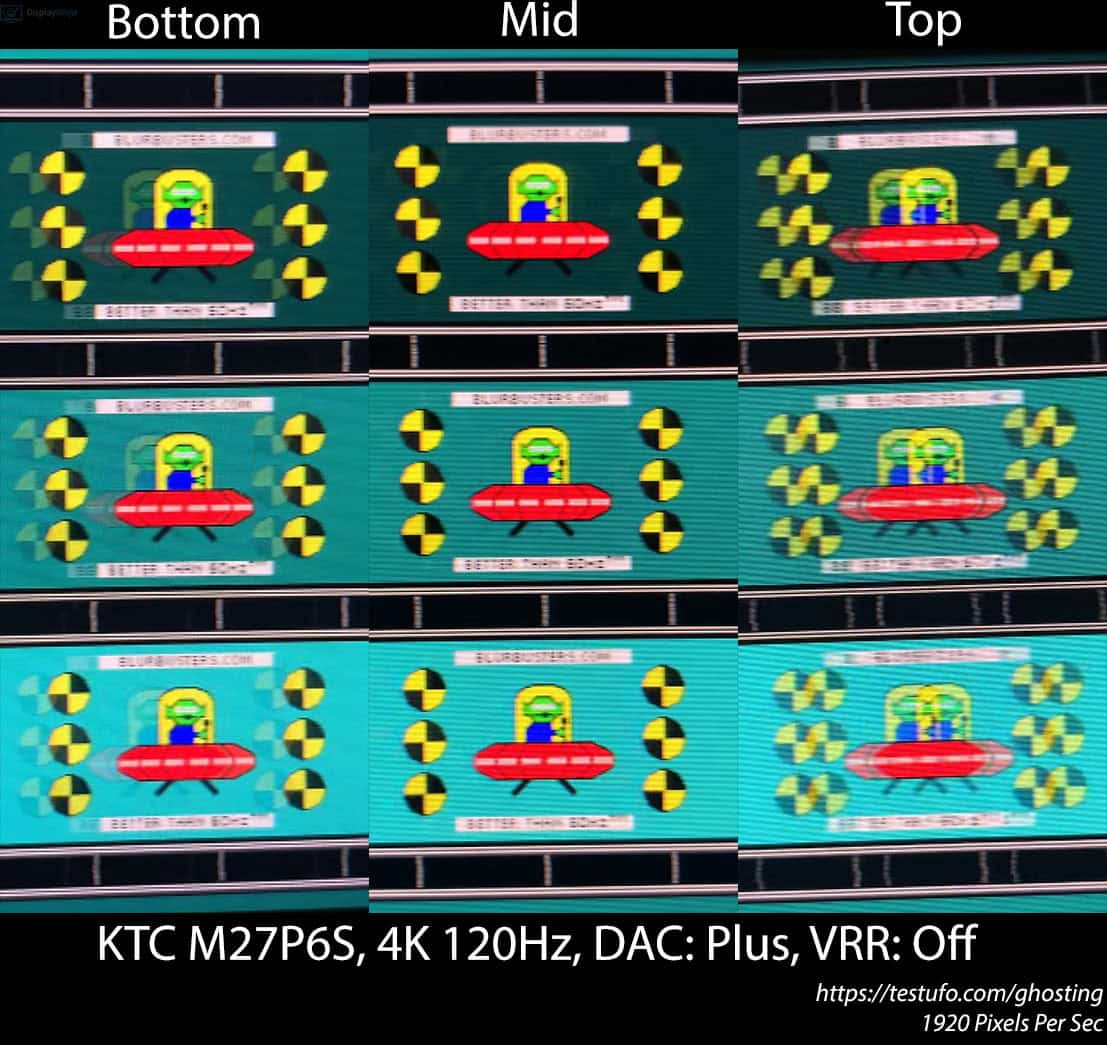
Here’s how response times look in Blur Busters’ UFO ghosting test at 1920 Pixels Per Sec. We set the shutter speed to 1/4 of the refresh rate with fixed focus, ISO and color temperature (6500K).
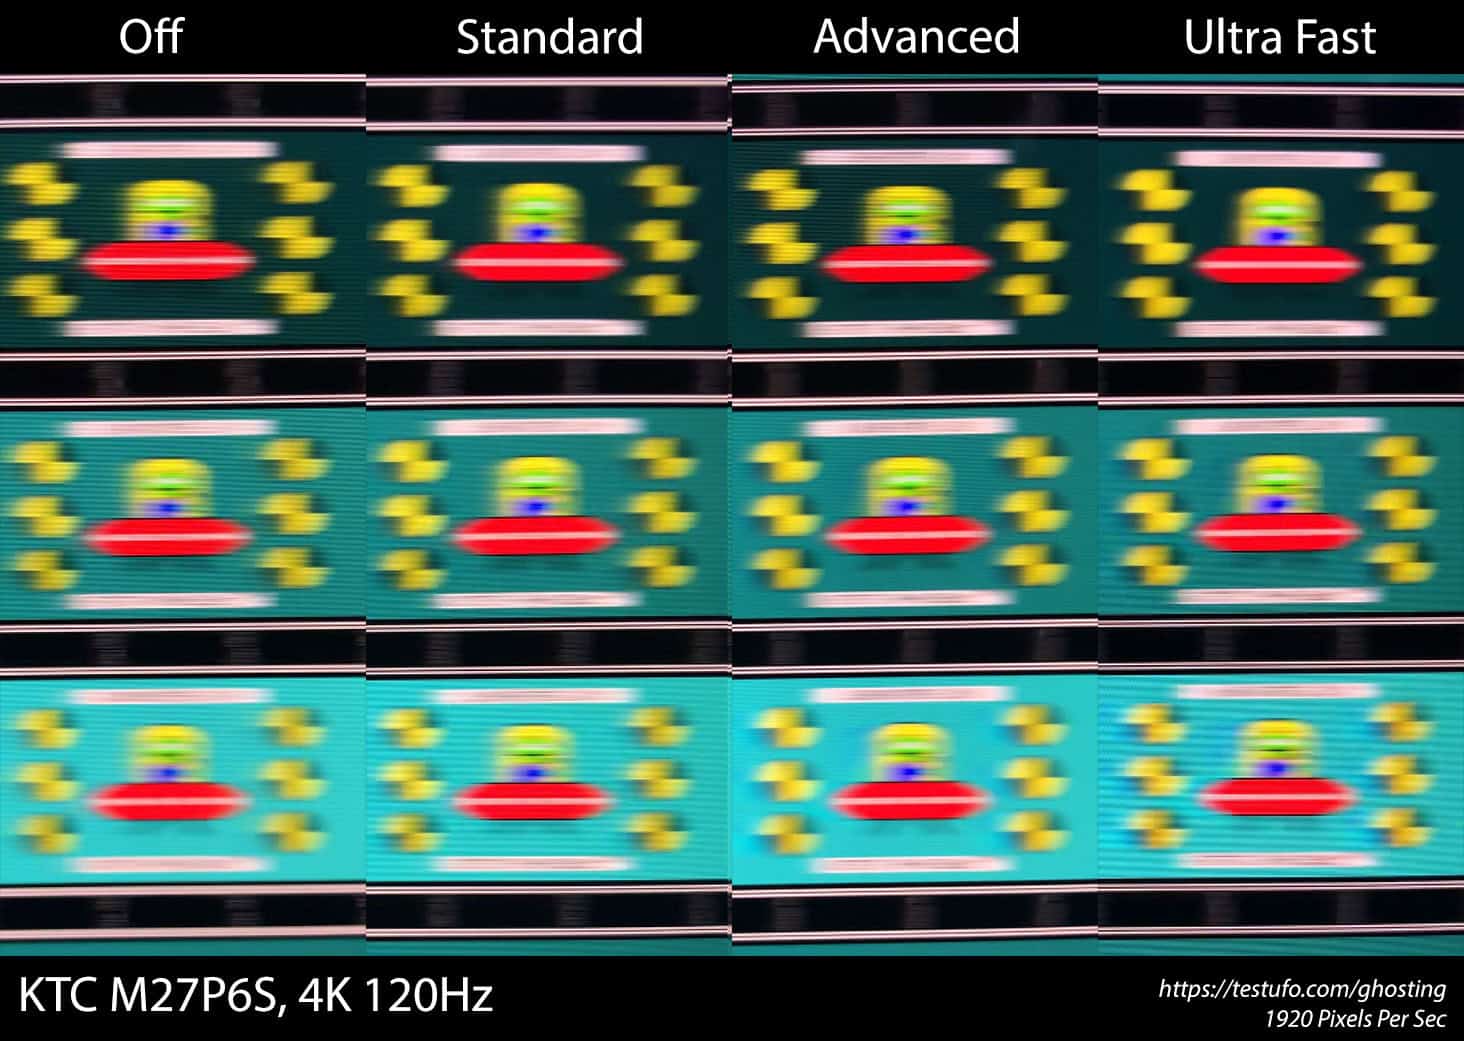
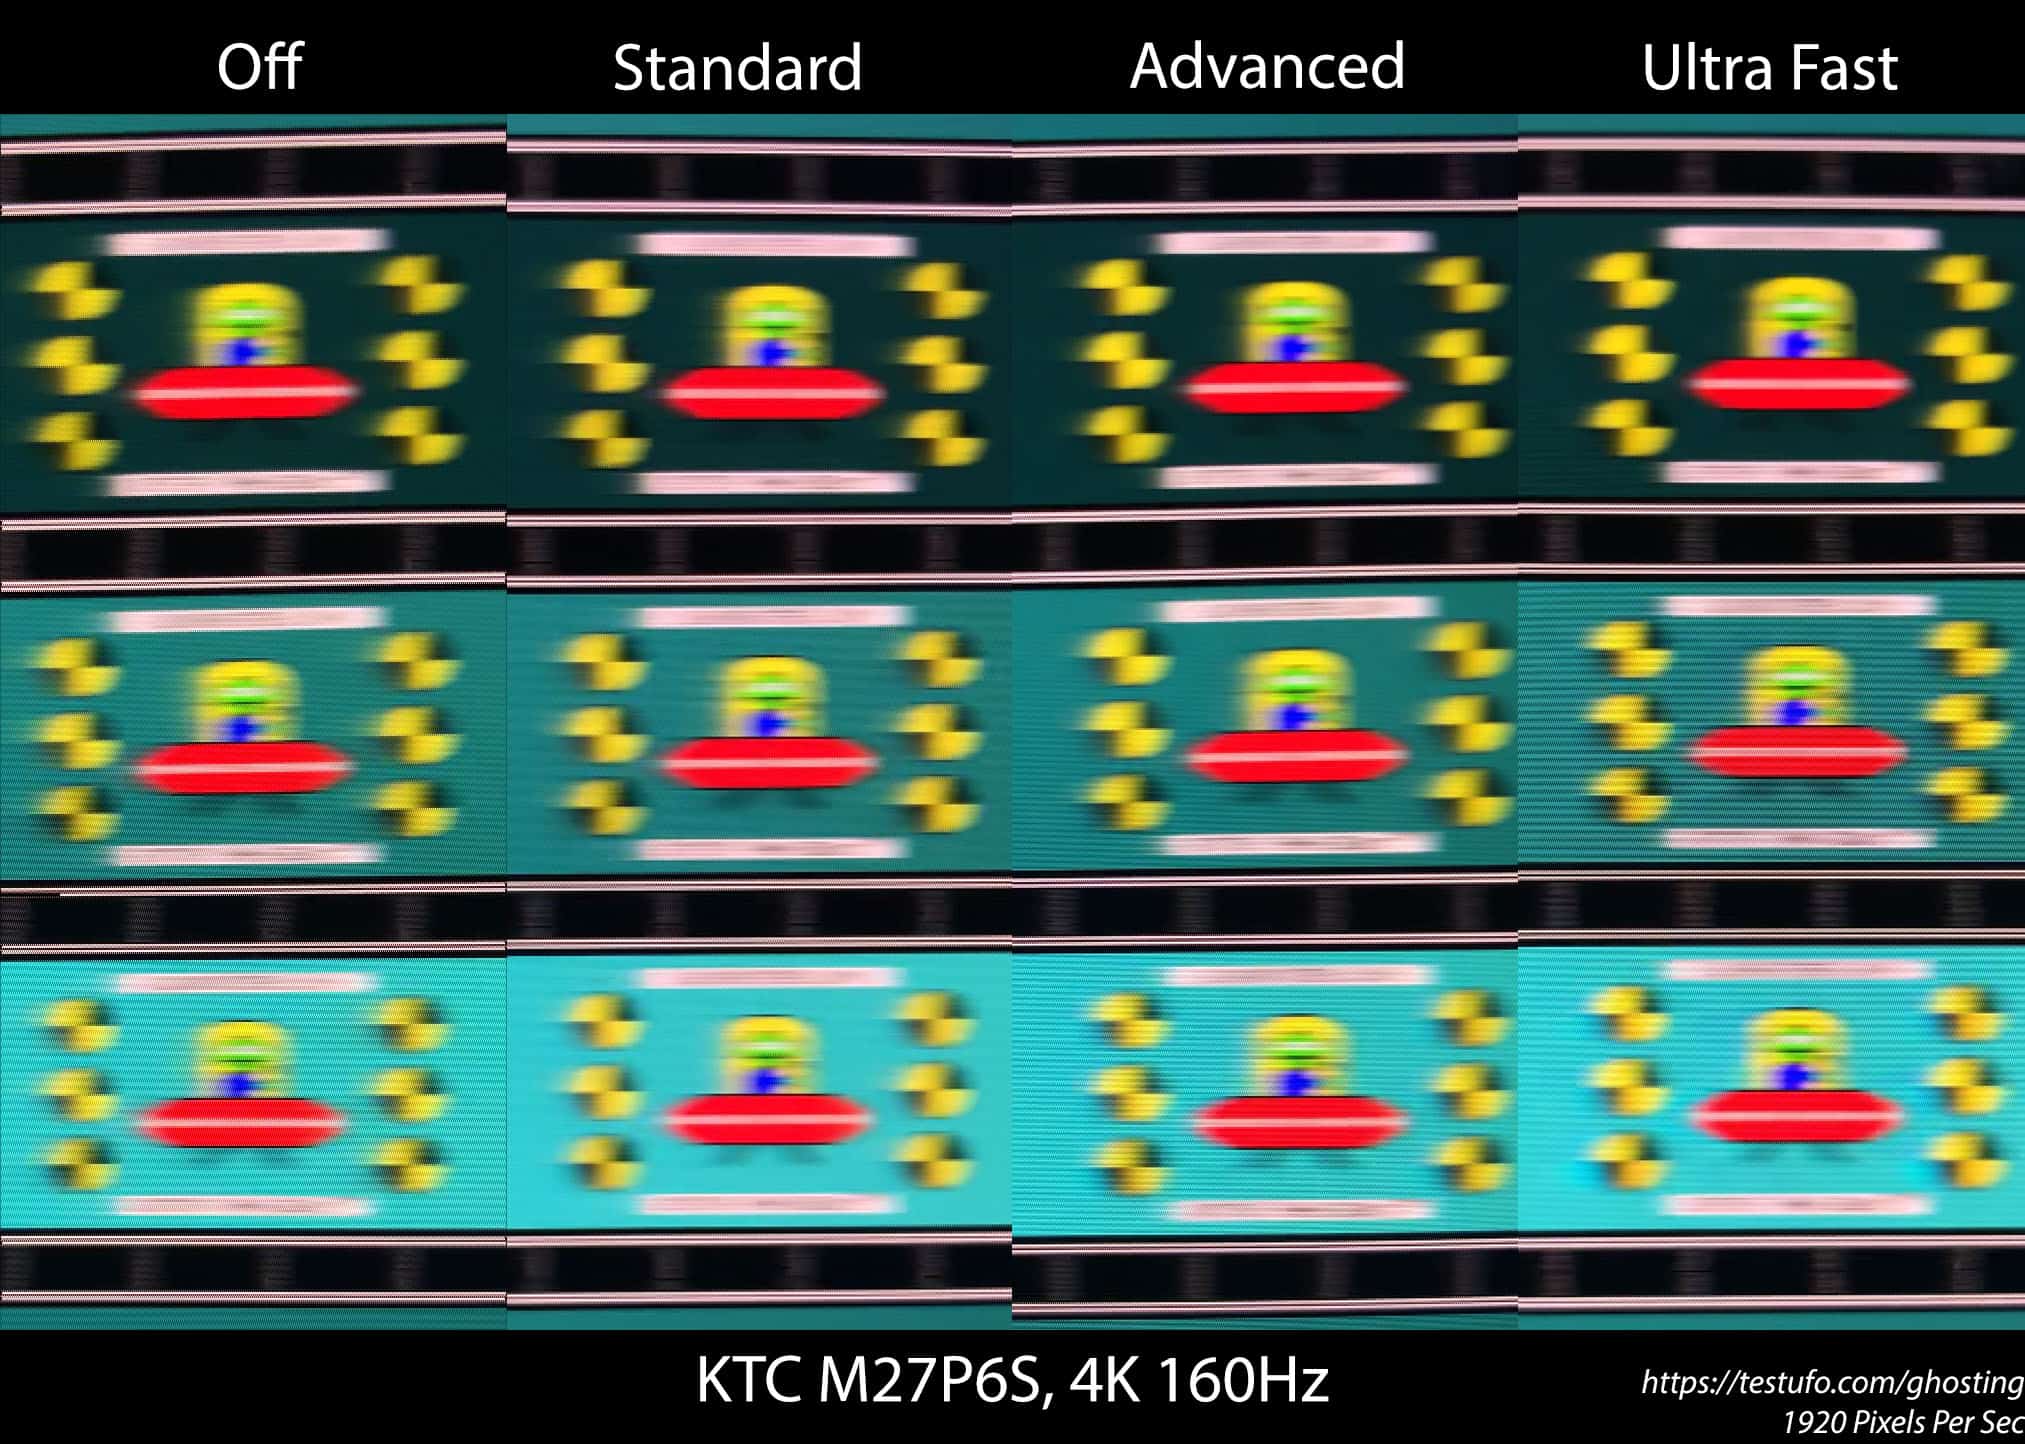
Next, here are the results at 1080p.
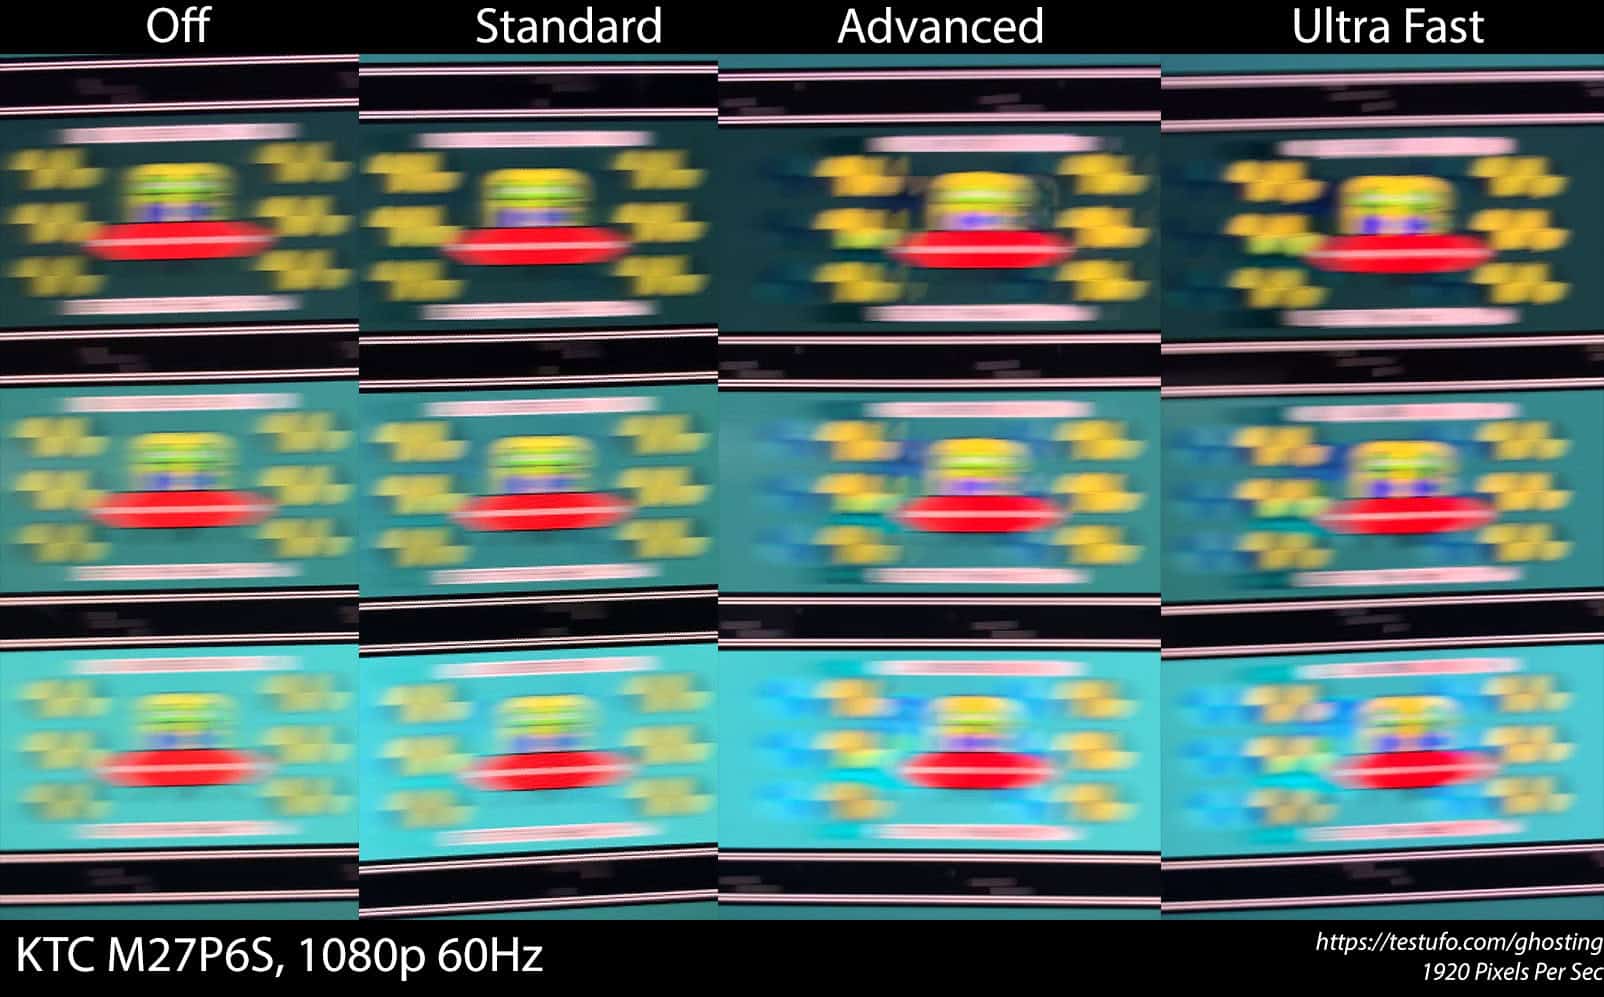
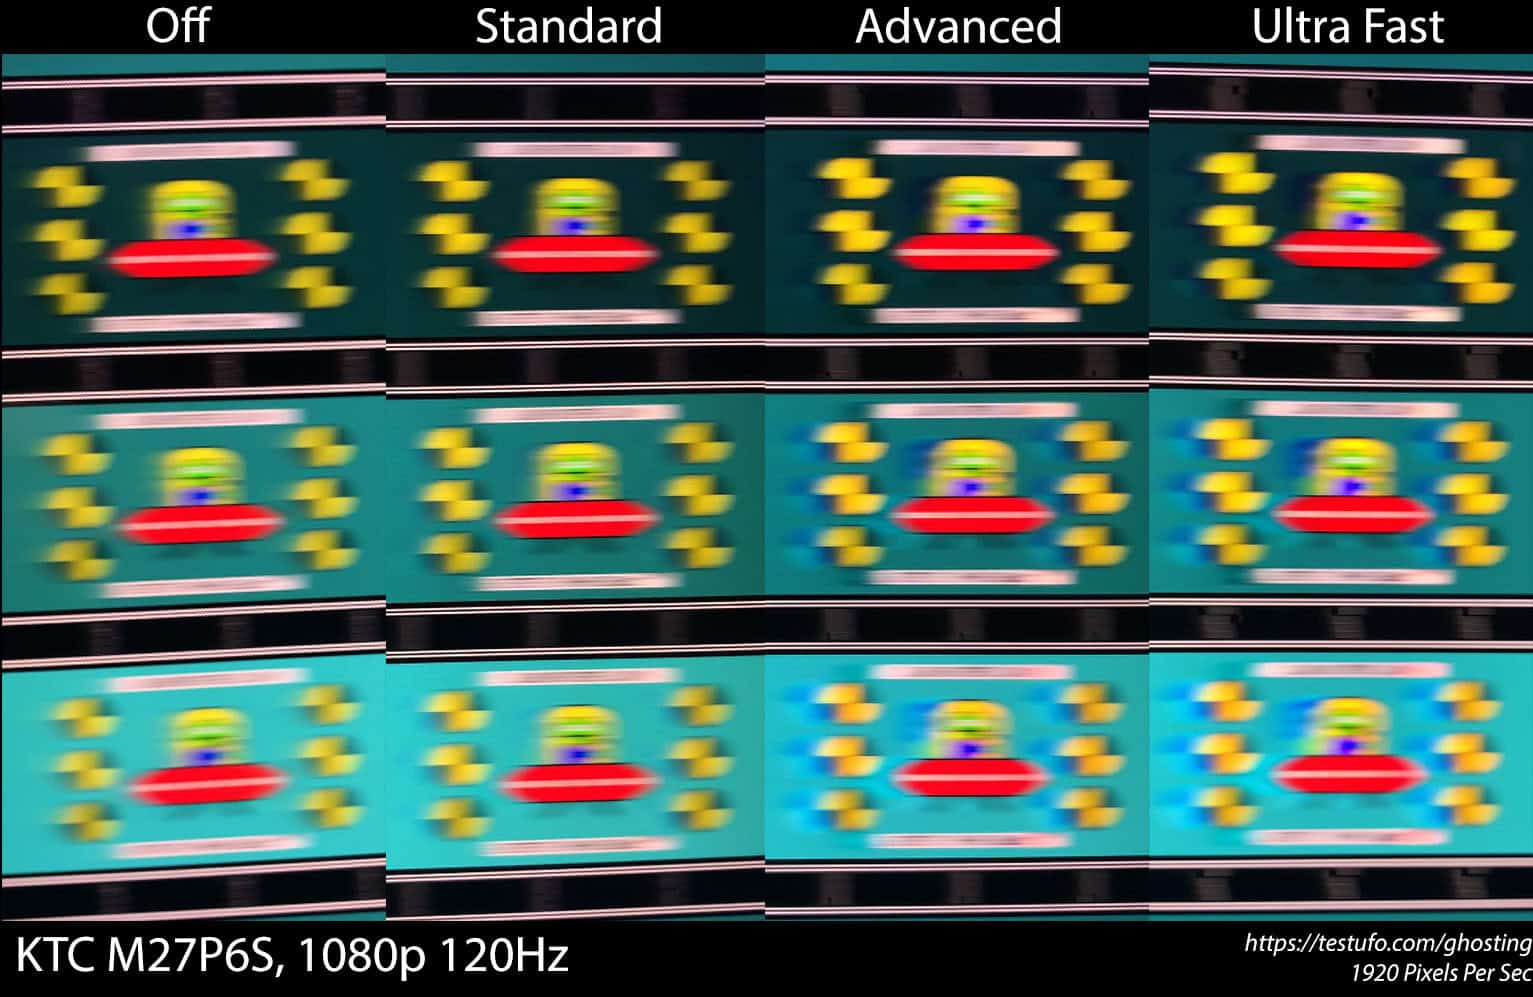
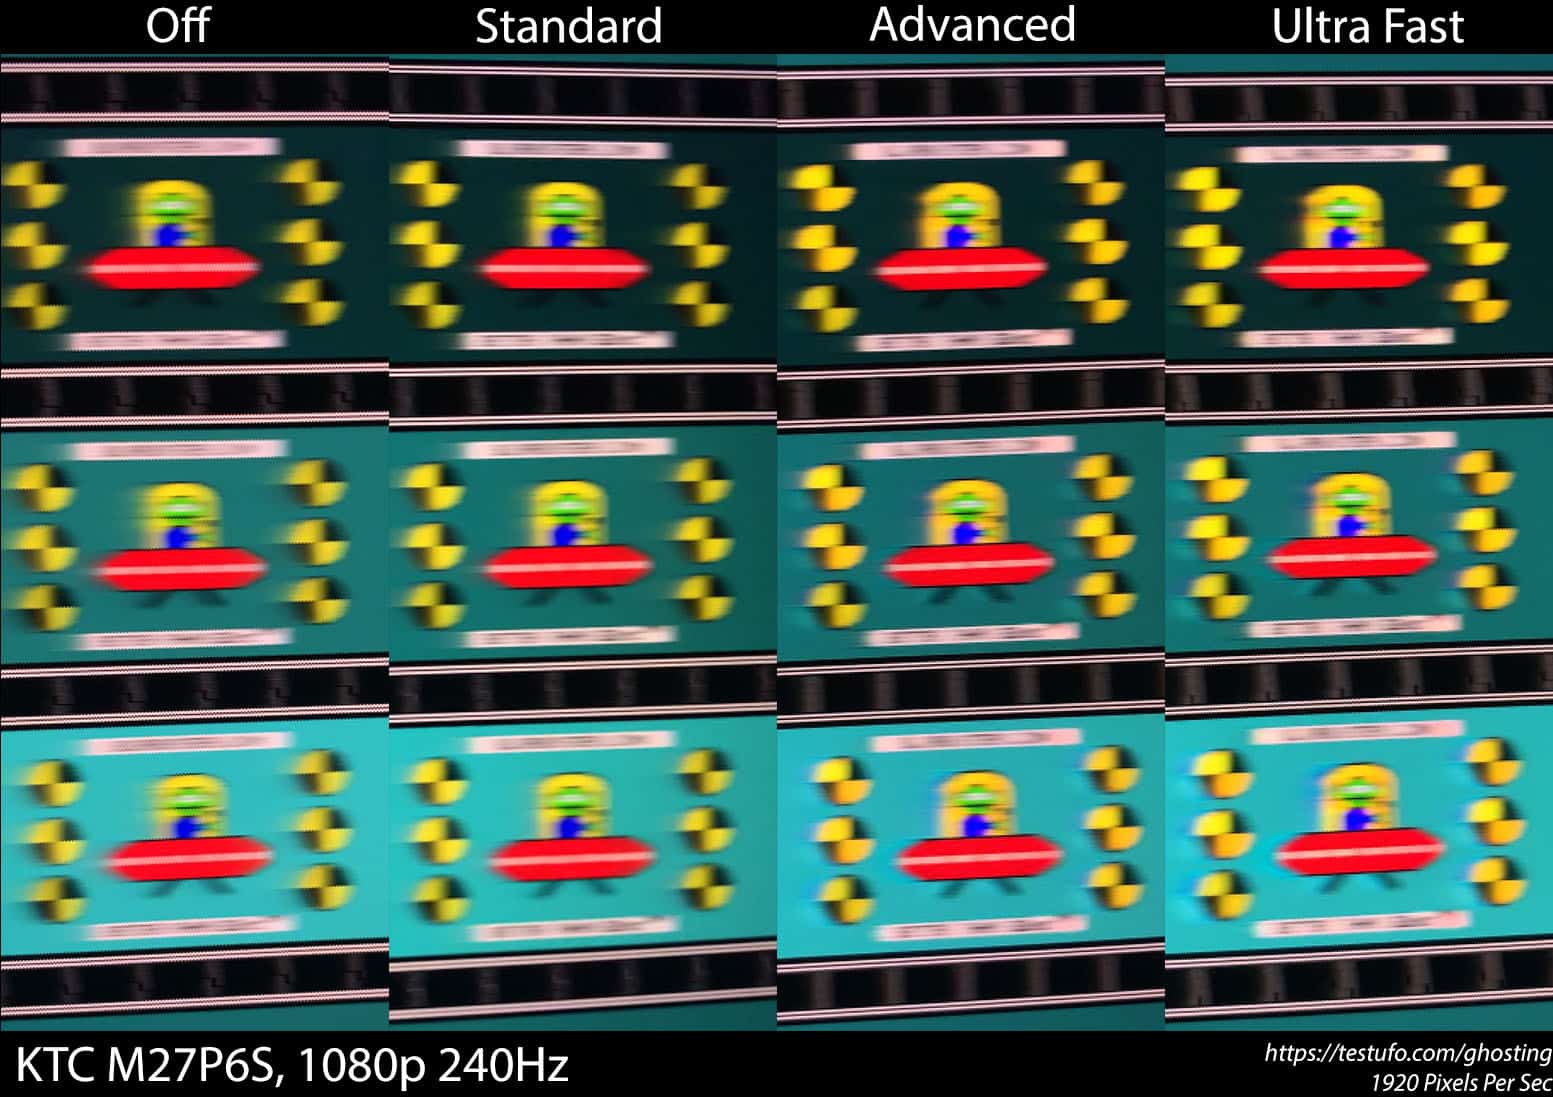
Motion Blur Reduction
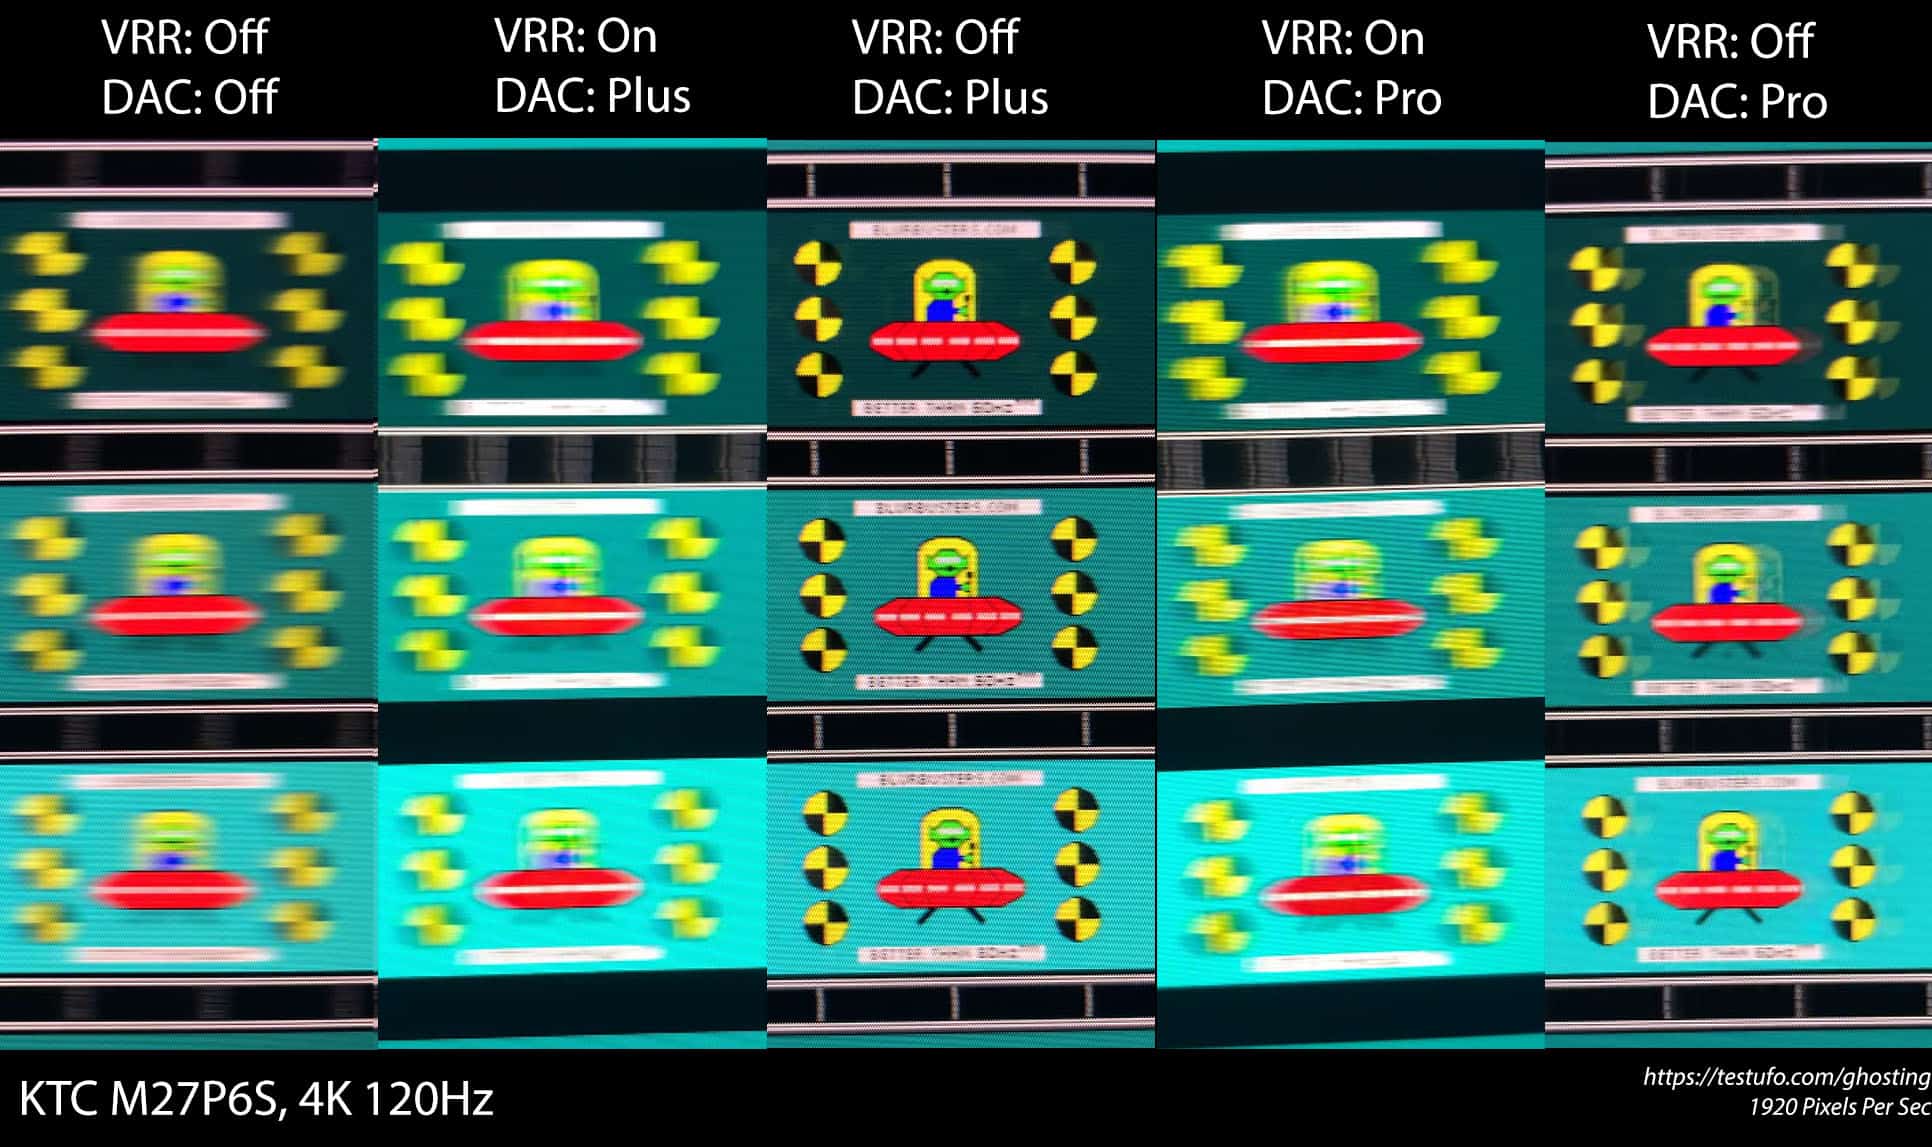
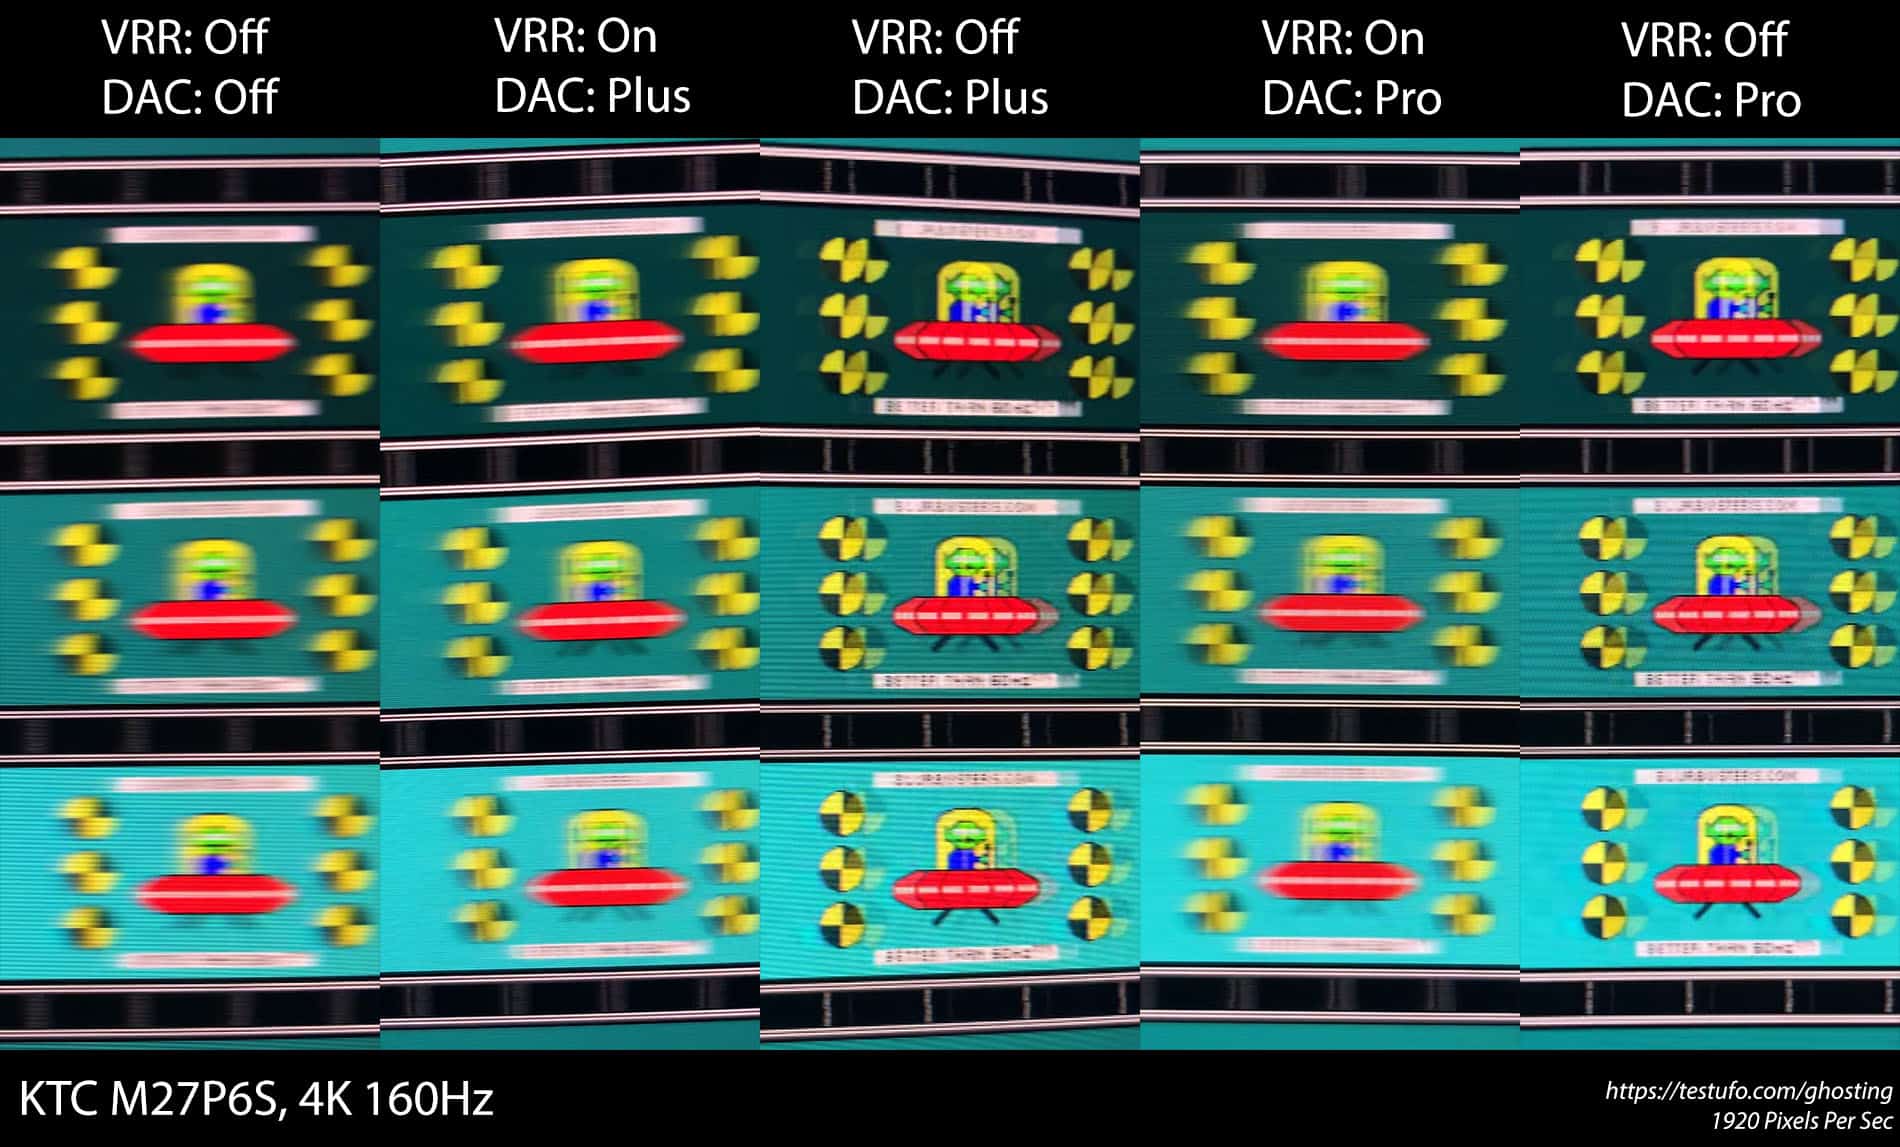
The monitor also supports MBR (Motion Blur Reduction) via its DAC feature, which uses backlight strobing to reduce perceived motion blur at the cost of image brightness. Note that MBR introduces screen flickering that’s invisible to the human eye, but can cause headaches to sensitive users after prolonged use.
There are two DAC modes: Plus and Pro. Both can be enabled at the same time as variable refresh rate! However, once the refresh rate drops below 100Hz, MBR disengages.
Here’s how both modes with VRR on and off compare to standard performance.
Next, here are the results at 1080p.
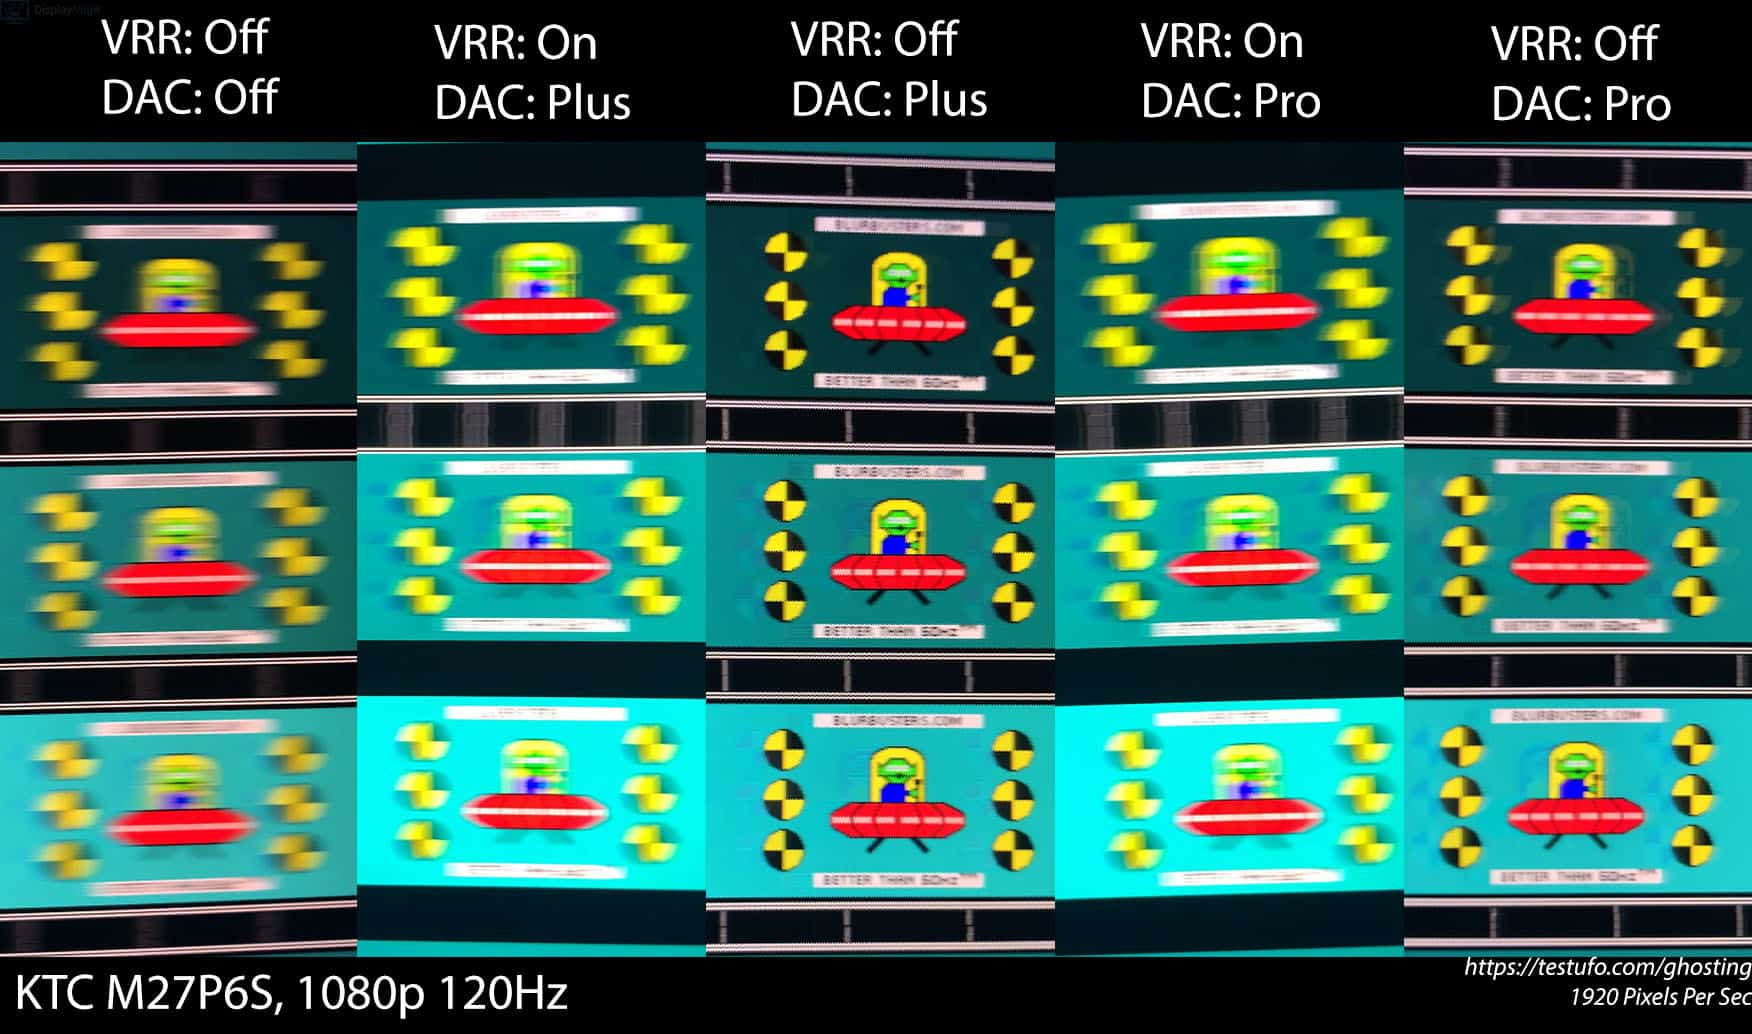
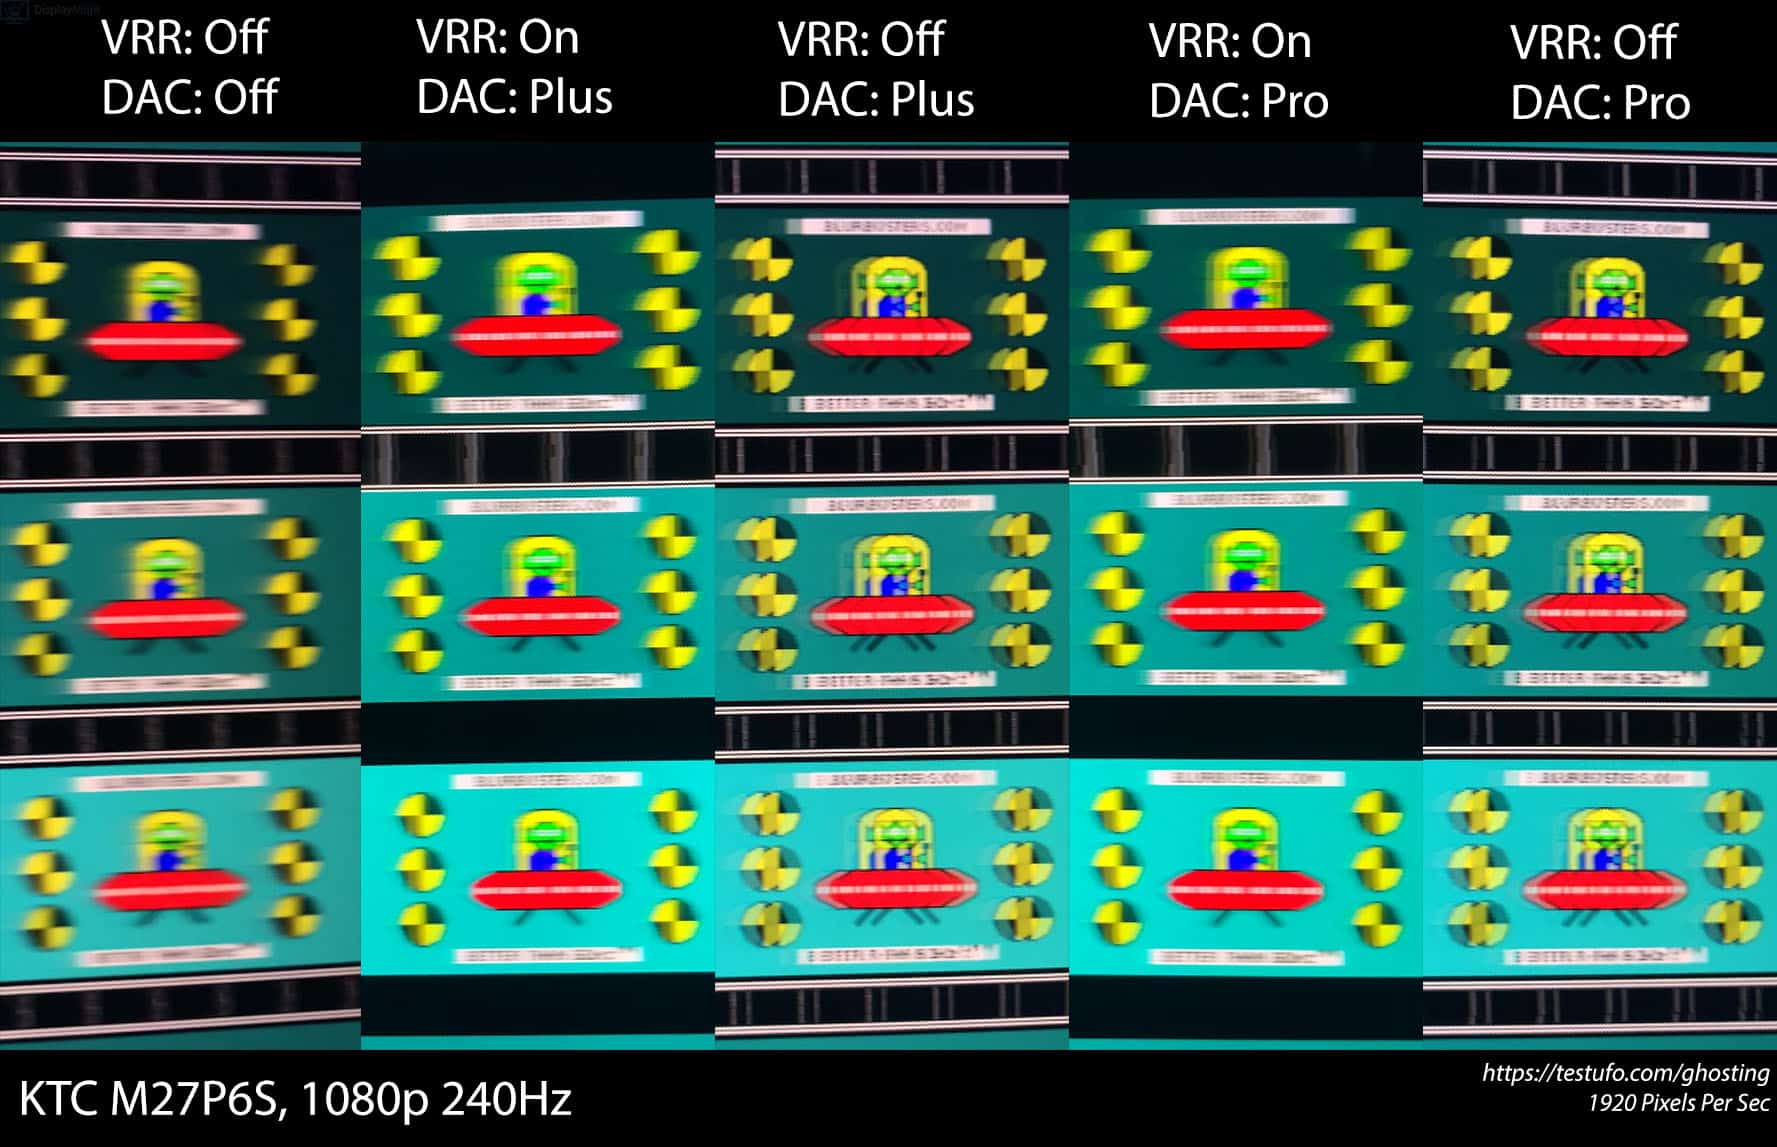
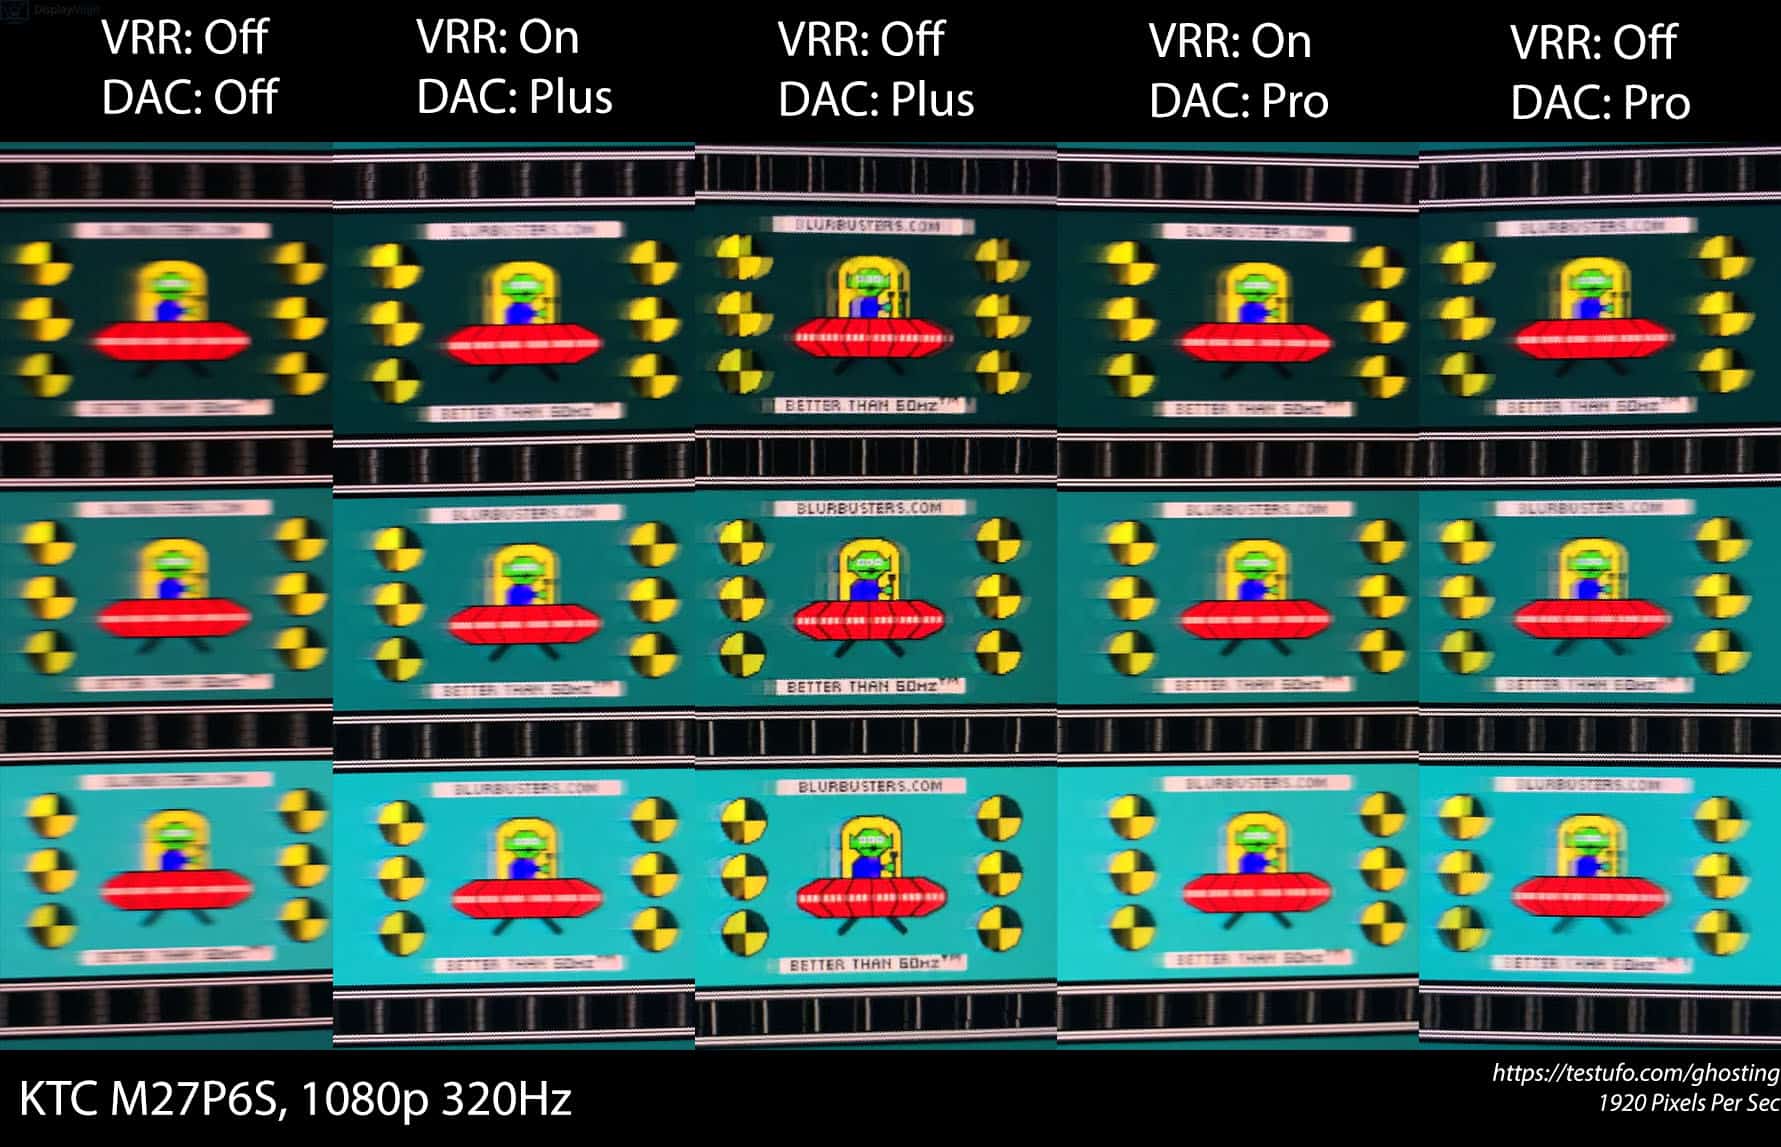
As you can see, with VRR enabled, there are only minor improvements in motion clarity when compared to non-strobed images. The implementation is not nearly as good as that of G-SYNC Pulsar, which we also tested on the MSI MPG 272QRF X36.
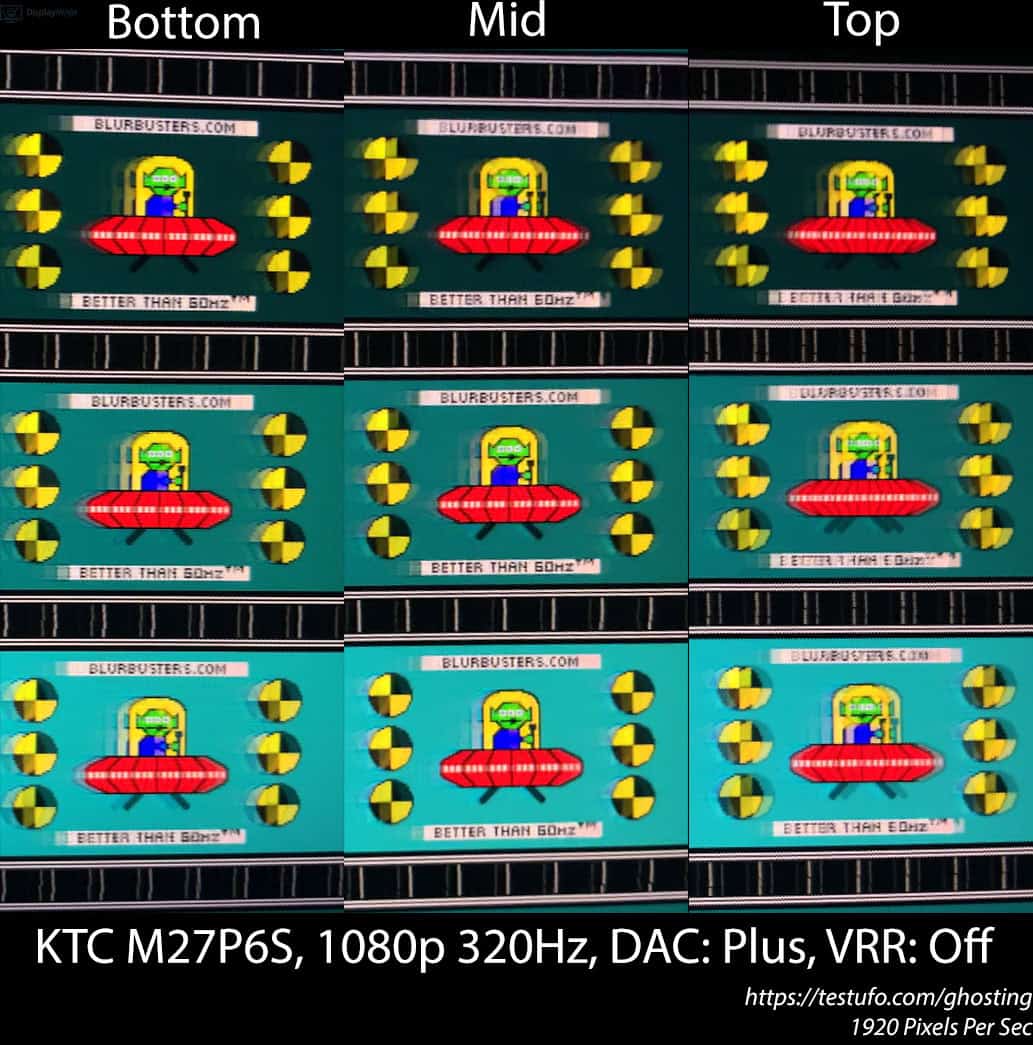
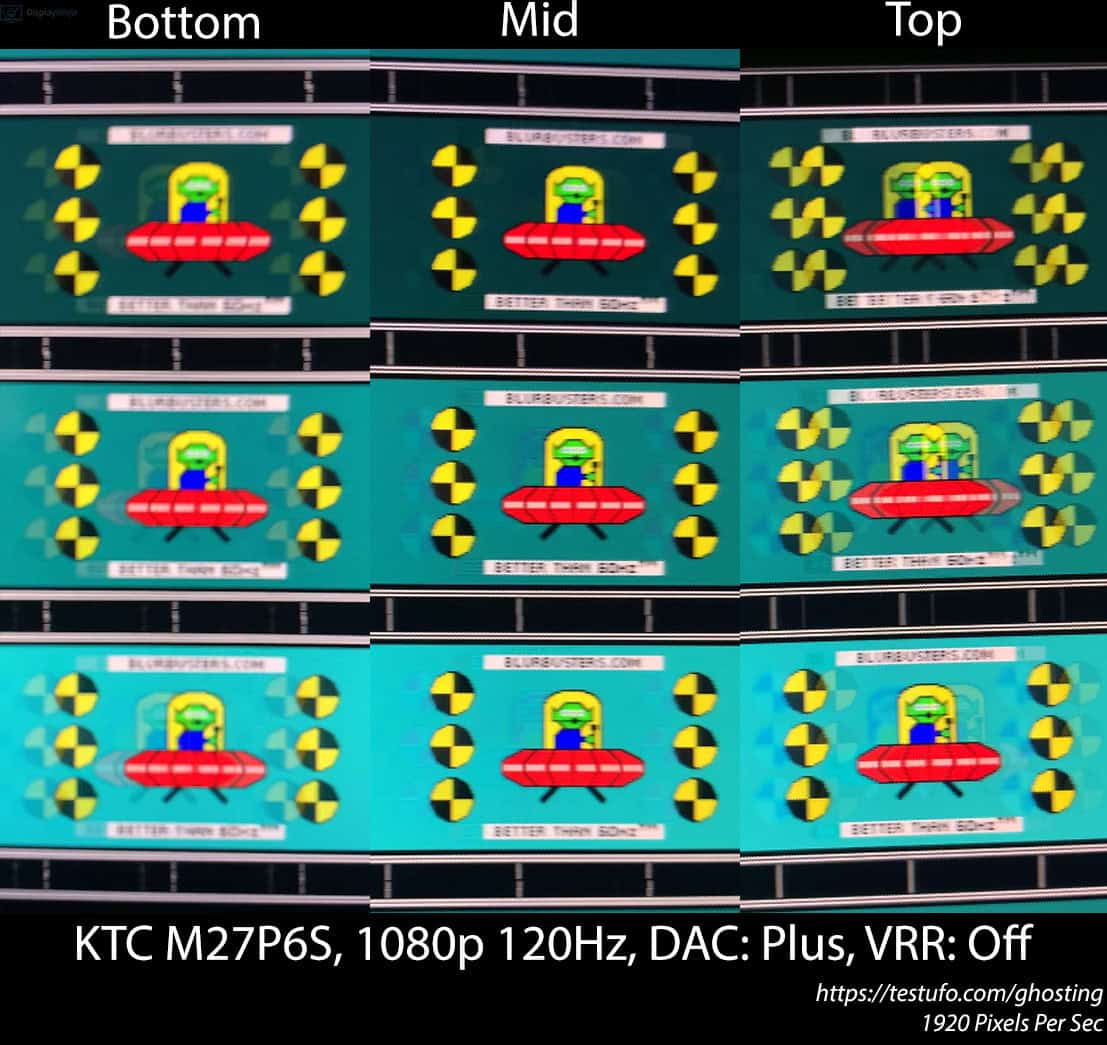
So, if you want notably clearer motion, you’ll have to opt for DAC Plus without VRR. We found that Plus looks better than Pro, so we don’t know why the Pro setting was included, as even the brightness penalty is the same. Perhaps it was intended to work better with VRR enabled but still requires some tuning.
Further, while the middle of the screen with DAC Plus looks fairly clear at 120Hz and 1080p 320Hz, the top and bottom edges of the screen show a lot of strobe crosstalk, so its usability is limited.
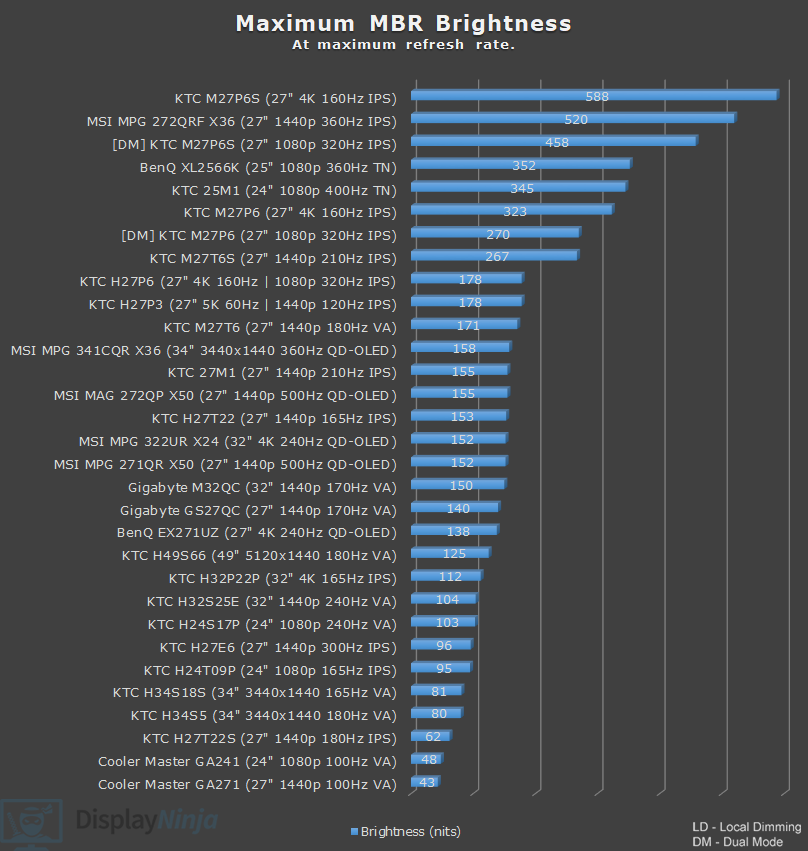
DAC cannot be enabled at the same time as HDR, but you can use local dimming with it. We measured maximum brightness with all combinations.
| VRR On | DAC+ / DAC Pro | VRR Off | DAC+ / DAC Pro |
| 4K 120Hz | 592 nits | 4K 120Hz | 446 nits |
| 4K 160Hz | 581 nits | 4K 160Hz | 588 nits |
| 1080p 320Hz | 570 nits | 1080p 320Hz | 458 nits |
| 1080p 240Hz | 579 nits | 1080p 240Hz | 458 nits |
| 1080p 120Hz | 595 nits | 1080p 120Hz | 428 nits |
With local dimming enabled, brightness drops to around 350 – 450 nits with smaller APLs, such as a 10% white window.
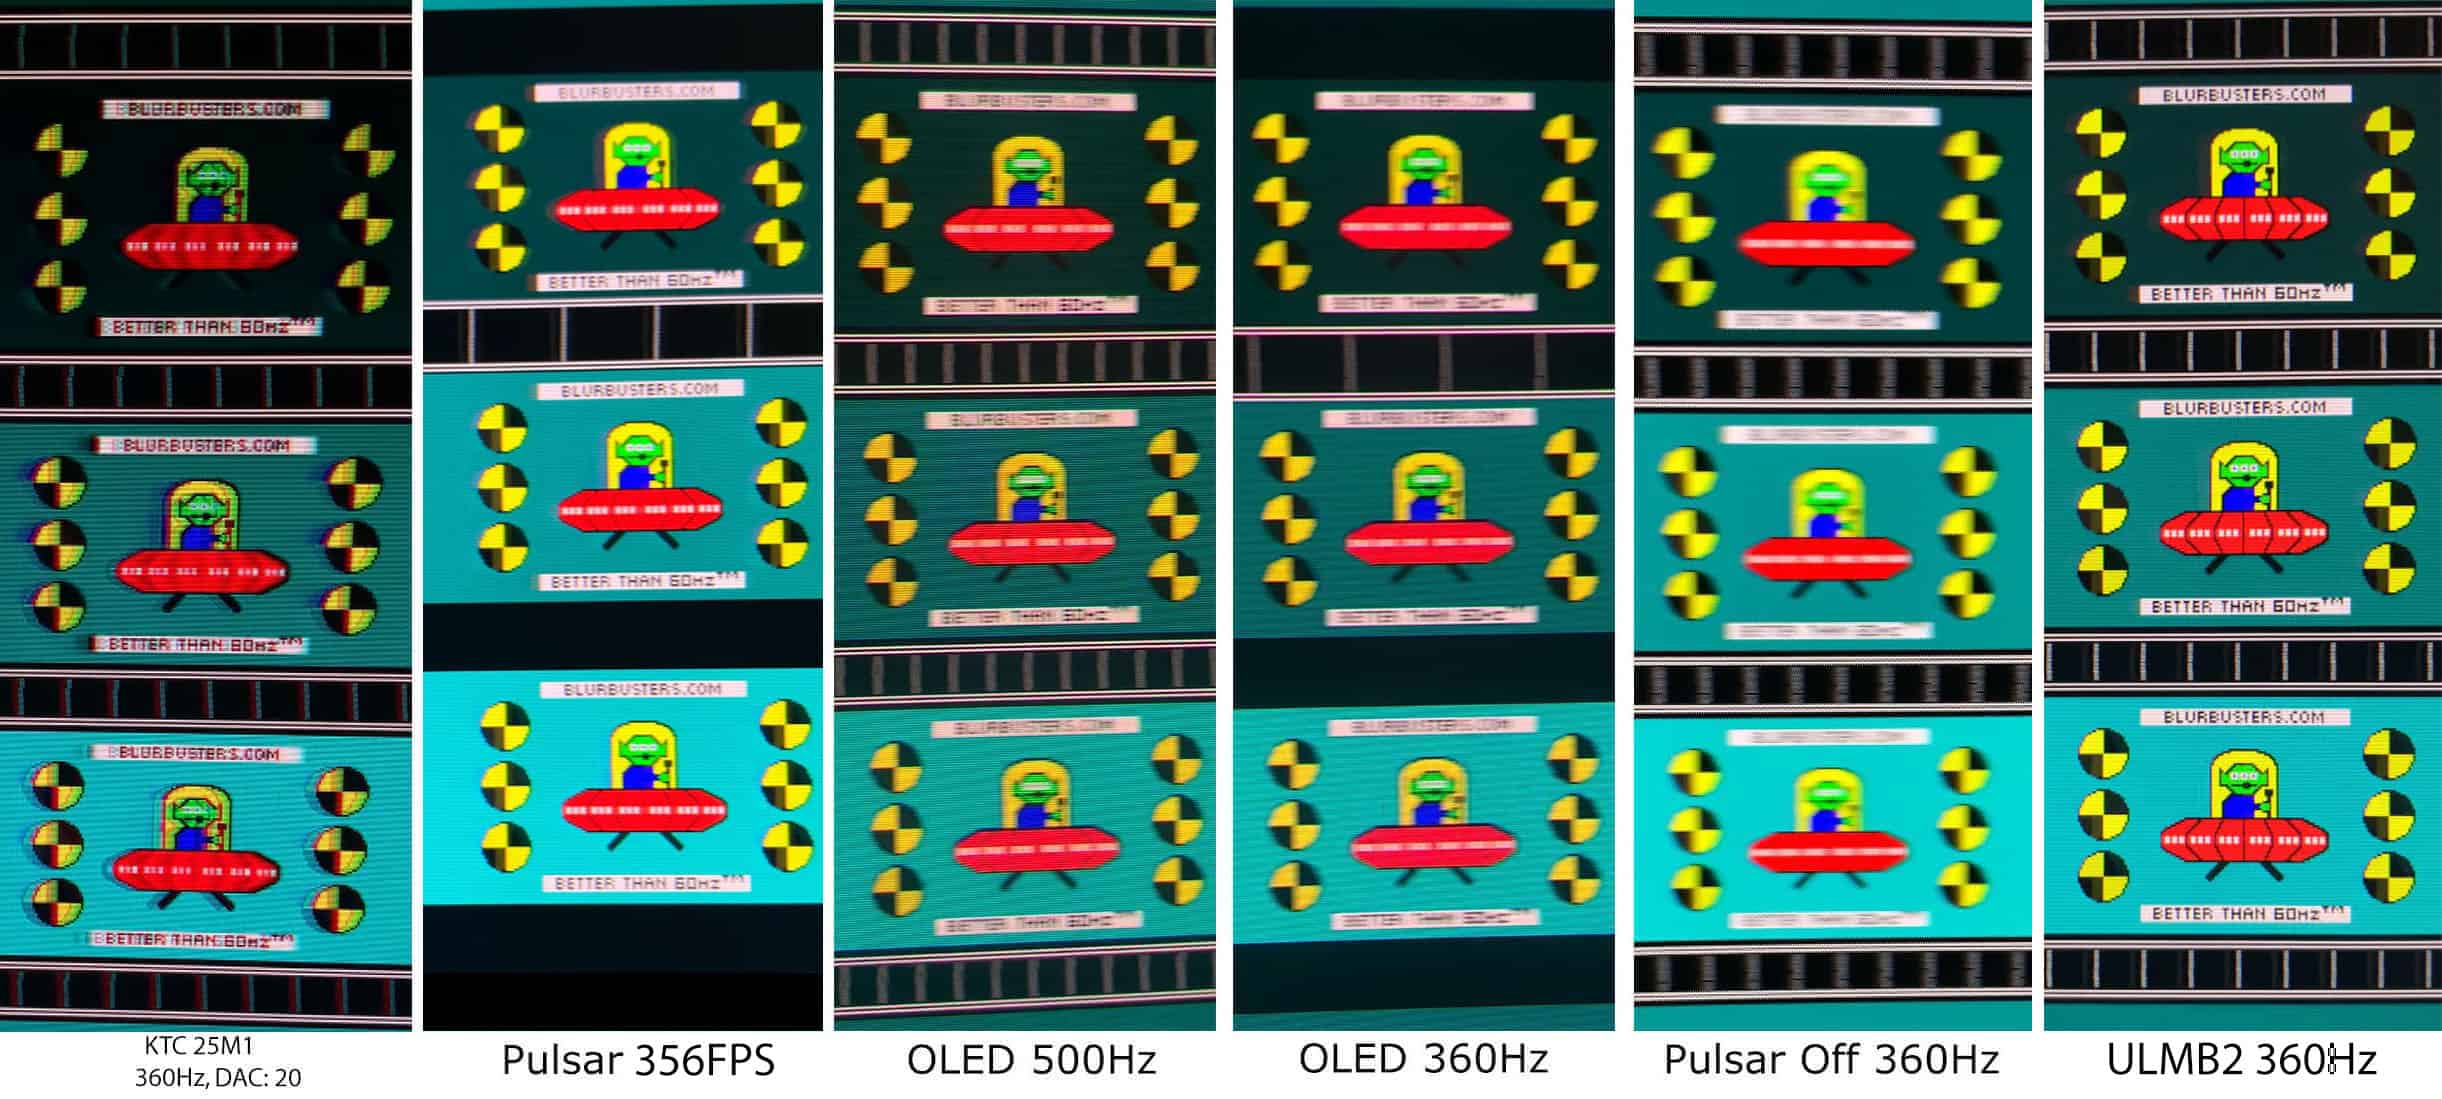
Finally, here are a few more UFO ghosting photos of other monitors for reference.
What’s interesting is that you can even get strobing to work at 60Hz, and even 50Hz. The DAC setting will be locked at fixed refresh rates below 100Hz, but if you first enable DAC and then decrease the refresh rate, strobing will remain active.
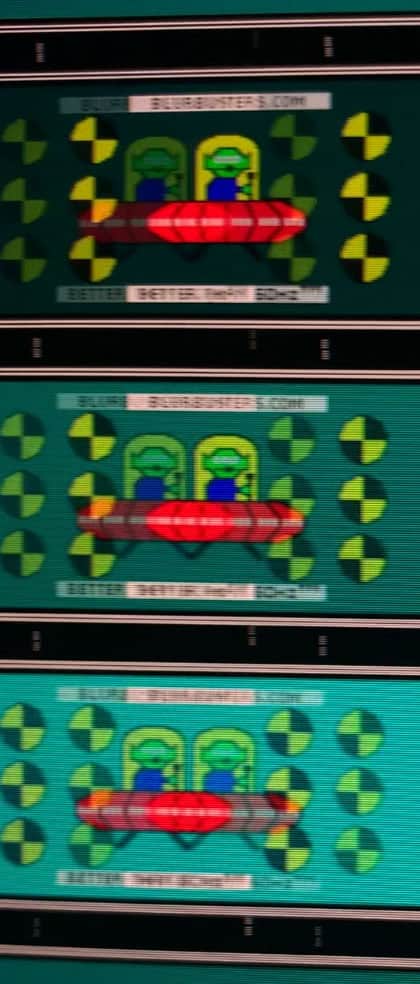
Unfortunately, the strobing performance isn’t particularly good at low refresh rates as there’s a lot of strobe crosstalk.
Variable Refresh Rate
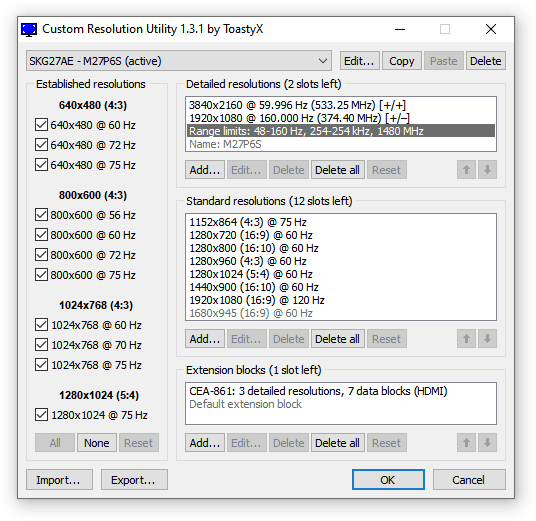
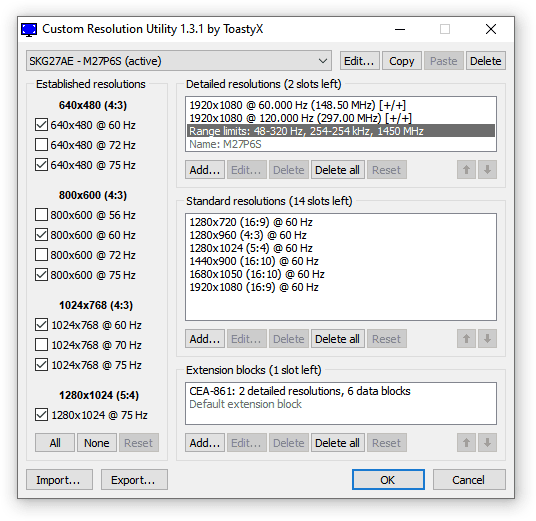
With ‘Adaptive-Sync’ set to ‘On’, you can enable variable refresh rate (VRR) in your GPU drivers, which allows the monitor’s refresh rate to change dynamically according to your frame rates in order to prevent screen tearing at no perceptible latency cost.
So, if you’re gaming at 160Hz, but you’re getting 120FPS, the monitor will run at 120Hz in order to provide you with 120 whole frames per second without the screen-tearing artifacts.
The supported VRR range is 48-160Hz (48-320Hz at 1080p), but even if your FPS dips below 48, the monitor uses LFC (Low Framerate Compensation) to refresh the screen at a multiple of your current frame rate. For example, 40FPS would be displayed at 80Hz or 120Hz to keep tearing at bay.
We didn’t encounter any VRR brightness flickering, a common issue on high refresh rate VA and OLED panels. VRR works at the same time as local dimming and HDR.
Latency
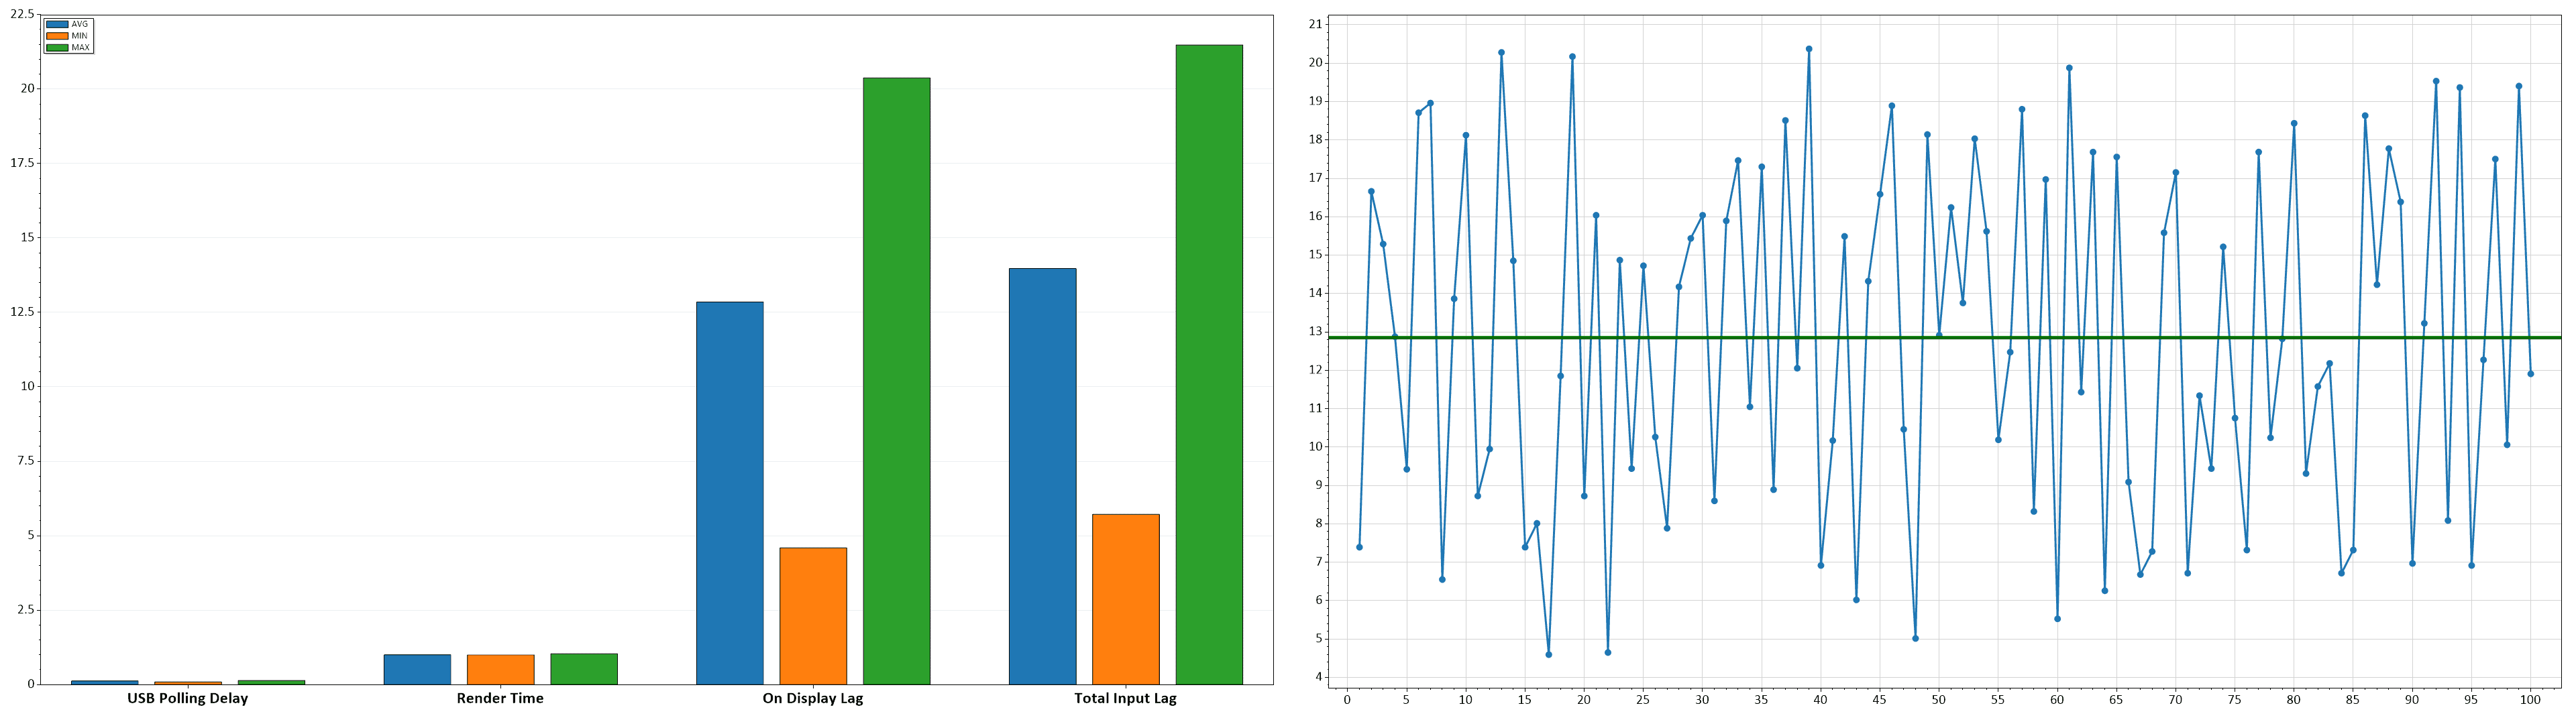
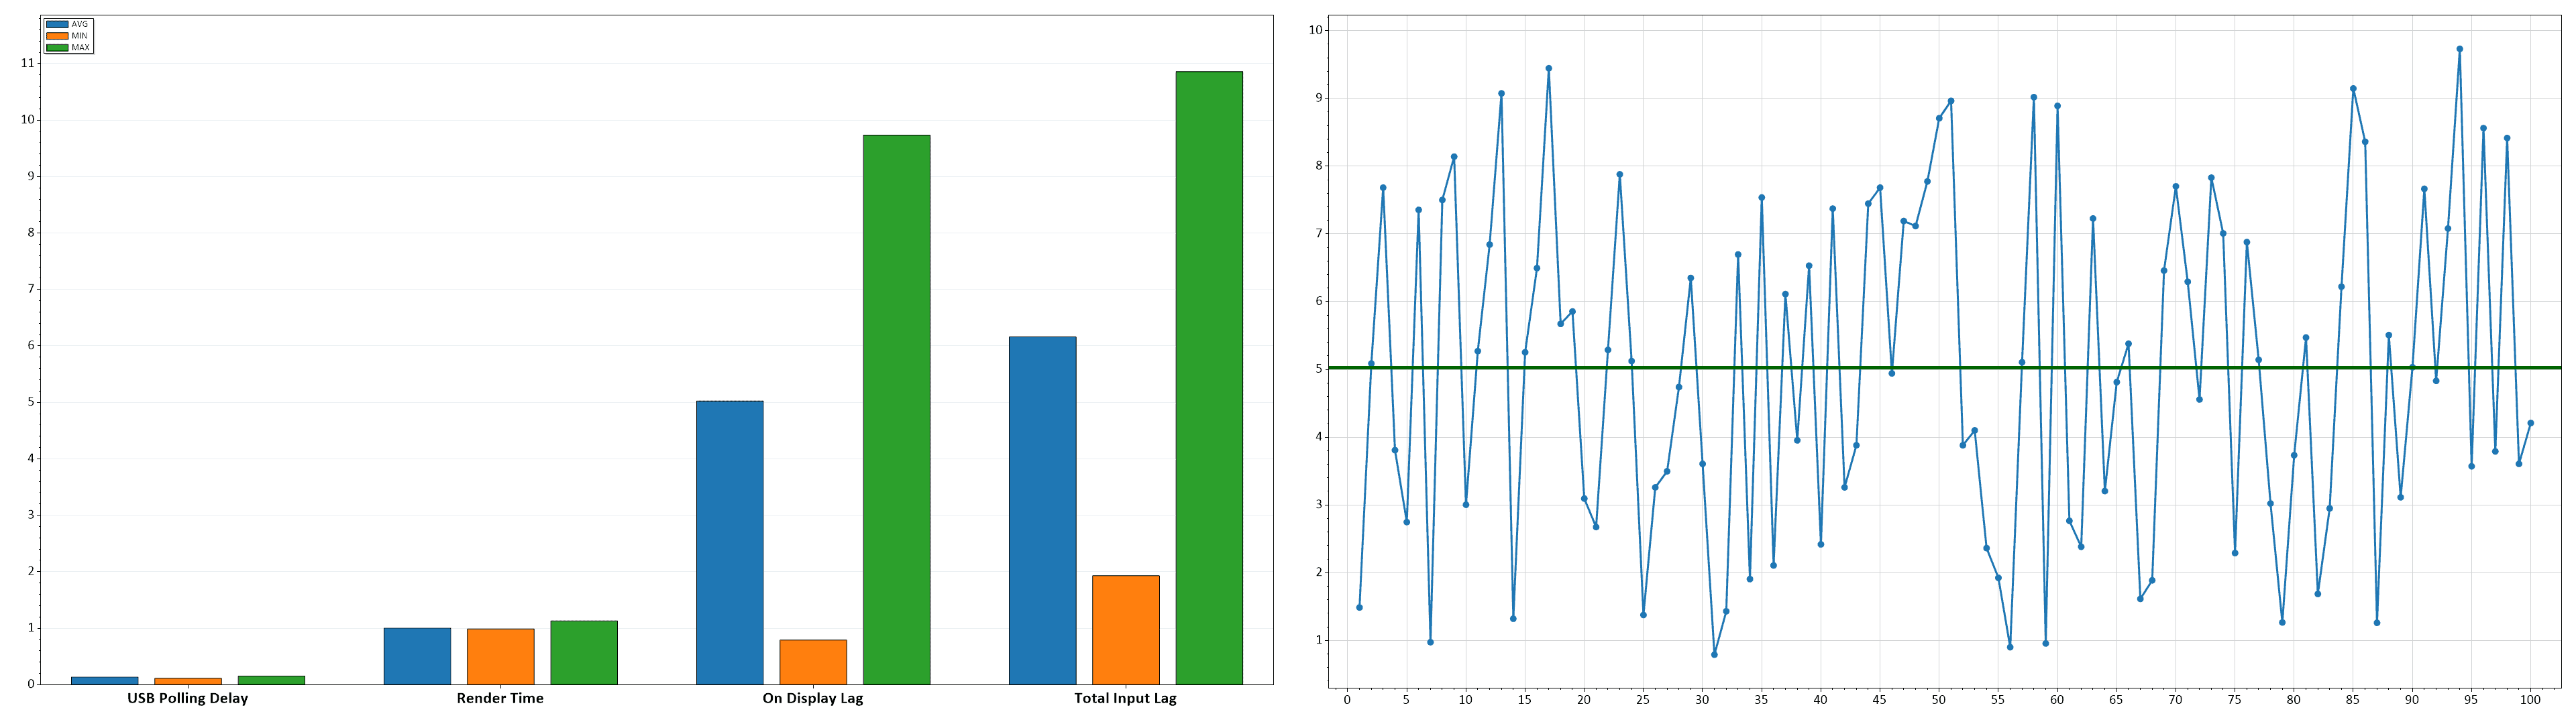
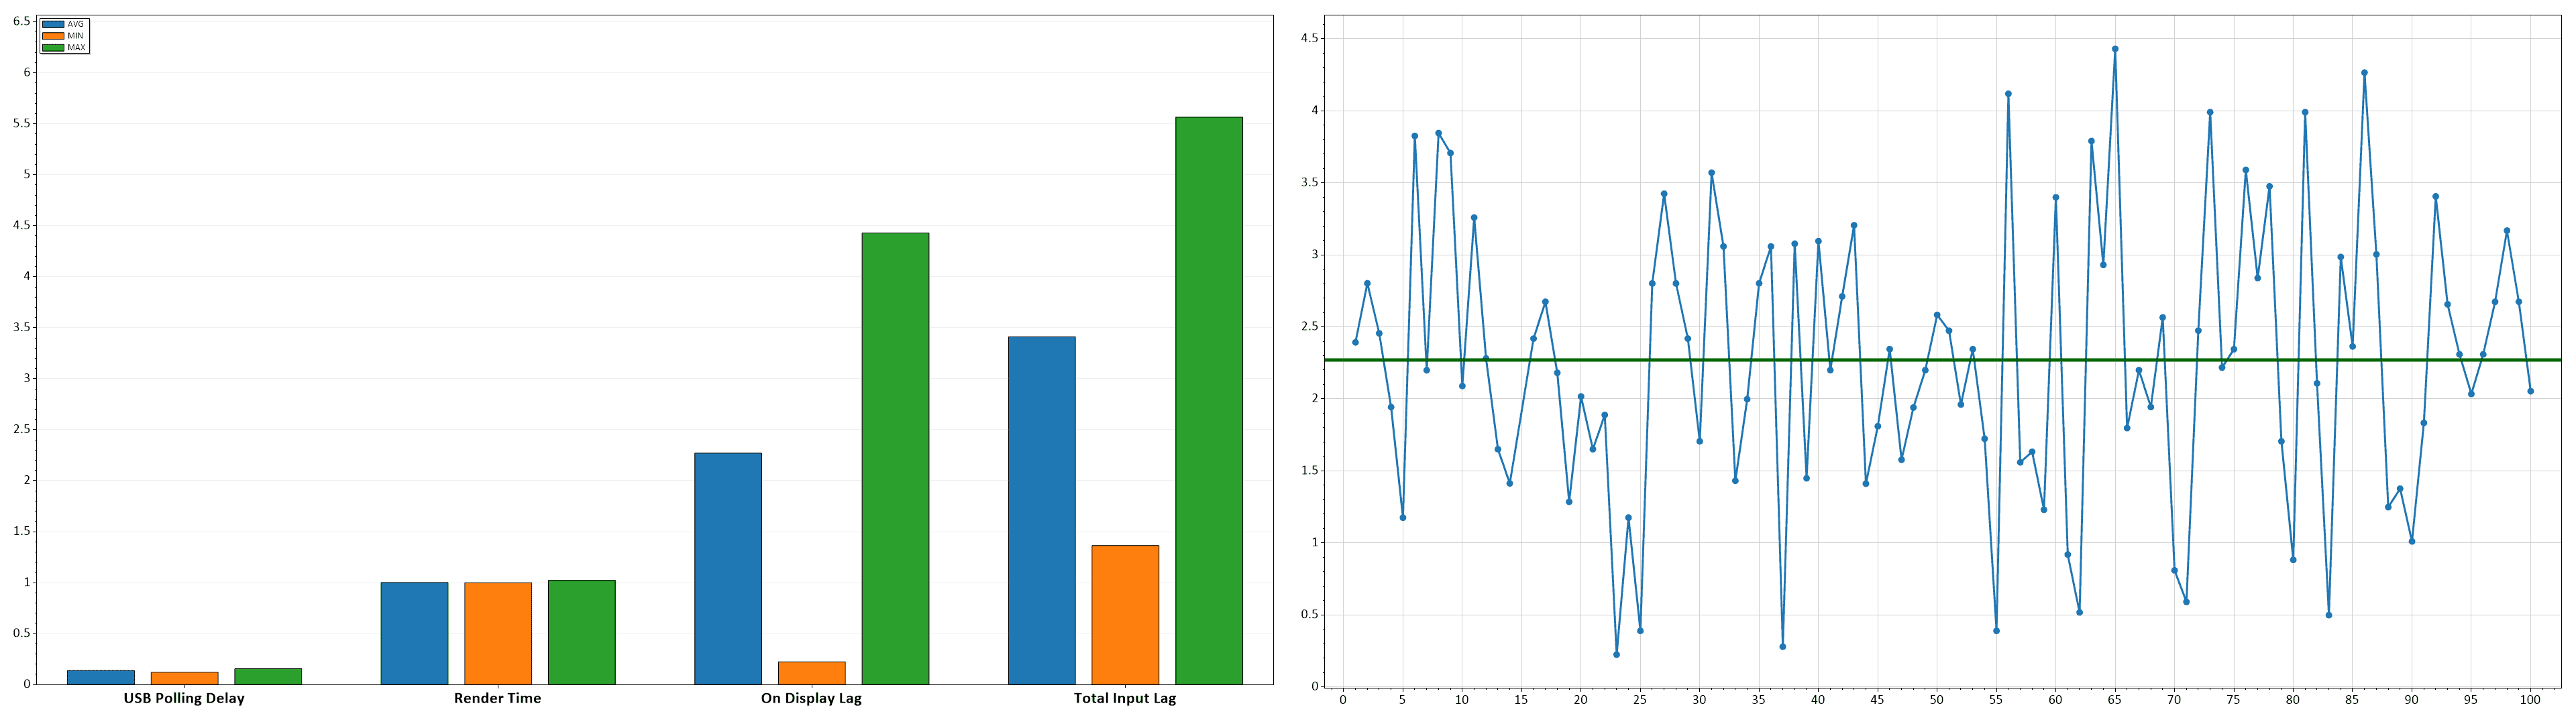
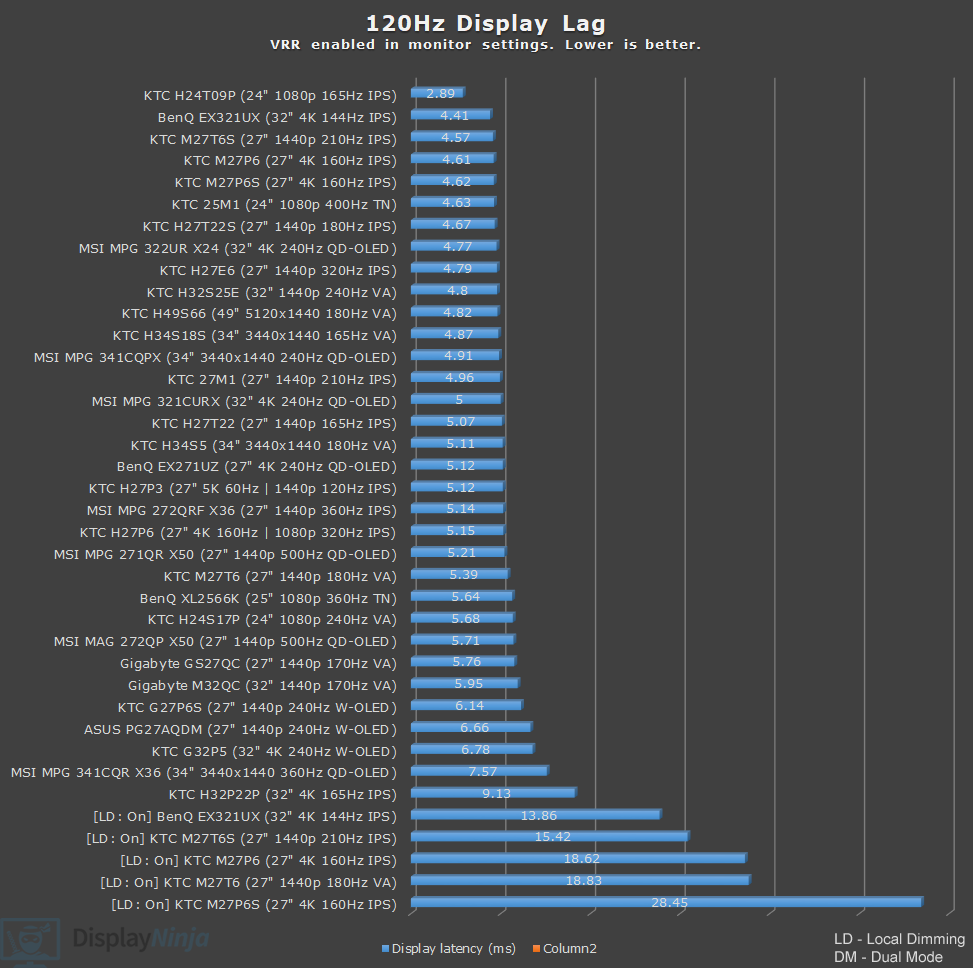
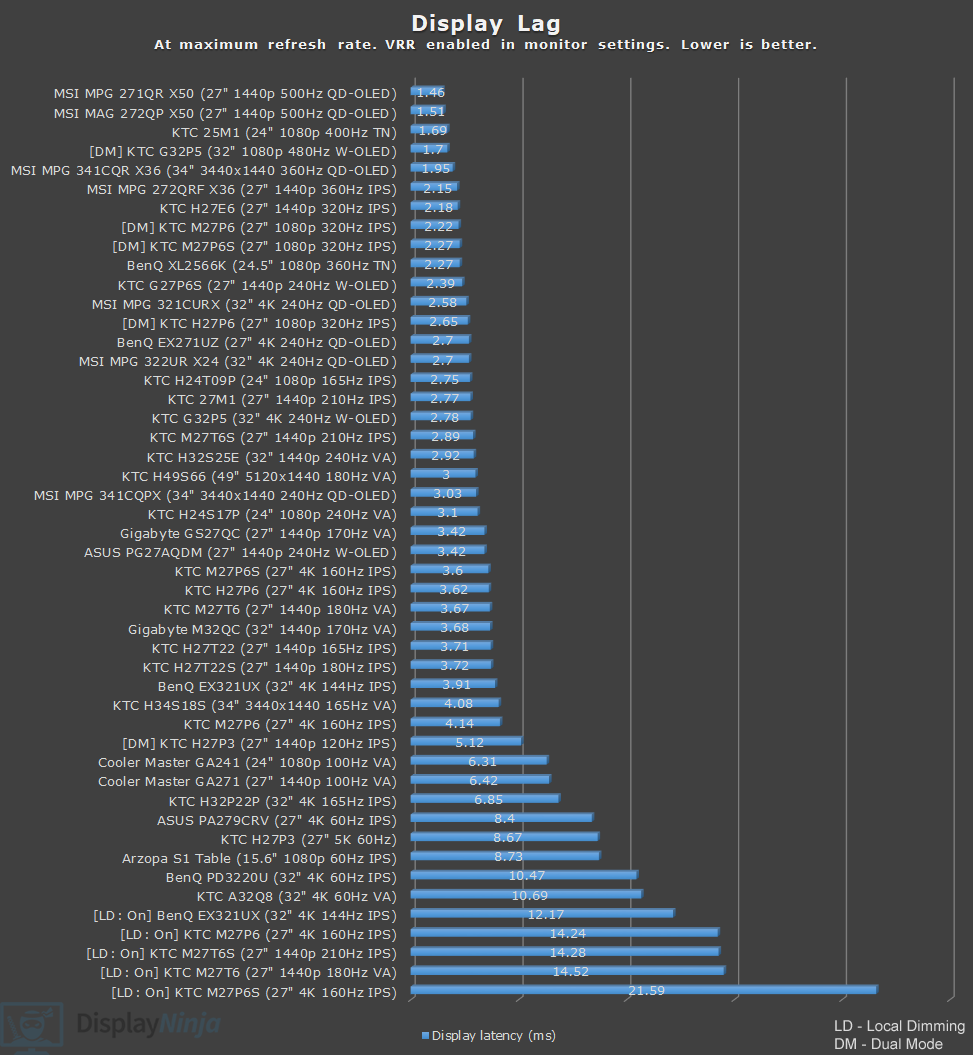
With ‘Adaptive-Sync’ and ‘Low Input Lag’ enabled, and local dimming disabled in the OSD menu, we measured low display latency of 3.6ms at 160Hz, 4.62ms at 120Hz and 9.52ms at 60Hz.
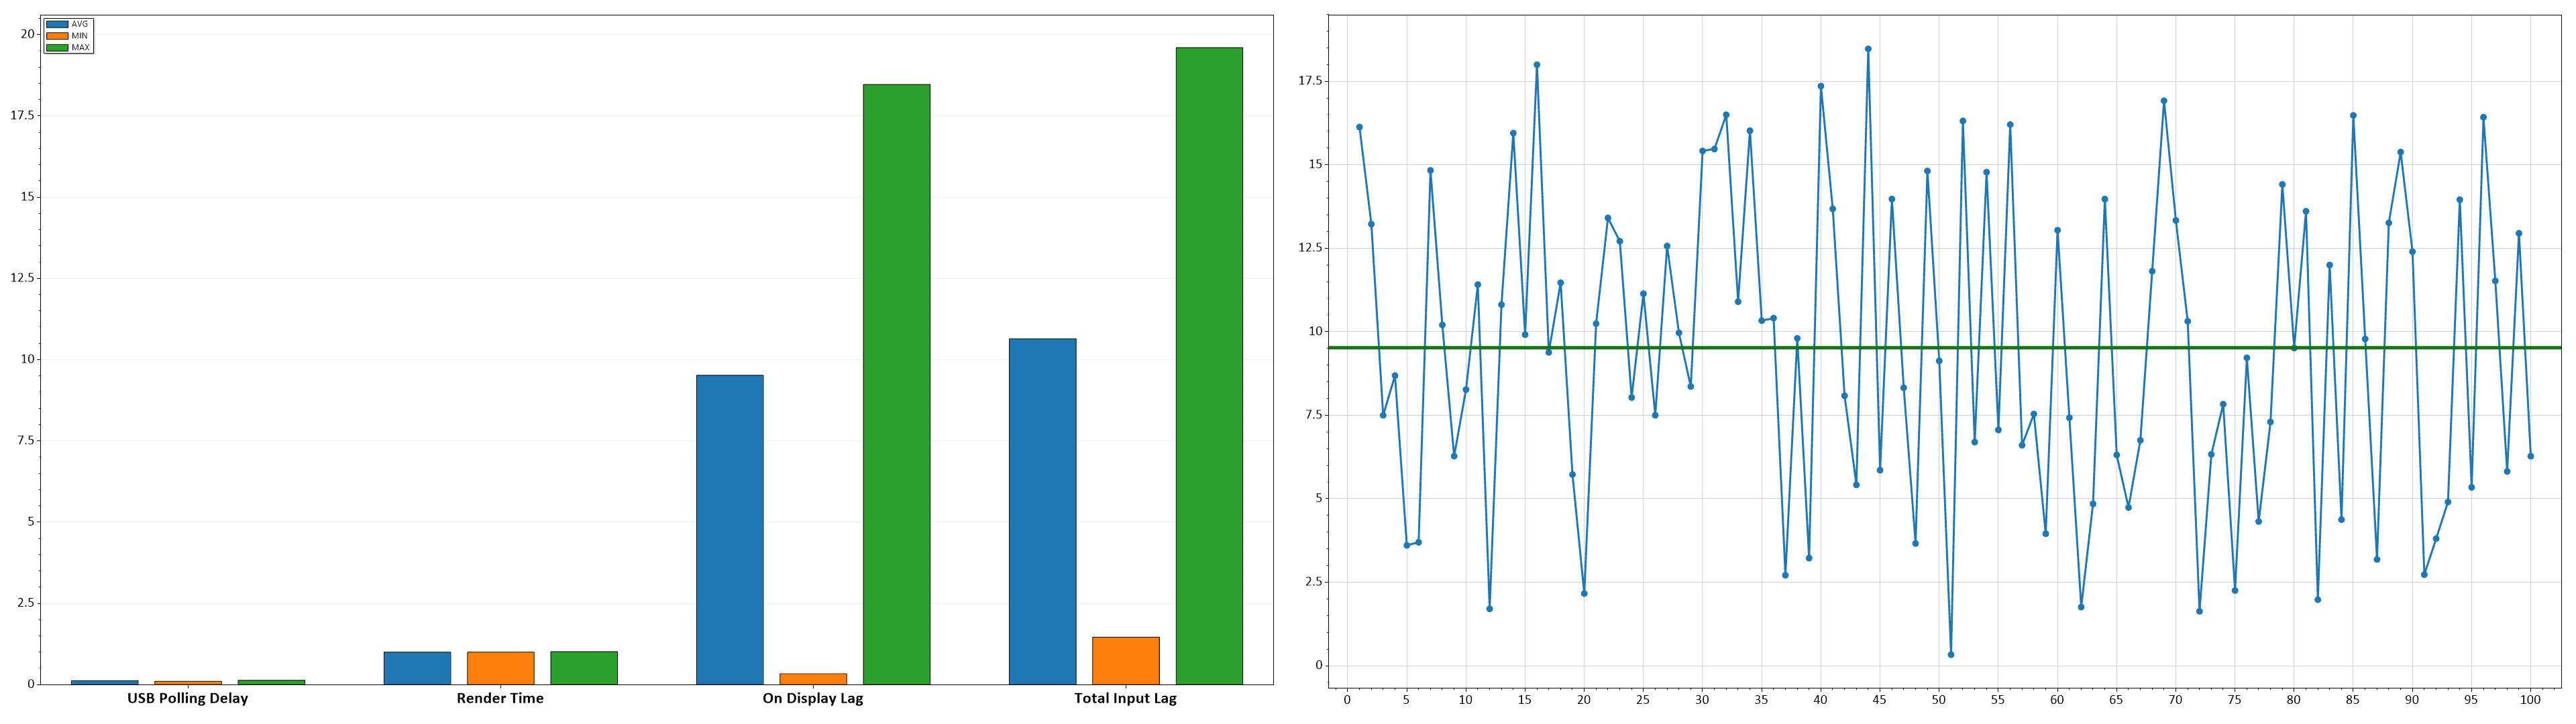
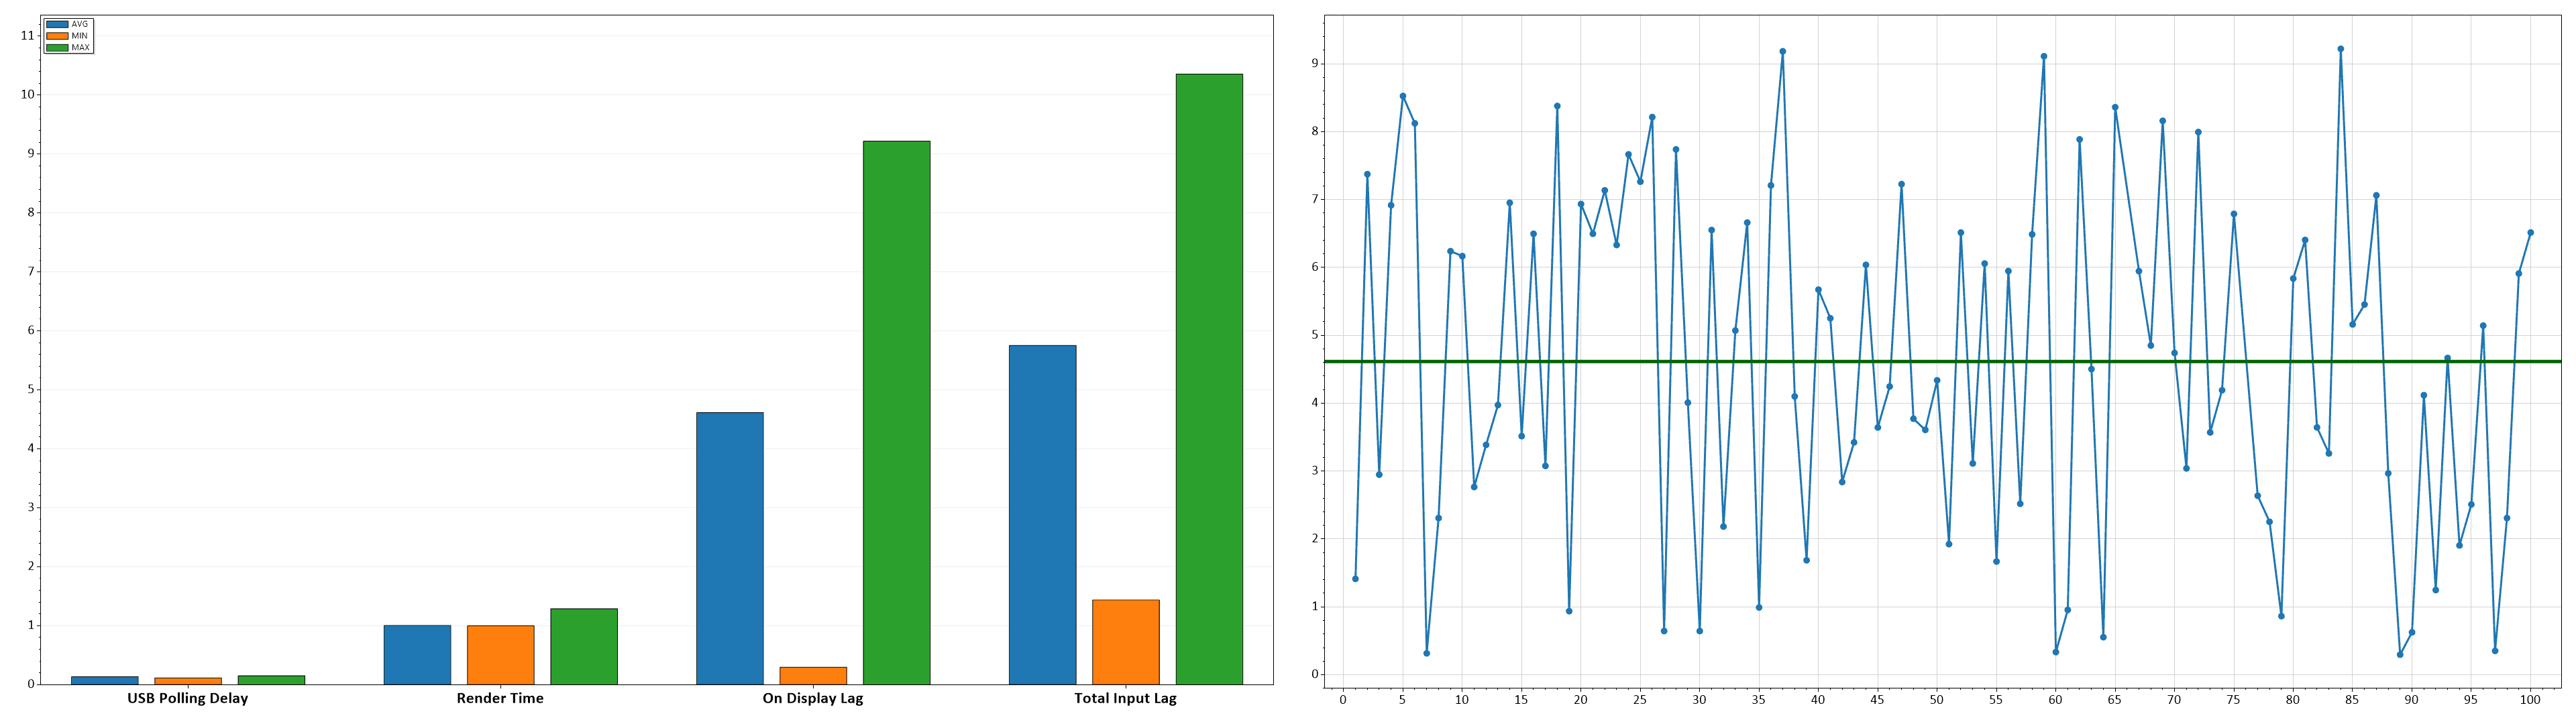
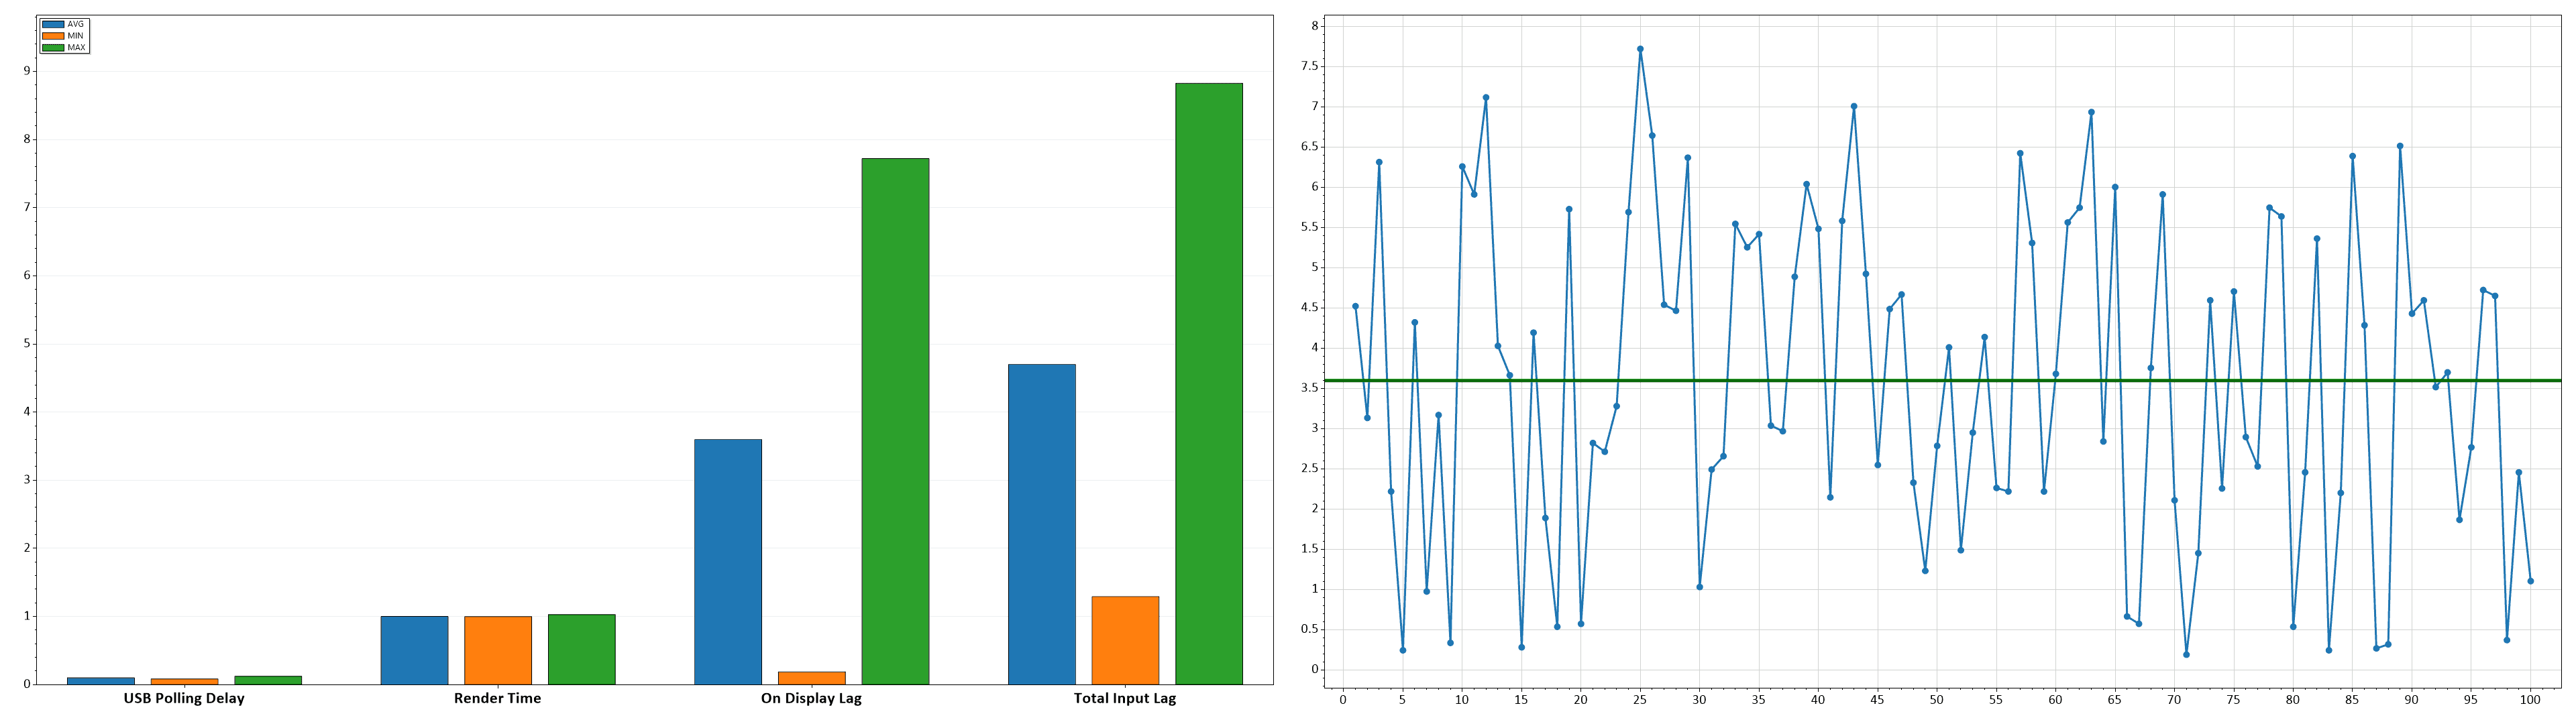
In the 1080p mode, we measured 2.27ms at 320Hz, 5.03ms at 120Hz and 12.85ms at 60Hz.
These are great results as there’s no perceptible delay between your actions and the result on the screen.
However, as expected, enabling local dimming increases display latency.
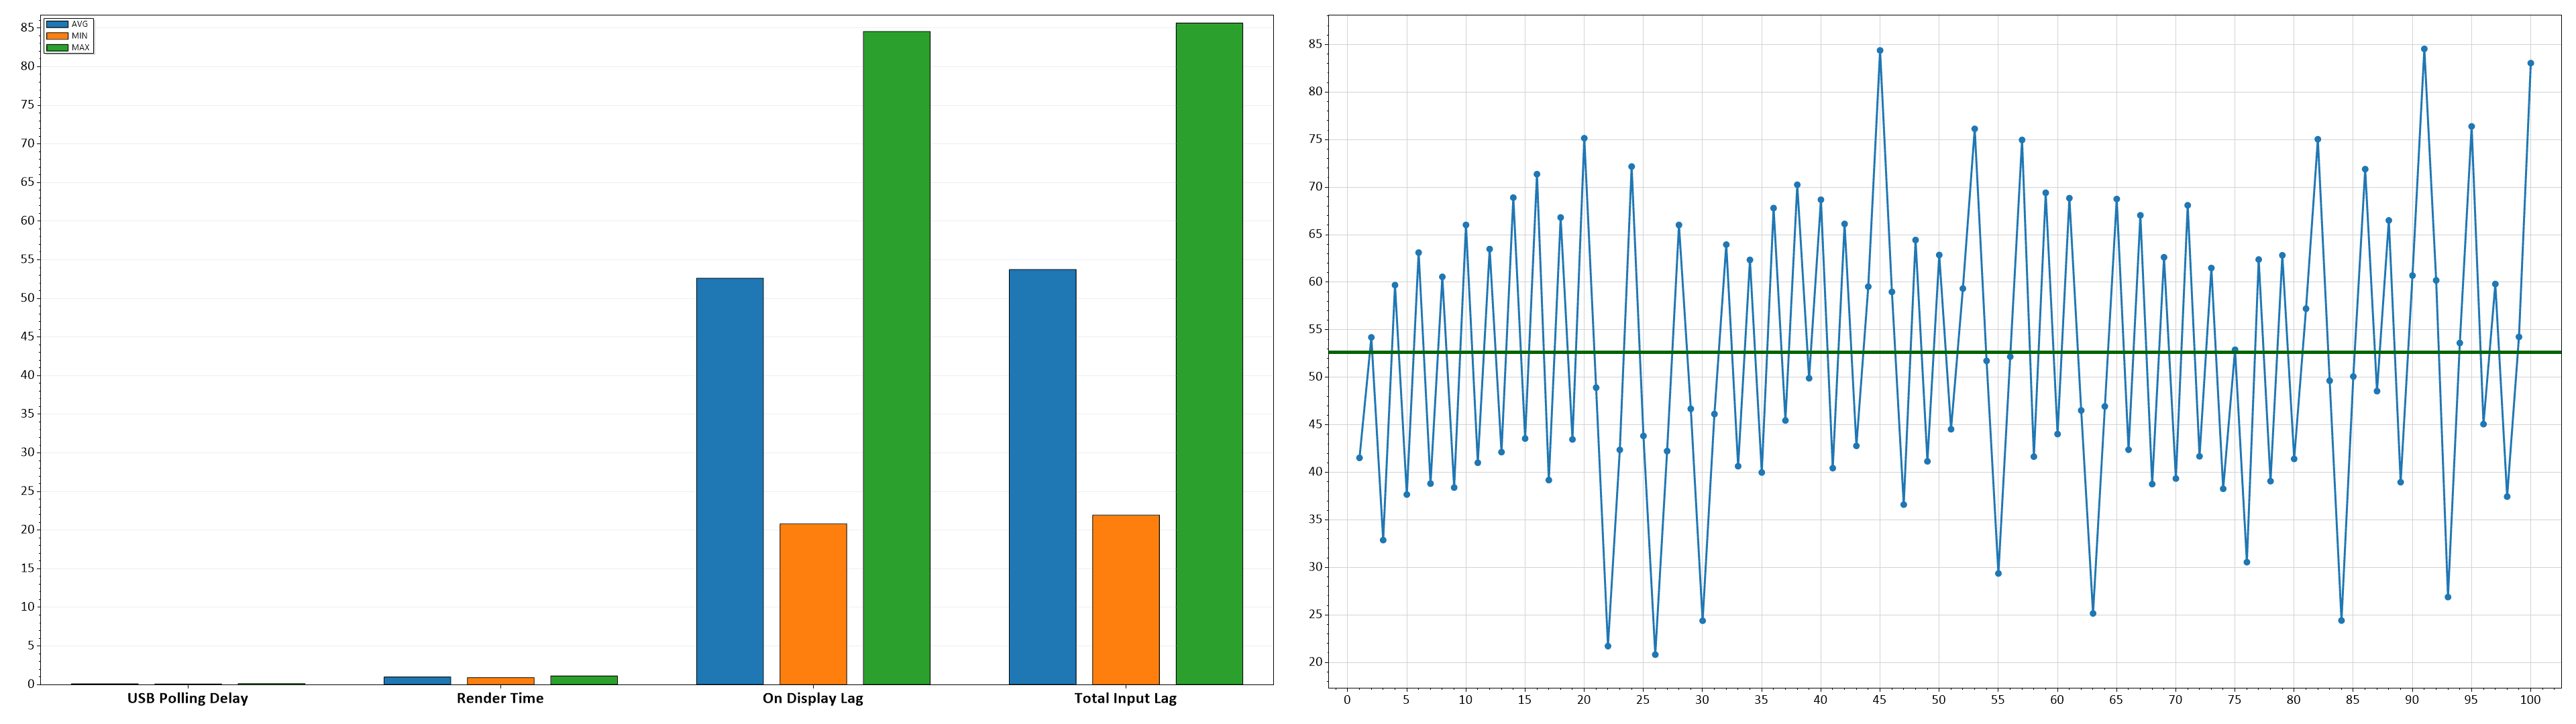
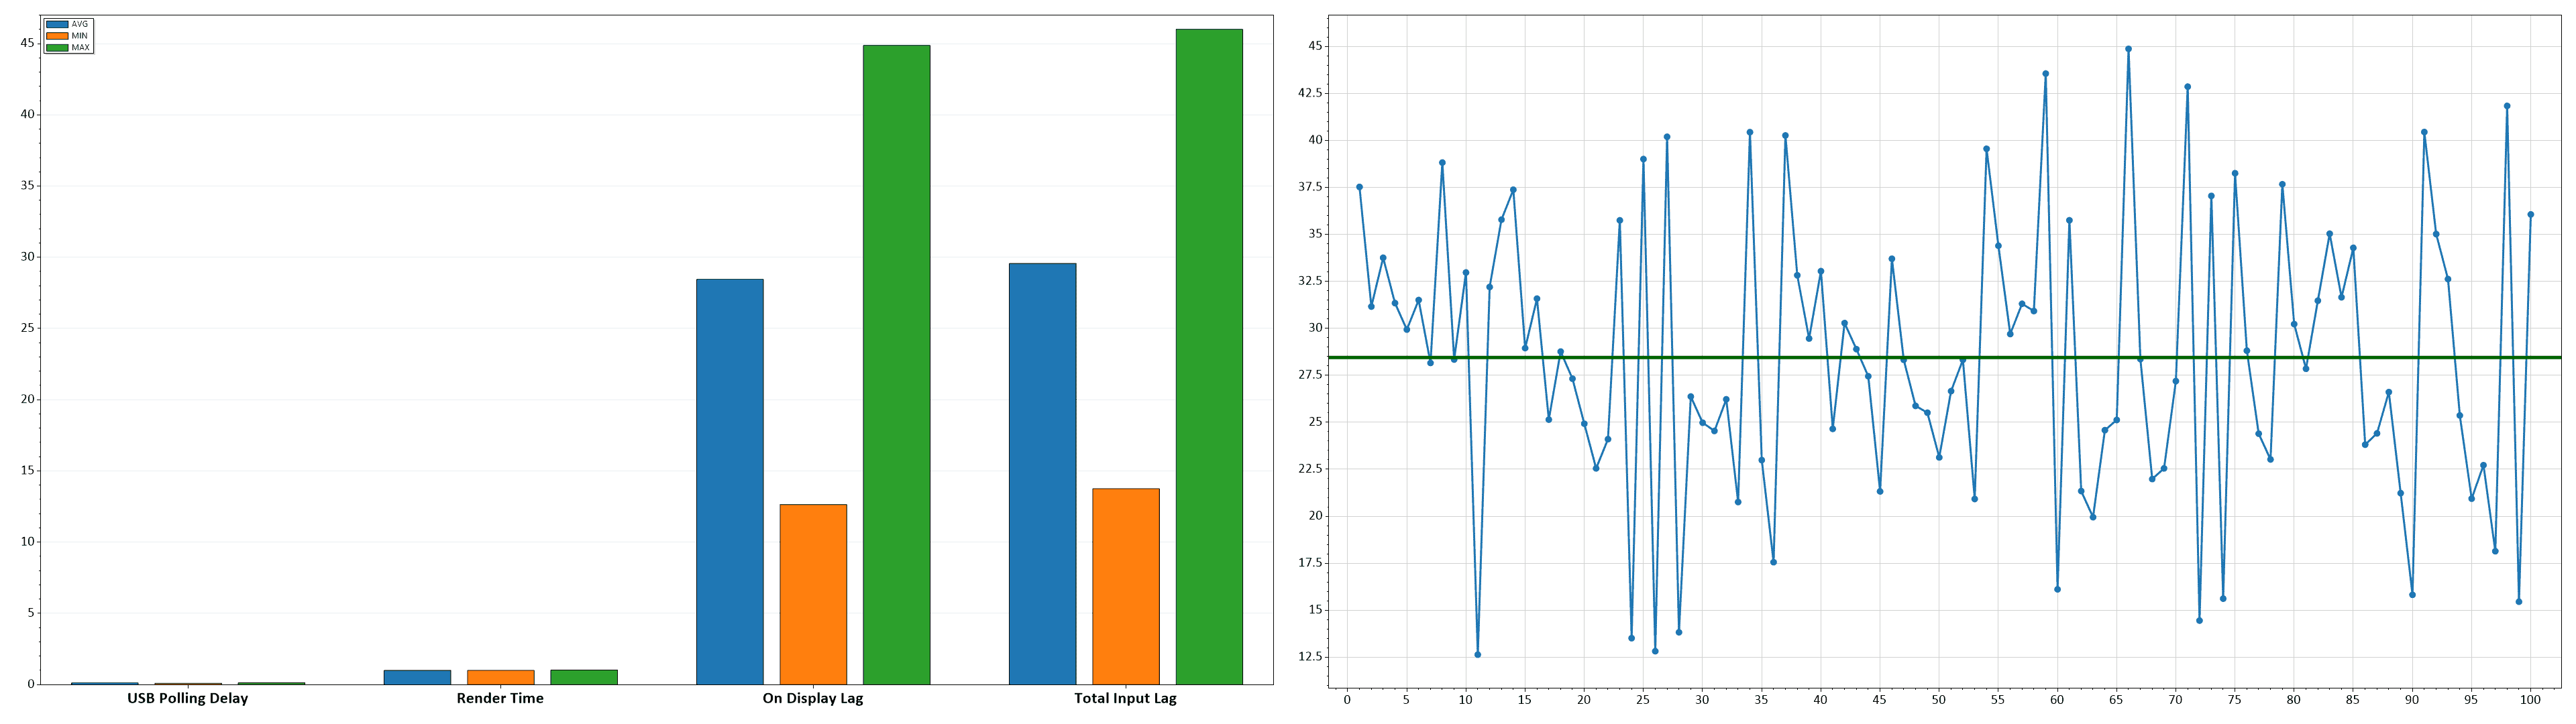
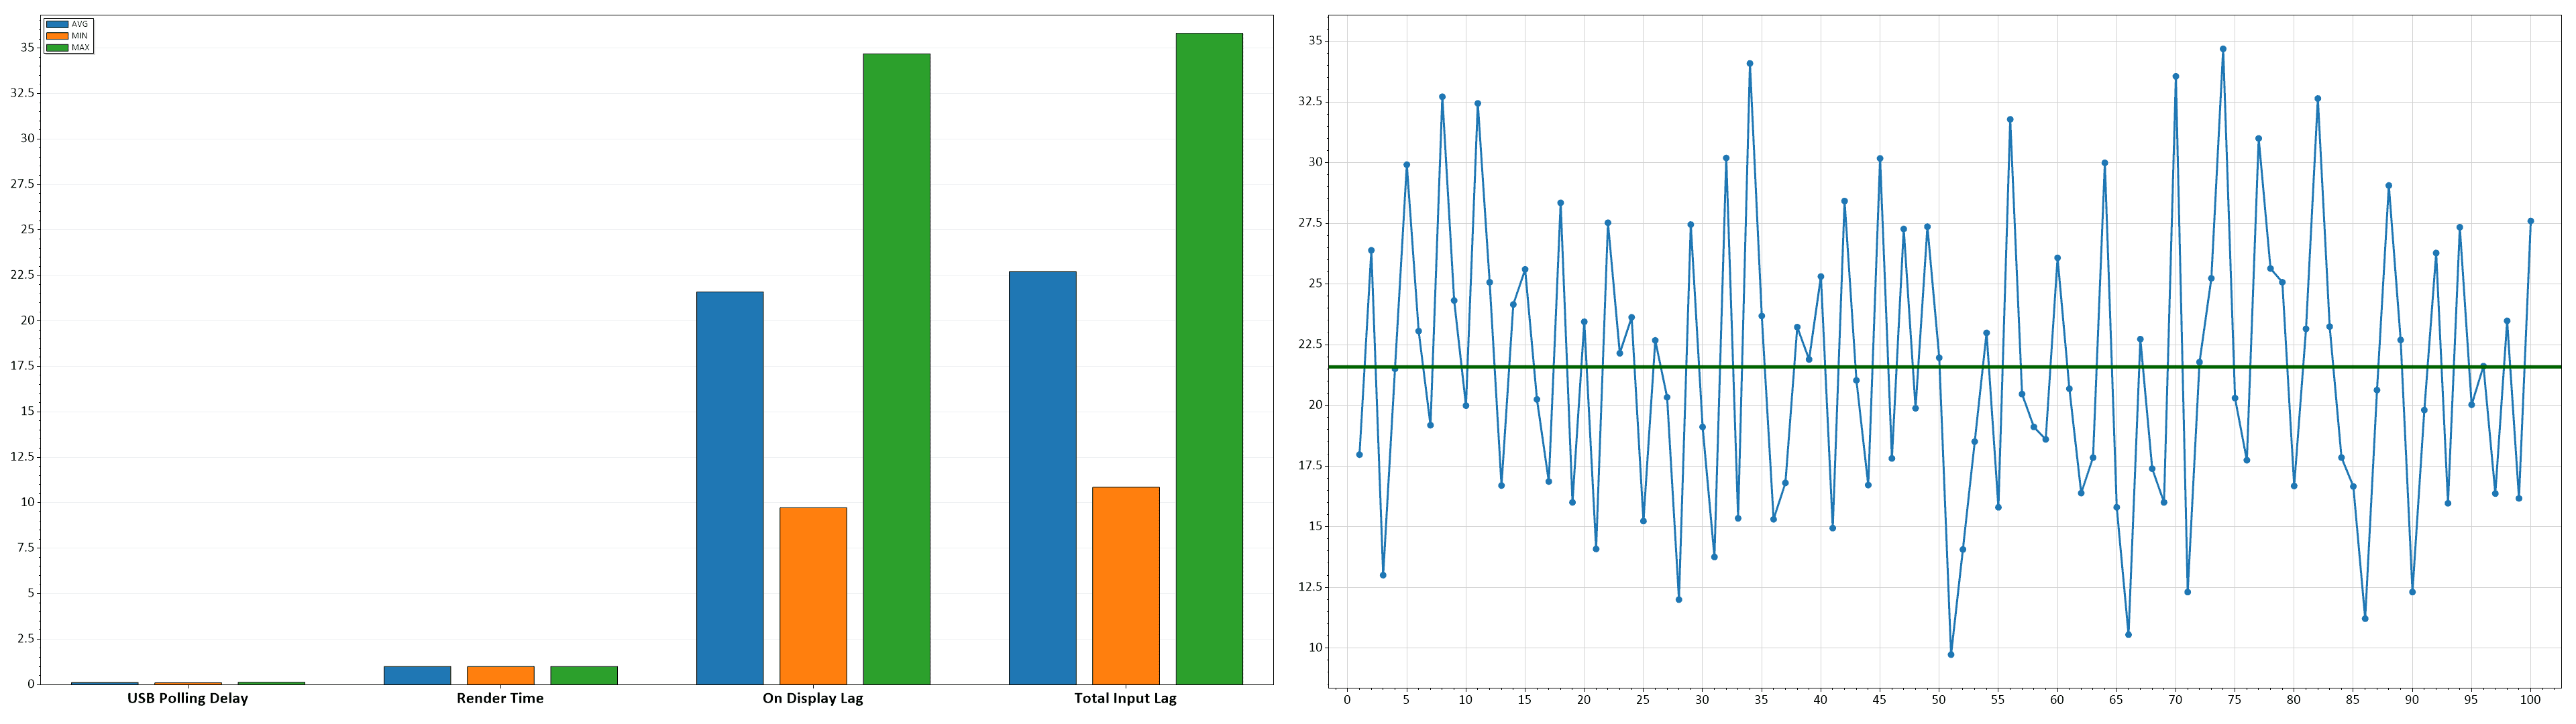
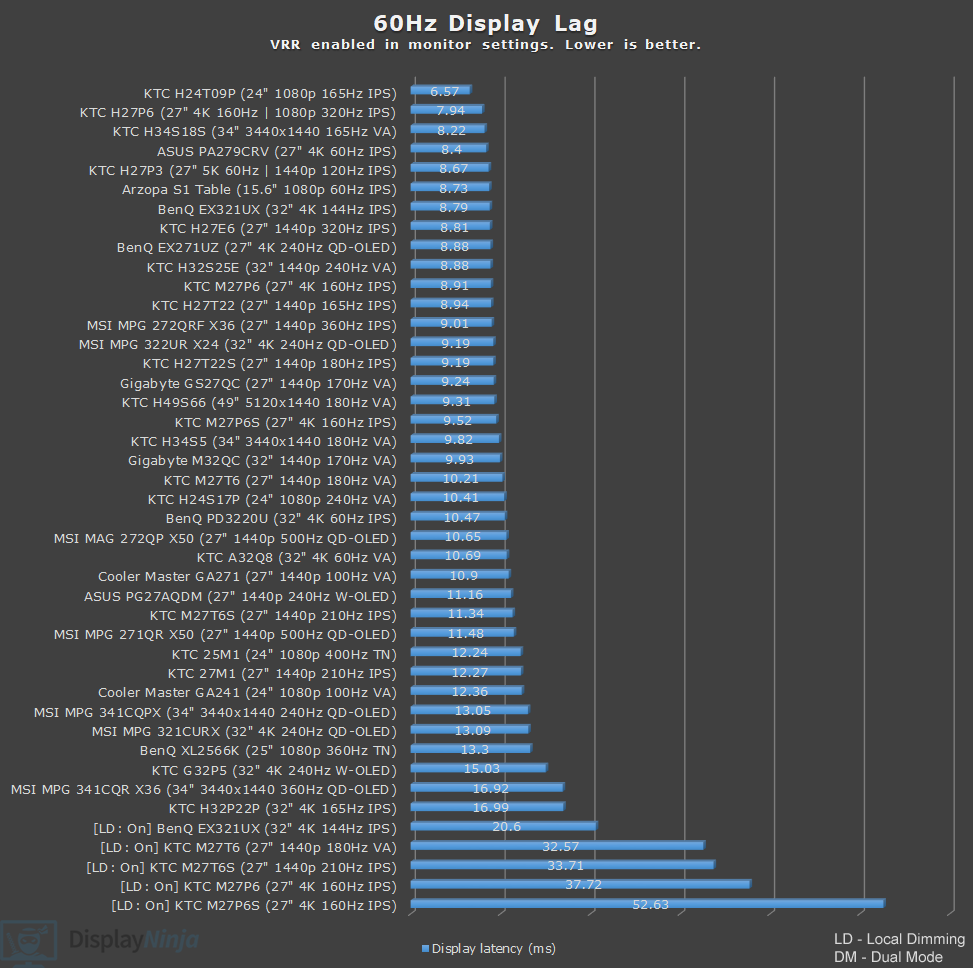
We measured 21.59ms at 160Hz, 28.45ms at 120Hz and 52.63ms at 60Hz. This is a bit more than the typical 10ms of delay that local dimming adds to all FALD monitors we’ve encountered so far.
There’s basically an extra refresh cycle of latency on top of what we’d typically see on mini LED monitors. For example, on a 160Hz monitor with around 4ms of latency, local dimming would usually increase that to roughly 14ms. Here, however, we’re seeing an additional 6.25ms of latency, which is the length of one 160Hz refresh cycle. The same pattern occurs at 120Hz and 60Hz.
We didn’t find the increased latency to be noticeable during everyday use and gaming, but other users may be more sensitive. Of course, for competitive gaming, you’ll want to disable local dimming for the best performance anyway.
The exception is 60Hz with local dimming, where you can definitely feel the latency.
The tests with local dimming were done with HDR enabled. You cannot enable HDR in the 1080p mode. What’s odd is that when we measured latency with local dimming enabled in SDR mode, the latency barely increased (to 4.06ms at 160Hz, 5.34ms at 120Hz and it even decreased to 8.36ms from 9.52ms at 60Hz).
Usually, latency increases equally in both SDR and HDR with local dimming enabled.
We’re not sure whether this is an issue with our testing tool (although the results have been consistent so far) or if the latency is genuinely this low with local dimming enabled in SDR.
Uniformity & Quality Control
We didn’t find any excessive IPS glow or backlight bleeding, no pixel inversion artifacts and no frame skipping.
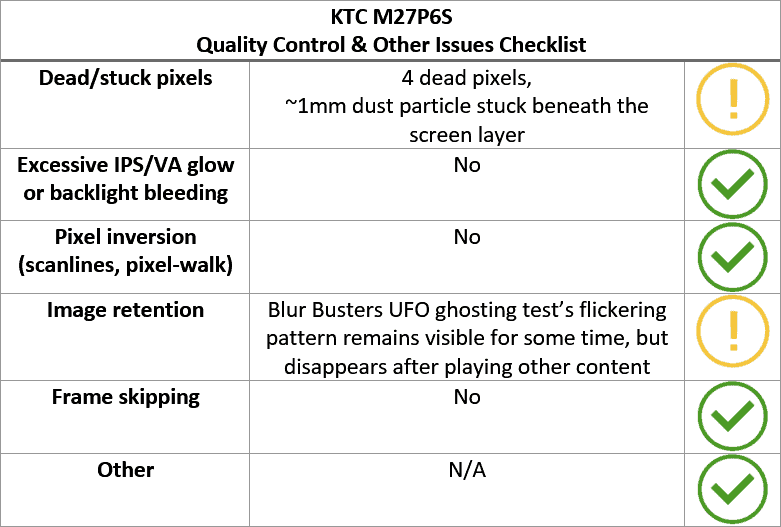
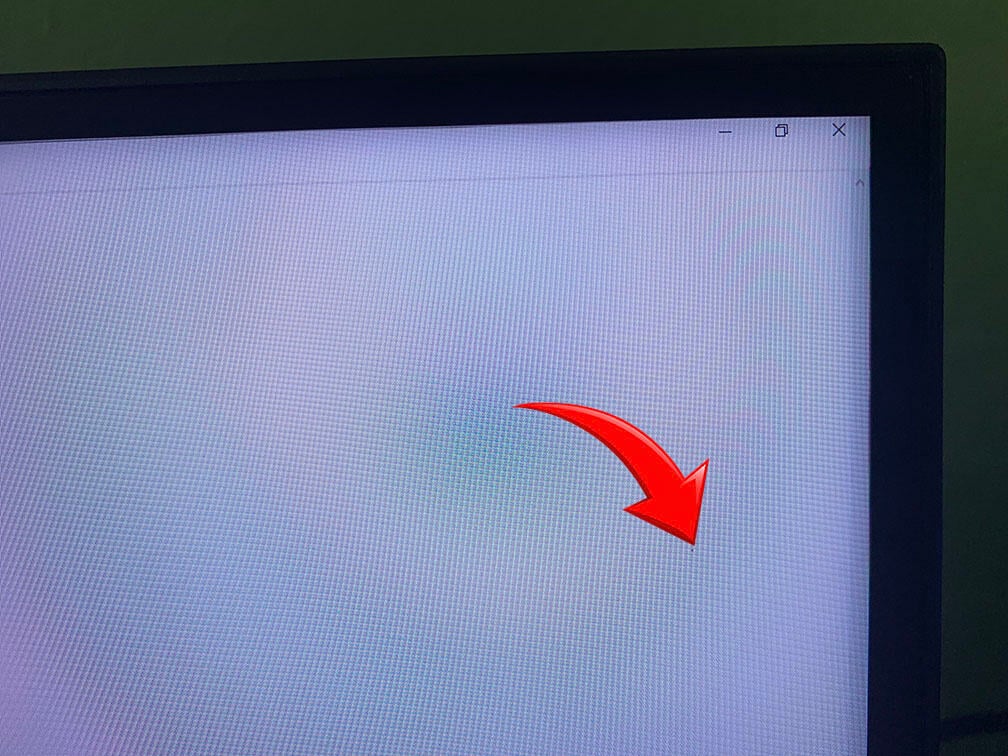
However, there is a ~1mm dust particle in the top right corner of the screen that’s only visible on solid colors.
In addition, there are four dead pixels across the screen: one in the bottom-left corner, one near the top edge, one near the right edge, and one near the bottom edge.
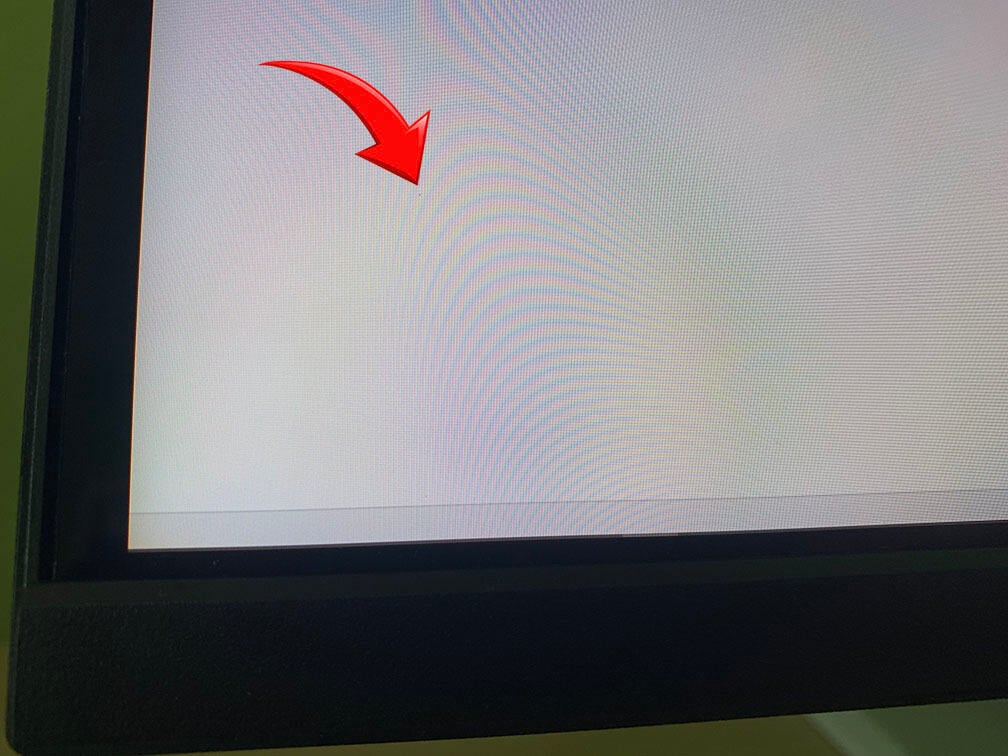
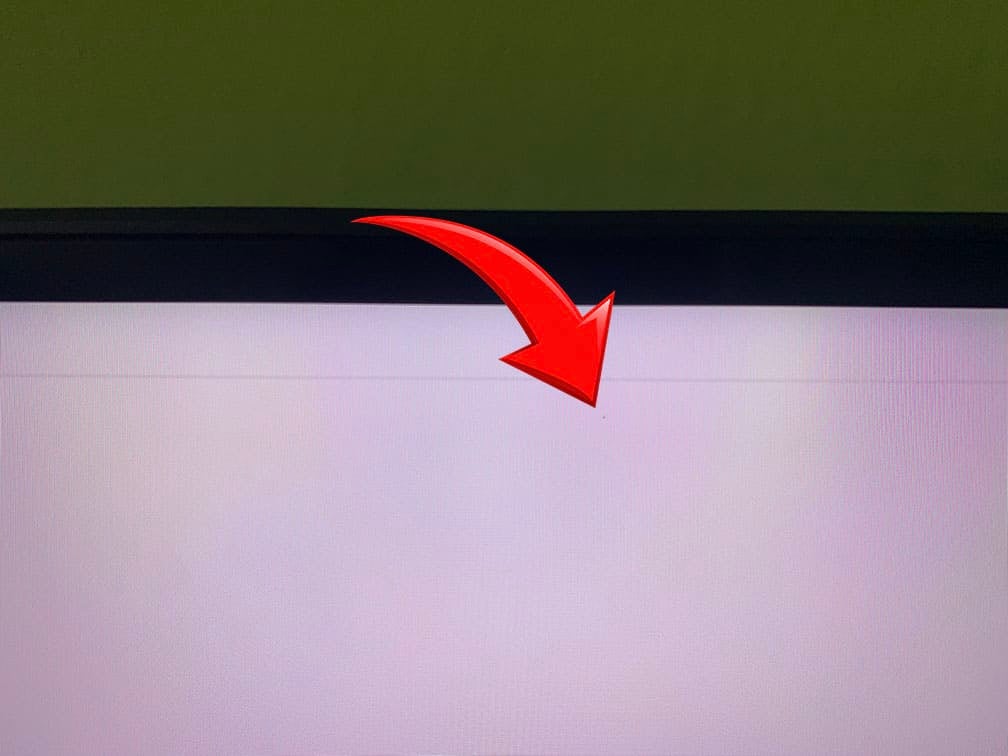
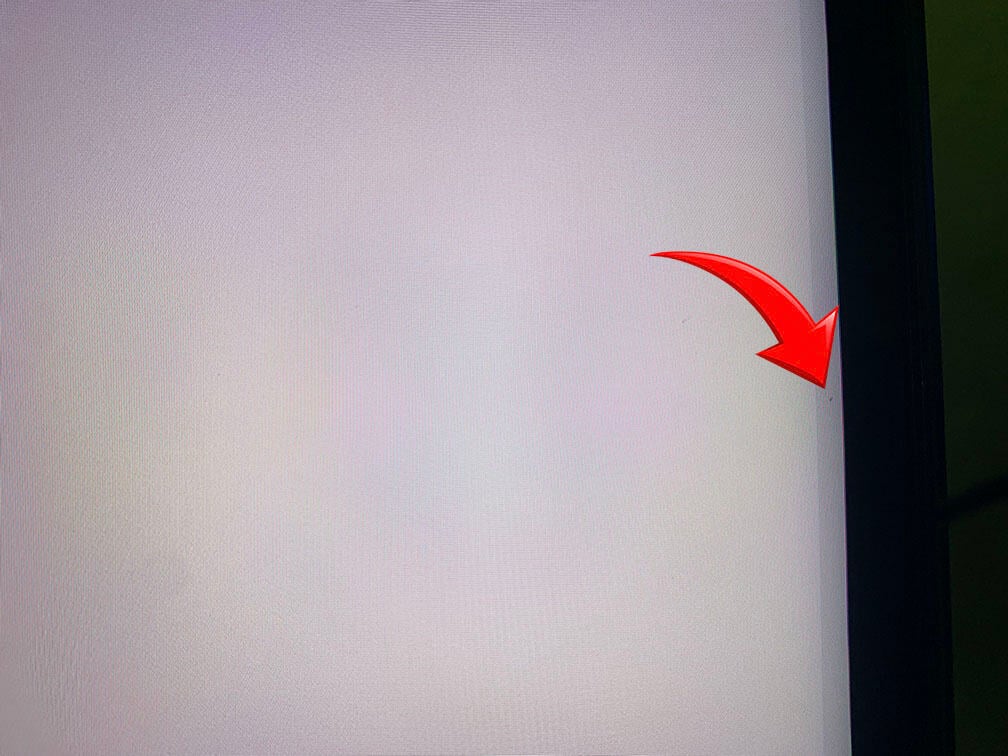
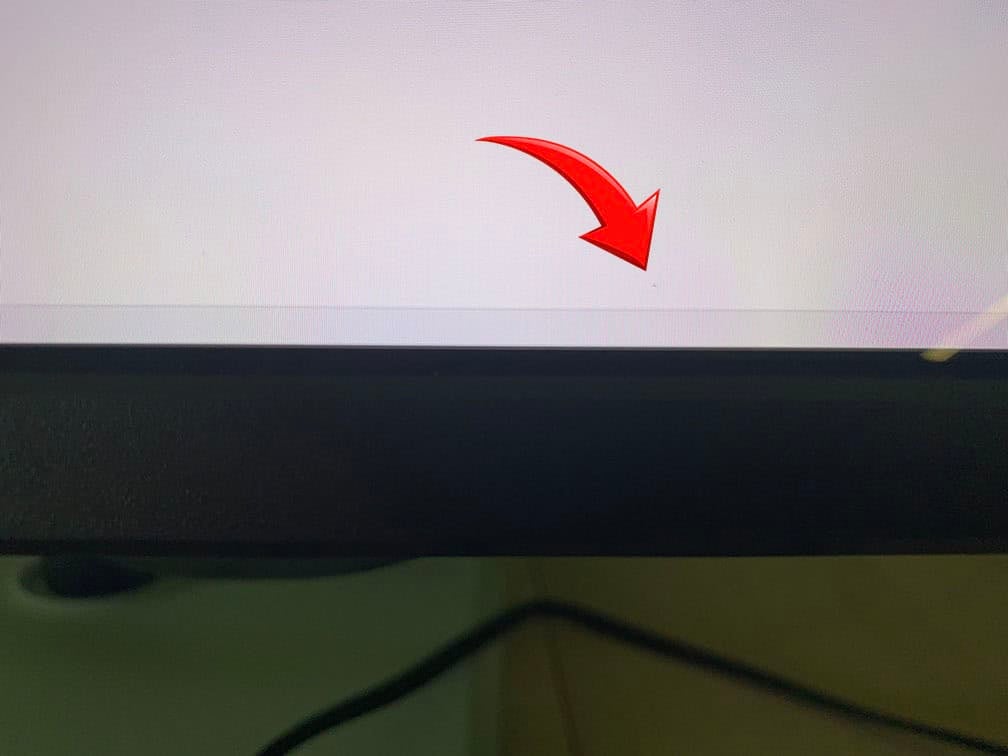
Luckily, due to the high pixel density and the fact that all the dead pixels are near the edges of the screen, they weren’t noticeable during everyday use.
Still, this many quality control issues would warrant an RMA.
During the Blur Busters’ UFO ghosting test, the flickering pattern was briefly visible as an afterimage on dark backgrounds, but it faded quickly once varied content was displayed. We didn’t experience any image retention in regular use.
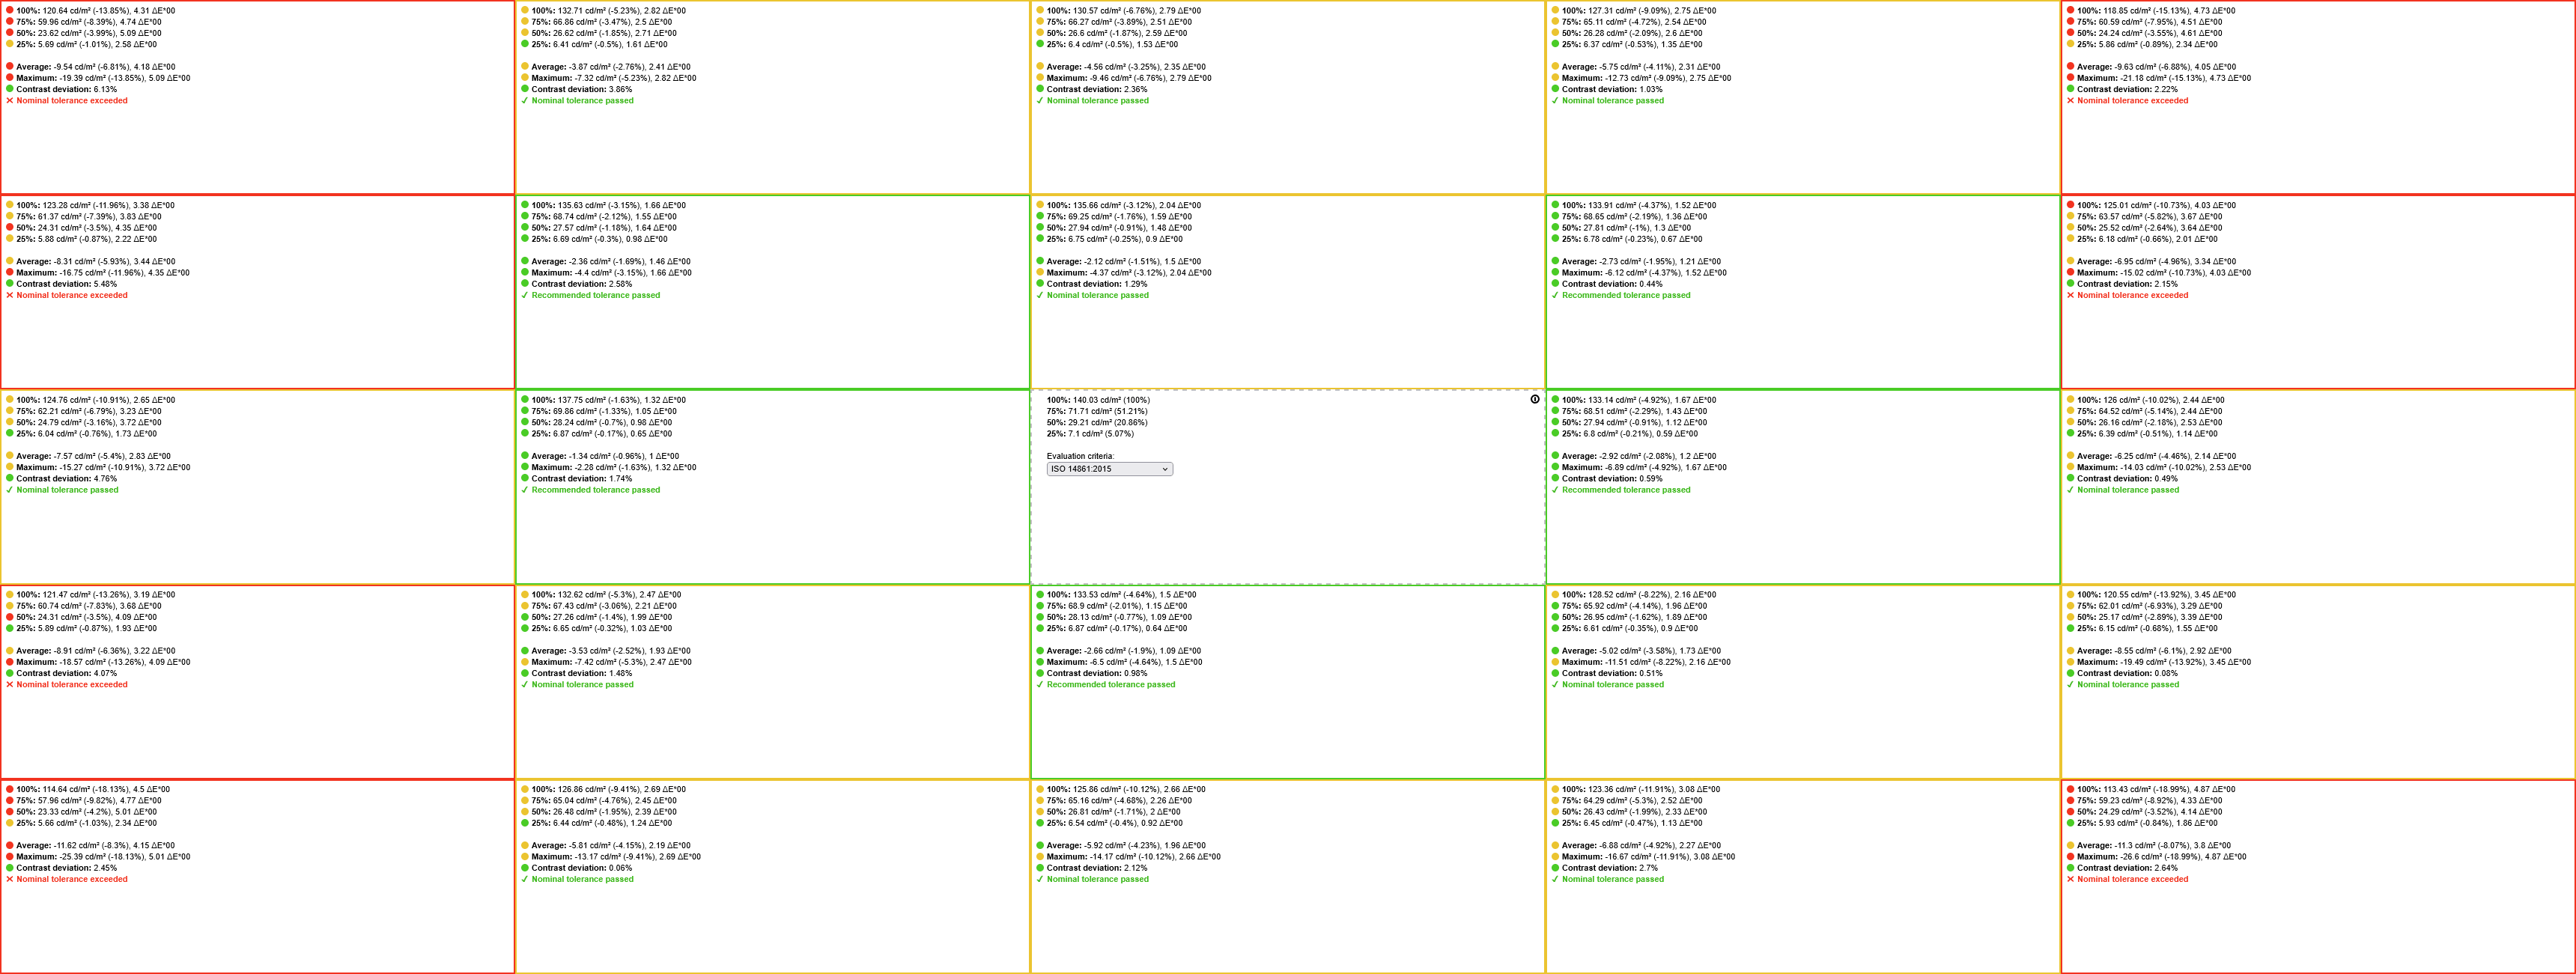
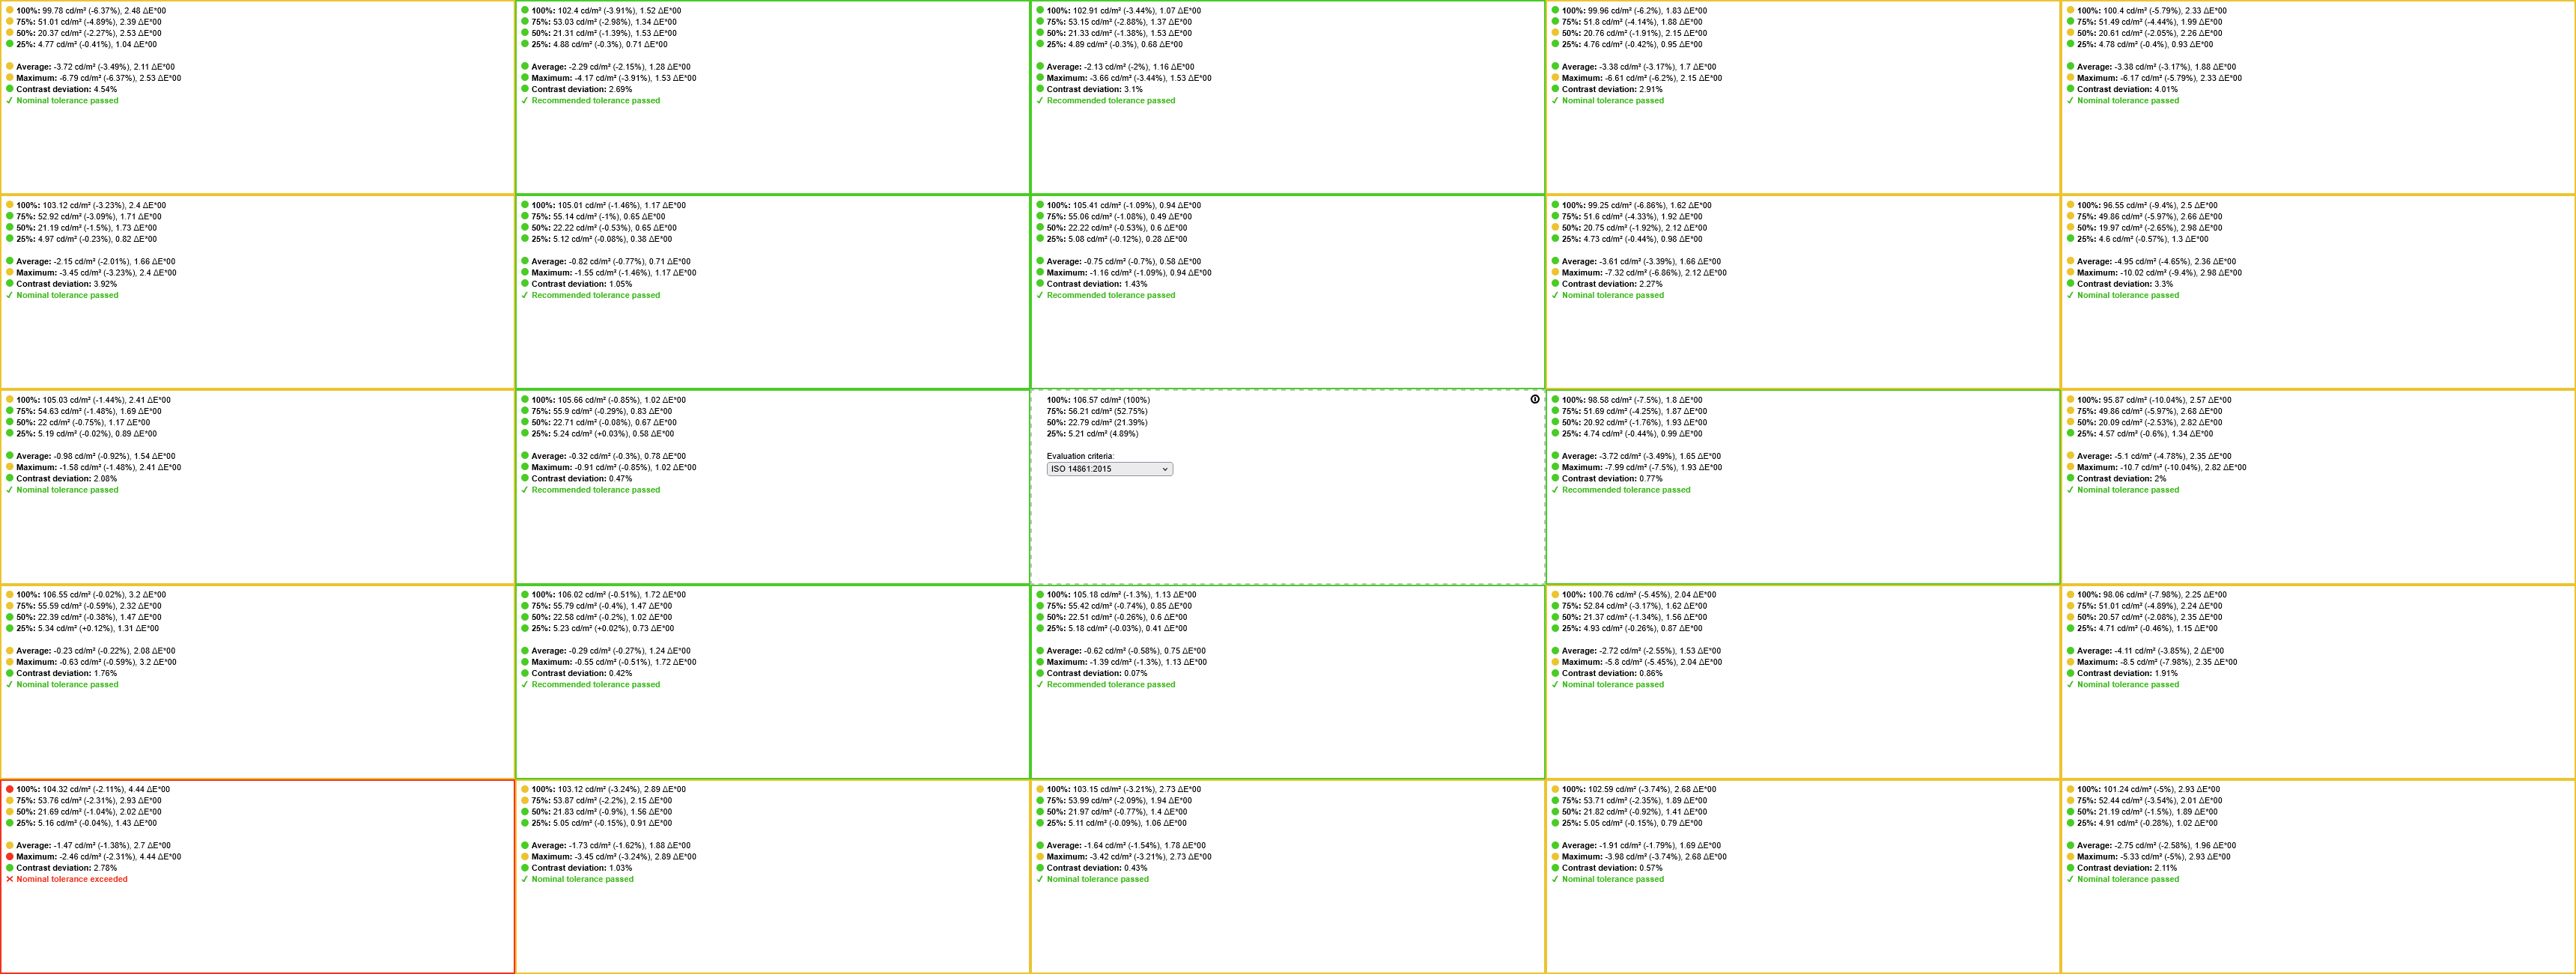
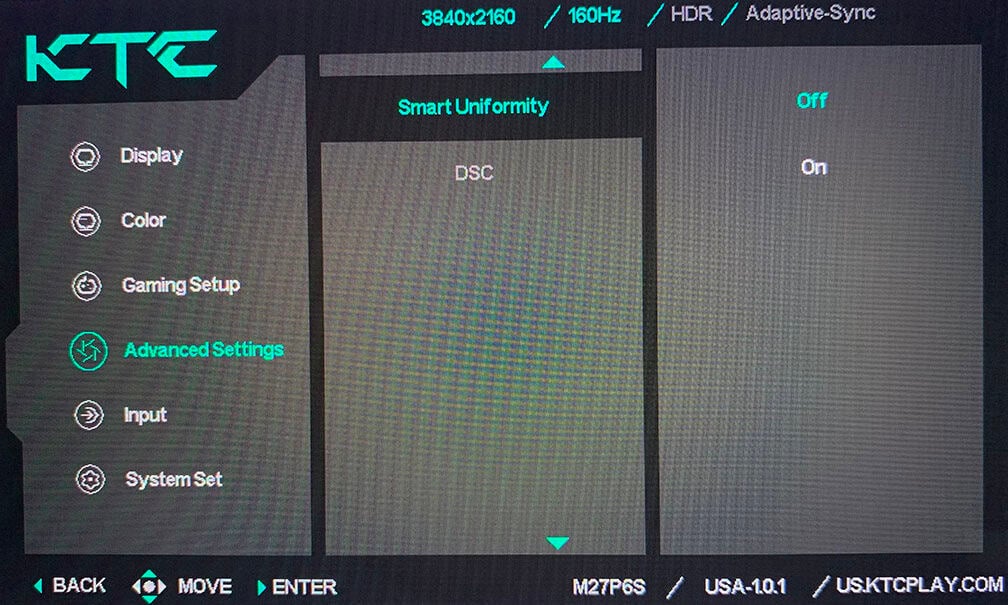
The KTC M27P6S features a Smart Uniformity option that improves image uniformity. With it disabled, uniformity is decent, with up to 18.99% brightness deviation in the corners, 6.13% contrast deviation, and a maximum Delta E of 5.09 for color tint.
Enabling Smart Uniformity improves these results to 10.04% brightness deviation, 4.54% contrast deviation, and a maximum Delta E of 4.44 for color tint.
As expected, this type of feature sacrifices a bit of contrast ratio, from 1083:1 down to 812:1. Maximum brightness is also reduced to 545 nits.
Overall, we didn’t notice any uniformity issues during everyday use, even with Smart Uniformity disabled, so you may not need to enable it. Still, it’s a useful feature to have for photo and video editors.
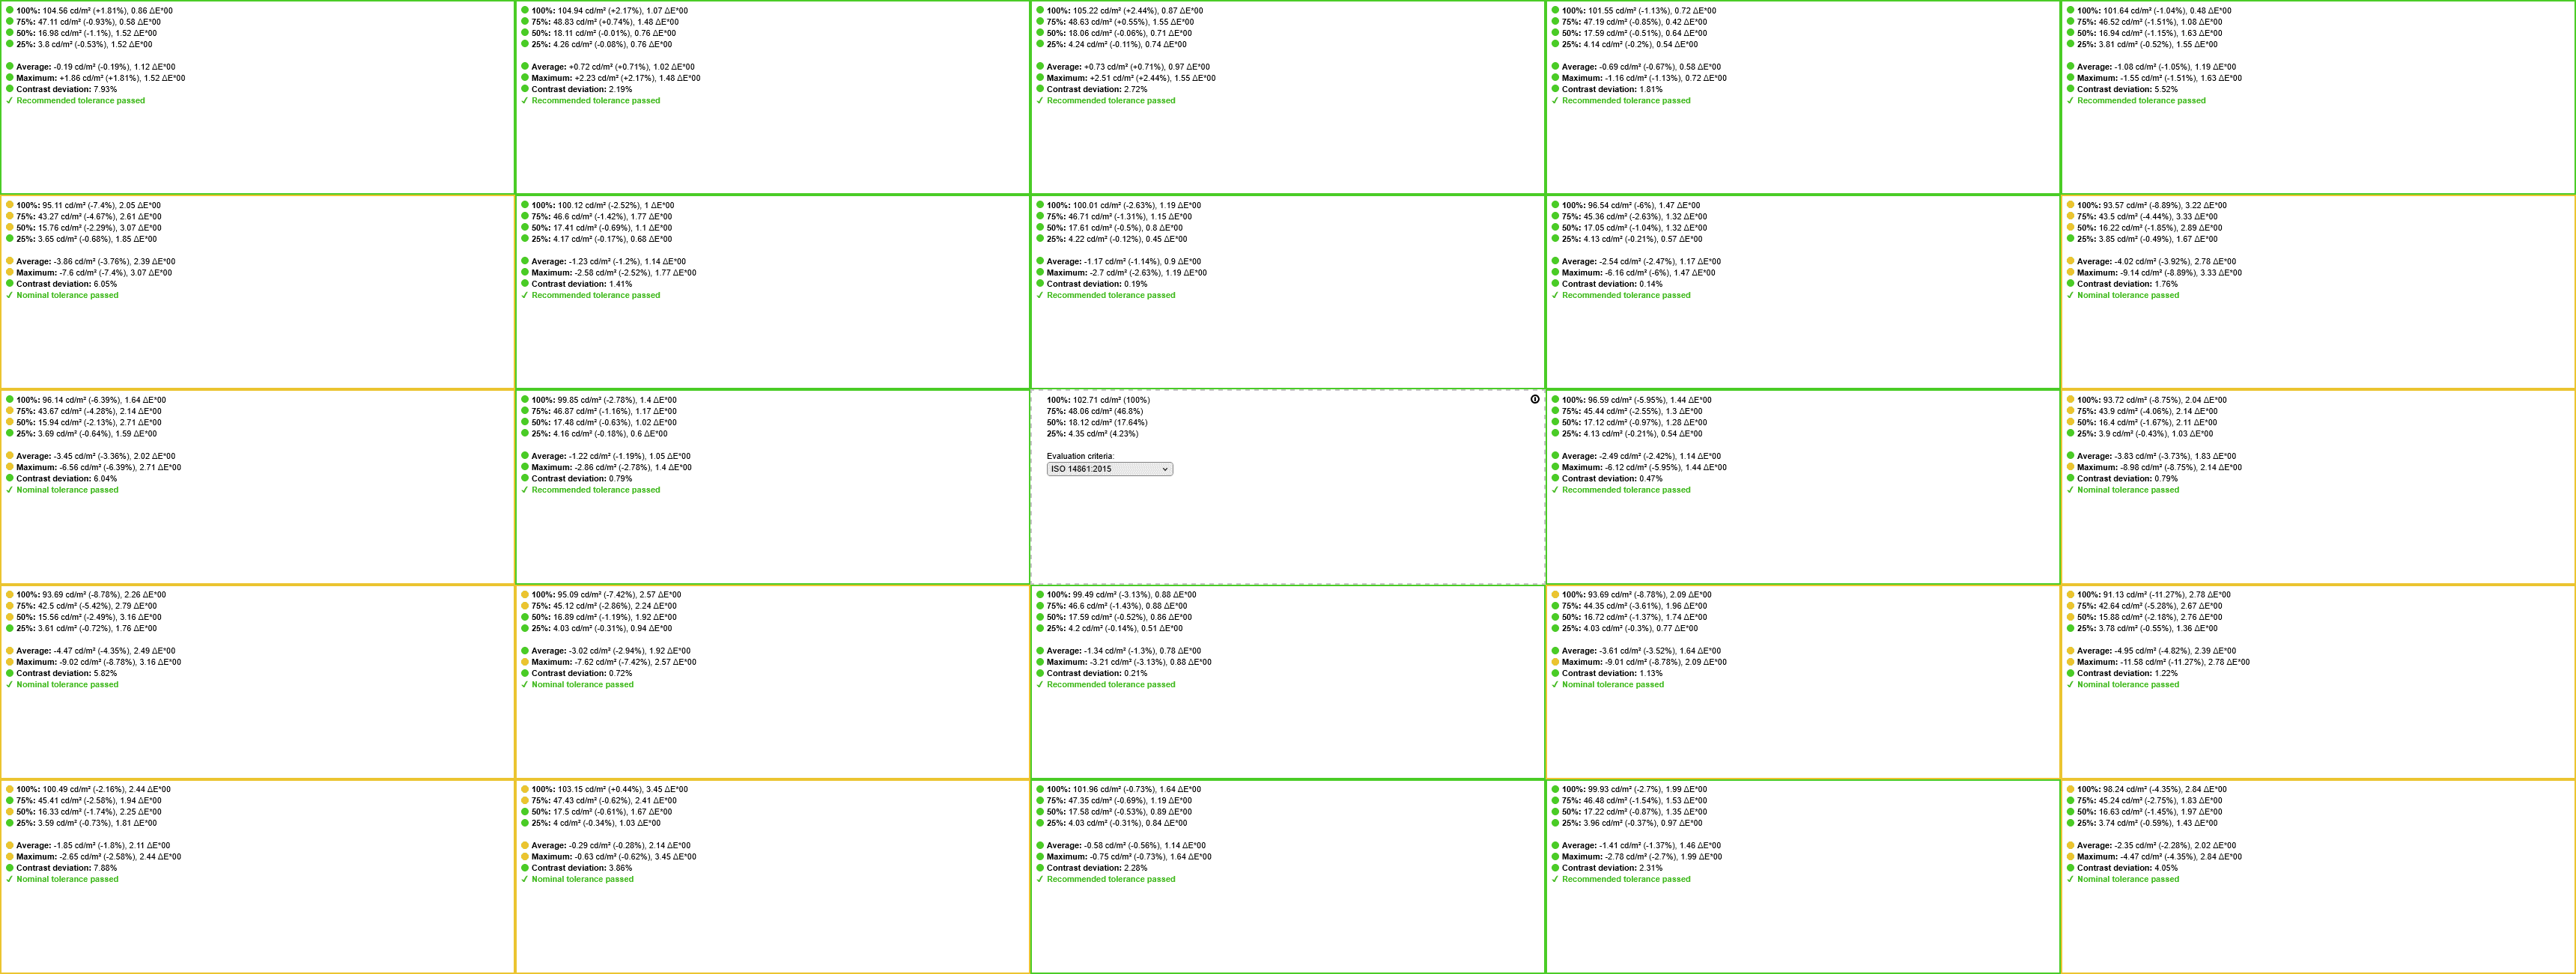
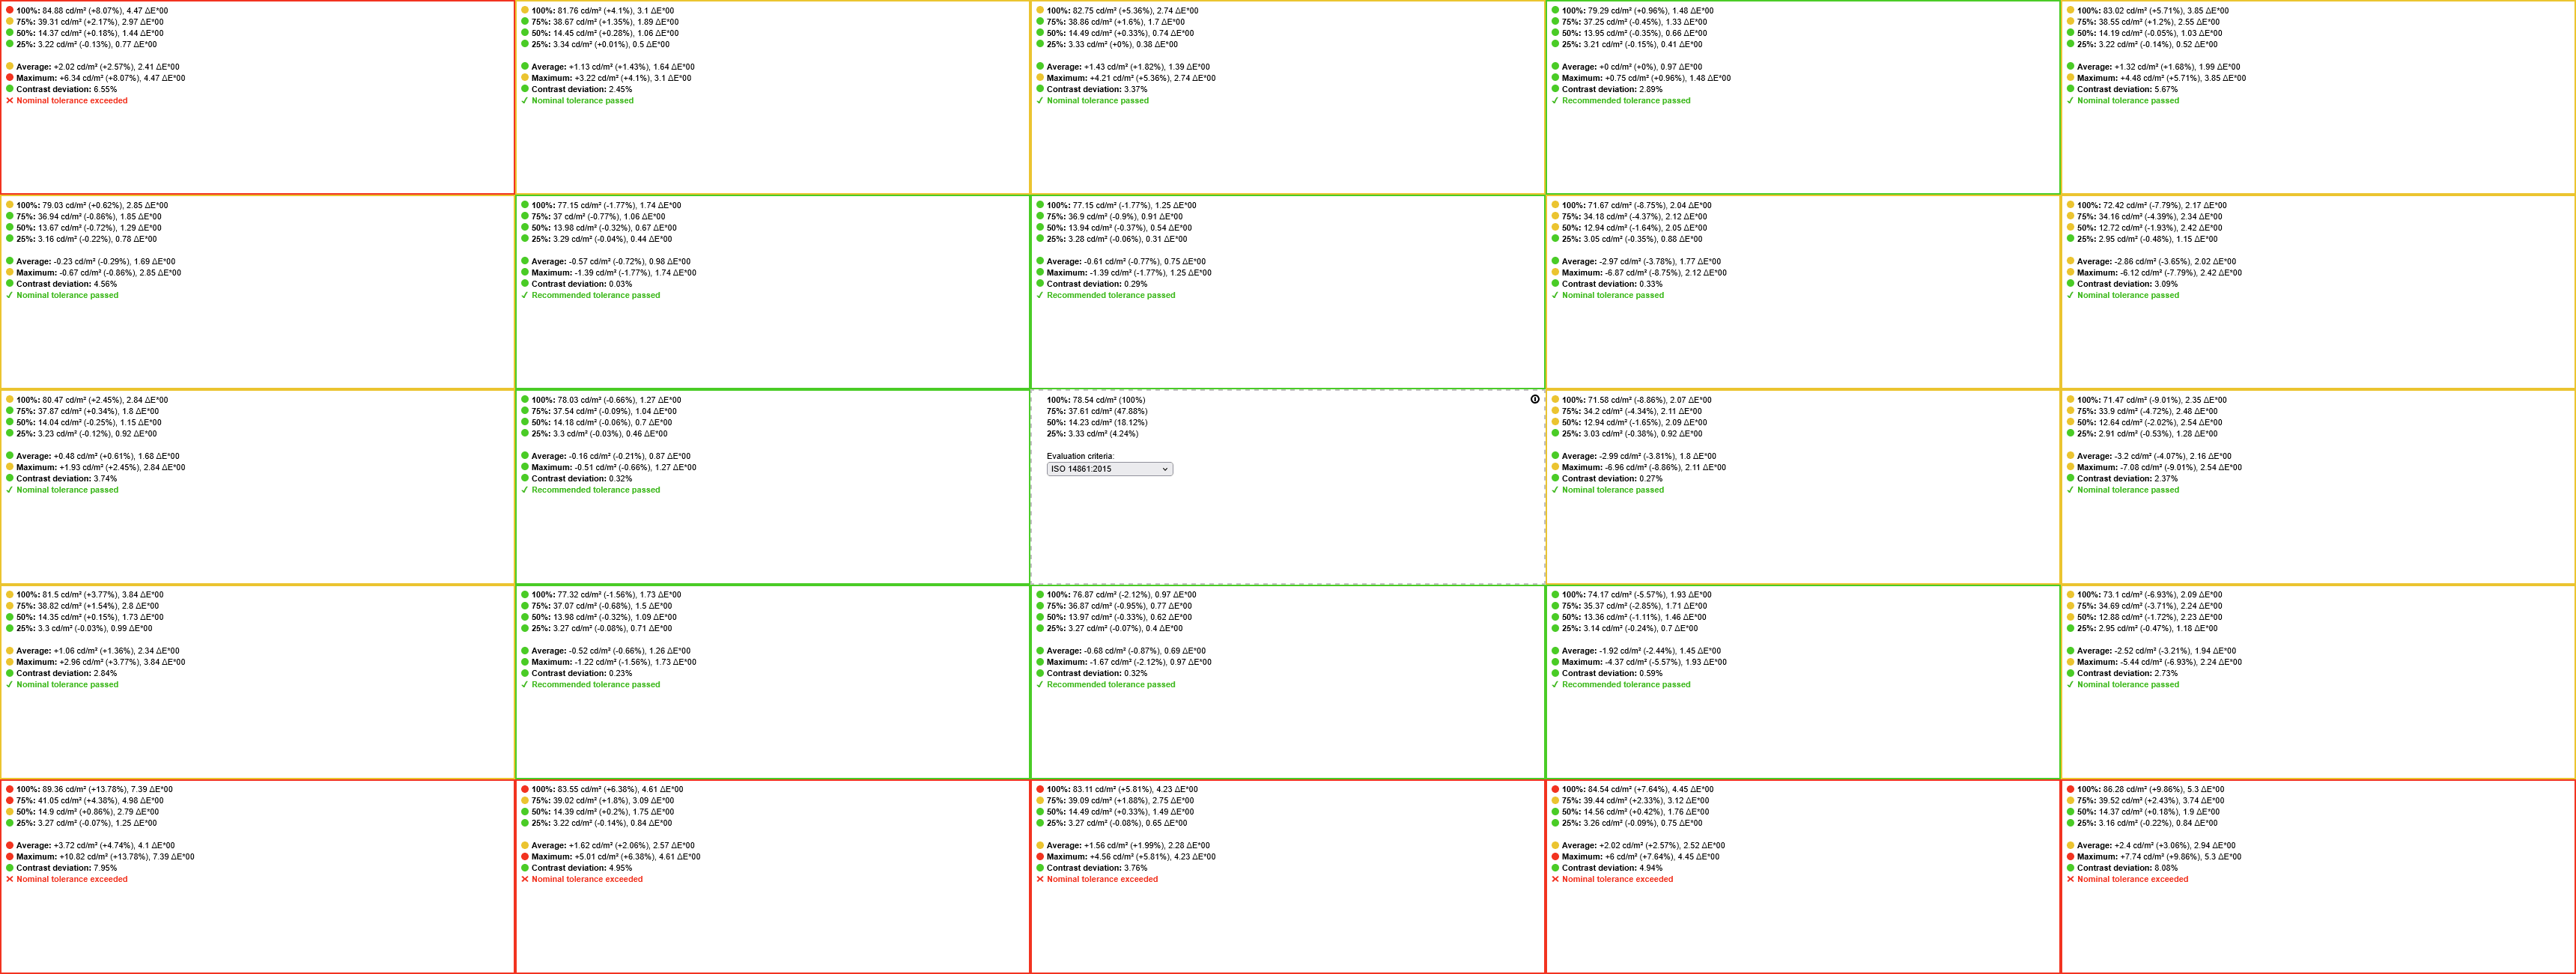
You can also enable Smart Uniformity with local dimming, but in this case, it actually makes uniformity worse, as the feature likely isn’t designed to be used with it. Uniformity is already good with local dimming enabled anyway.
Features
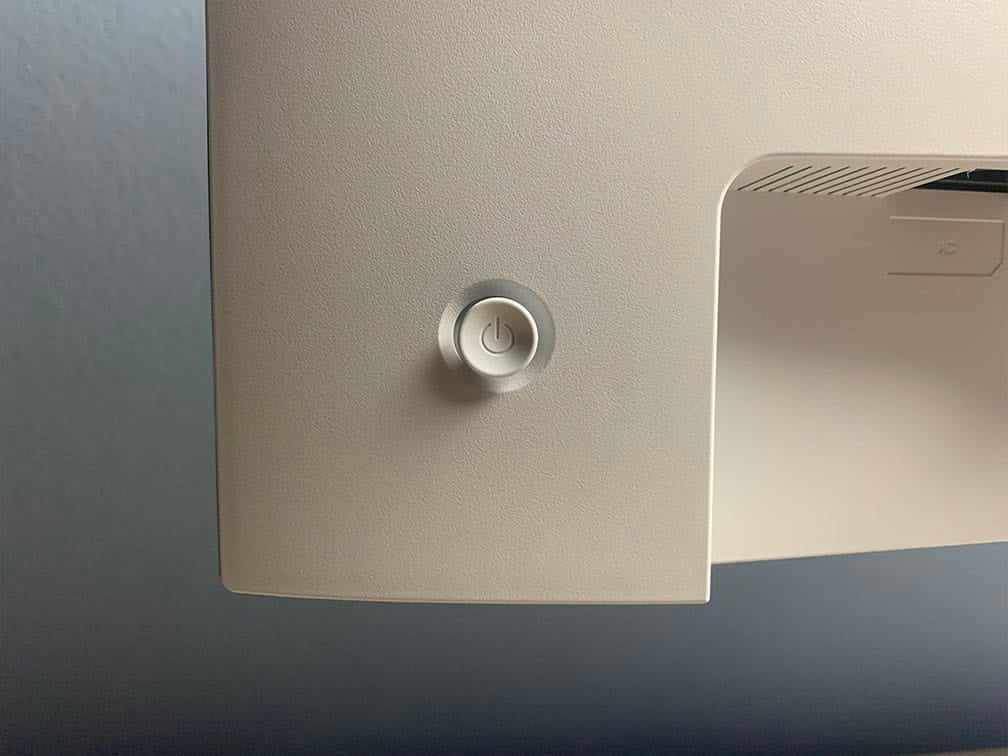
On the rear of the monitor, there’s a directional joystick for quick and easy navigation through the menu. Moving the joystick up, down, left or right also serves as a quick menu for certain functions that can be changed in the menu.
Possible hotkey shortcuts include brightness, volume, mute, color temperature, Game Assist, Preset, HDR, contrast, RGB Light, Professional Modes, Overdrive, DAC, Dual-mode and most importantly, local dimming, allowing you to easily try out different modes. Moving the joystick up is reserved for input source selection.
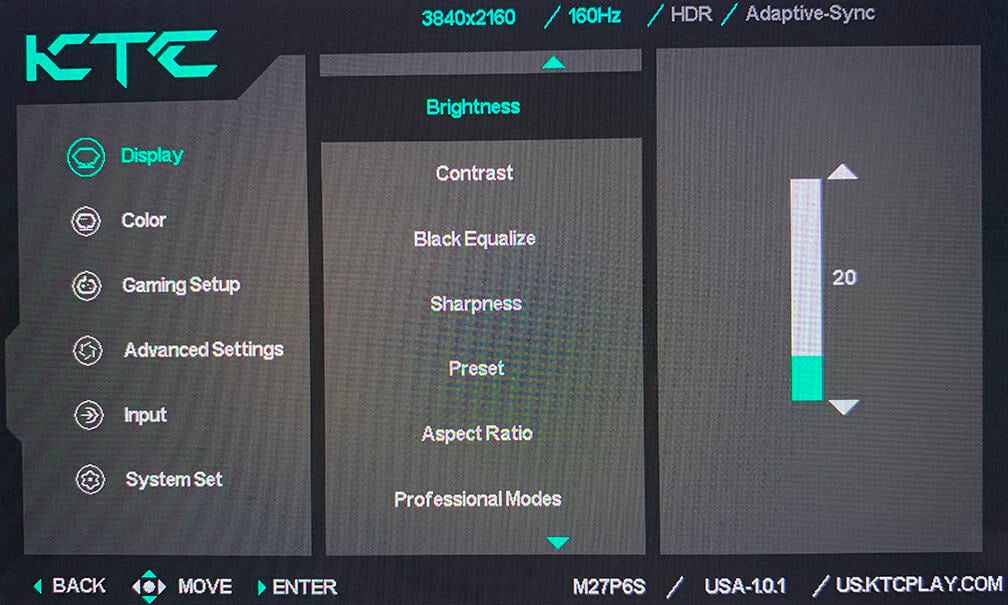
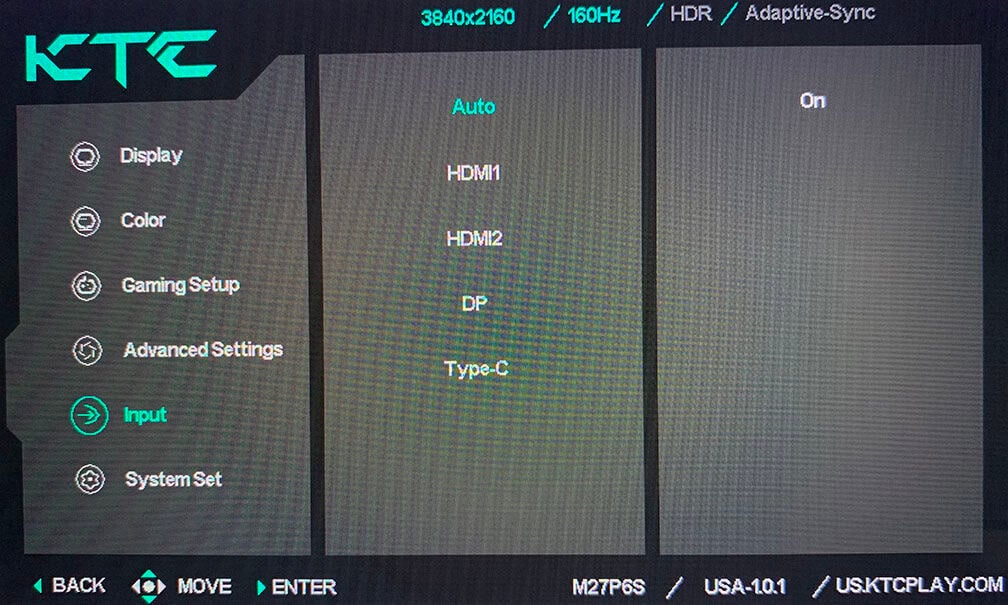
Besides typical image adjustment tools (brightness, contrast, color temperature), there are some advanced settings available too, including sharpness, aspect ratio (full, 16:9, 4:3), gamma (from 1.8 to 2.4), color range (auto, full, limited), 6-axis hue/saturation and automatic input detection.
KTC also offers a desktop application called MCC (Monitor Command Center), which you can use to make some OSD-related adjustments, assign keyboard hotkeys for certain functions or picture modes to different applications.
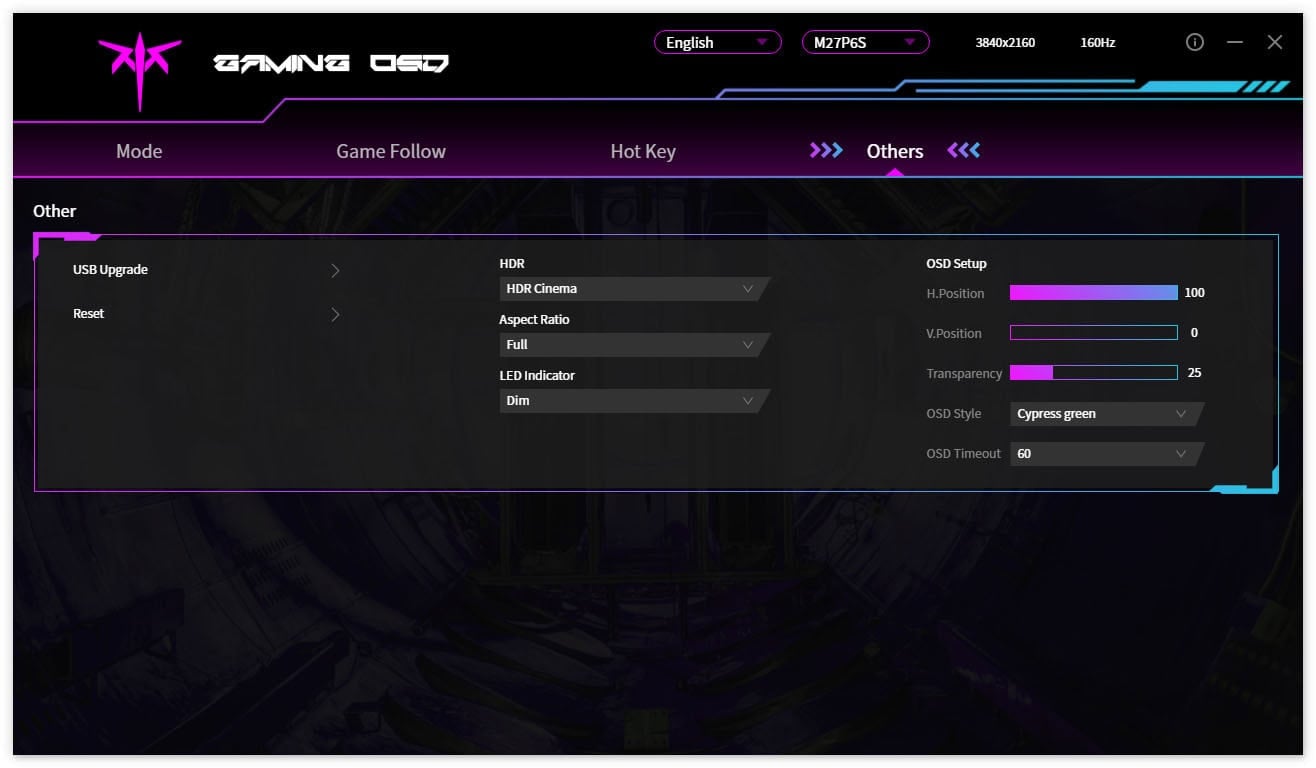
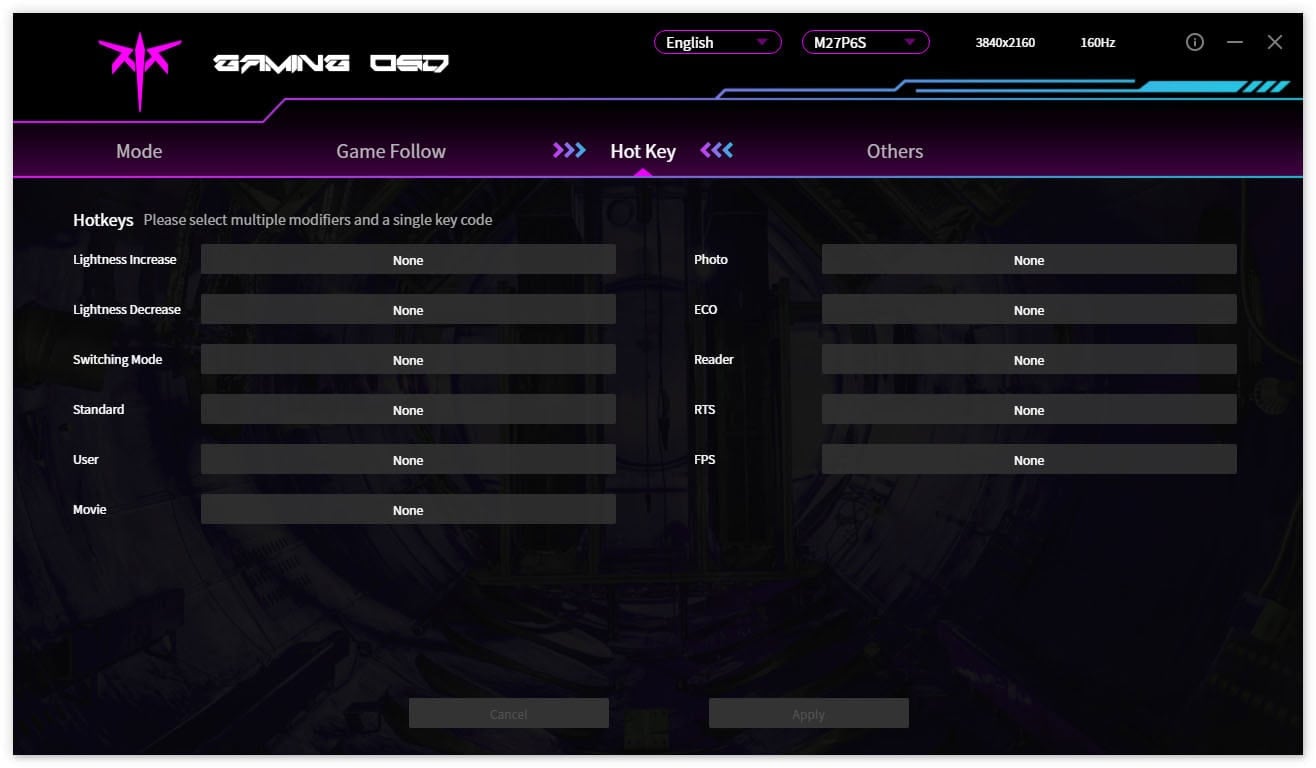
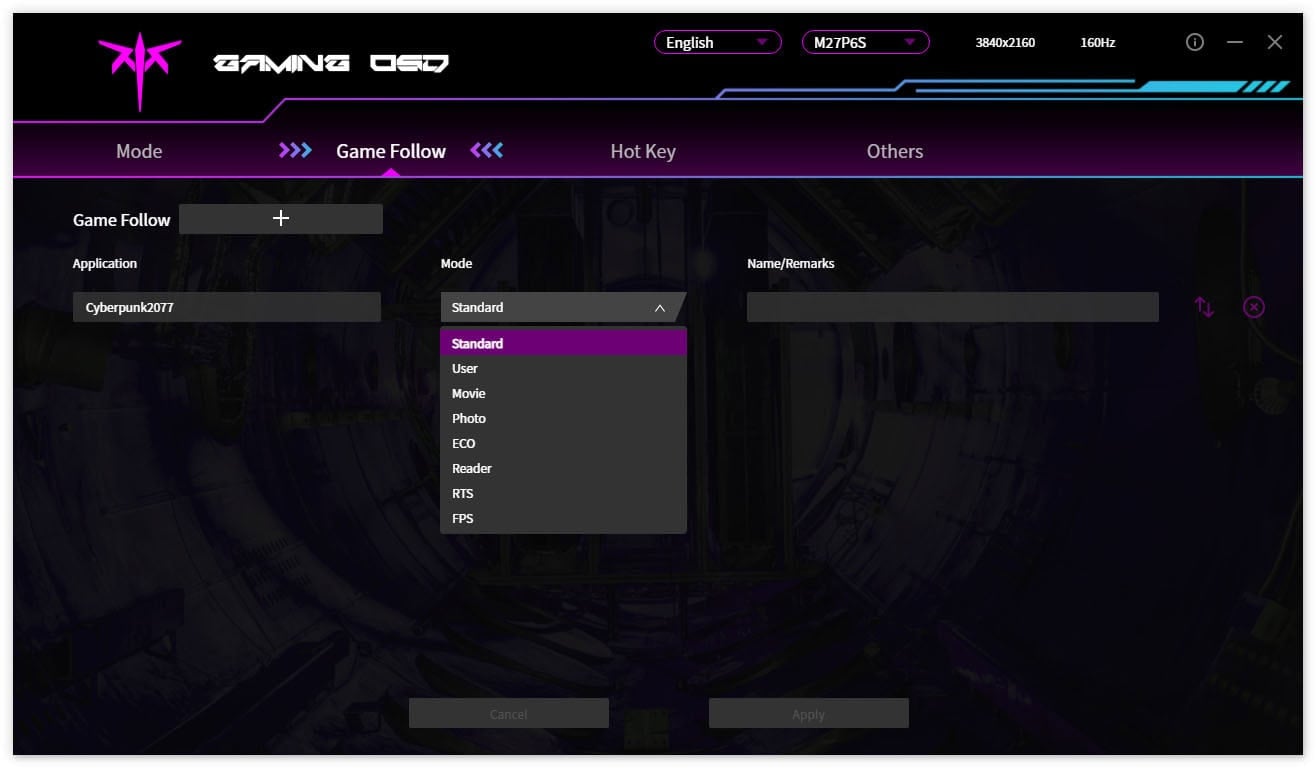
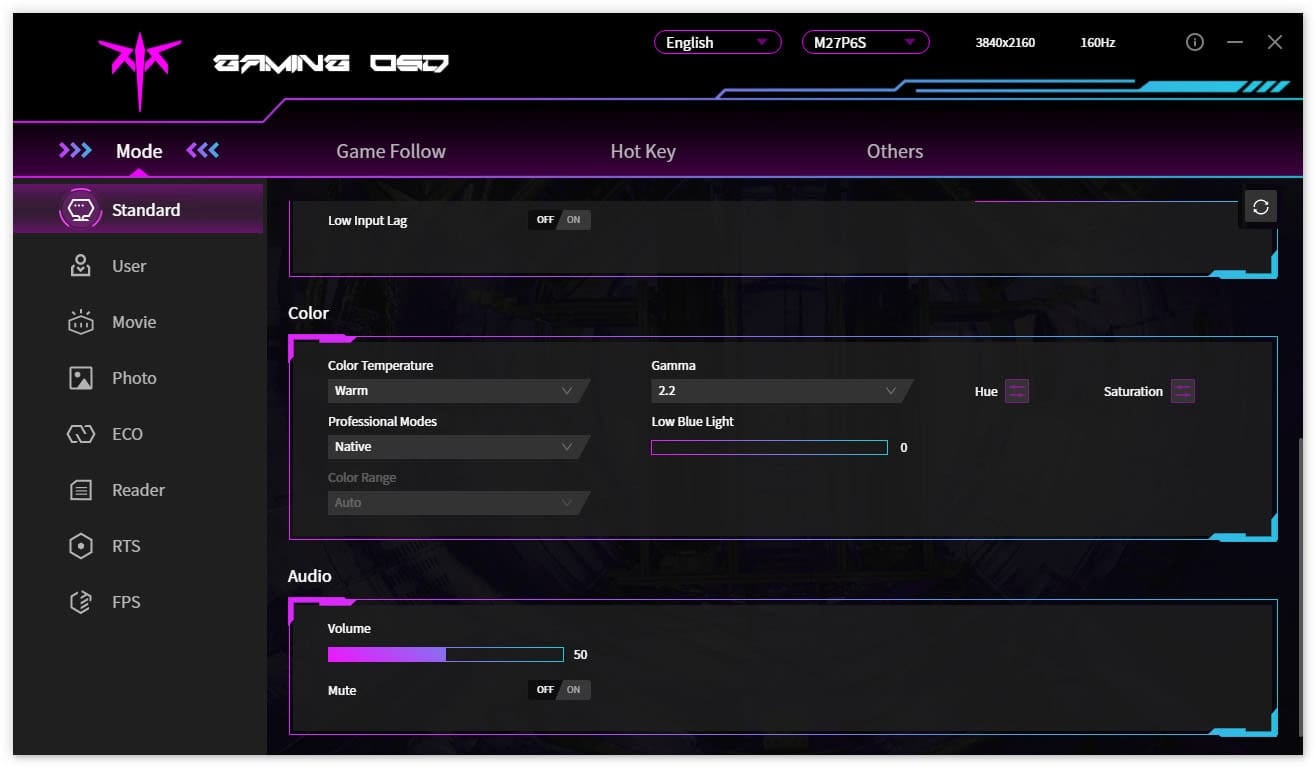
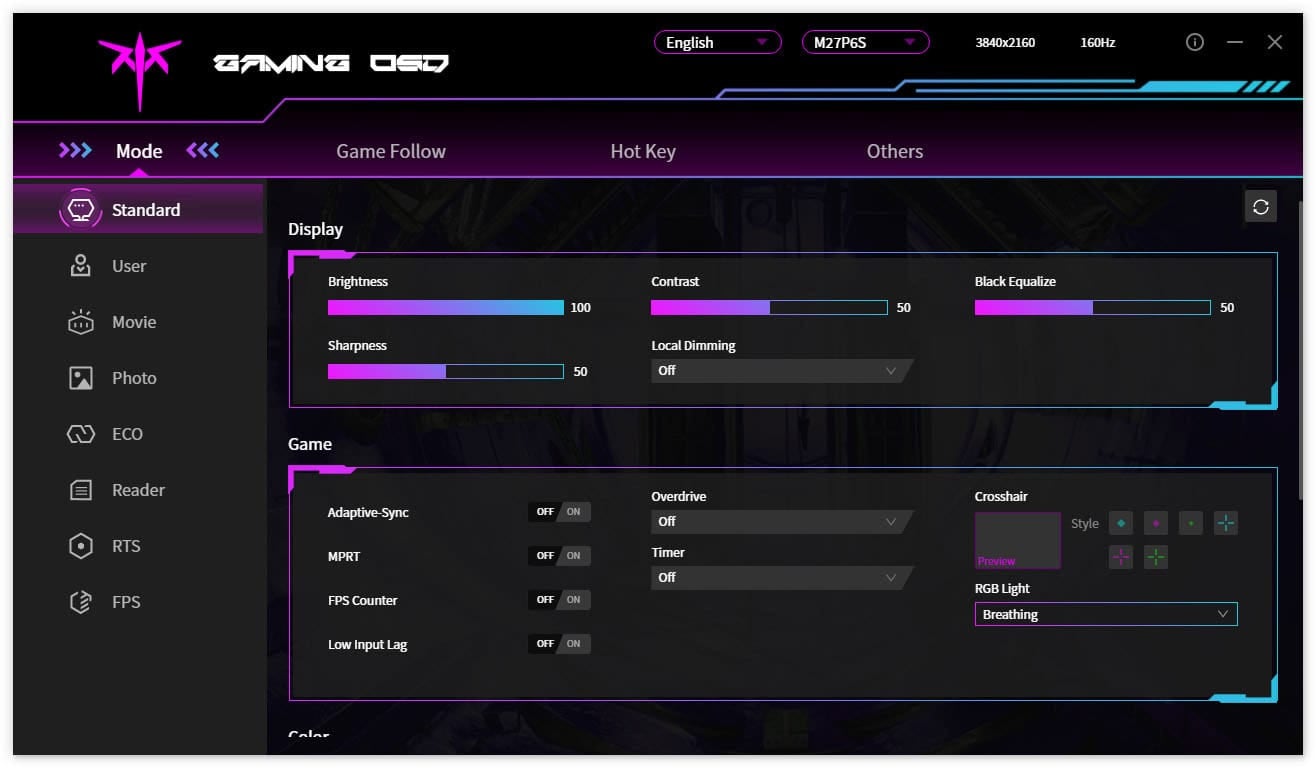
You can download the MMC app here, though you’ll need to change your browser’s preferred language to ‘Chinese (Simplified)’; otherwise, it will just take you to the English homepage. Alternatively, use this direct download link (clicking it will start the download immediately).
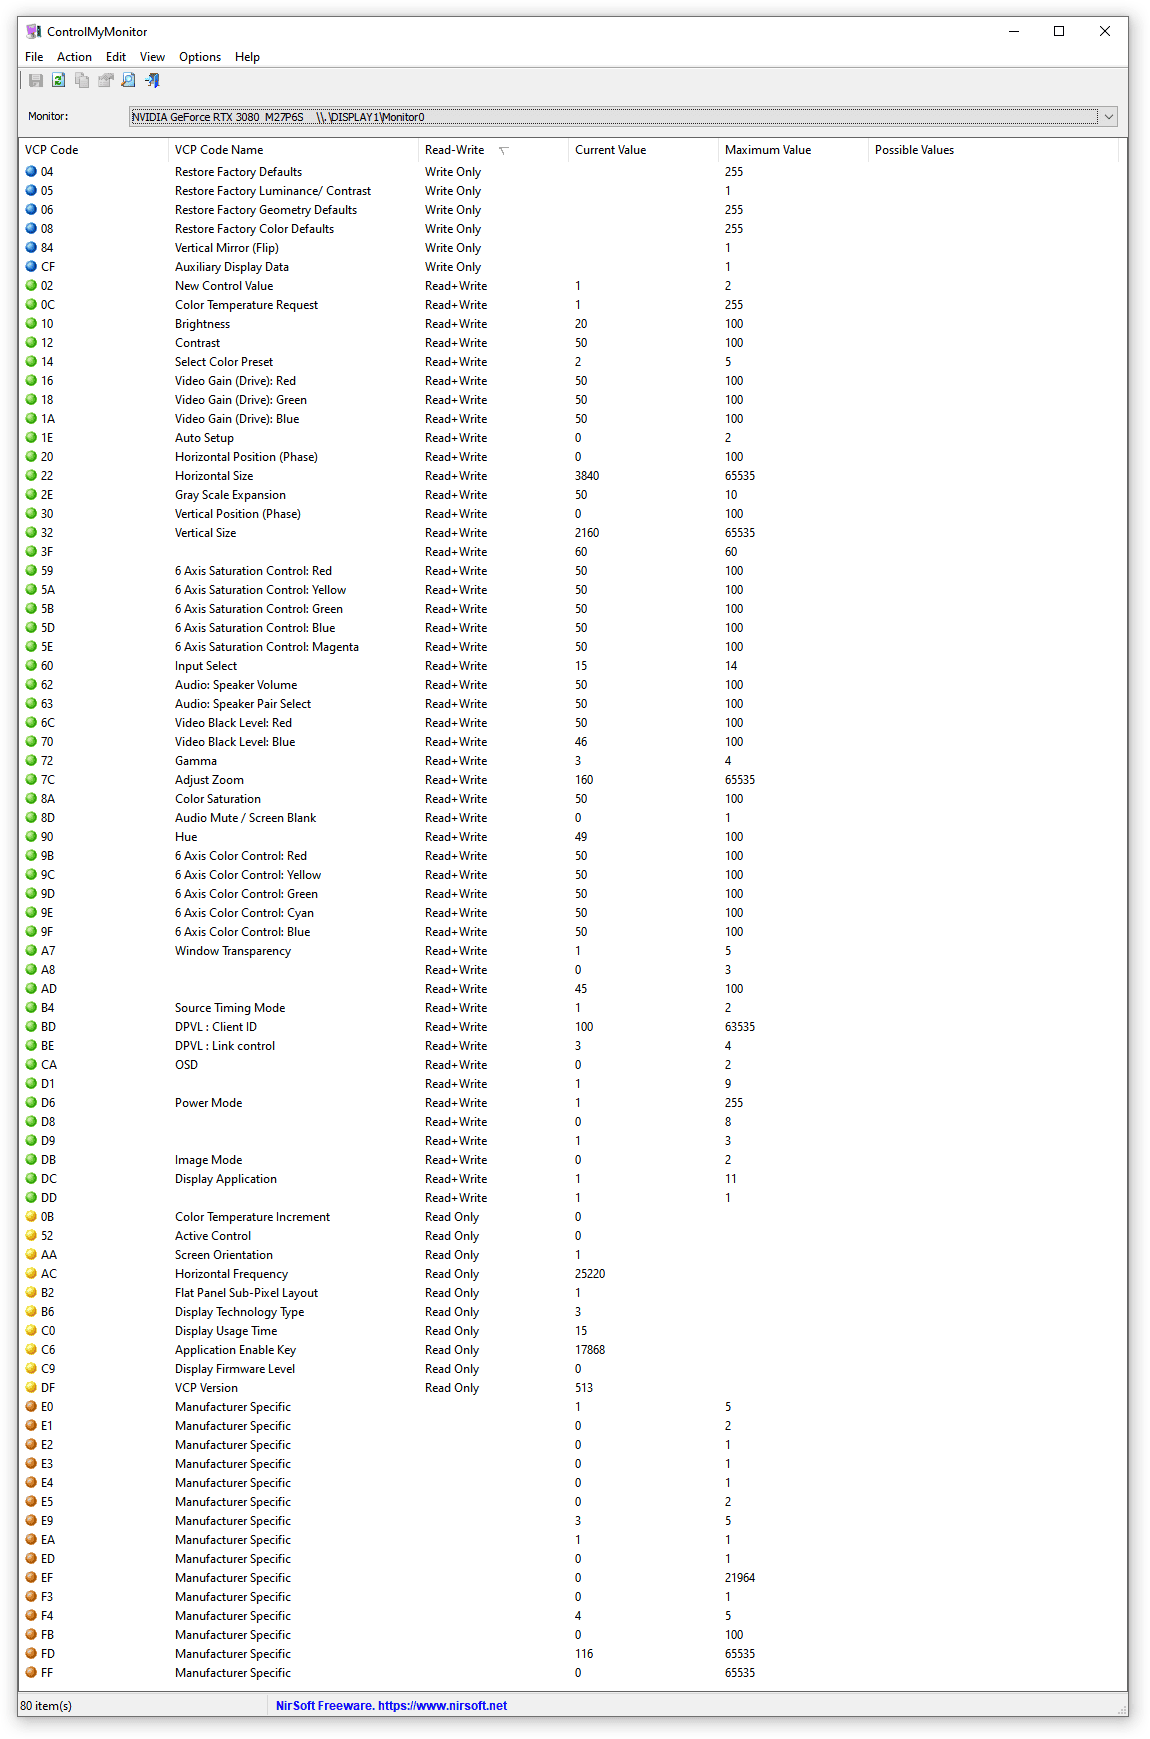
You can also use third-party apps, such as ControlMyMonitor, to make the following OSD settings:
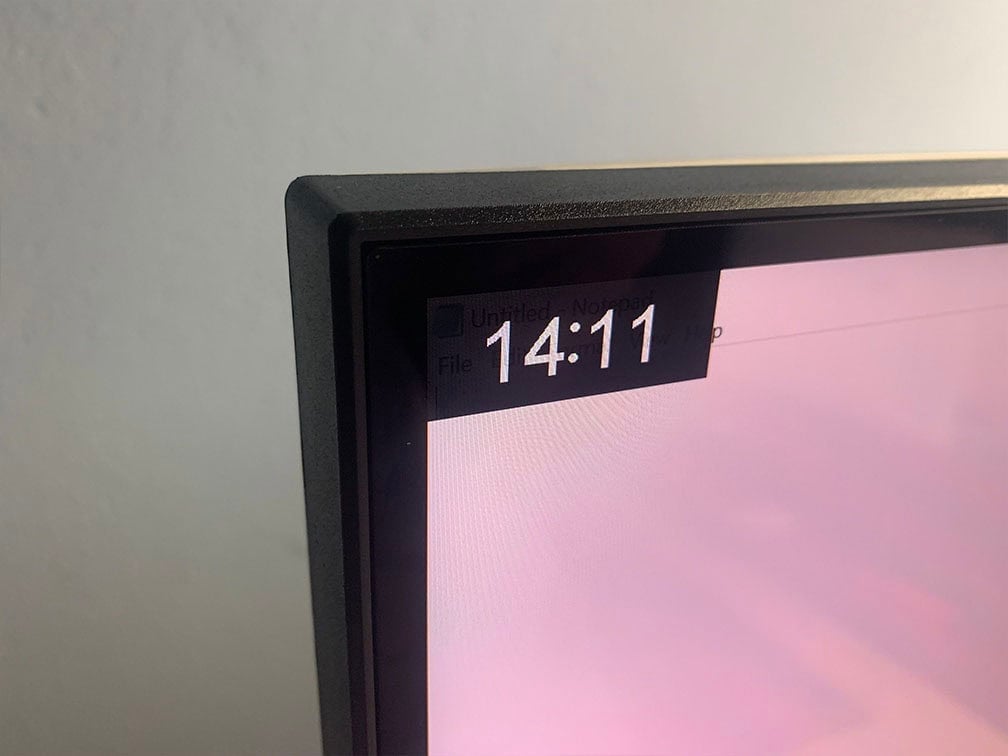
Useful gaming features include Black Equalize (improves visibility in dark scenes by altering the gamma curvature), crosshair overlays, a refresh rate tracker and an on-screen timer.
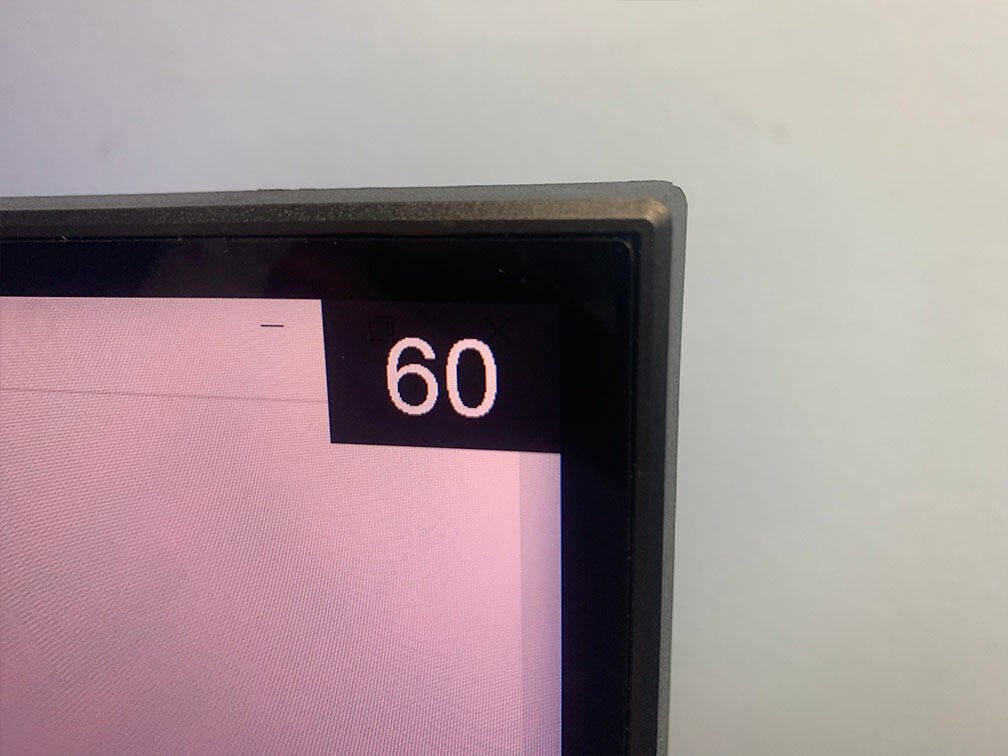
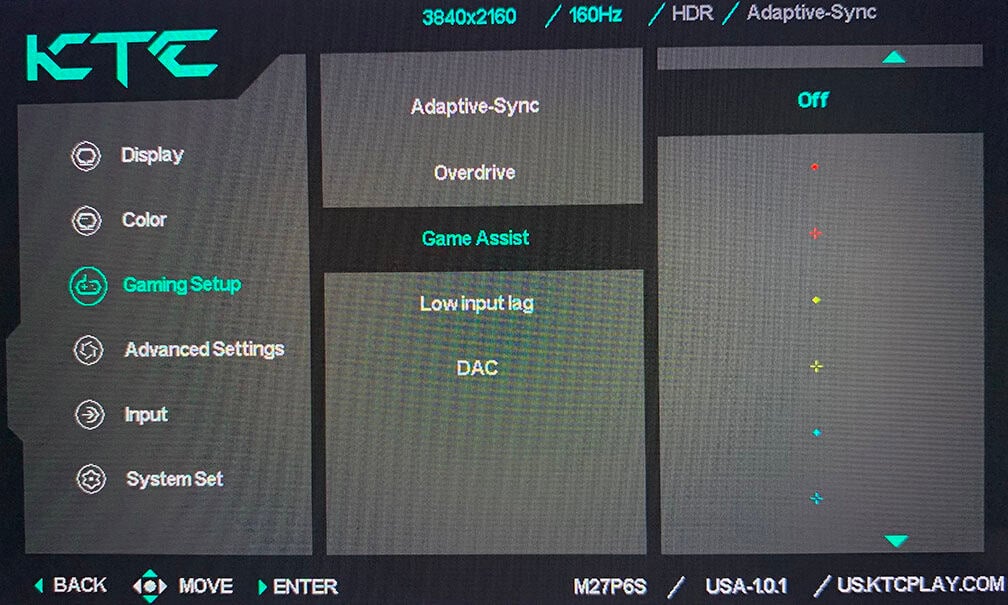
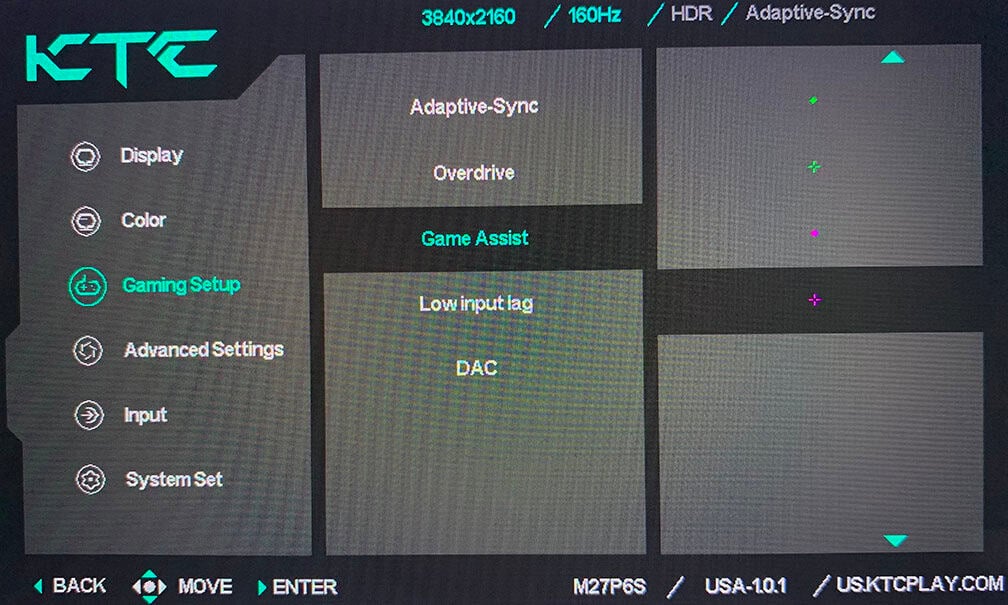
There’s also an ‘AI Crosshair’ option, which automatically changes the crosshair’s color based on the background to make it easier to see.
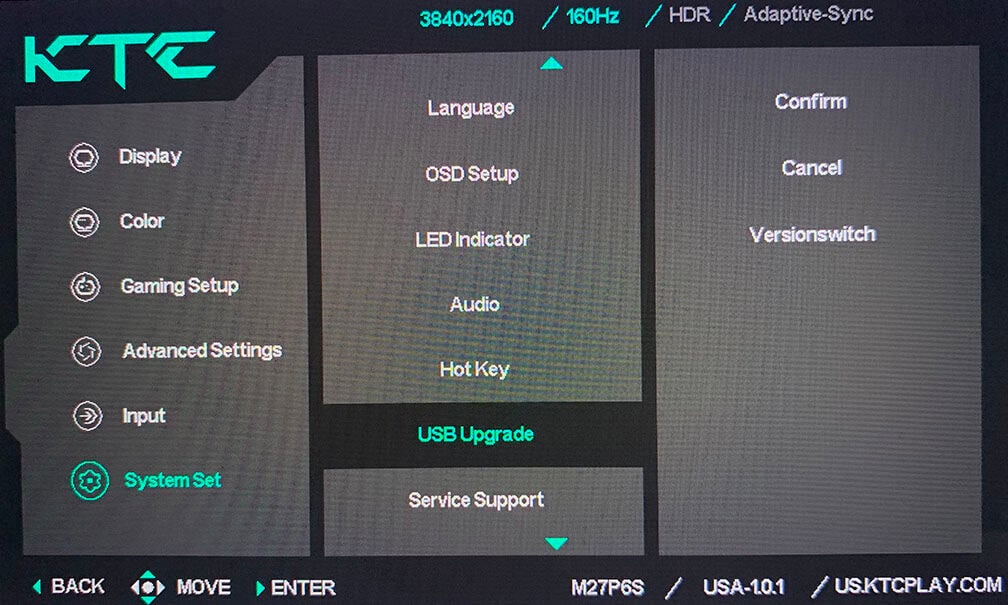
Other OSD settings include language, OSD setup (position, timeout, transparency, rotation, style), power LED indicator (on, off), audio (mute, volume), USB Upgrade, Service Support (QR code) and factory reset.
There’s a DSC toggle option, but it’s grayed out and we weren’t able to access it.
Design & Connectivity
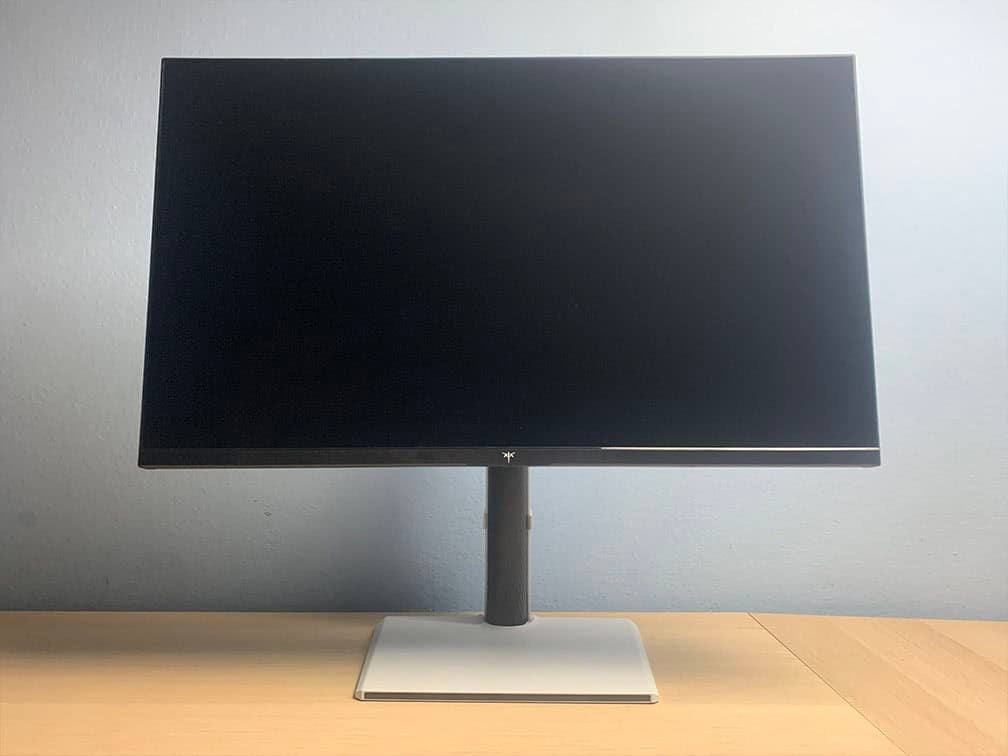
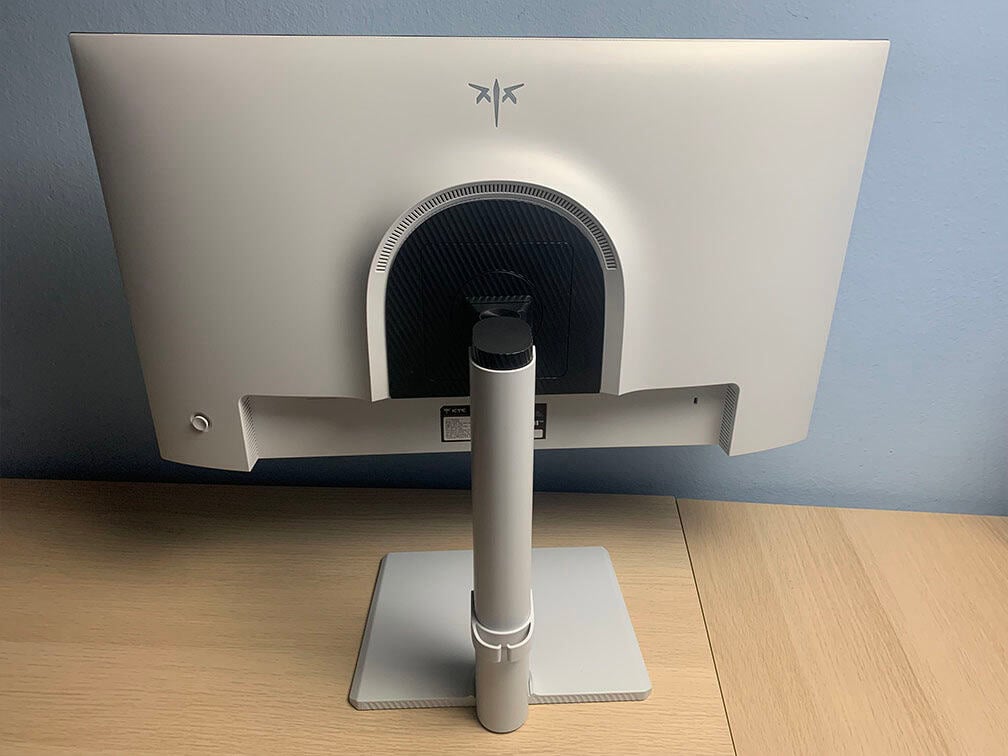
The stand of the monitor is robust and offers full ergonomic support, including up to 135mm height adjustment, +/- 90° pivot, -5°/20° tilt, +/- 45° swivel and 100x100mm VESA mount compatibility (recommended screw size M4*10mm).
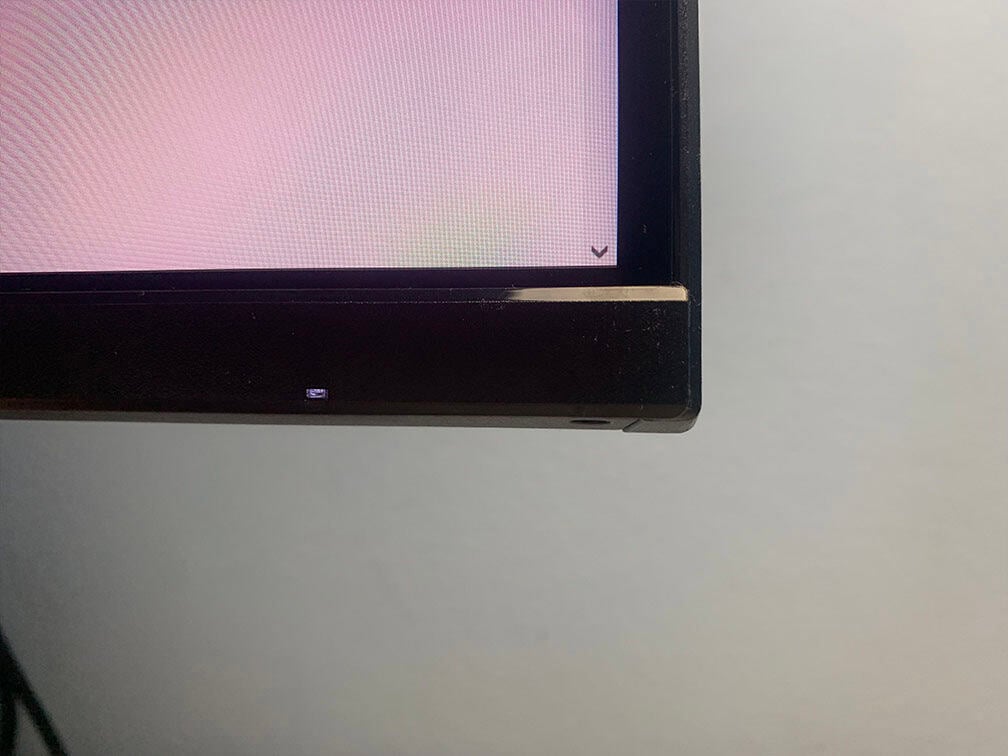
The bezels are ultra-thin (1mm) at the top and at the sides, while the bottom bezel is a bit thicker at 15mm. There’s also a 6mm black border (2mm at the bottom) around the screen before the image starts.
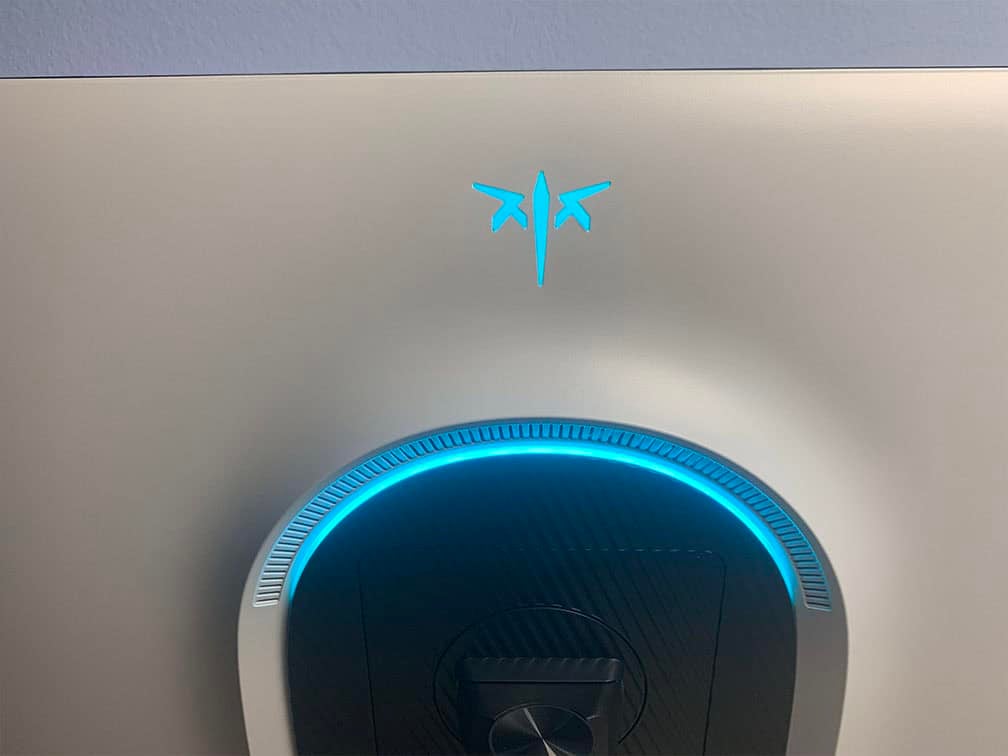
At the rear of the monitor, there’s customizable RGB lighting with static red, green, blue, yellow, magenta, cyan and white options, as well as a breathing effect. It’s bright enough to reflect off the wall and provide some ambient lighting.
The monitor has a glossy screen surface, which makes the image more vivid as there’s no added graininess associated with matte anti-glare coatings.
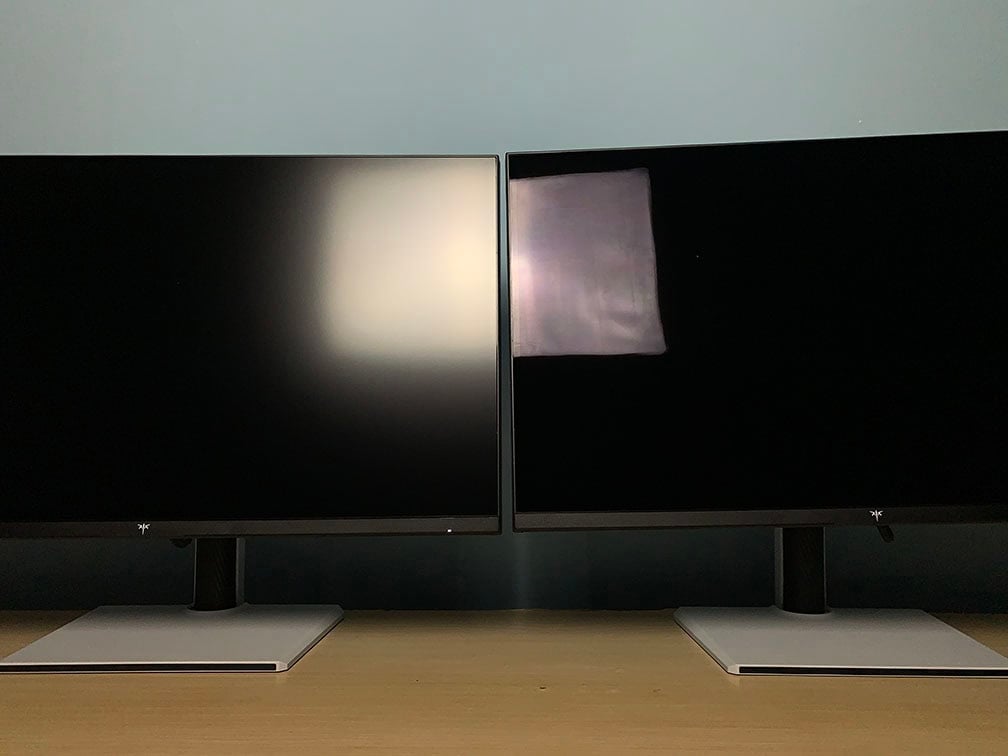
However, this also makes the screen more reflective, as direct light hitting the display can cause mirror-like reflections. So, you’ll need to be mindful of the lighting in your room for the best viewing experience.
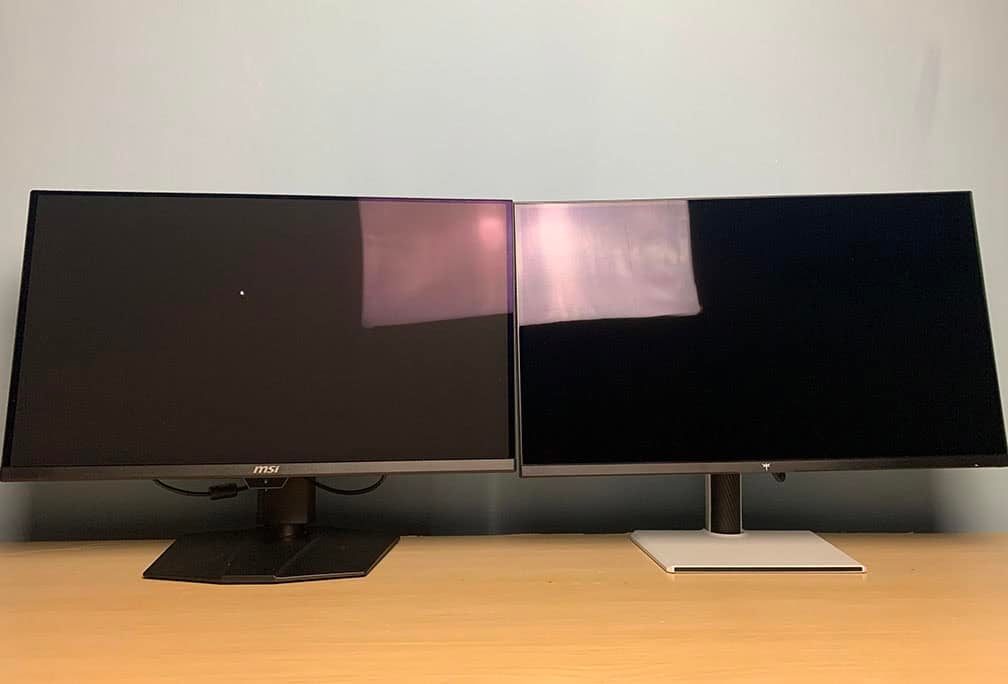
In the image above, you can see how it compares to the semi-glossy QD-OLED panel of the MSI MPG 271QR X50, which doesn’t have a polarizer and therefore raises blacks under direct lighting, while the M27P6S maintains deep blacks.
Here’s a comparison to the MSI MPG 322UR QD-OLED X24 with a newer QD-OLED semi-glossy finish that removes the magenta cast and has 40% better black depth than previous-gen QD-OLED displays.
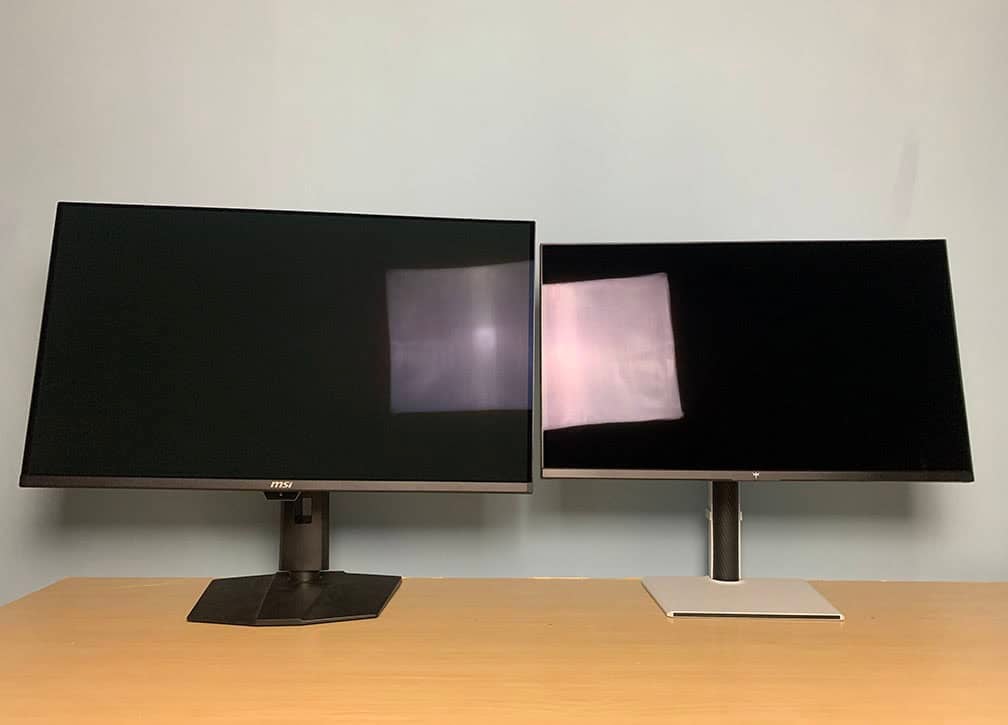
Finally, you can see how all three displays compare in the image below.
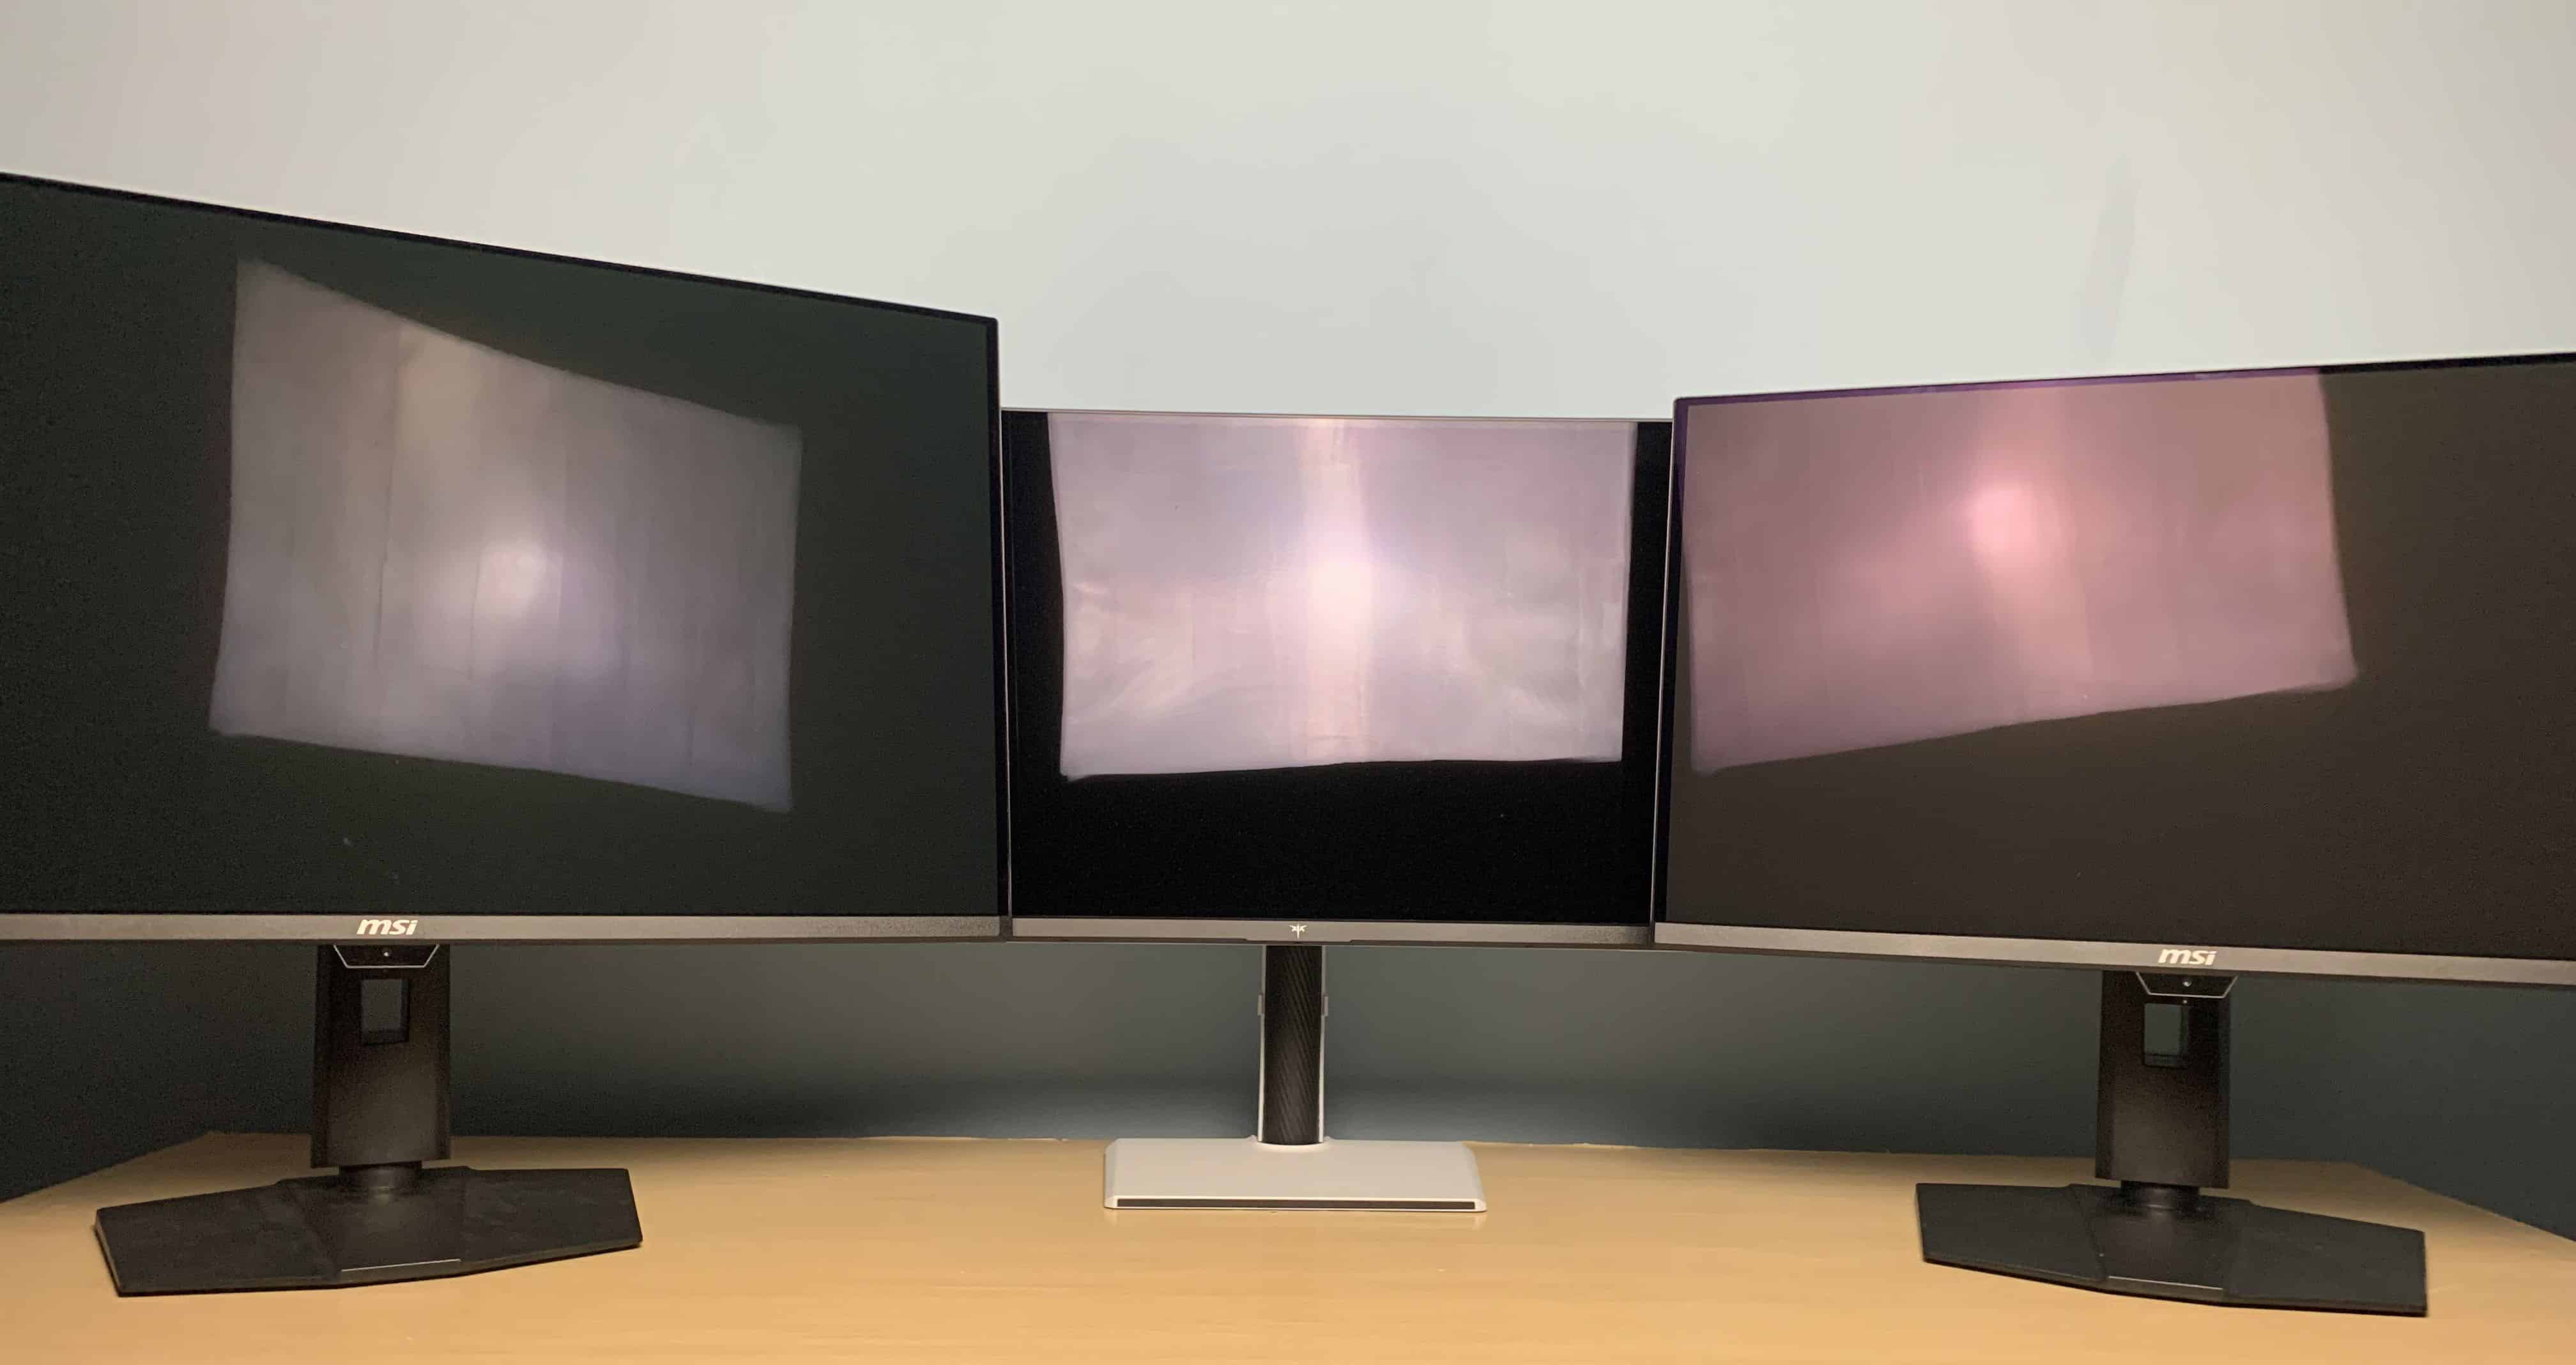
Note how only the KTC M27P6S doesn’t raise blacks under direct lighting.
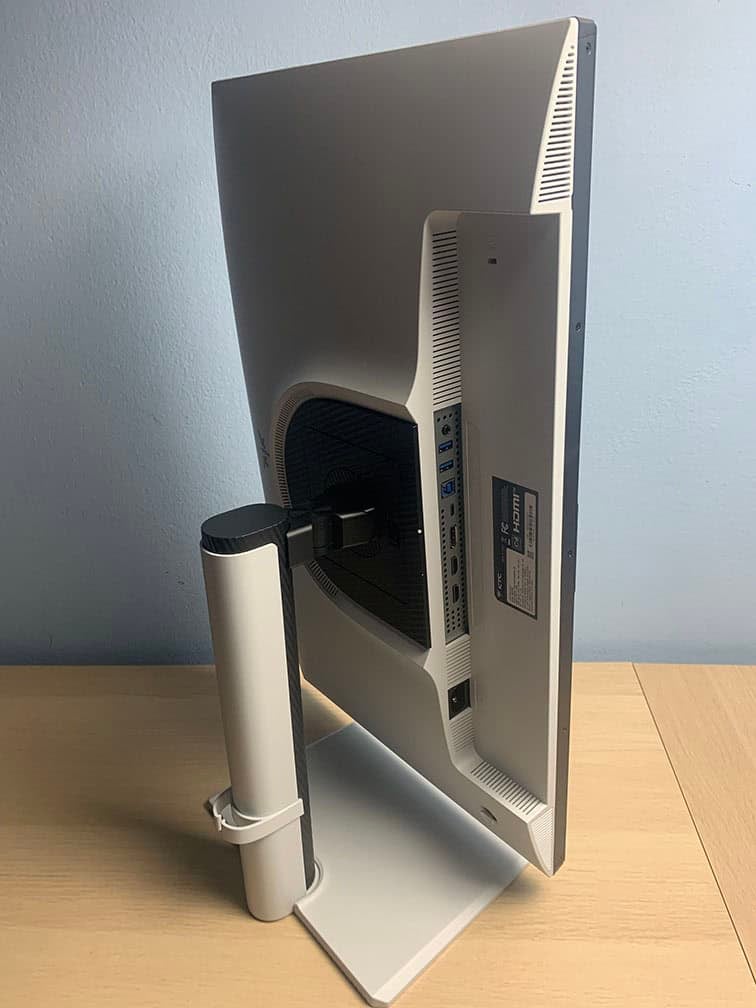
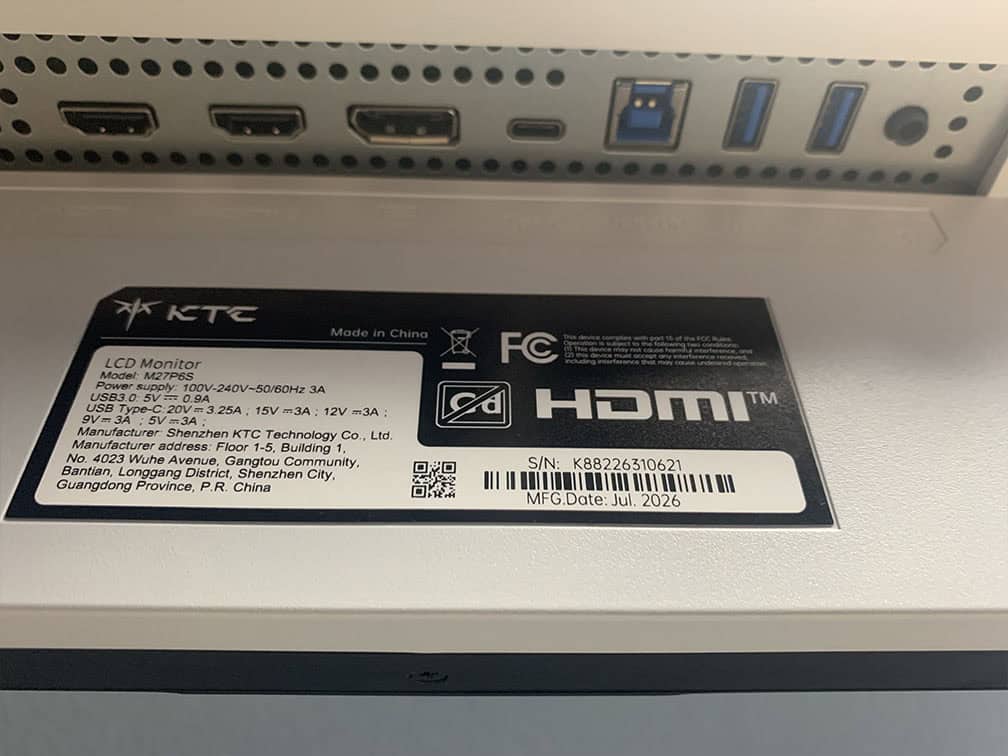
Connectivity options include DisplayPort 1.4, two HDMI 2.1 ports, a USB-C port with DP Alt Mode and 65W Power Delivery, a headphone jack, two USB-A 3.0 ports and a USB-B. It has an integrated power supply.
There’s also built-in KVM functionality. When you connect two PCs to the monitor, you can effortlessly swap control between them by connecting your keyboard and mouse to the monitor.
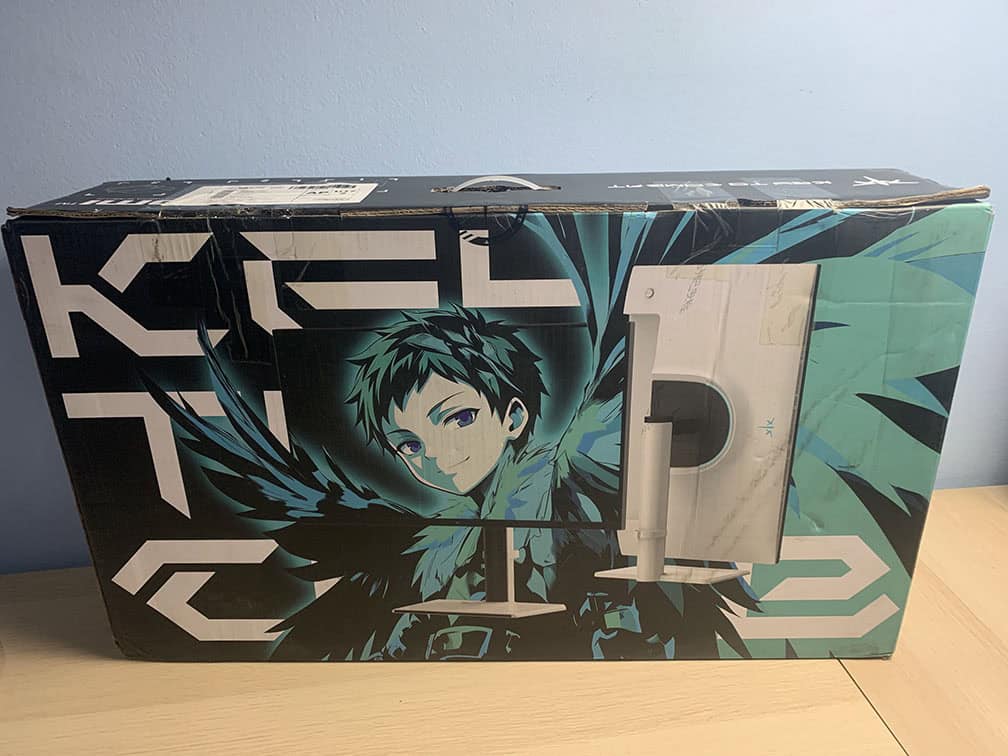
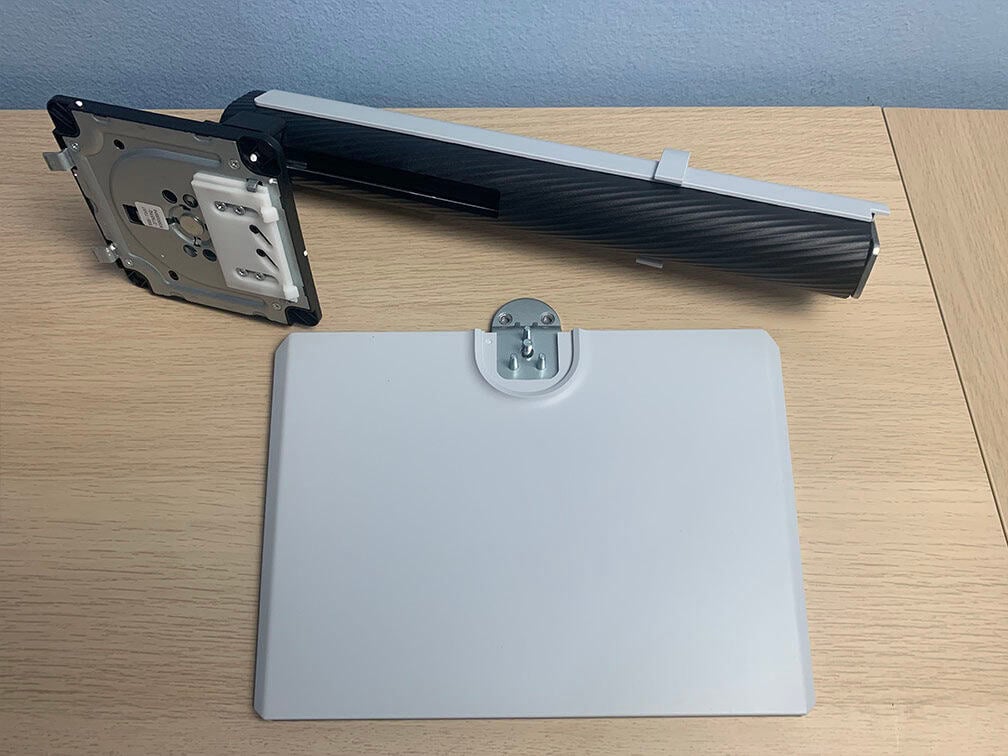
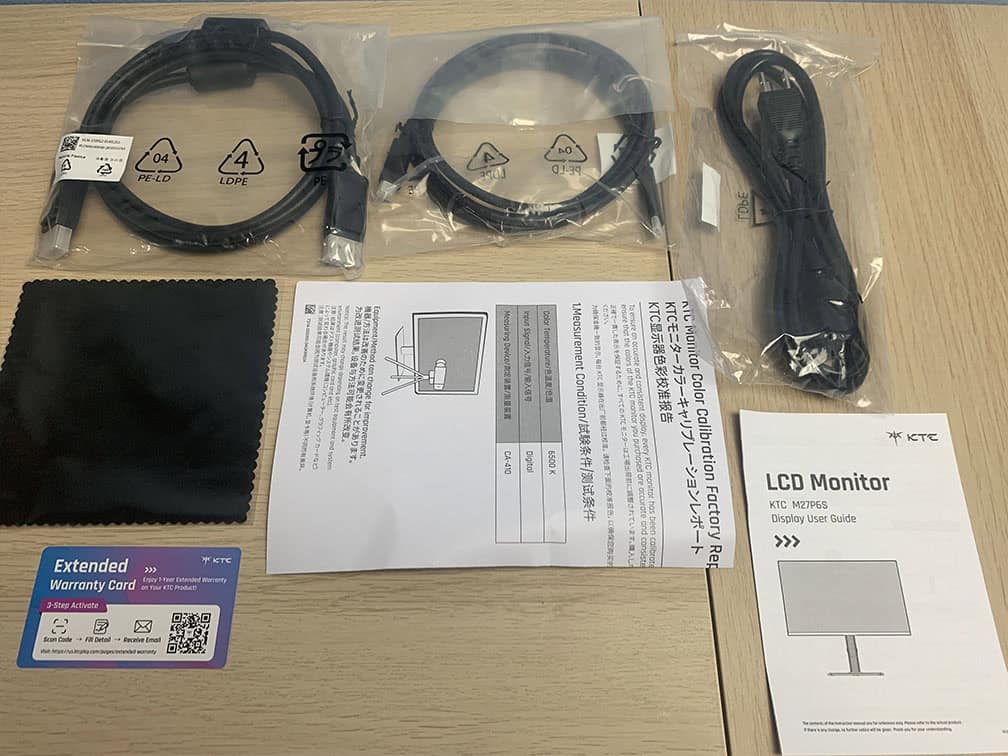
In the box, along with the monitor, you also get a power cord, a DisplayPort cable, a USB-C cable, a microfiber cloth, a warranty card, a factory calibration report and a quick start guide.
Price & Similar Monitors
10% off code: 10M27P6S on Amazon. Also available at Best Buy.
The KTC M27P6S has a $600 MSRP, but it’s currently available for $400, which we find to be excellent money for the value considering it goes for the same price (and even lower) than the 1152-zone models.
At the moment, the KTC M27P6S is the only 27″ 4K mini LED monitor with a glossy screen surface that we’re aware of.
There are upcoming 27″ 5K 165Hz IPS 2304-zone glossy models, as well as a 32″ 4K 165Hz VA 1596-zone RGB mini LED glossy model. You can check out all upcoming mini LED and OLED monitors in our dedicated articles.
For the best deals currently available, check out our best HDR monitors buyer’s guide.
Conclusion
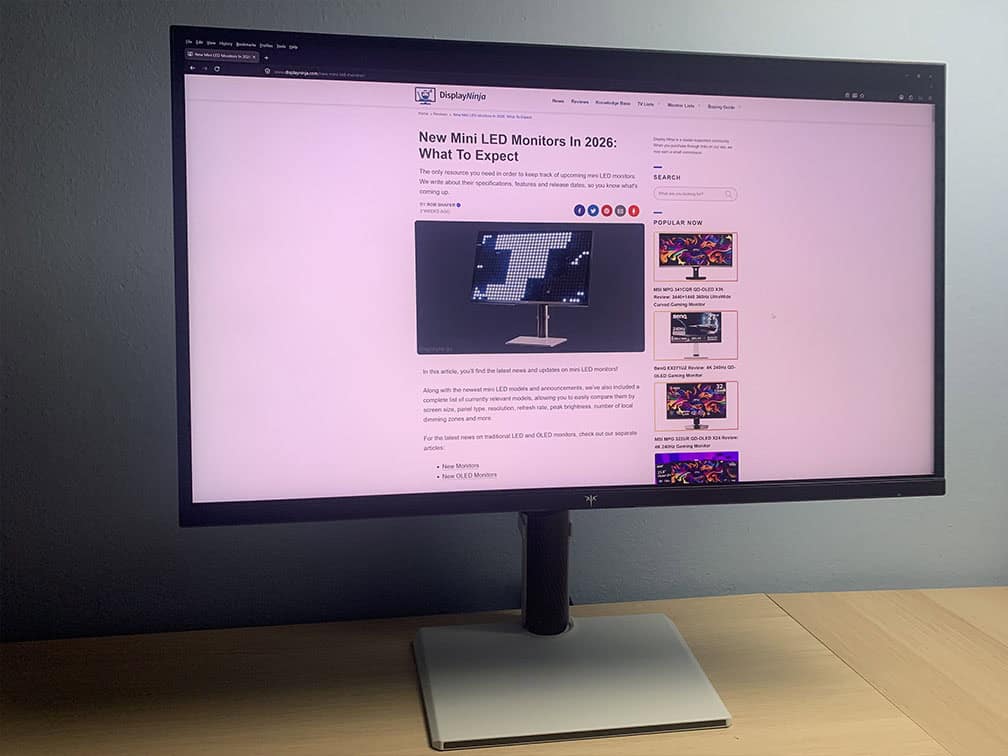
Overall, the KTC M27P6S is an exceptional HDR gaming monitor, but there’s room for improvement.
To start with, it needs better HDR color calibration, as it falls short of covering the specified DCI-P3 color space, particularly in the green range. Saturation sweeps are also inaccurate, and the color temperature is too high.
The overdrive settings are locked when running at 1920×1080 320Hz. Fortunately, you can change them using KTC’s MCC desktop application.
It was a nice surprise to see that simultaneous VRR and MBR is possible. However, despite the low brightness penalty, there’s quite a lot of strobe crosstalk, so the implementation could use more tuning.
Latency with local dimming enabled in HDR is also a bit higher than expected, and we’d like to see this addressed in a future firmware update.
Compared to the M27P6, the M27P6S has twice as many dimming zones, yet it delivers essentially the same brightness and contrast performance.
KTC has primarily used the additional zones to reduce blooming, and they’ve done a great job in that regard, as there’s virtually no blooming during regular viewing. Blooming is also much less noticeable when viewing the screen from an angle, which is another notable improvement.
The inclusion of the Halo Control option is great to see too, allowing you to make the local dimming more aggressive than High, more lenient than Low, or fine-tune it anywhere in between.
Finally, the glossy screen is a welcome addition, especially as interest in glossy displays has been growing rapidly.
Even with its current flaws, we can still recommend the KTC M27P6S as it offers a unique and immersive viewing experience thanks to its glossy screen surface and 2304 dimming zones that help deliver exceptionally low blooming.
You get fast response times, smooth VRR performance and excellent SDR calibration, while HDR colors look decent despite the subpar calibration. Latency is higher than ideal with local dimming, but it’s still playable at high refresh rates.
Hopefully, a future firmware update will address some of its shortcomings and further improve the overall experience.
Specifications
| Screen Size | 27-inch |
| Resolution | 3840×2160 (Ultra HD) |
| Panel Type | IPS |
| Aspect Ratio | 16:9 (Widescreen) |
| Refresh Rate | 4K 160Hz 1080p 320Hz |
| Response Time | 2ms (GtG) |
| Motion Blur Reduction | DAC Pro, DAC + |
| Adaptive-Sync | FreeSync Premium (48-320Hz), HDMI 2.1 VRR |
| Ports | DisplayPort 1.4, 2x HDMI 2.1, USB-C (DP Alt Mode, 65W PD) |
| Other Ports | Headphone Jack, 2x USB-A 3.0, USB-B |
| Brightness (1 – 3% White Window) | 1105 cd/m² (measured at 3% APL with local dimming set to High) |
| Brightness (10% White Window) | 1467 cd/m² |
| Brightness (100% White Window) | 1749 cd/m² |
| Contrast Ratio | 1000:1 |
| Colors | 1.07 billion (8-bit + FRC) 99% DCI-P3, 97% Adobe RGB |
| HDR | VESA DisplayHDR 1400 |
| VESA | Yes (100x100mm) |
The Pros:
- Wide color gamut with well-calibrated sRGB and Adobe RGB modes
- High peak brightness, high contrast ratio, 2304-zone mini LED FALD backlight for minimal blooming
- Plenty of features, including VRR and MBR up to 320Hz
- Fully ergonomic stand and rich connectivity options, including built-in KVM and USB-C 65W PD
- STW polarizer improves black depth when the screen is viewed at an angle
The Cons:
- FALD blooming (negligible in most scenes)
- Missing coverage of the DCI-P3 color space in HDR mode
- Slightly colder color temperature in HDR
- Overdrive locked at 1080p 320Hz (there’s a software workaround)
- Latency with local dimming is slightly higher (by one refresh cycle) than what we’d expect
- Quality control could be better


