Bottom Line
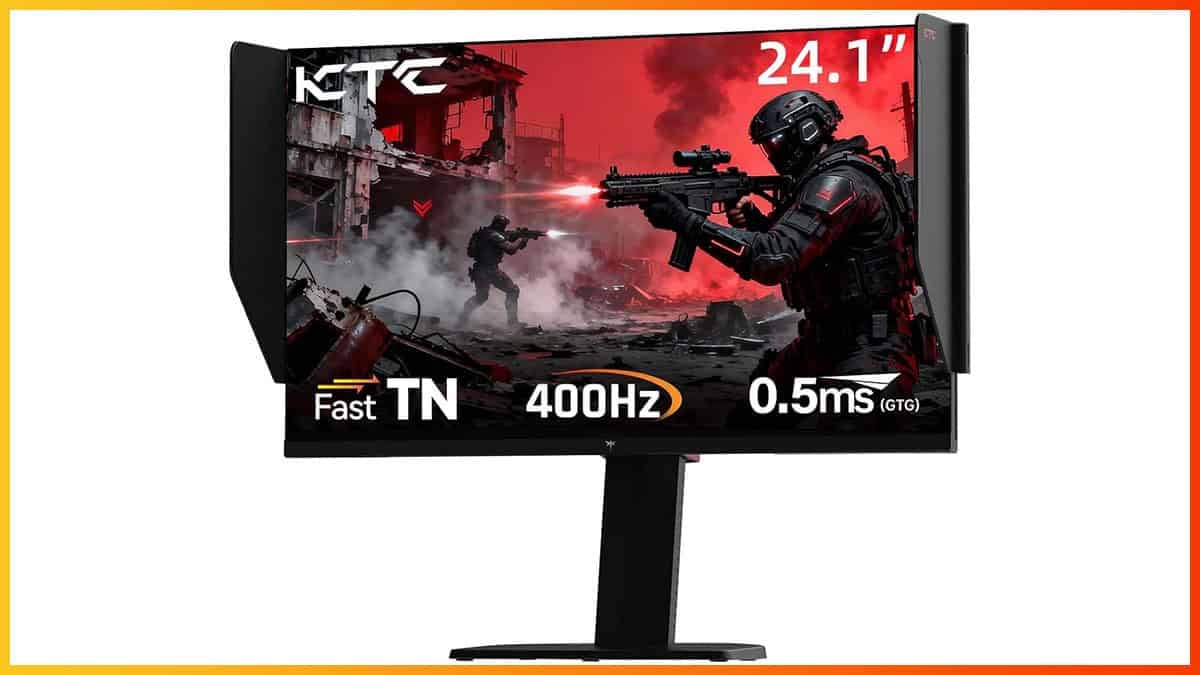
The KTC 25M1 is the best eSports monitor under $400 thanks to its fast 24.1″ 1080p 400Hz TN panel with a solid backlight strobing implementation and plenty of other gaming features, including a versatile design.
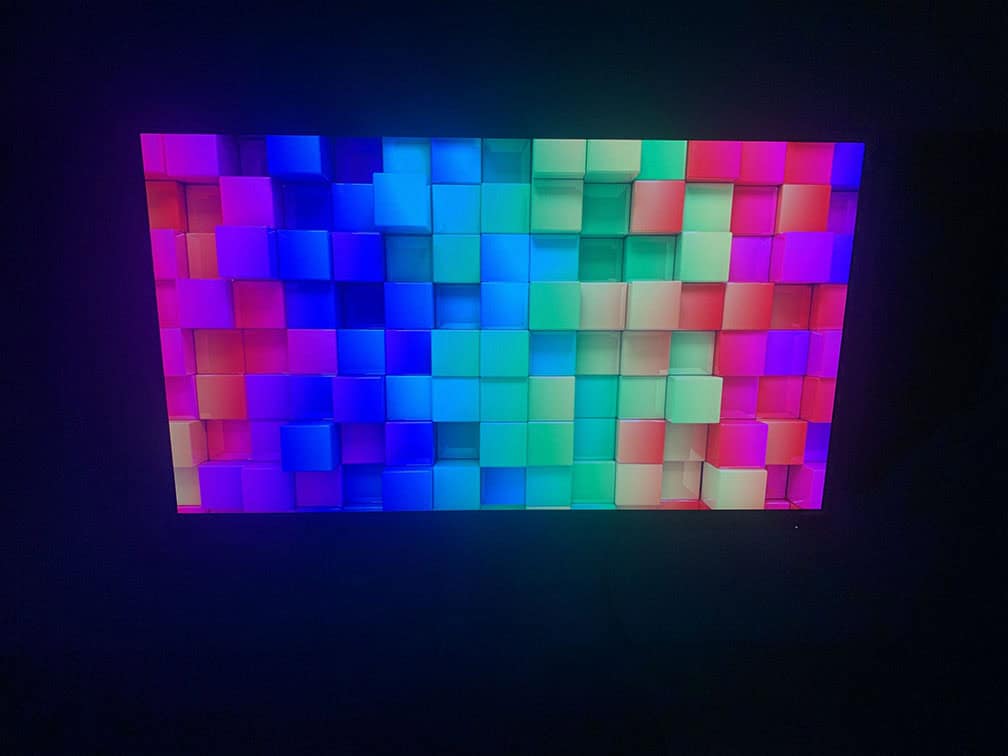
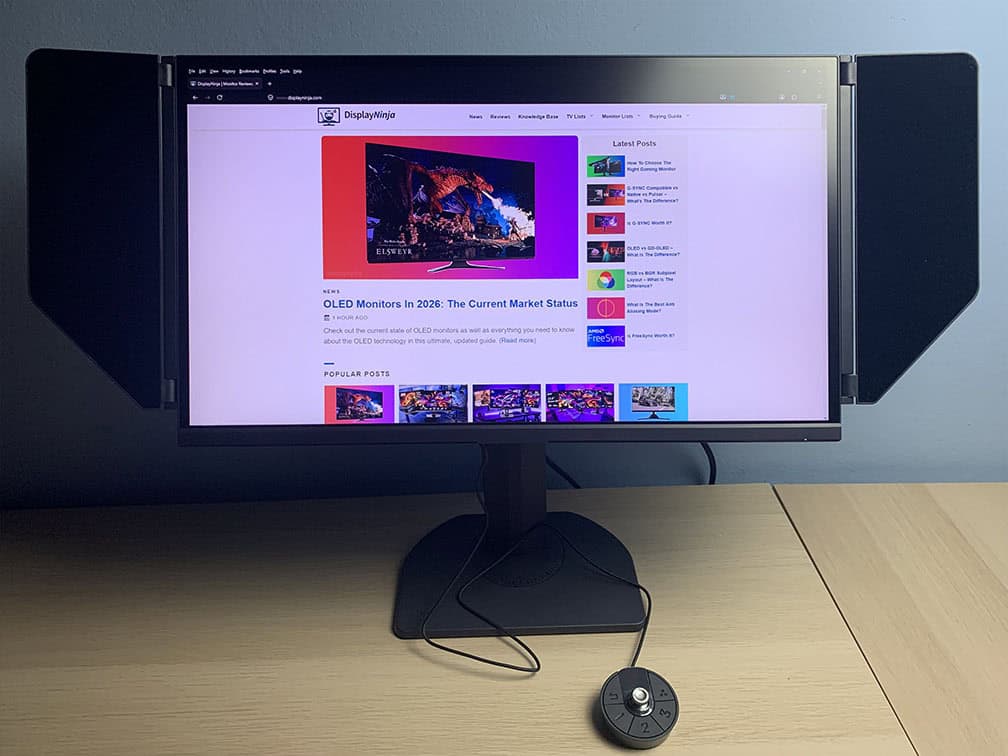
The KTC 25M1 is a 24.1-inch 1080p 400Hz TN gaming monitor designed for esports, featuring side shields and a wired OSD controller for quick access to settings.
Moreover, it offers plenty of gaming features, including VRR and backlight strobing support – let’s see how it handles our tests!
Note that it’s available in two KTC stores on Amazon: Link 1, Link 2.
Image Quality
The monitor is based on a TN (Twisted Nematic) panel with a quoted 0.5ms GtG (gray to gray) pixel response time, 125% sRGB color gamut volume, a 1,000:1 static contrast ratio and a 350-nit peak brightness.
To test the display’s capabilities and accuracy, we’re using our Calibrite Display Pro HL colorimeter paired with DisplayCAL.
Note that we’re testing the USA-1.0.1 firmware version.
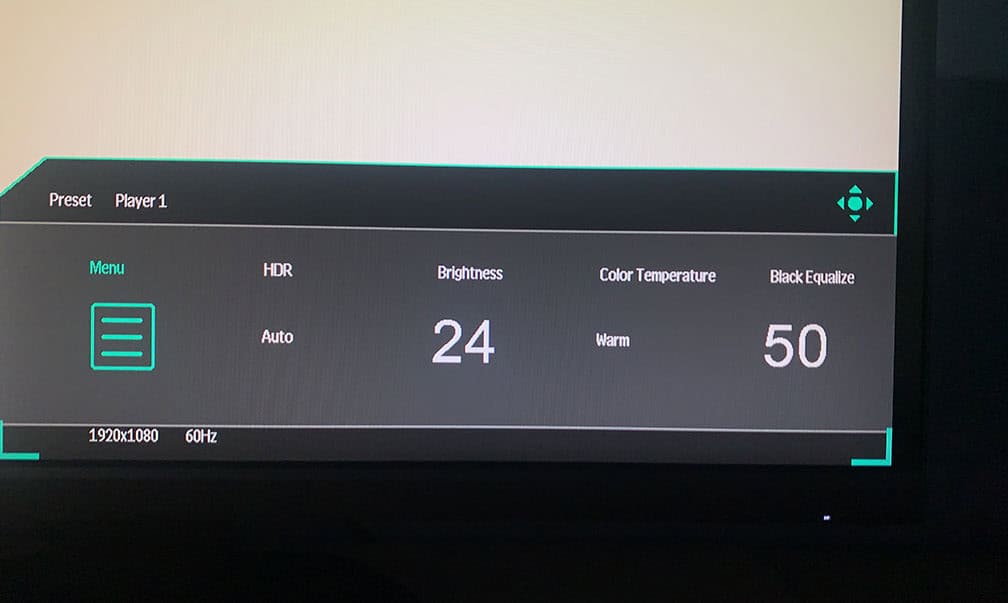
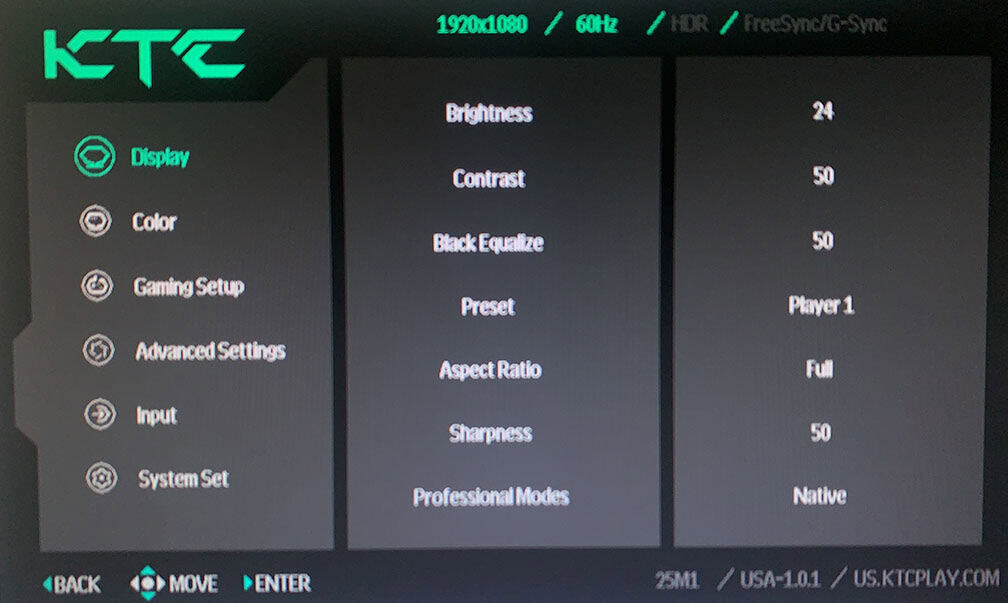
In the OSD (On-Screen Display) menu, under the ‘Display’ settings, you’ll find several ‘Preset’ options: Player 1, Player 2, Player 3, Standard, Movie, RTS, FPS1 and FPS2.
Options other than ‘Player 1, 2 and 3’ simply apply preset brightness, contrast, hue, saturation and Black Equalize values, which you can’t adjust. So, for full customization, we recommend using the most accurate default ‘Player’ mode.
By default, all three Player modes use the same image settings, so you can customize each one and quickly switch between them using the wired controller.
For example, you could set Player 1 to a lower brightness for work and Player 2 to a higher brightness for gaming, then switch between them with a single press of the 1 or 2 button on the controller.
If you scroll a bit further in the ‘Display’ section, you’ll find the ‘Professional Modes’ options, including ‘Native’ and ‘sRGB’.
Color Gamut
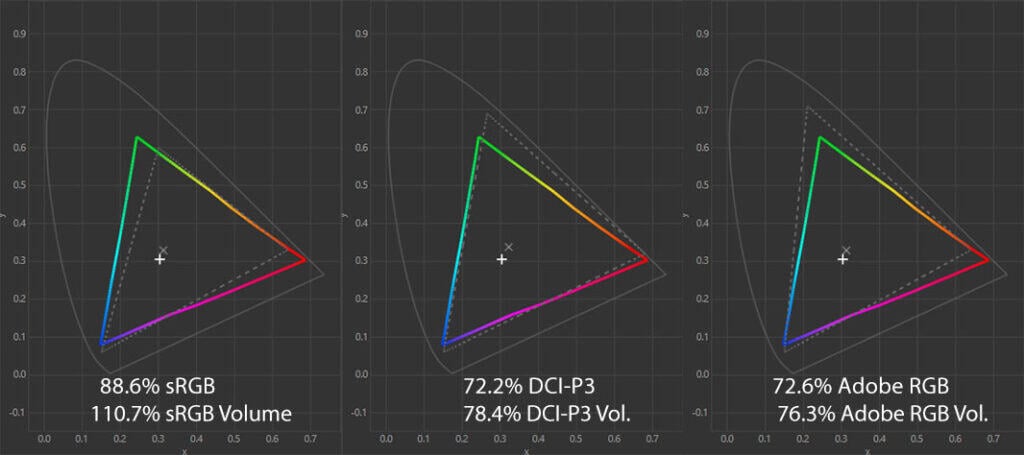
The KTC 25M1 has an 110.7% sRGB color gamut volume with 88.6% sRGB color space coverage.
There’s some undersaturation in blues, and some oversaturation in reds and greens. The extra color vibrancy is not too intrusive and can help your enemies stand out more in certain environments.
By using the ‘sRGB’ ‘Professional Mode’, you can clamp the gamut down to 99.7% volume with a bit better 93.7% coverage.
In the Standard mode, we measured a bit higher 122.3% volume with 93.4% coverage, which is closer to the specified 125%, but this mode has locked brightness, contrast and Black Equalize values, which makes the image too washed out.
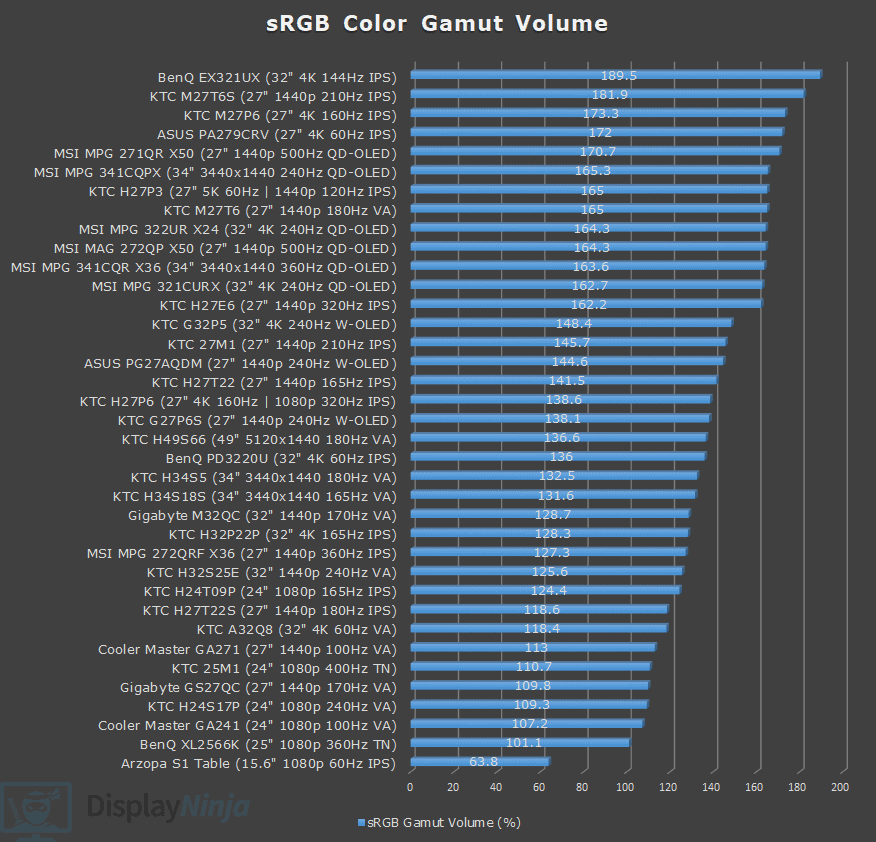
Image Accuracy
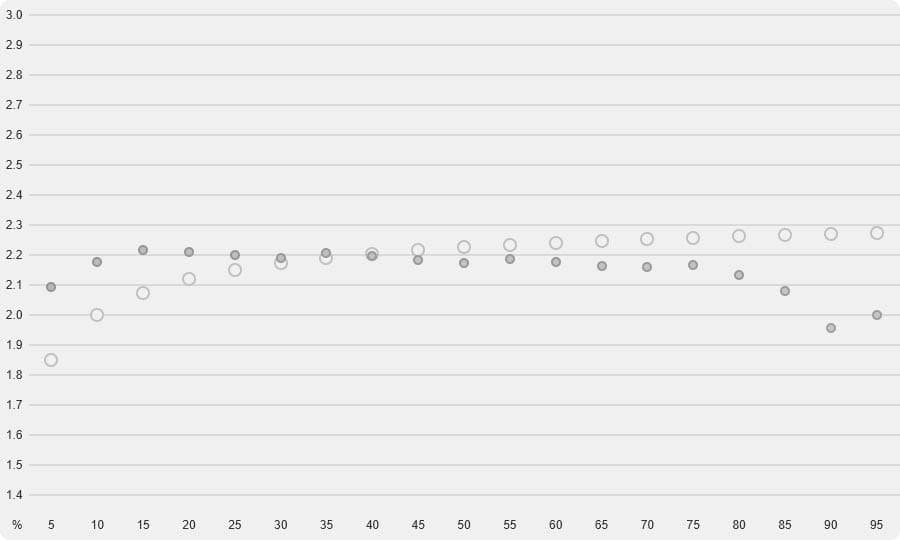
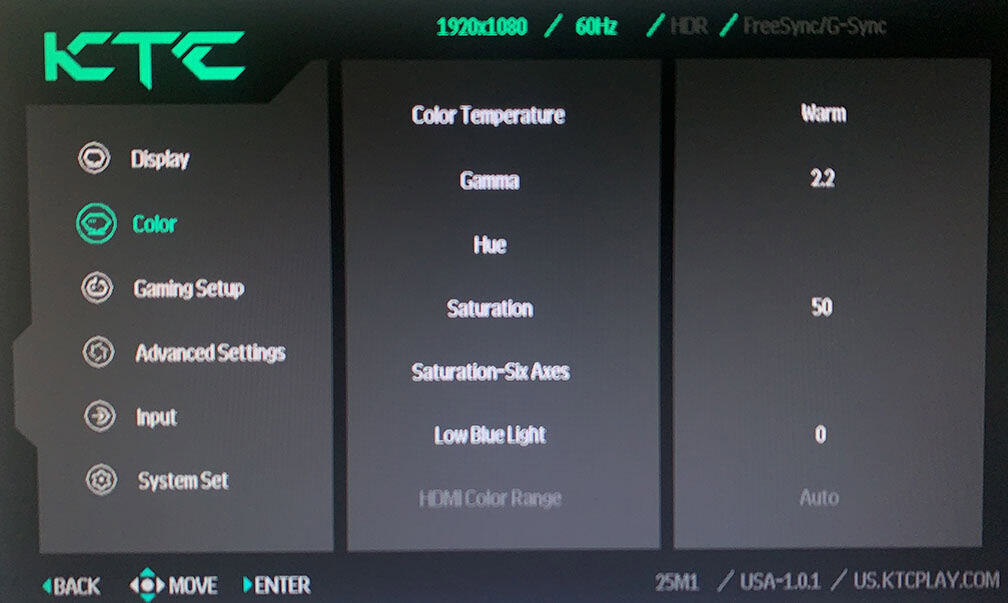
In the default Player 1 preset, we measured a high color temperature of 7691K, which adds a noticeable blue tint to the whitepoint. We recommend changing it to ‘Warm‘, which is much closer to the 6500K target and shows no tinting at 6556K.
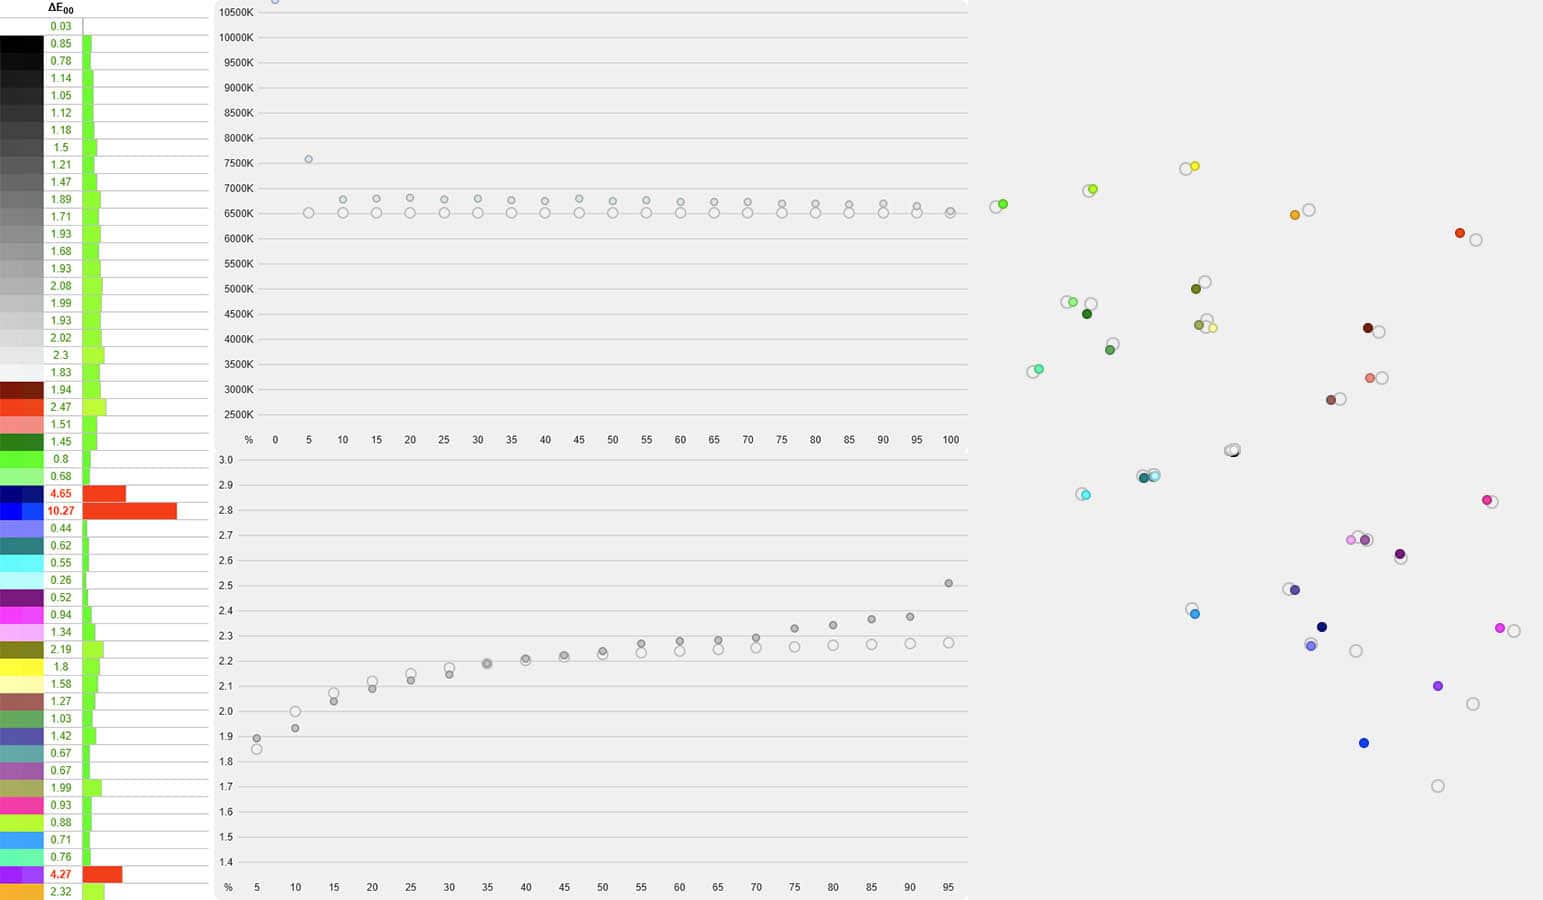
Since Windows doesn’t do color management by default, colors in SDR are oversaturated, resulting in a high Delta E of 3.66 average (color deviation from the target, less than 1.5 is considered good) and 10.66 maximum (target is less than 3).
The average gamma is 2.15 (target is 2.2). Shadow detail (5 – 15% white) appears darker than intended, while bright scenes (85 – 95% white) look brighter than intended.
For the best results in games, you should increase Black Equalize to 80. This will improve visibility in dark scenes without over-exposing the bright areas.
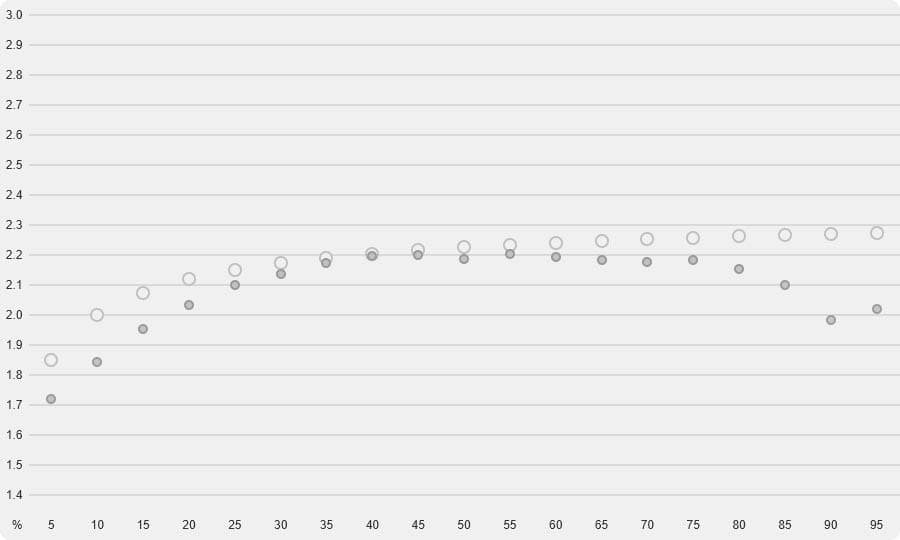
The sRGB mode is more accurate with an average Delta E of 1.62, but the maximum is still high at 10.27 due to the monitor missing some blue coverage in the color gamut. Color temperature is very good at 6550K in the User color temperature mode.
Gamma tracking is now improved with a 2.22 average, and it follows the sRGB tone curve accurately.
You can adjust the brightness and color temperature in the sRGB mode; only contrast, gamma and hue/saturation settings are locked.

Overall, the color accuracy isn’t very good, but since it’s a TN panel, it’s not recommended for color-critical work anyway. However, due to the gamma being higher than intended, the default settings aren’t the best for competitive gameplay either.
Luckily, you can usually correct this by increasing the Black Equalizer setting (or switching to a lower gamma mode) until shadow details become more visible to your liking.
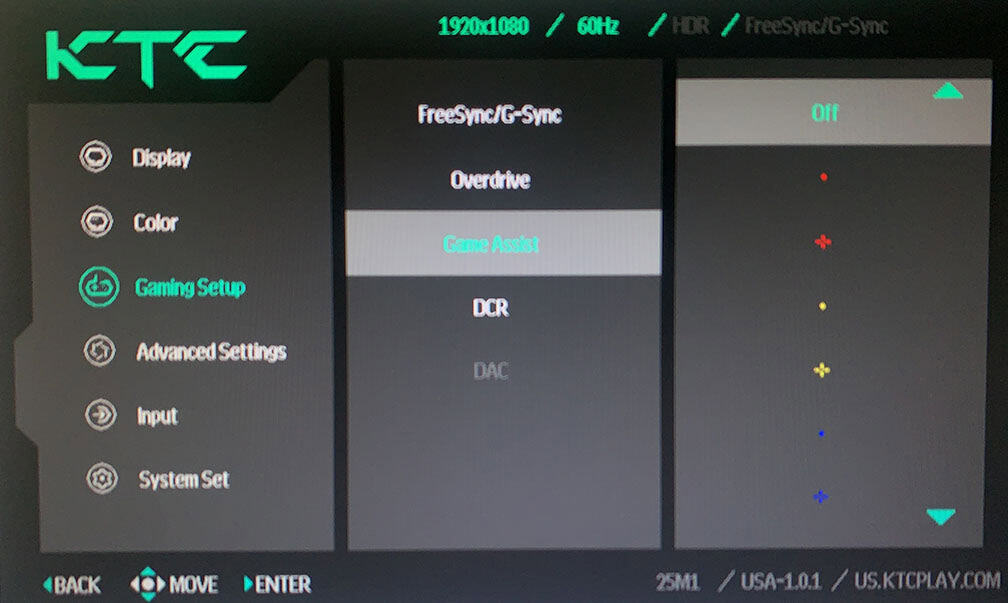
You can also enable ‘Night-Vision‘ under ‘Gaming Setup‘ and ‘Game Assist‘ in the OSD menu – this increases Black Equalize to 80 and Sharpness to 60.
Calibration
For full calibration, we set the brightness to 9/100 for 123-nits, used the ‘Native’ color temperature mode, and ‘Custom’ color temperature with red, green and blue channels set to 50, 49, 47, respectively, to get 6531K.
We noticed an issue where adjusting the red, green, and blue channels would sometimes not register full steps. For example, we had to decrease the green value by two steps for it to change from 50 to 49, even though both adjustments resulted in a measurable change.
Due to panel variance, we don’t recommend copying these settings anyway, but it’s something to keep in mind if you decide to calibrate the monitor yourself using your own colorimeter.
Delta E improved to 1.41 average, but the maximum Delta E remains high at 8.17 due to missing blue coverage. Gamma tracking is also improved with a 2.18 average. You can download our ICC profile here.
Brightness & Contrast
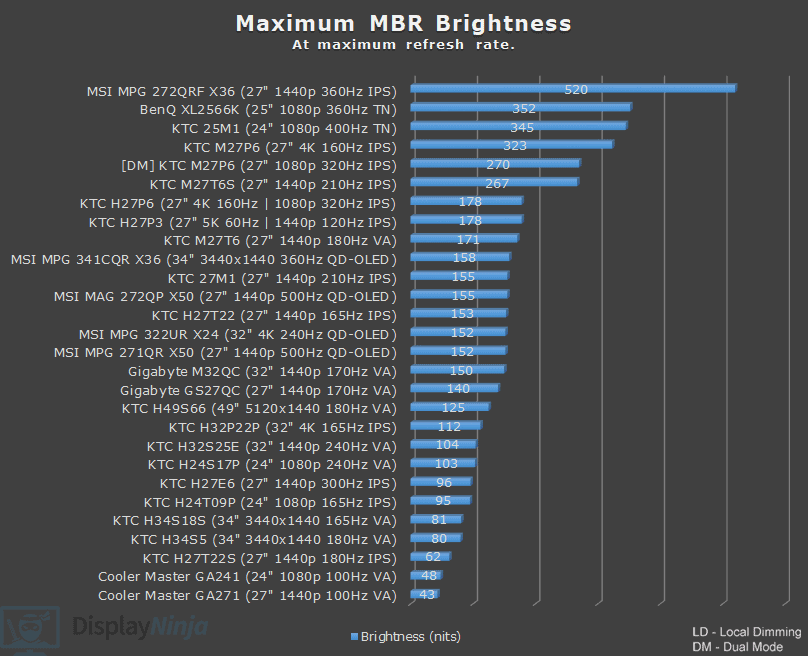
We measured a maximum brightness of 432-nits, exceeding the specified 350-nits.
The minimum brightness was 89-nits. So, while the monitor is suitable for use in bright rooms, some users who prefer low brightness in dark rooms may find the monitor too bright at its lowest brightness setting.
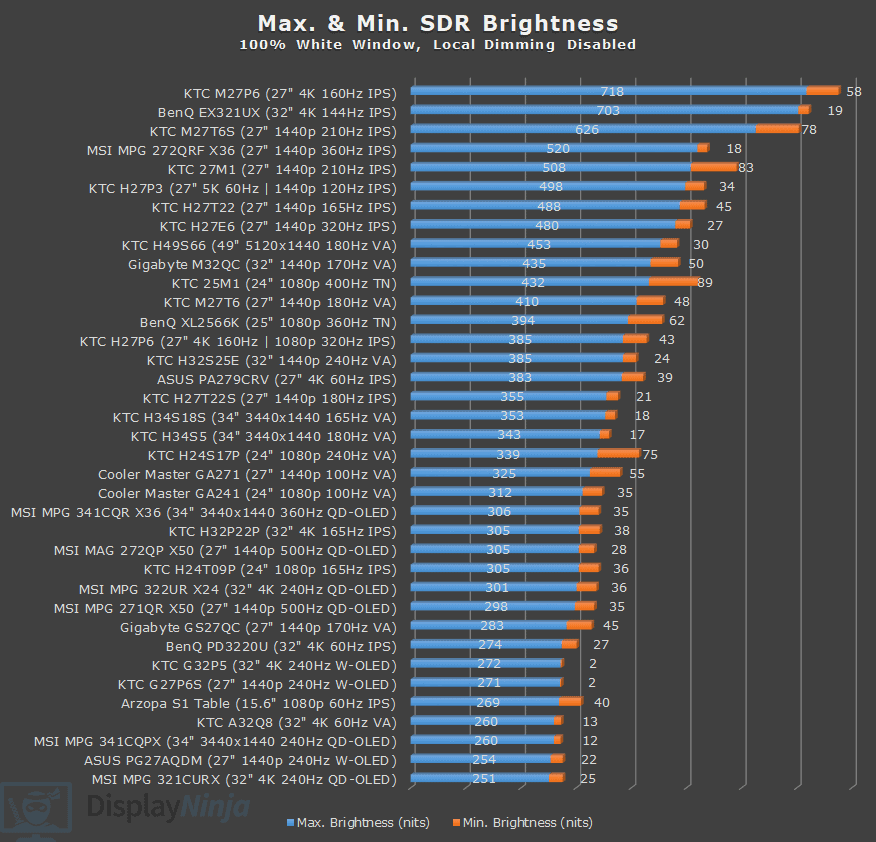
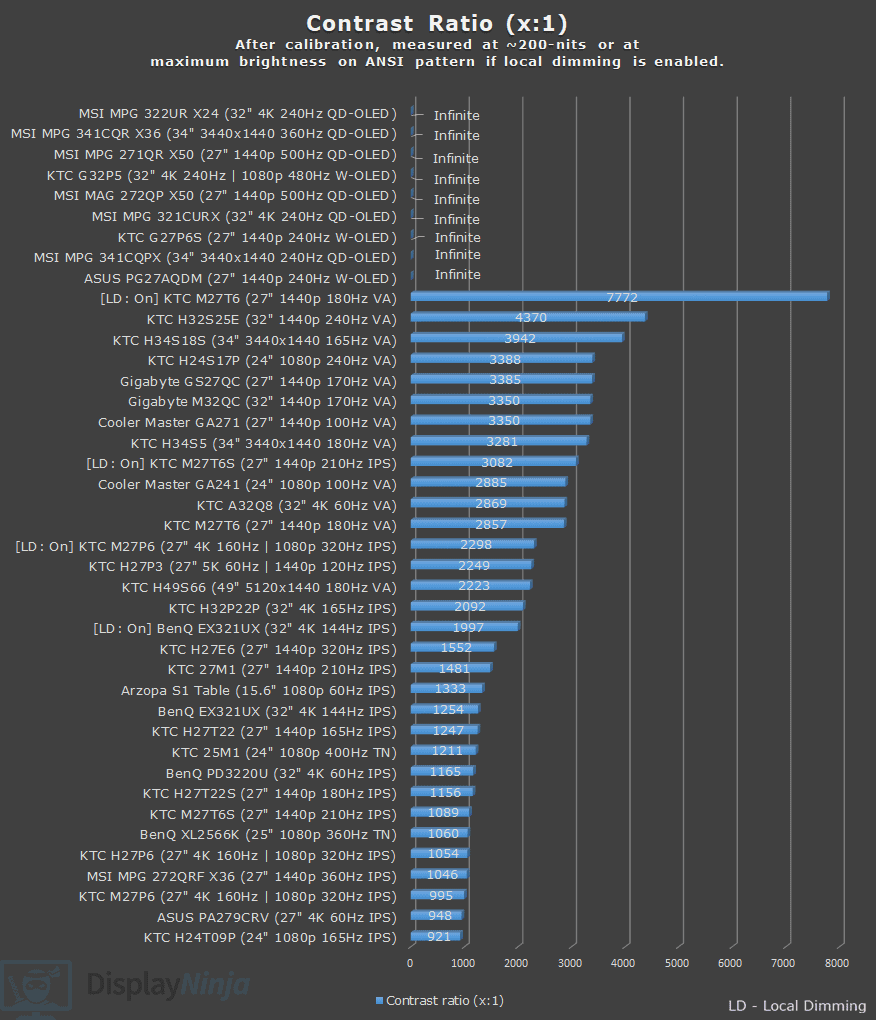
At around 200-nits, we measured a static contrast ratio of 1211:1, which is a good result for a TN panel. Blacks won’t be as deep as that of VA or OLED panels, but those panels have their own drawbacks.
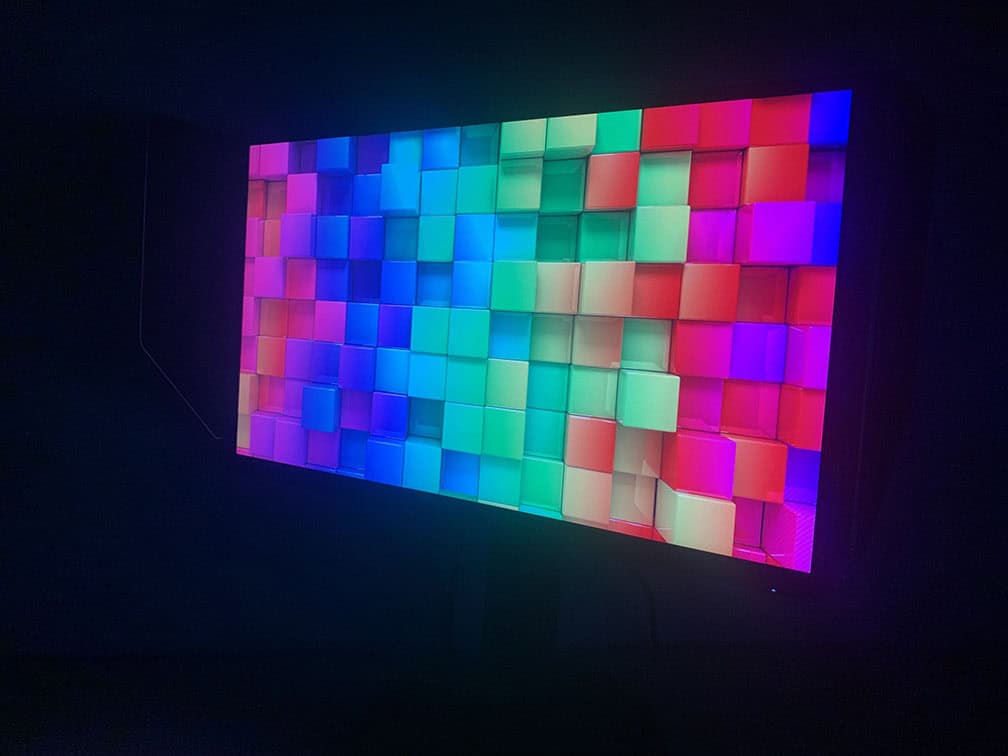
Subpixel Layout, Pixel Density & Viewing Angles
The KTC 25M1 has a typical RGB subpixel layout, meaning that there’s no noticeable colored fringing on small text and fine details.
While monitors with ’25’ in their name are usually 24.5″ diagonally, the KTC 25M1 actually has a 24.1″ viewable screen, which is more typical of monitors labeled as ’24’ models. There’s no meaningful difference in real-world use, just a small detail worth noting.
You get a pixel density of 91.41 PPI (pixels per inch), which results in reasonably sharp details. The image is notably clearer than 1920×1080 on 27″ sized screens.
24″ 1080p displays are still the most popular screen size for esports FPS games, since the smaller screen makes it easier to take in everything at a glance, while the lower 1080p resolution helps achieve higher frame rates and, in turn, lower latency.
Some players prefer 27-inch 1440p monitors, where the extra sharpness and detail can also be an advantage.
Among all panel technologies, TN panels have the narrowest viewing angles, typically around 160° vertically and 170° horizontally, compared to the 178° commonly seen on other panel types.
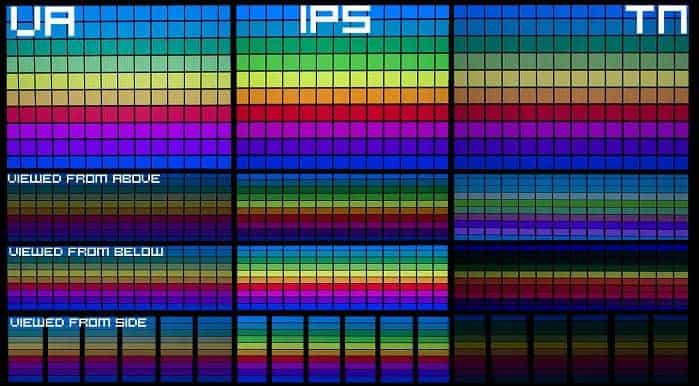
This means brightness, contrast and colors can shift when the screen is viewed from off-angles. However, when viewed straight on, these issues are generally not noticeable in normal use.
HDR
While the monitor can accept and display the HDR10 signal, it doesn’t have the required hardware (full-array local dimming or an OLED panel) for proper HDR image quality. Therefore, we don’t recommend using HDR on this monitor.
Performance
The monitor has a maximum refresh rate of 400Hz, which provides you with a huge boost in motion clarity and responsiveness in comparison to typical 60-75Hz displays.
For latency and response time testing, we’re using OSRTT.

Response Time
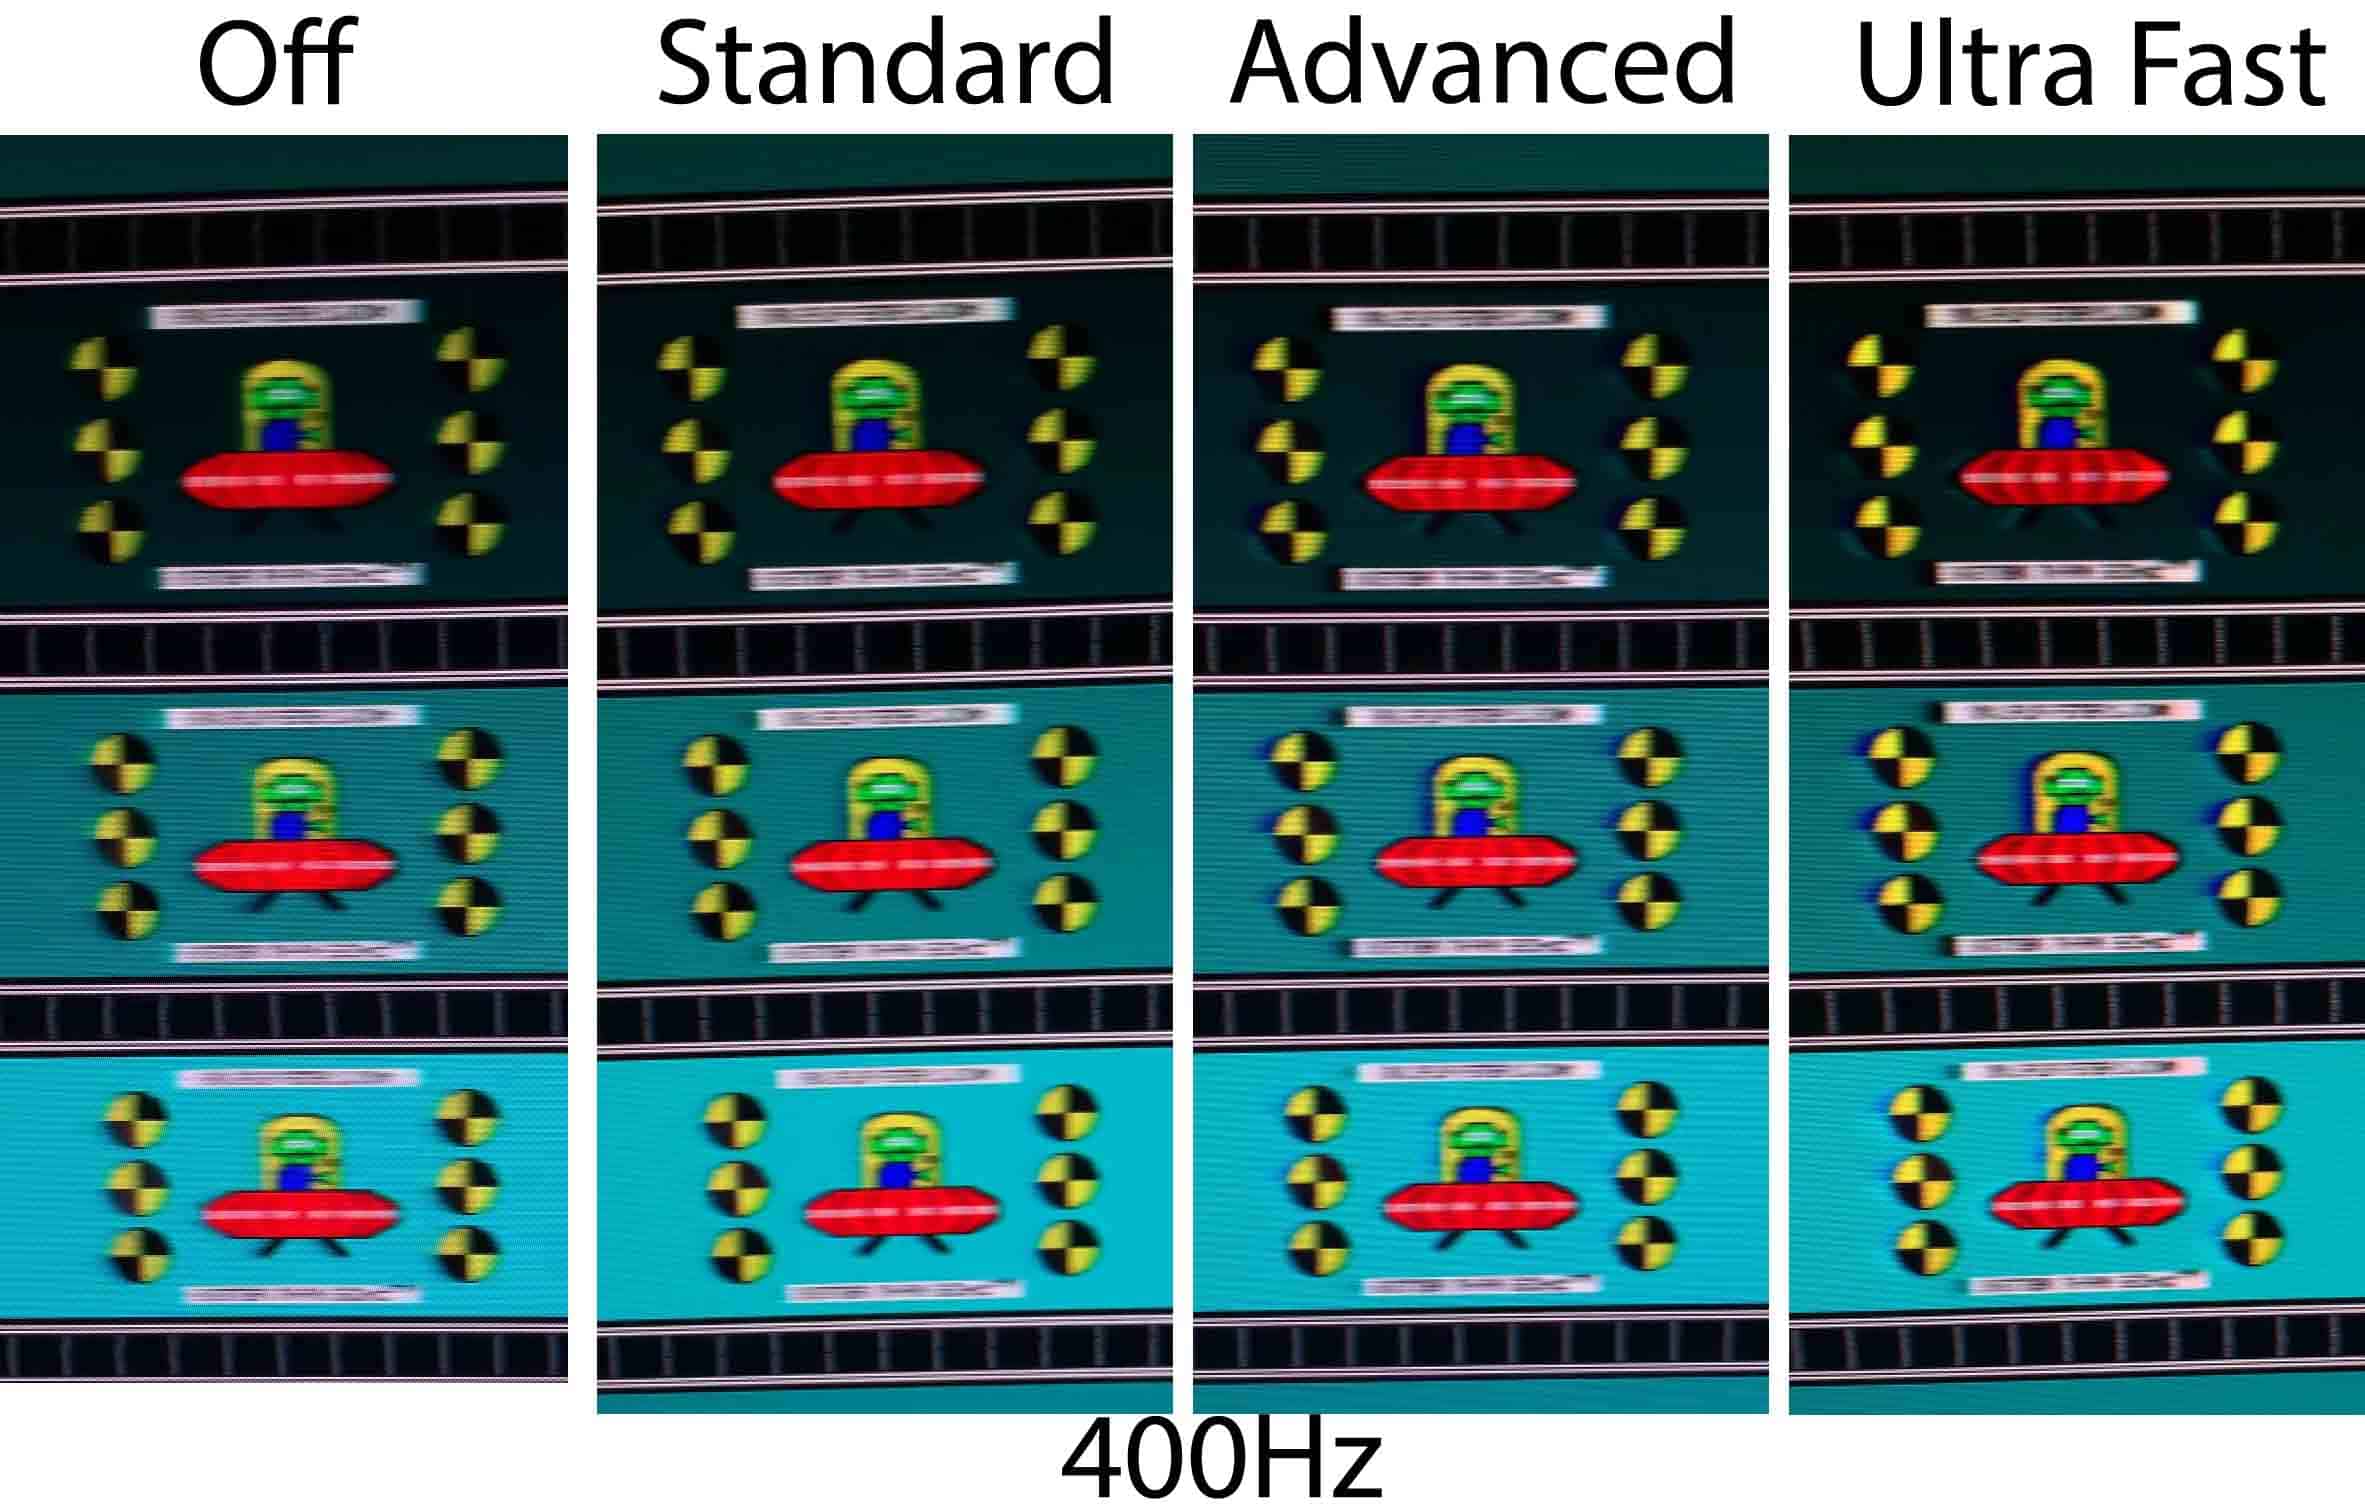
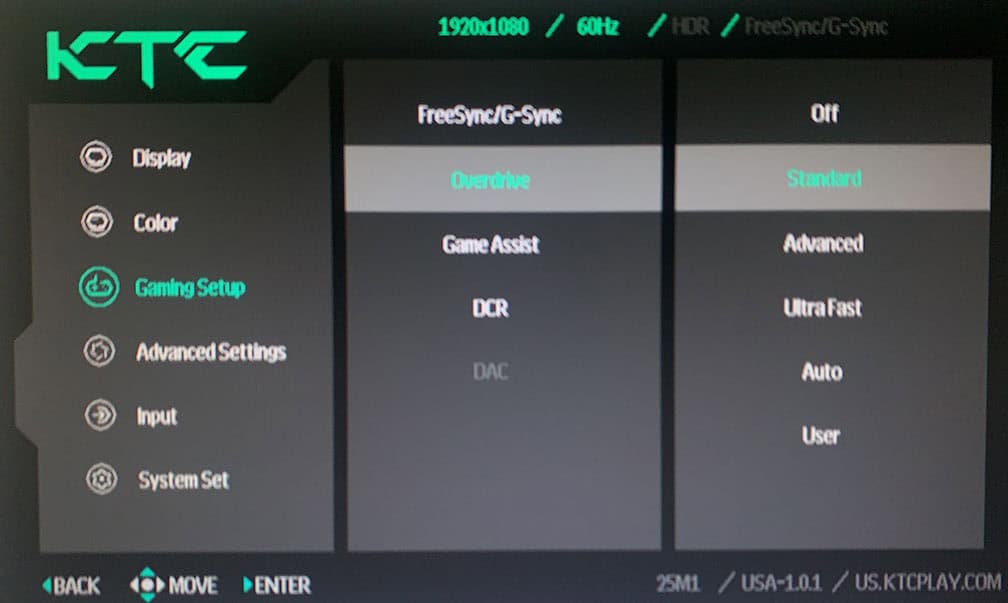
The KTC 25M1 has six response time overdrive modes: Off, Standard, Advanced, Ultra Fast, Auto and User.
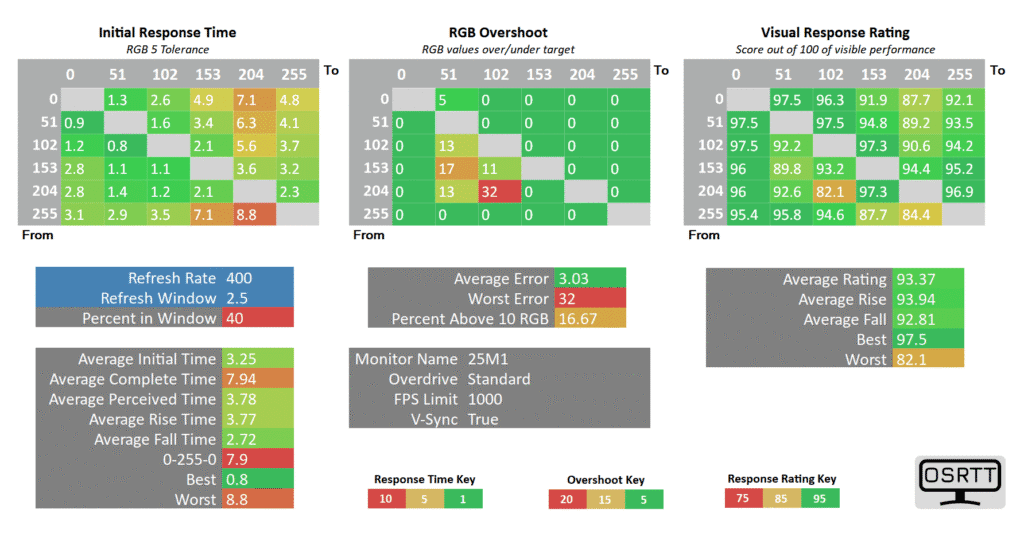
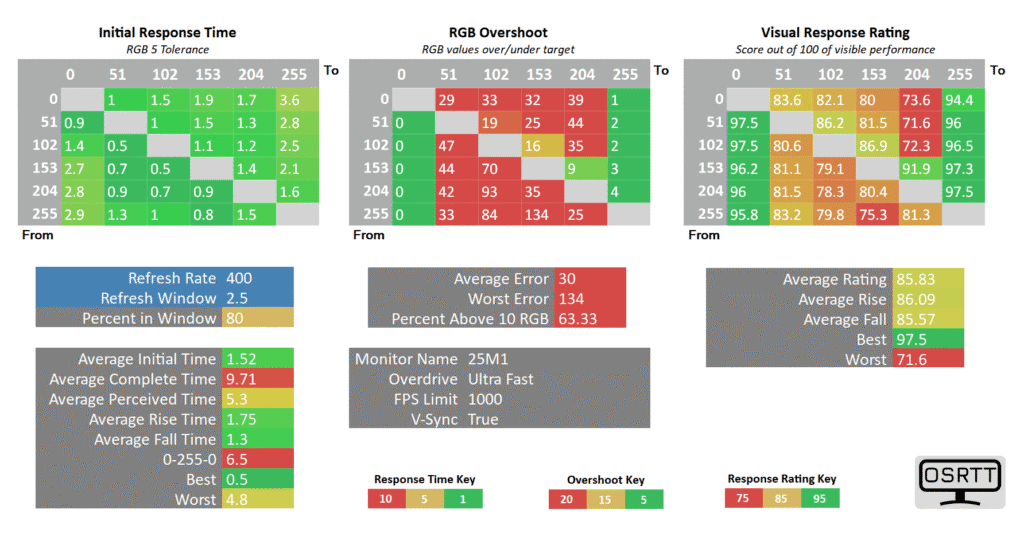
Here are the response time results at 400Hz.

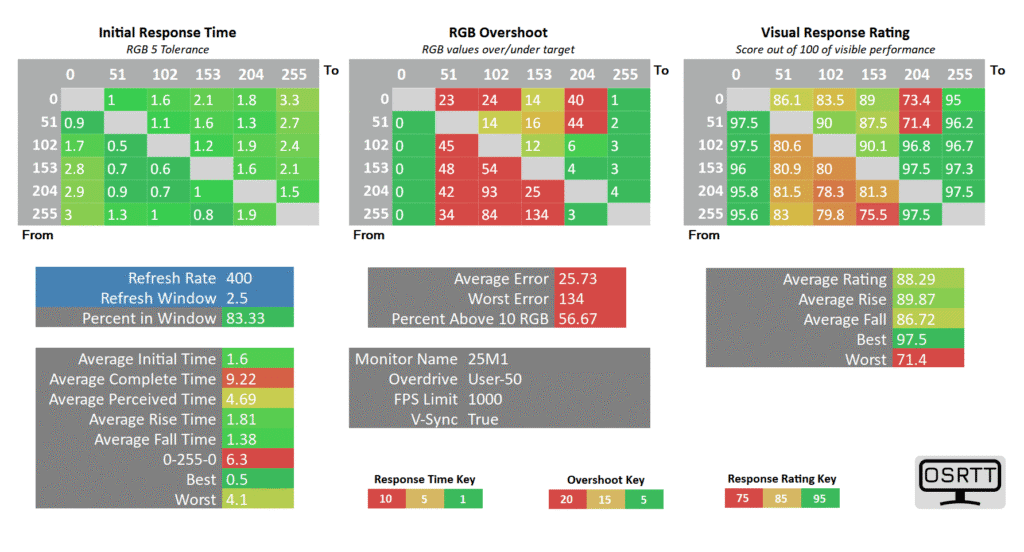
The User mode allows for customizable overdrive from 0 to 100 in increments of 1.
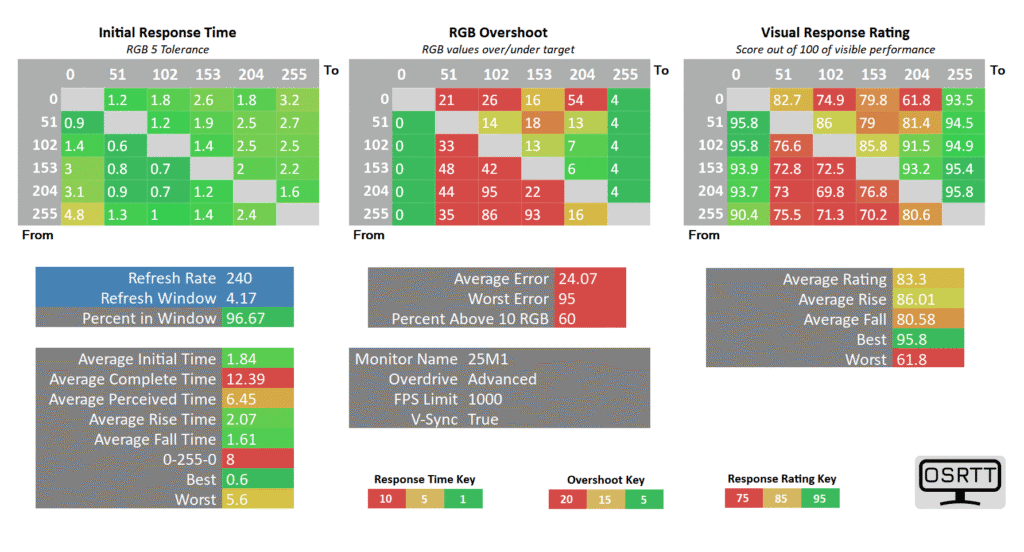
The Auto mode is supposed to act as a variable overdrive when variable refresh rate (VRR) is enabled, but it has the same performance as User 50, resulting in excessive overshoot at all refresh rates.
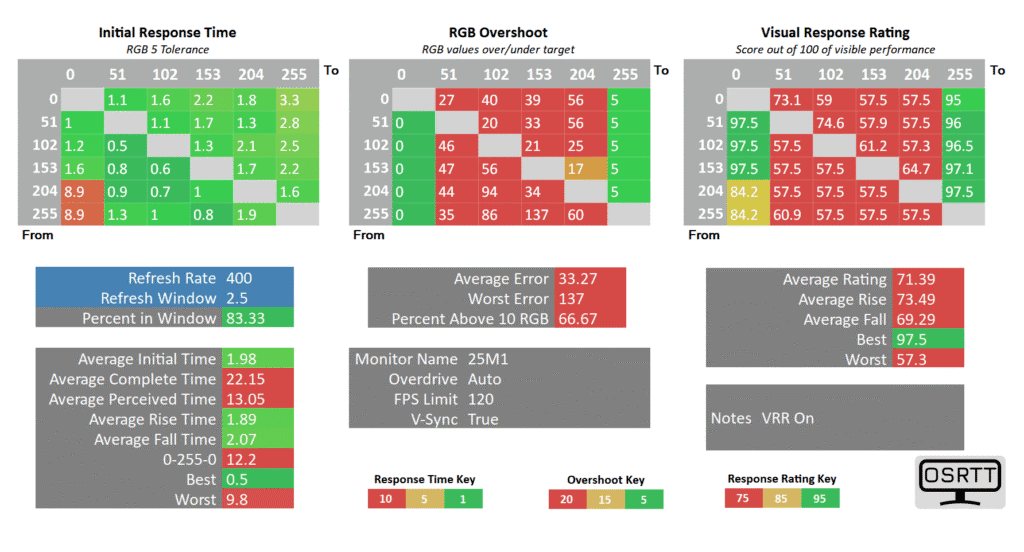
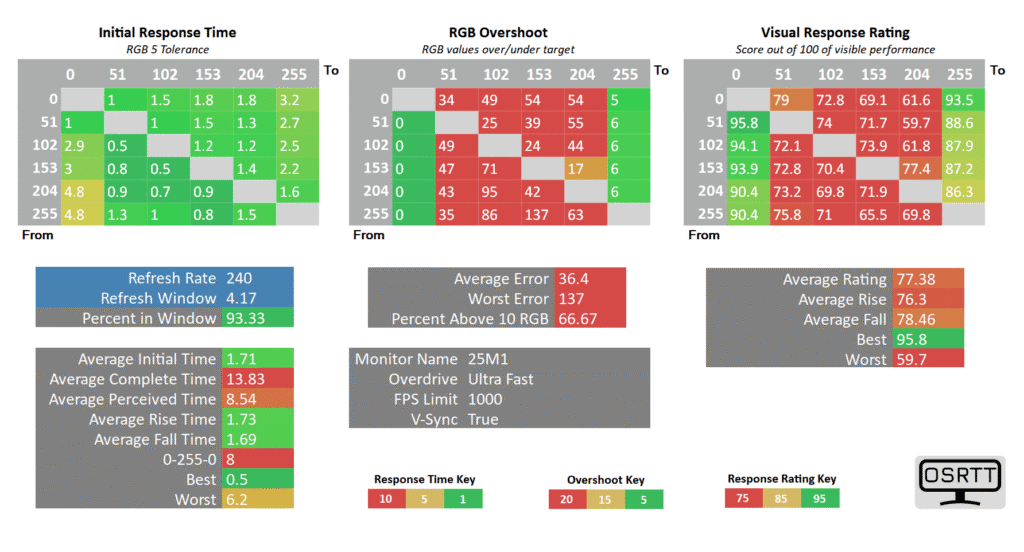
Next, the Ultra Fast mode has too much overdrive regardless of the refresh rate, so you can ignore it.
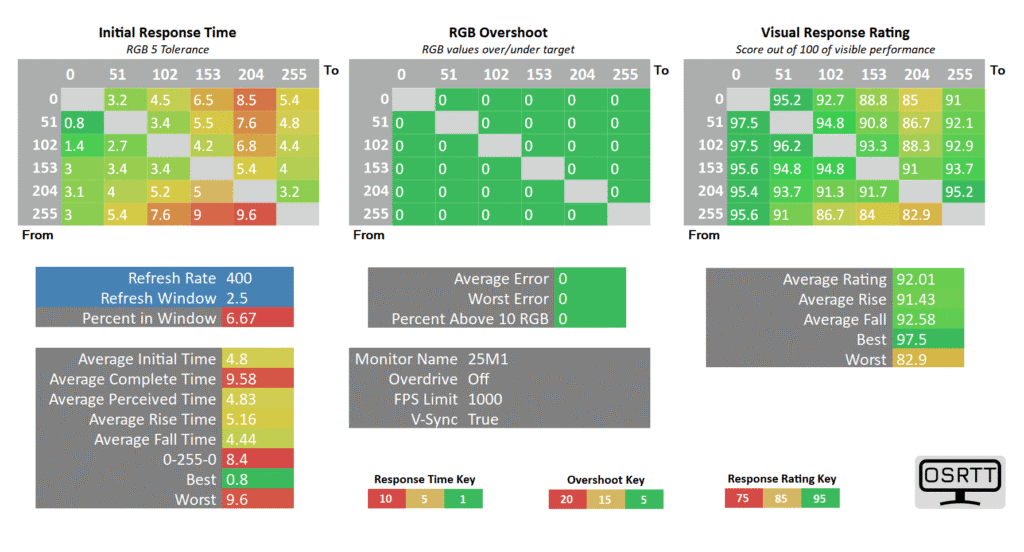
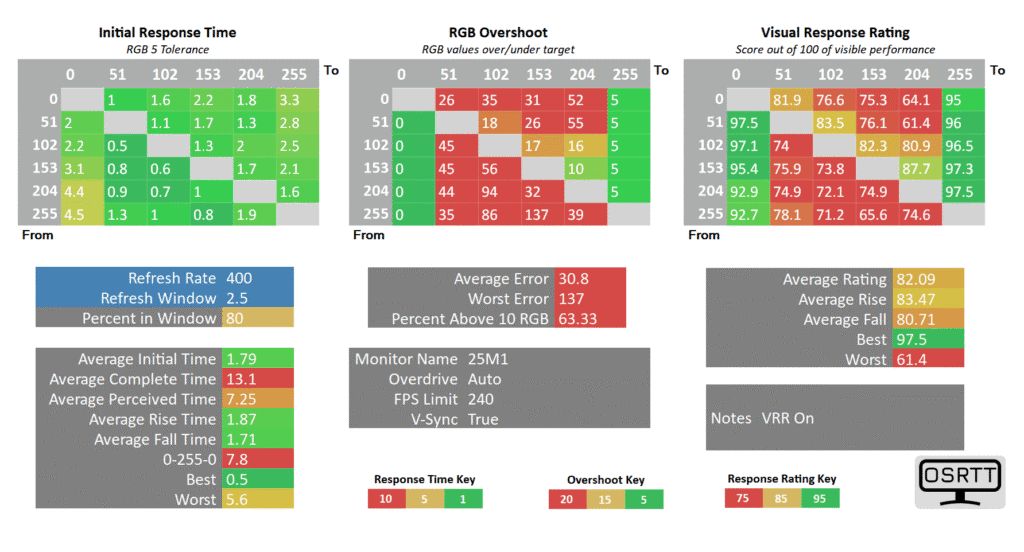
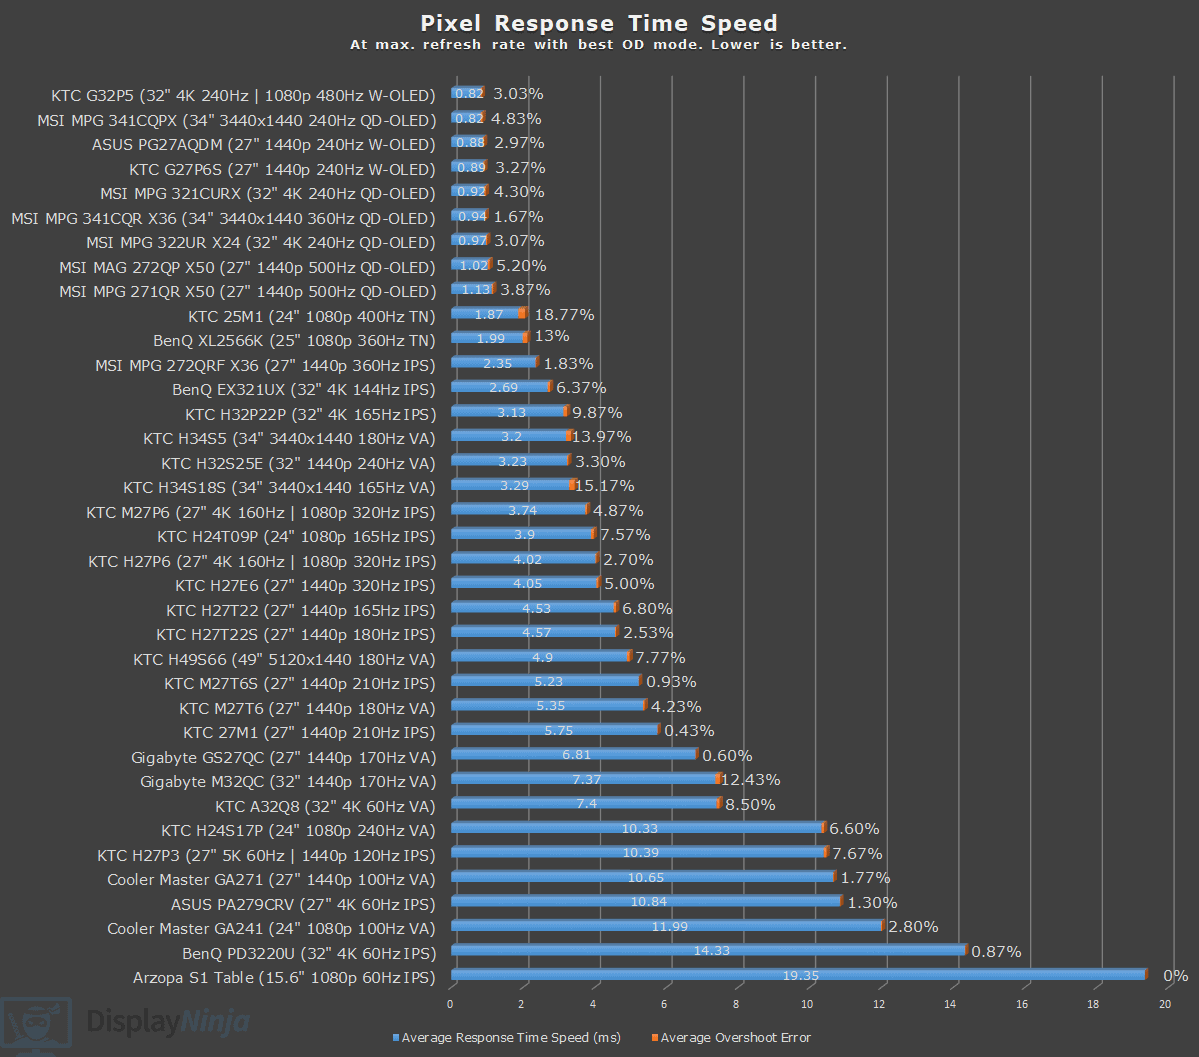
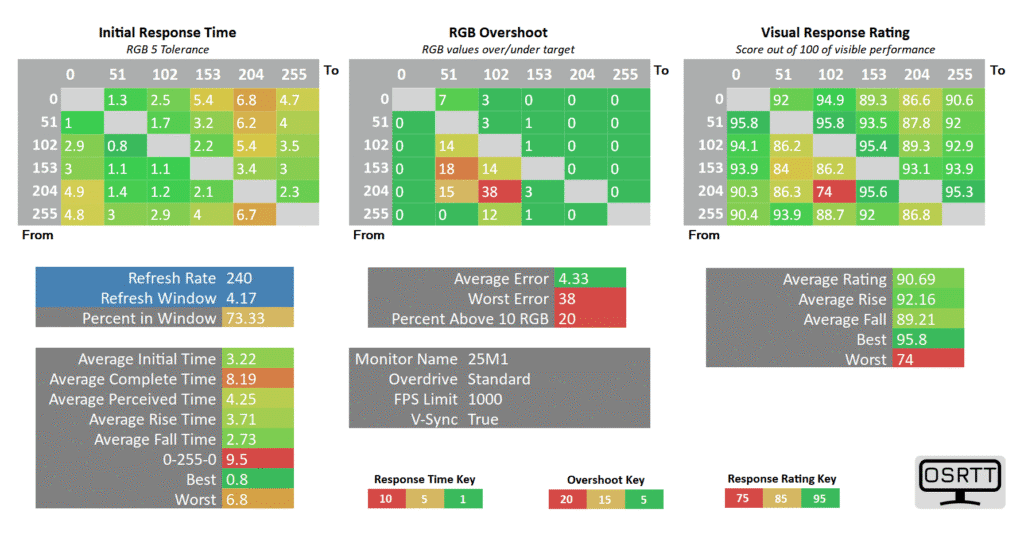
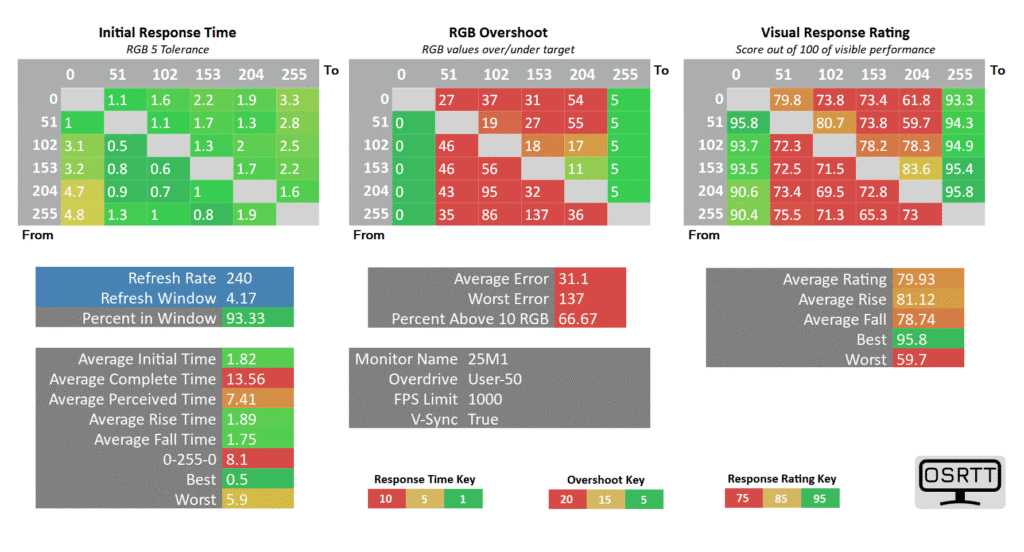
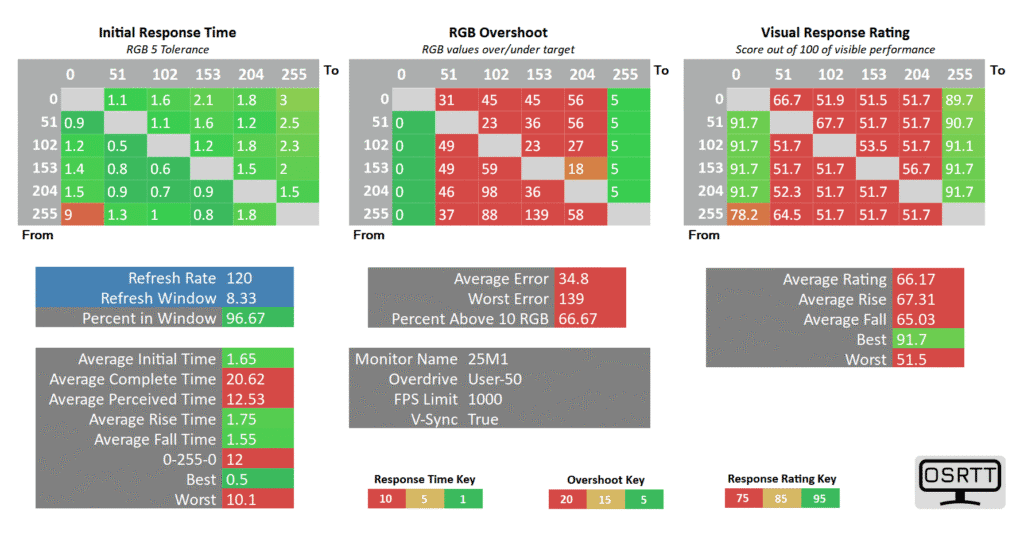
At 400Hz, we recommend using the Advanced overdrive mode. It has a fast 1.84ms average GtG (gray to gray) response time with moderate levels of overshoot at 18.77% average error and decent 66.67% refresh rate compliance.
It has a similar performance to a User setting between 35 and 40, so you can fine-tune it to your preference, as the amount of visible ghosting or overshoot will depend on the game.
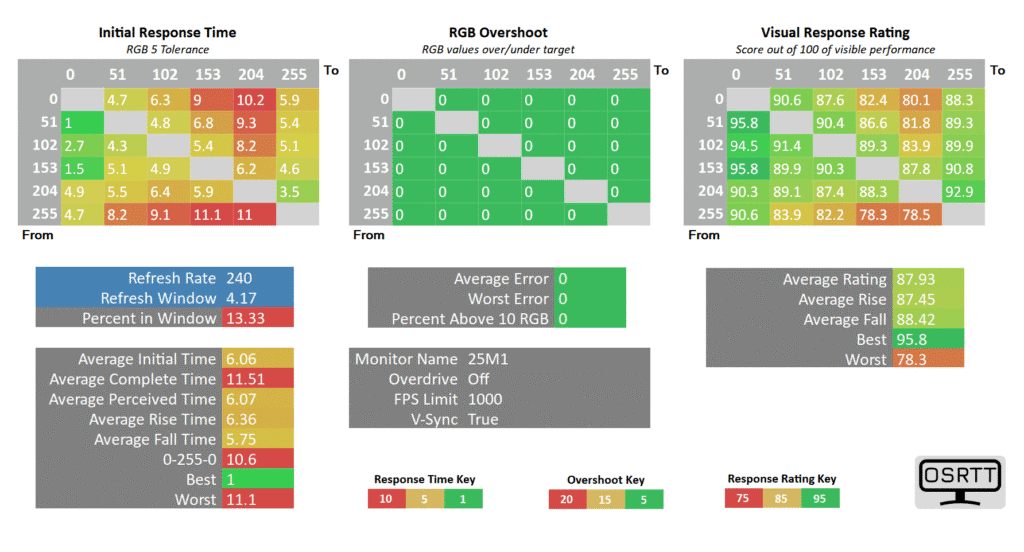
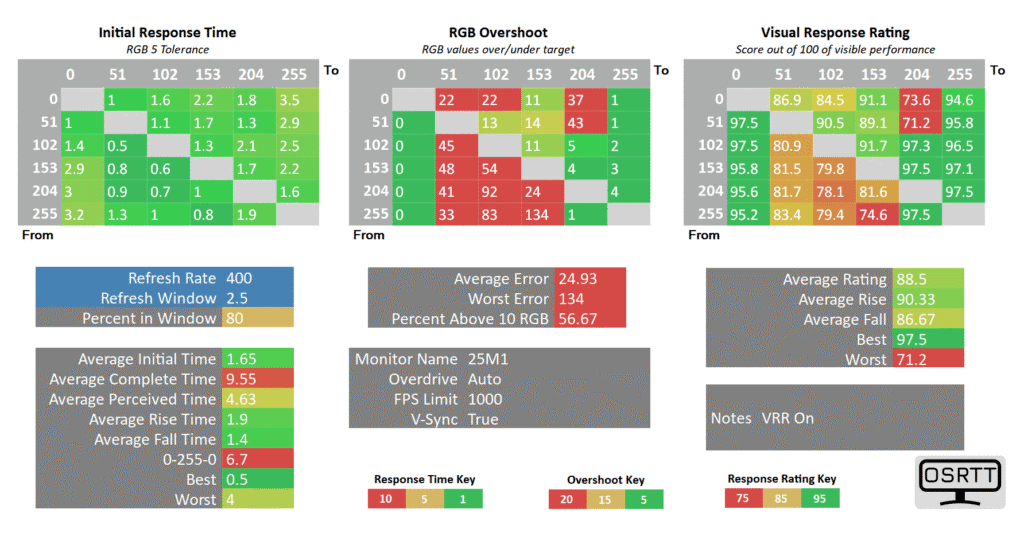
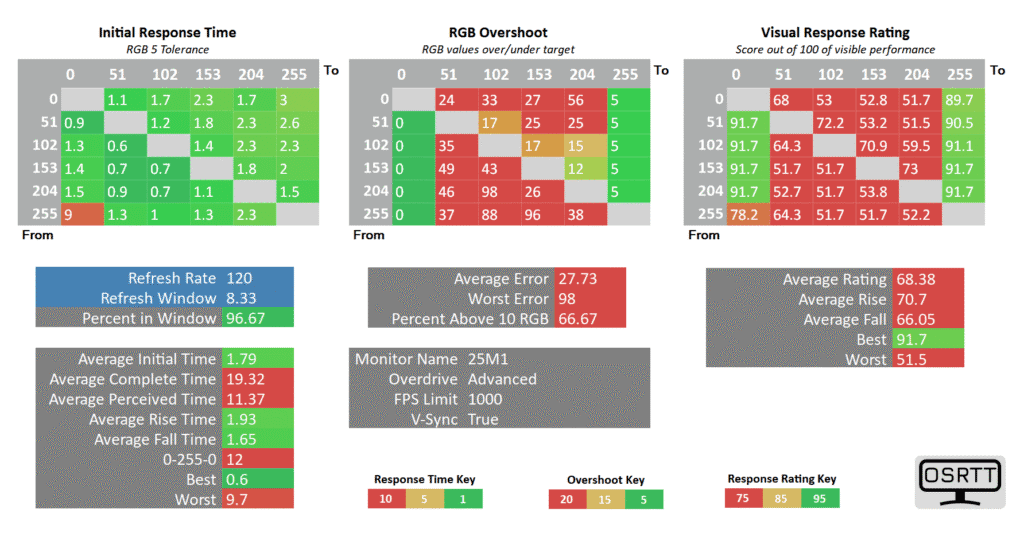
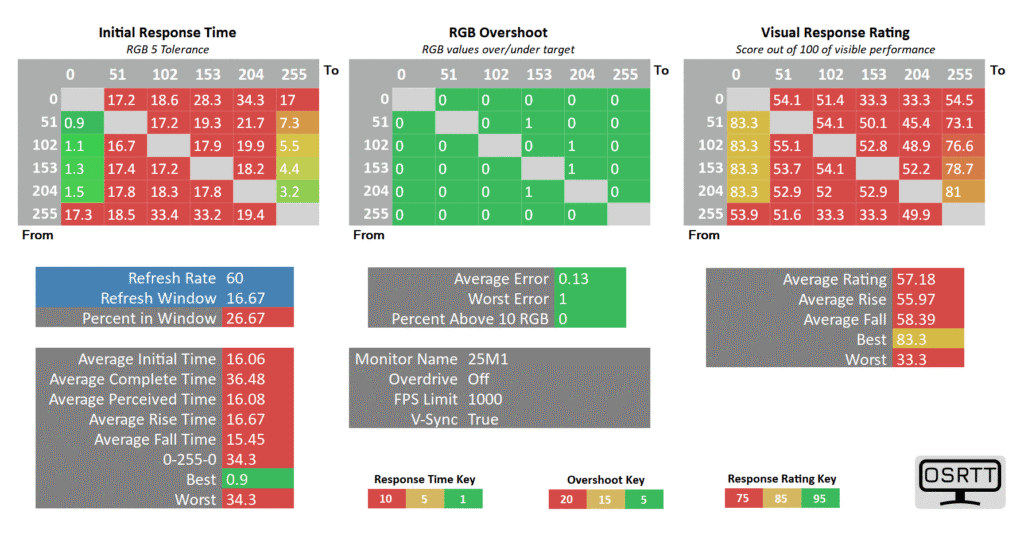
At a fixed 240Hz refresh rate, the ‘Advanced’ overdrive mode is too aggressive, so we recommend dialing it down to ‘Standard‘, which has a decent 3.22ms GtG response time with low 4.33% overshoot error and 73.33% refresh rate compliance.
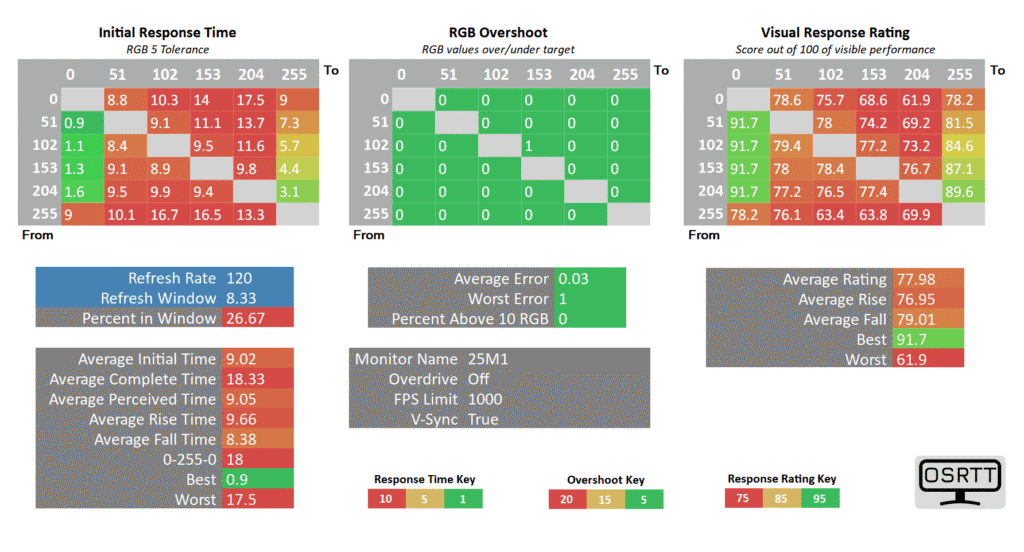
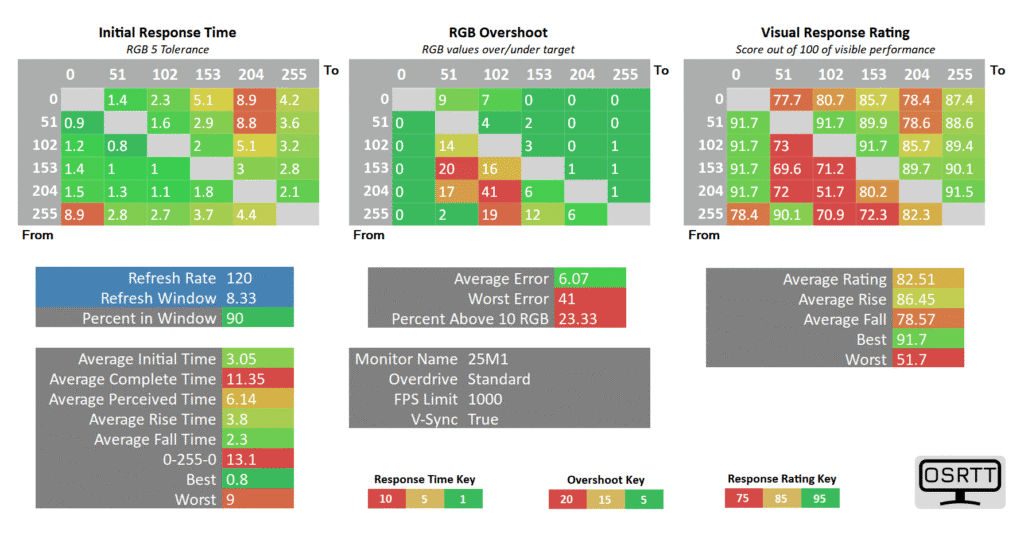

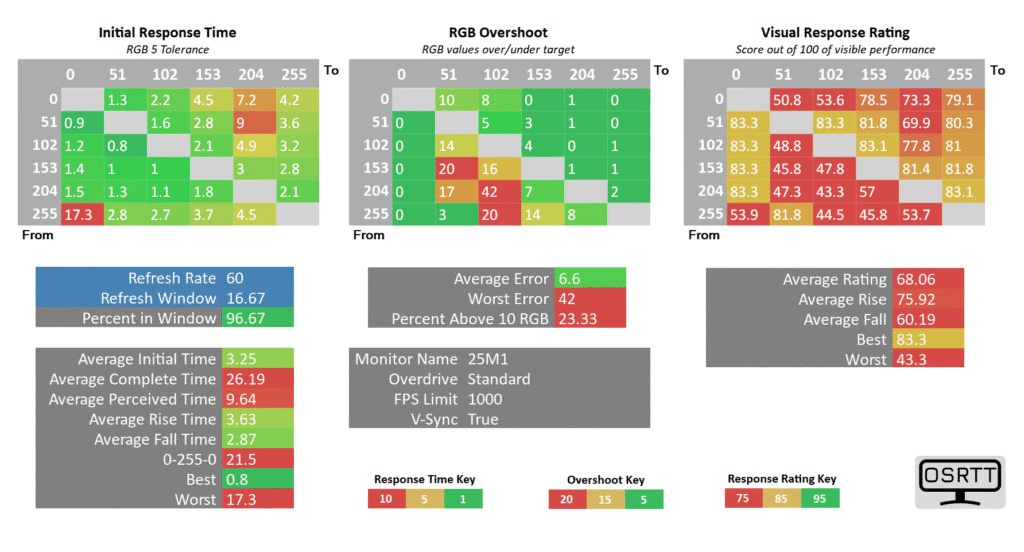
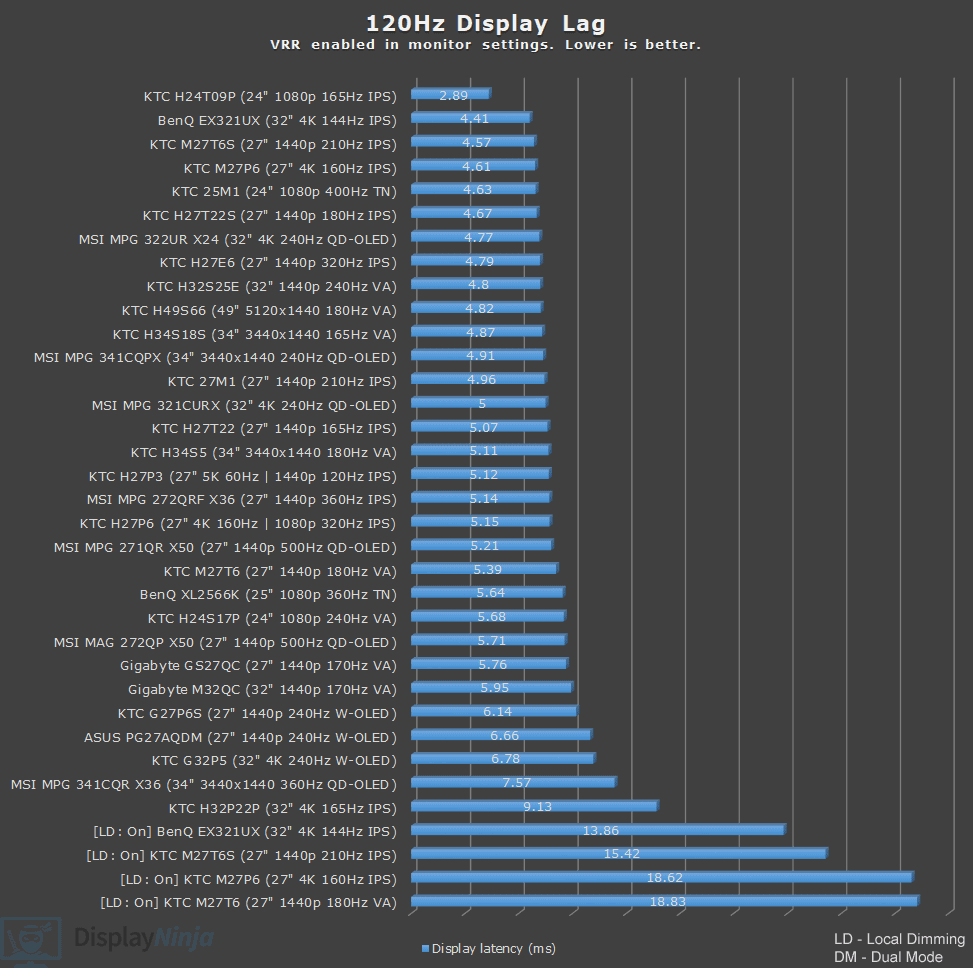
At 120Hz, Standard is the best overdrive mode to use with a 3.05ms GtG response time, 90% refresh rate compliance and low 6.07% average overshoot error.
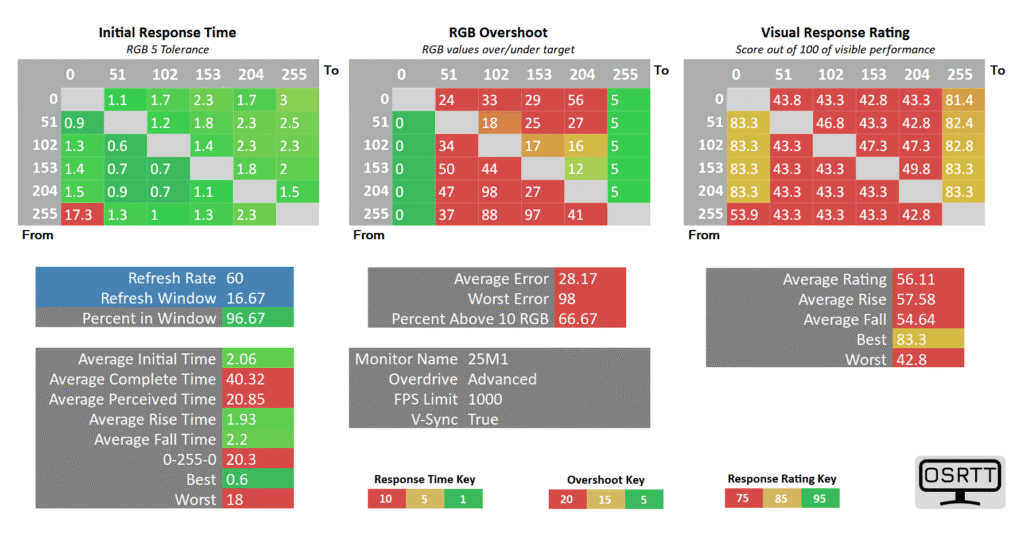
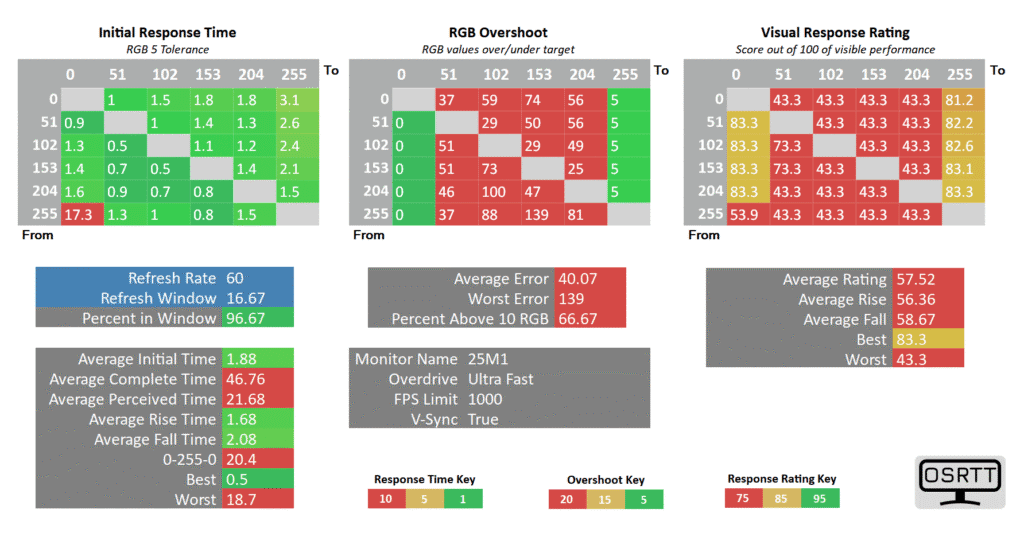

Finally, at 60Hz, Standard is also the best mode with 3.25ms GtG response time, 6.6% overshoot error and 96.67% refresh rate compliance.
Here’s how these response time results look in Blur Busters’ UFO ghosting test. We used the 1920 Pixels Per Sec test for 240Hz and 400Hz pursuit photos and 960 Pixels Per Sec for 60Hz and 120Hz tests. Shutter speed is set to 1/4 of the refresh rate with fixed focus, ISO and color temperature (6500K).
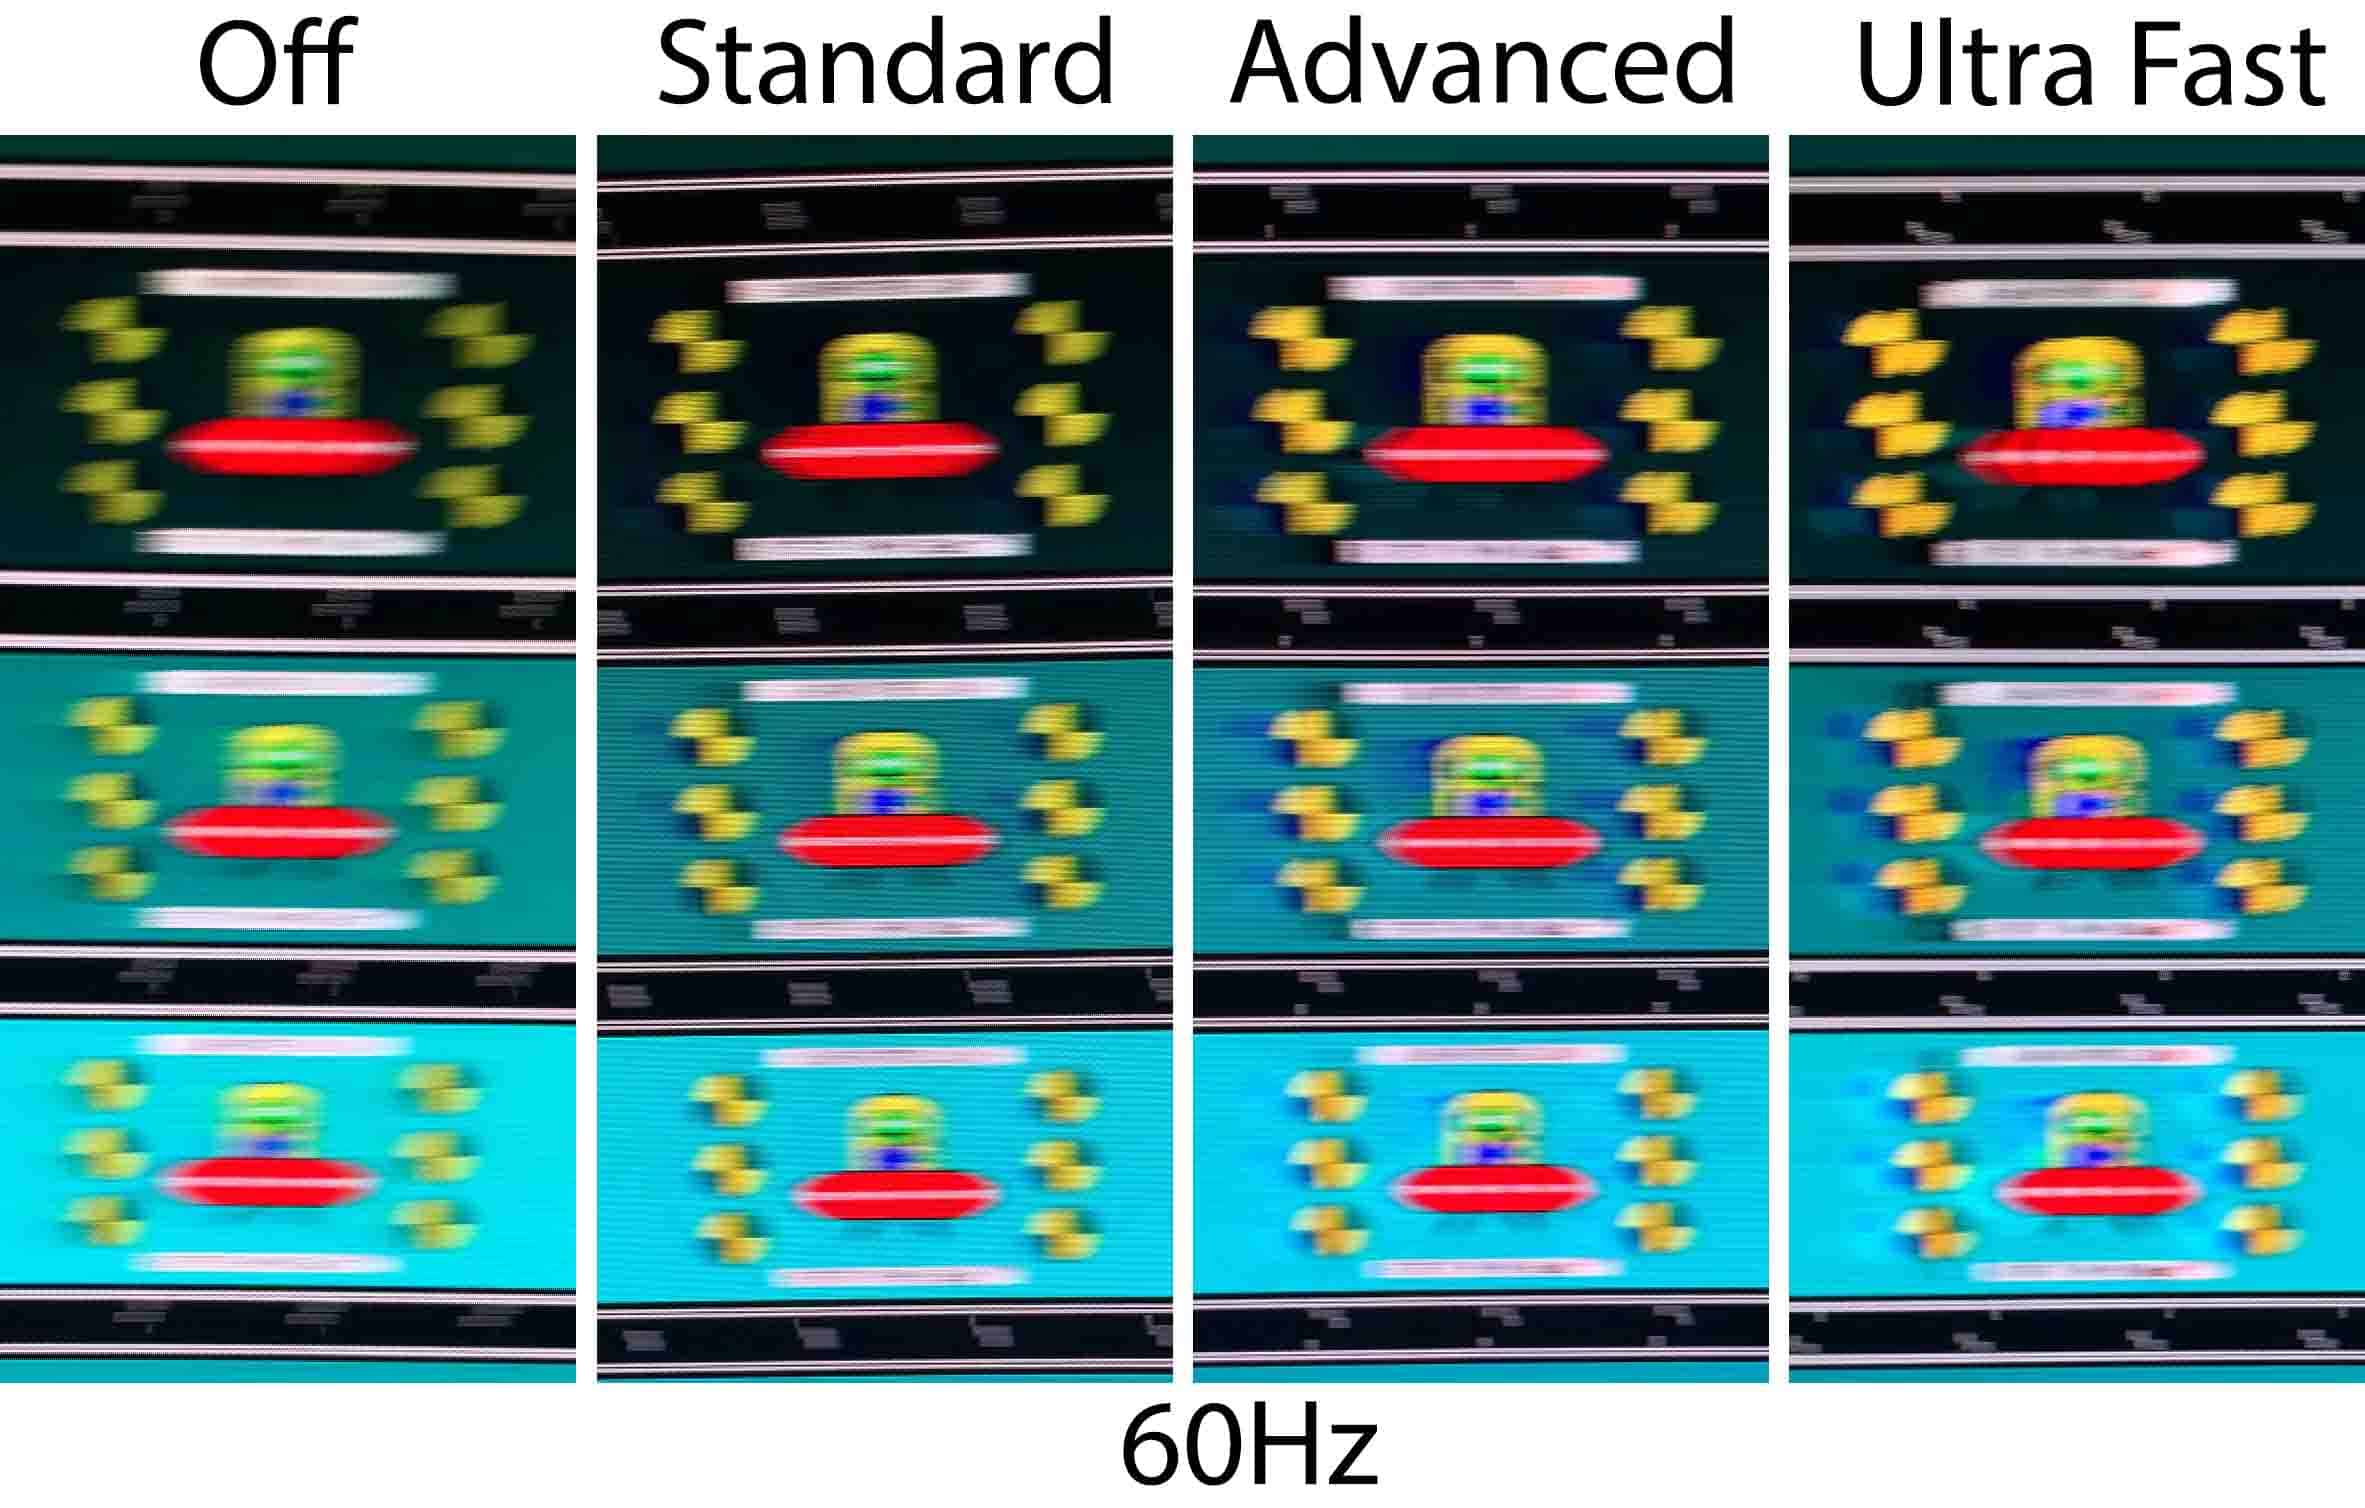
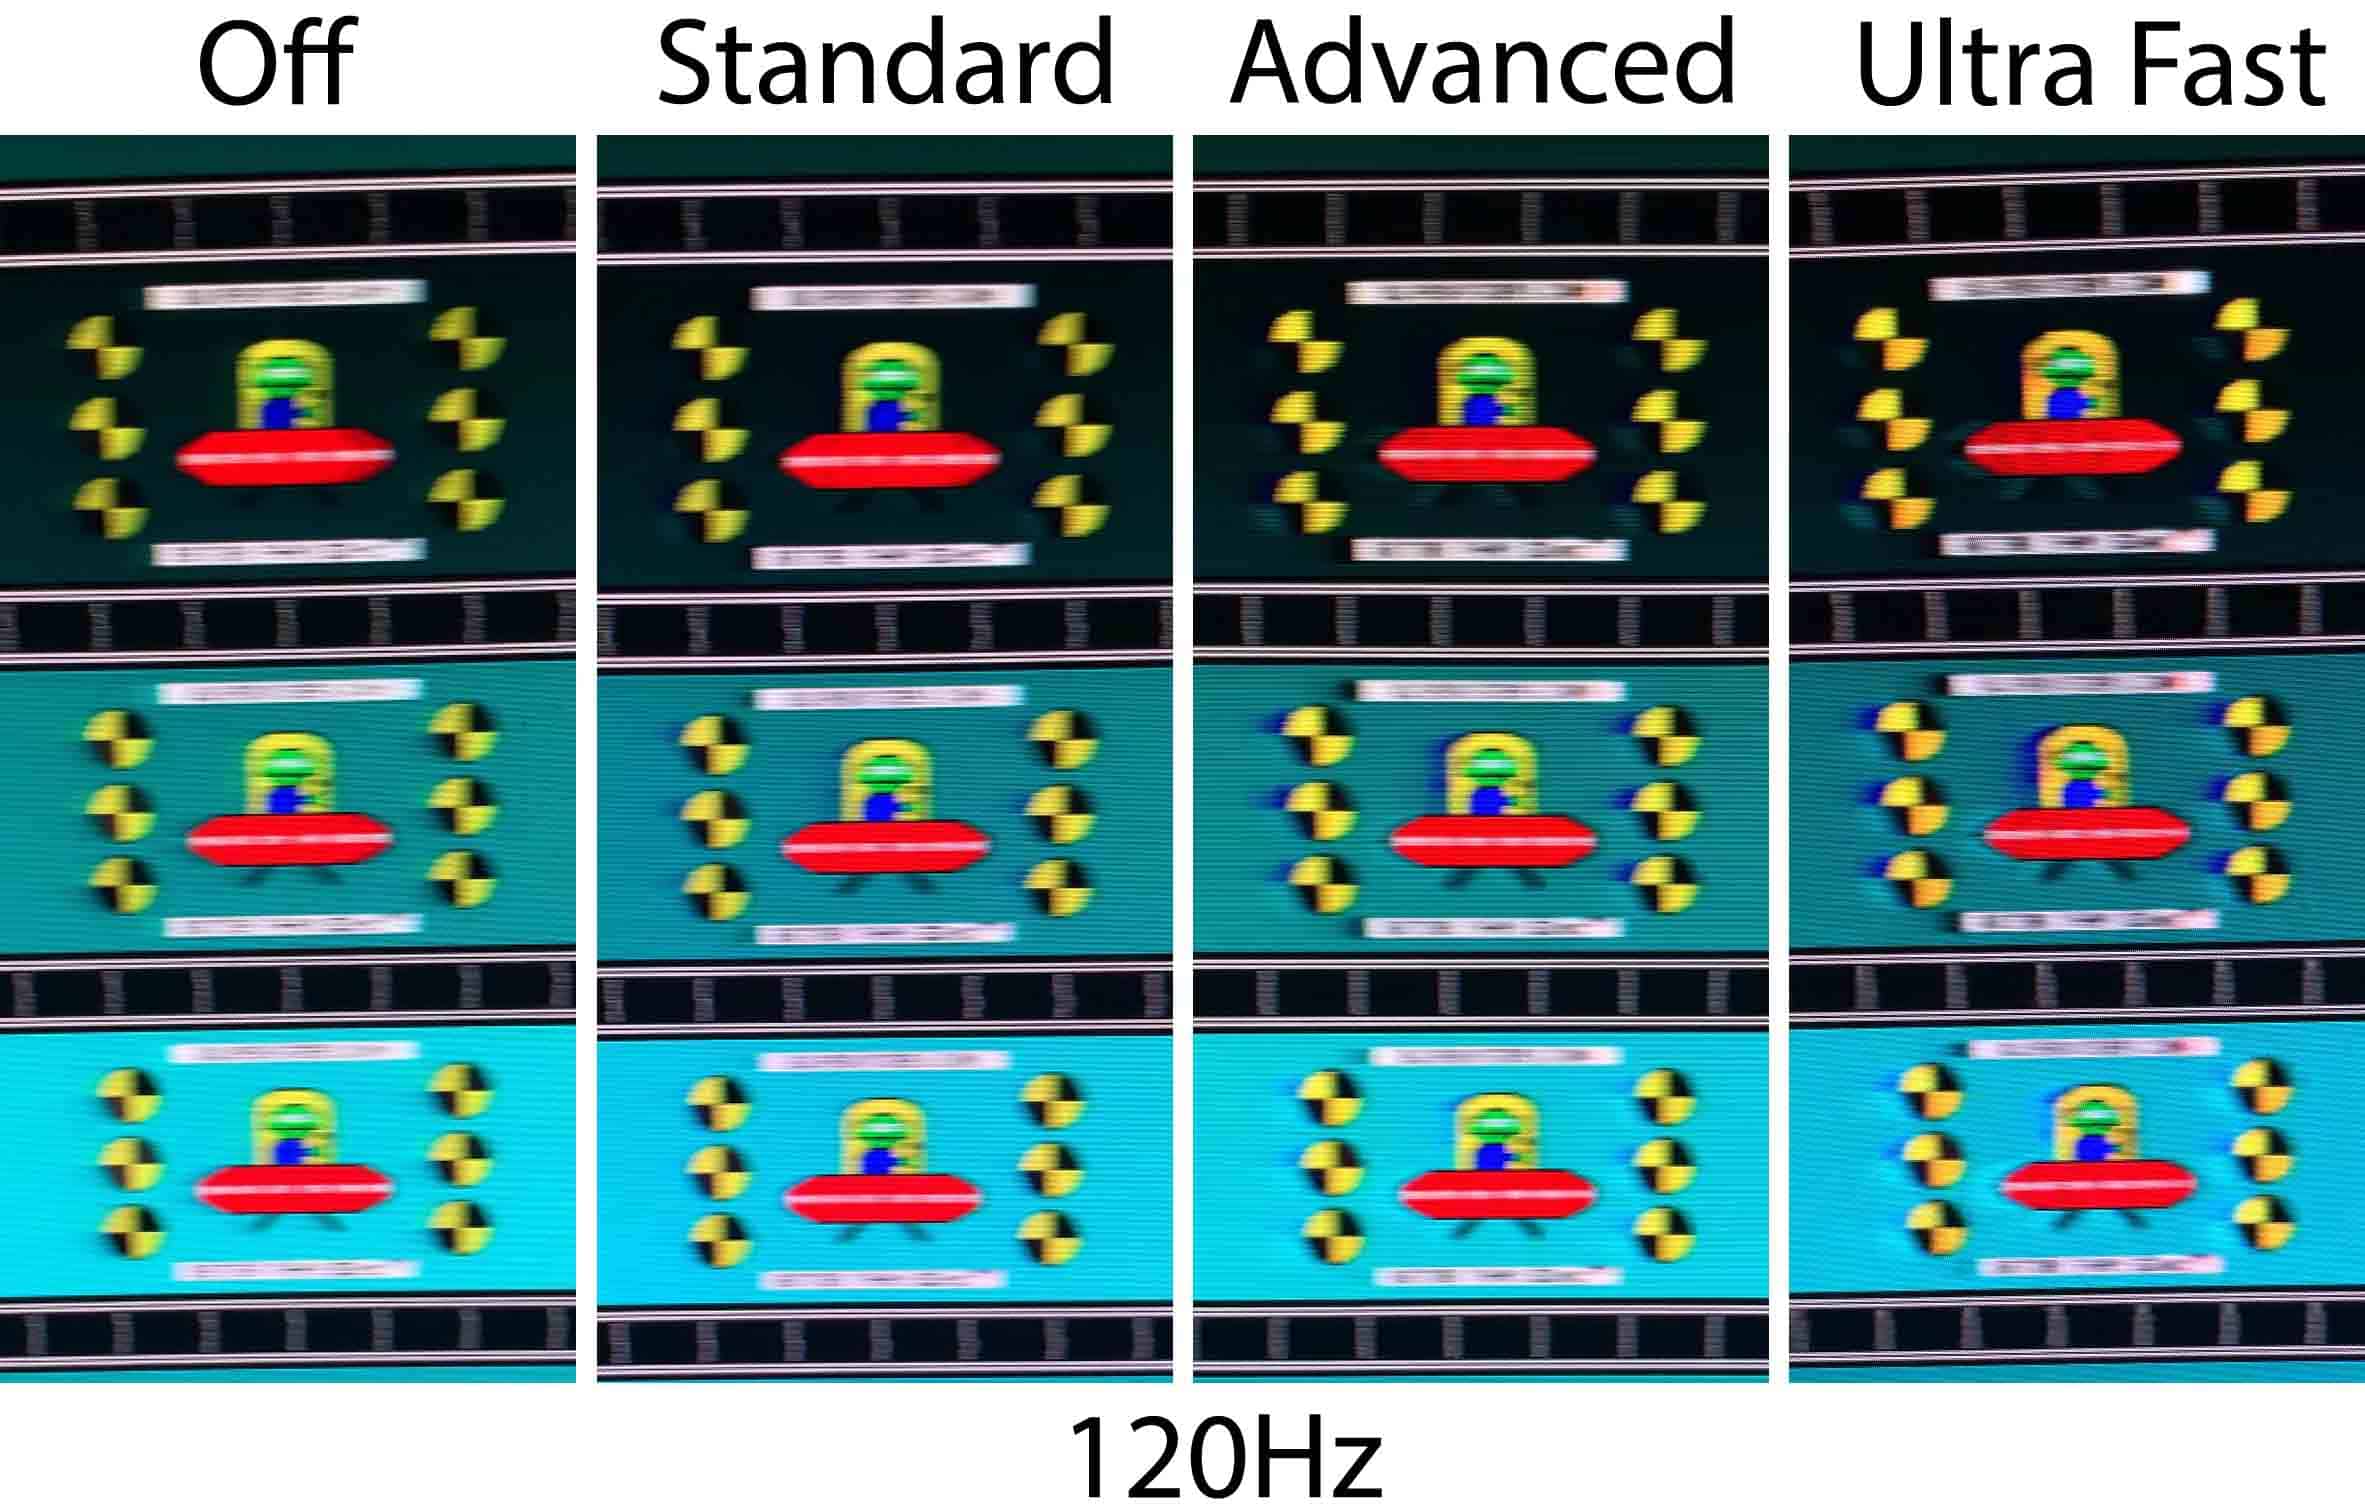
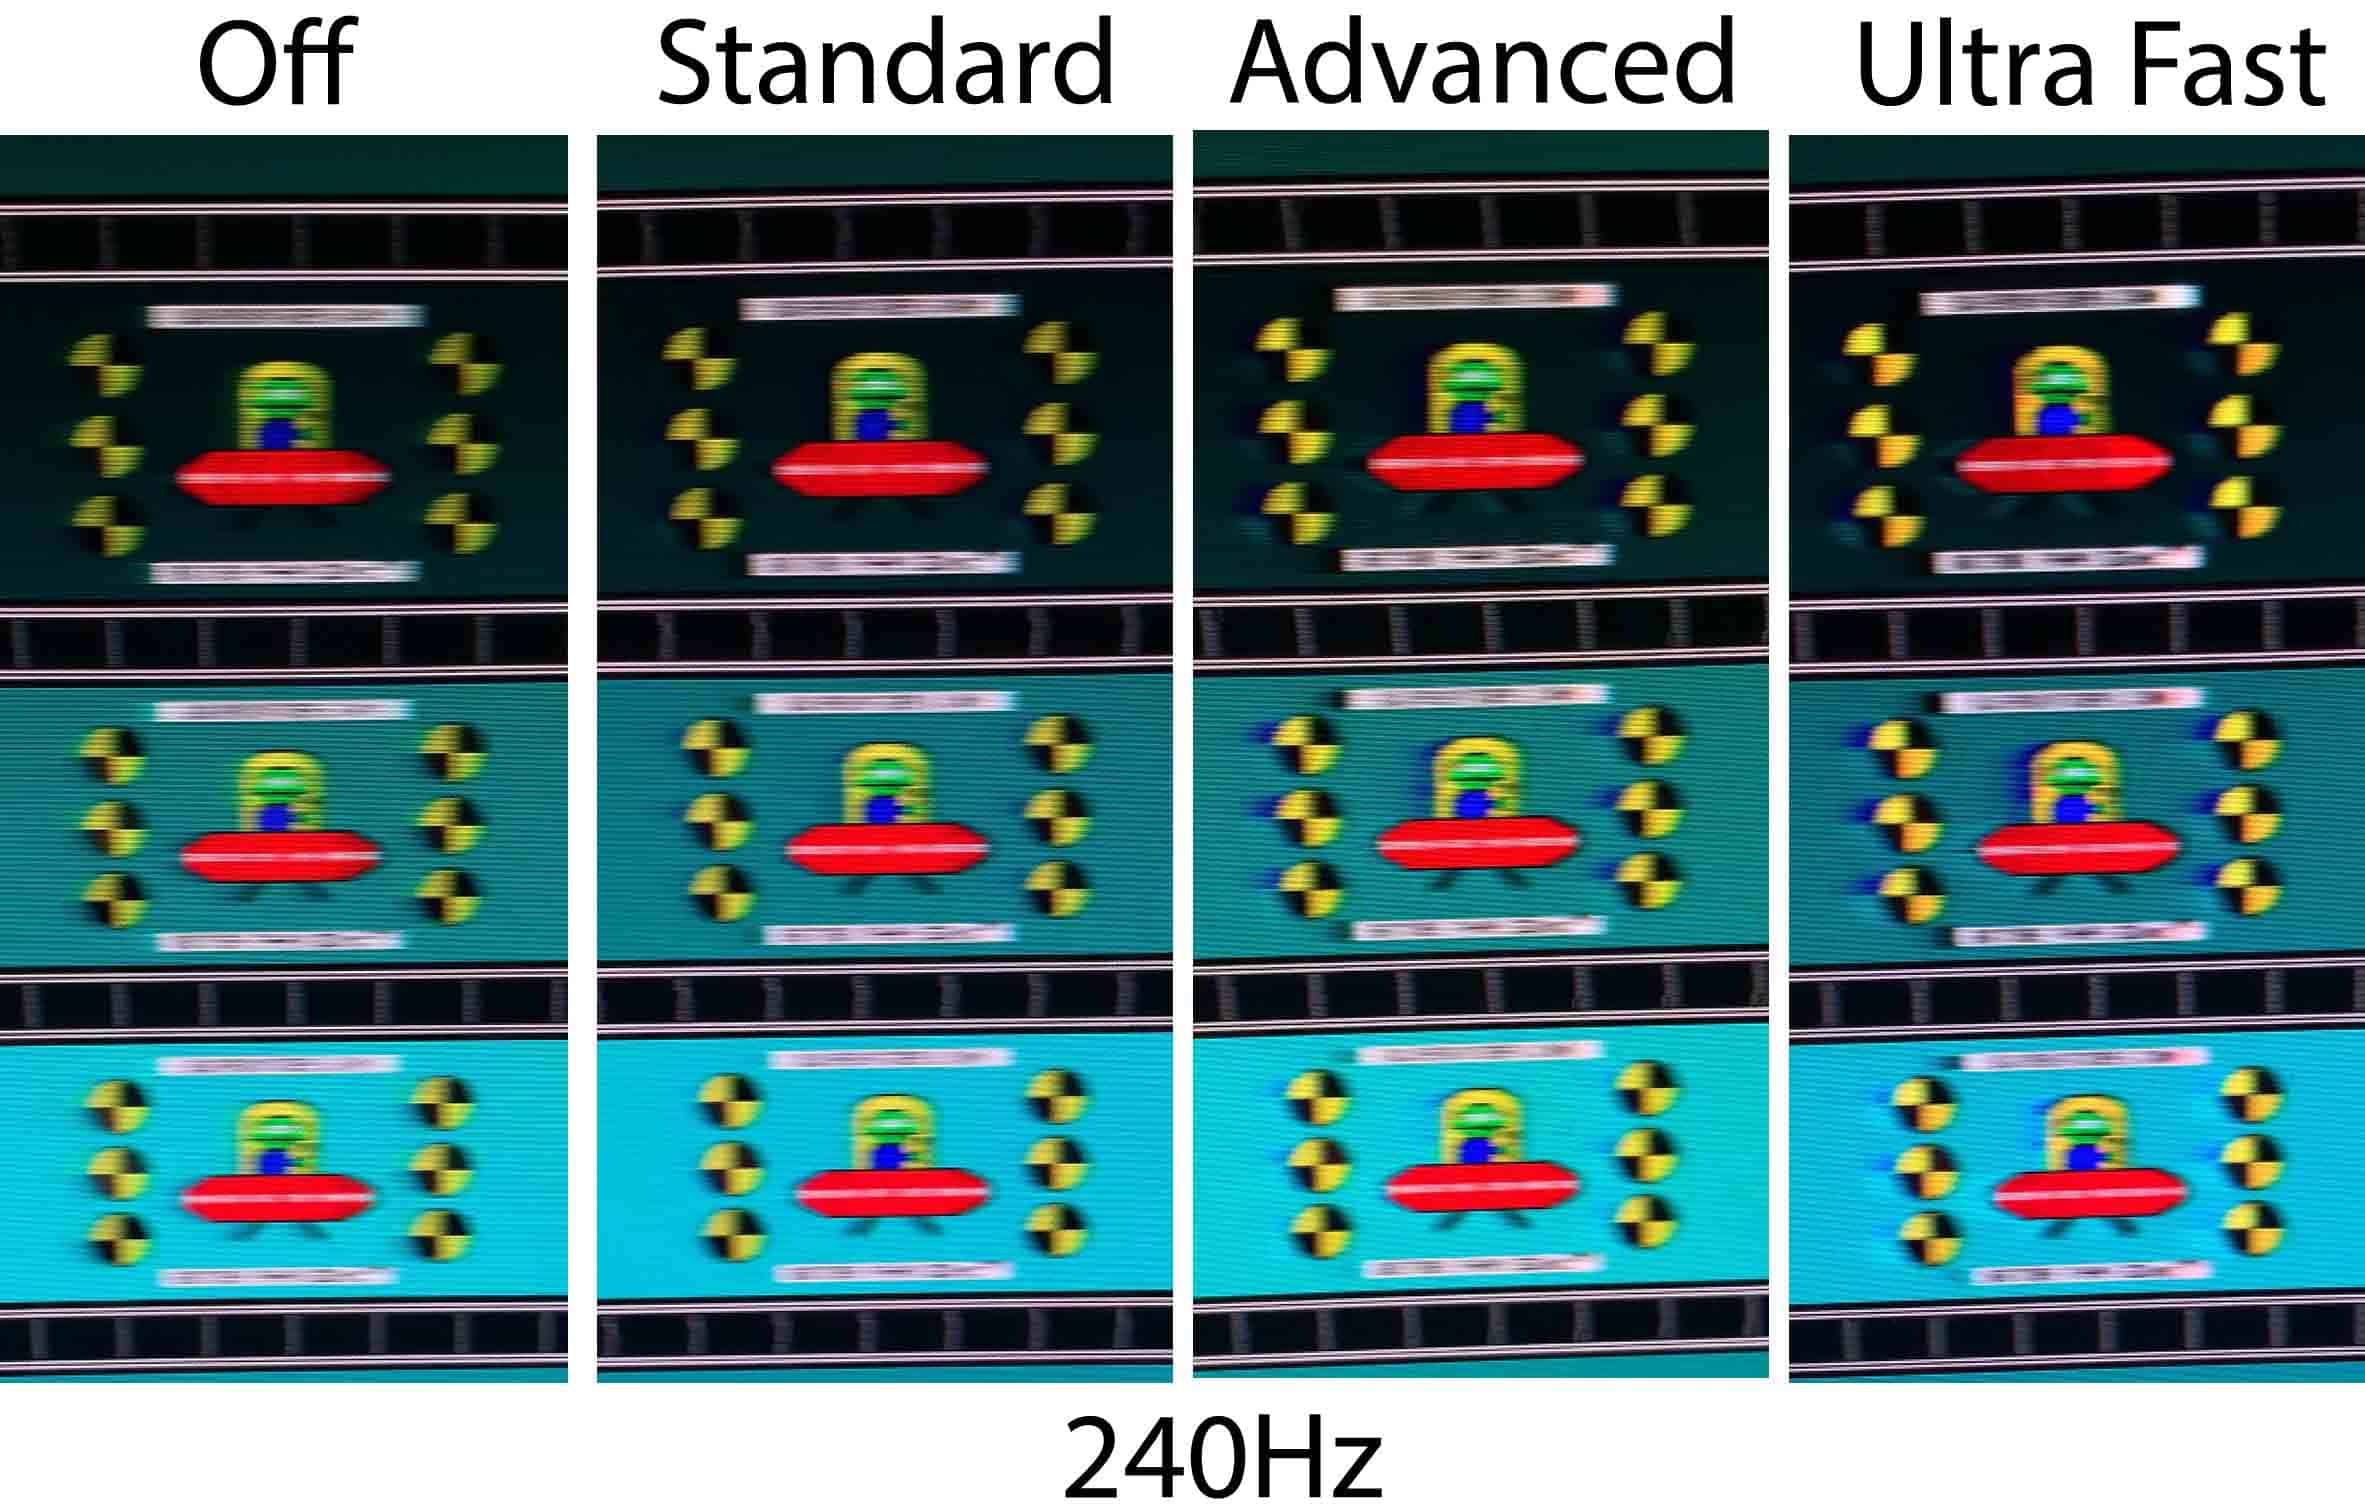
We have more pursuit photos and comparisons in the Motion Blur Reduction section.
Variable Refresh Rate
With ‘FreeSync/G-sync’ set to ‘On’, you can enable variable refresh rate in your GPU drivers, which allows the monitor’s refresh rate to change dynamically according to your frame rates in order to prevent screen tearing at no perceptible latency cost.
So, if you’re gaming at 400Hz but you’re getting 120FPS, the monitor will run at 120Hz in order to provide you with 120 whole frames per second without the screen-tearing artifacts.
The supported VRR range is 60-400Hz, but even if your FPS dips below 60, the monitor uses LFC (Low Framerate Compensation) to refresh the screen at a multiple of your current frame rate. For example, 50FPS would be displayed at 100Hz to keep tearing at bay.
The VRR performance was generally smooth, though we did detect some VRR brightness flickering in loading screens of a few games with poor frame pacing, which is common.
Since screen tearing is basically unnoticeable at 400Hz, we find that most users won’t use variable refresh rate on this monitor. This way, you also ensure the lowest input latency and you can use the DAC backlight strobing implementation.
If you do choose to use VRR and want to use a single overdrive mode across the entire refresh rate range, you should stick with ‘Standard.’

Motion Blur Reduction
The monitor also supports MBR (Motion Blur Reduction) via its DAC feature, which uses backlight strobing to reduce perceived motion blur at the cost of image brightness.
It cannot be enabled at the same time as VRR and it introduces screen flickering that’s invisible to the human eye, but can cause headaches to sensitive users after prolonged use.
To enable it, you must first disable ‘FreeSync/G-Sync’ in the OSD menu, set the refresh rate to at least 120Hz, and scroll down in the ‘Gaming Setup’ section of the menu to enable ‘DAC.’ KTC previously referred to this feature as ‘MPRT.’
Here’s how backlight strobing improves motion clarity on this monitor.
All backlight strobing pursuit shots were captured using 1920 Pixels Per Sec.
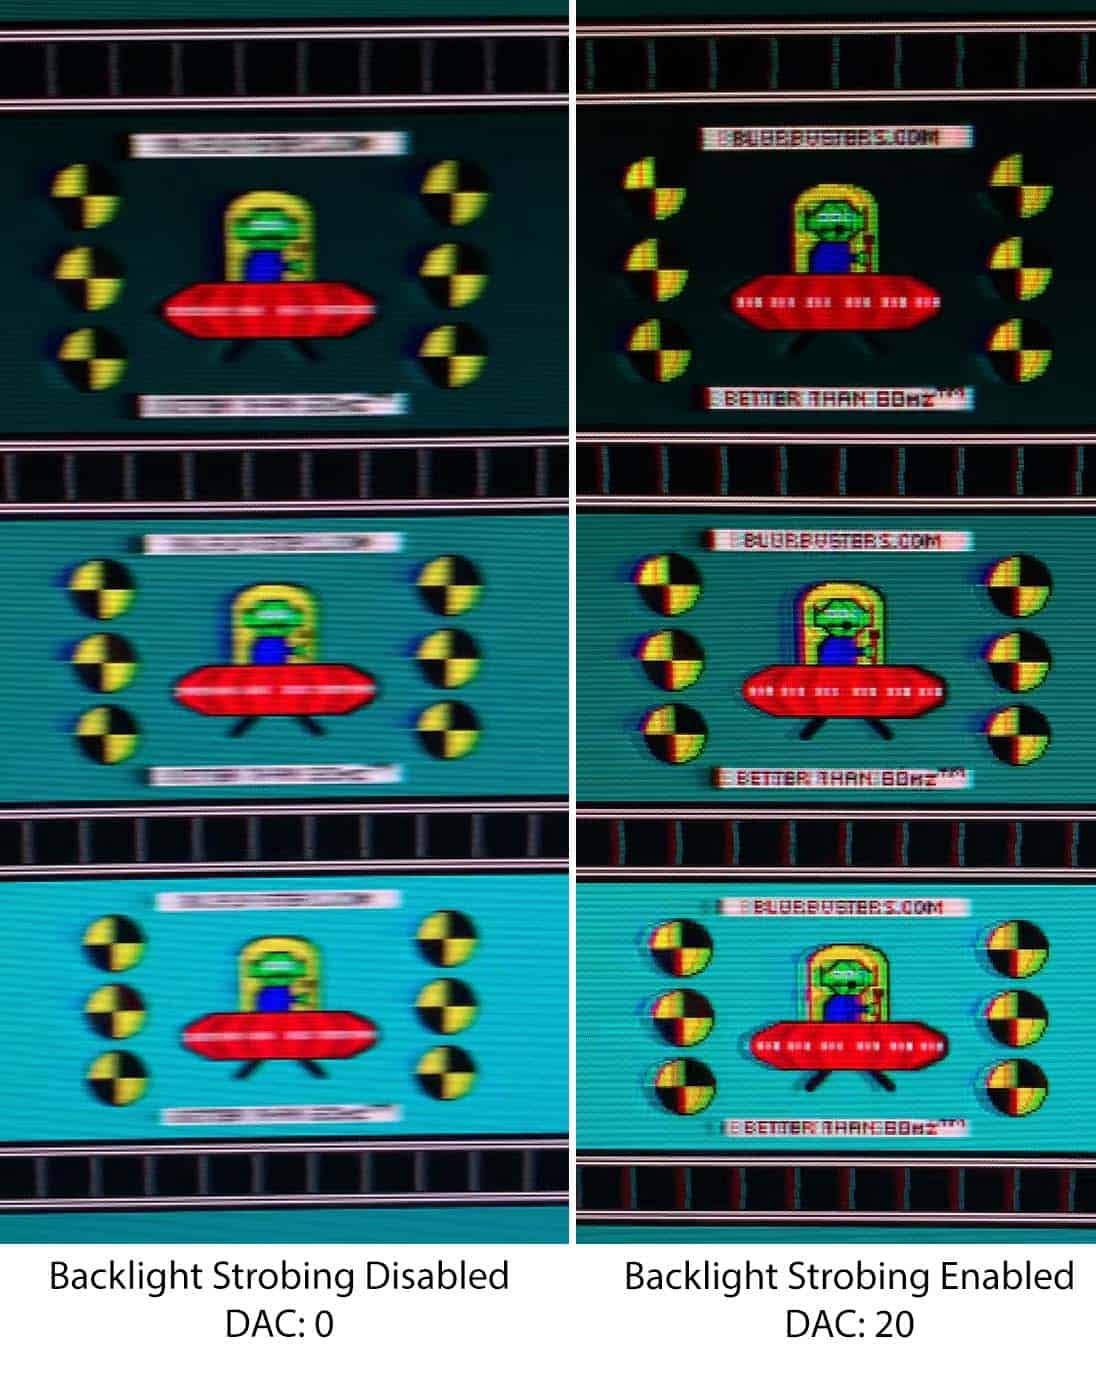
As you can see, motion clarity is improved, making details easier to distinguish and text sharper. However, some strobe crosstalk is present, resulting in image duplication.
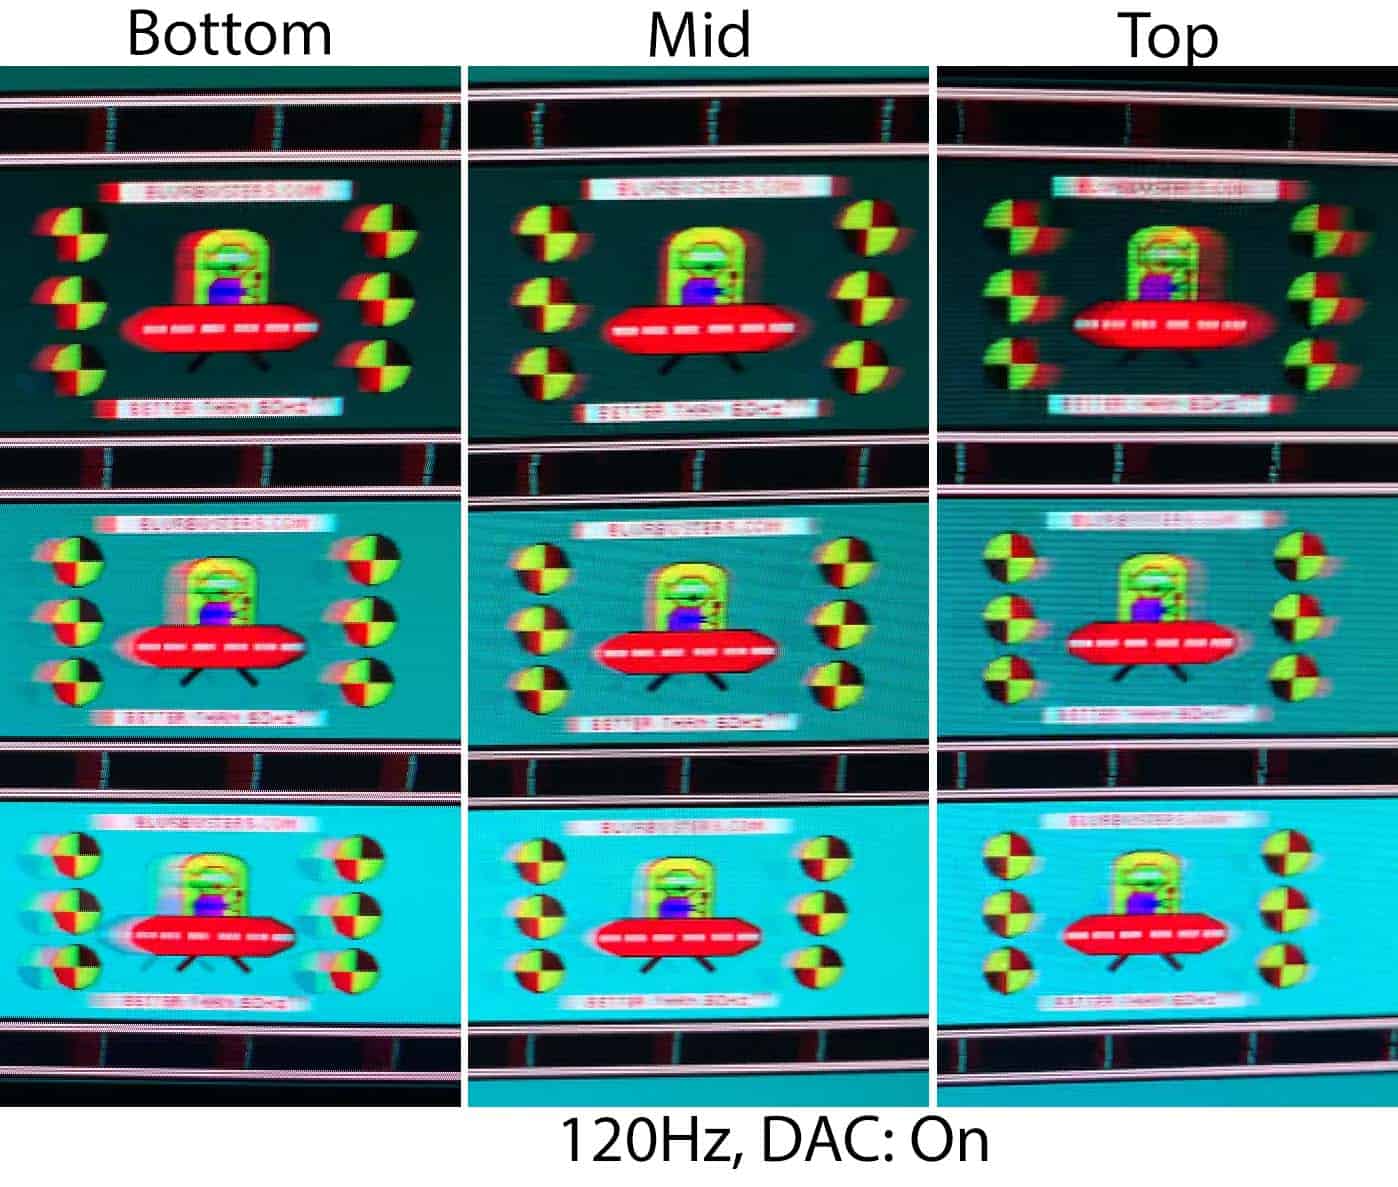
Here’s how the strobe crosstalk looks at different parts of the screen.

Strobe crosstalk is most noticeable at the bottom of the screen, while the top remains the clearest. Ideally, the center of the screen would offer the best clarity, but the overall performance is still decent.
The strobe crosstalk artifacts are the same regardless of the refresh rate (a bit more noticeable at lower refresh rates, especially at 120Hz) or Pulse Width setting.
Sadly, while the monitor offers a Pulse Width setting to adjust the trade-off between motion clarity and brightness, it lacks a Pulse Phase option that would let you adjust the strobe timing and choose which area of the screen appears the sharpest.
You can set DAC from 20 to 100 in increments of 20, giving you a total of five Pulse Width presets.
At 20, the image is at its clearest, but brightness is at its lowest – we measured a peak of 278-nits, which is still a very good result. At 100, brightness reaches a maximum of 345-nits. Here’s how image clarity compares between 20 and 100.
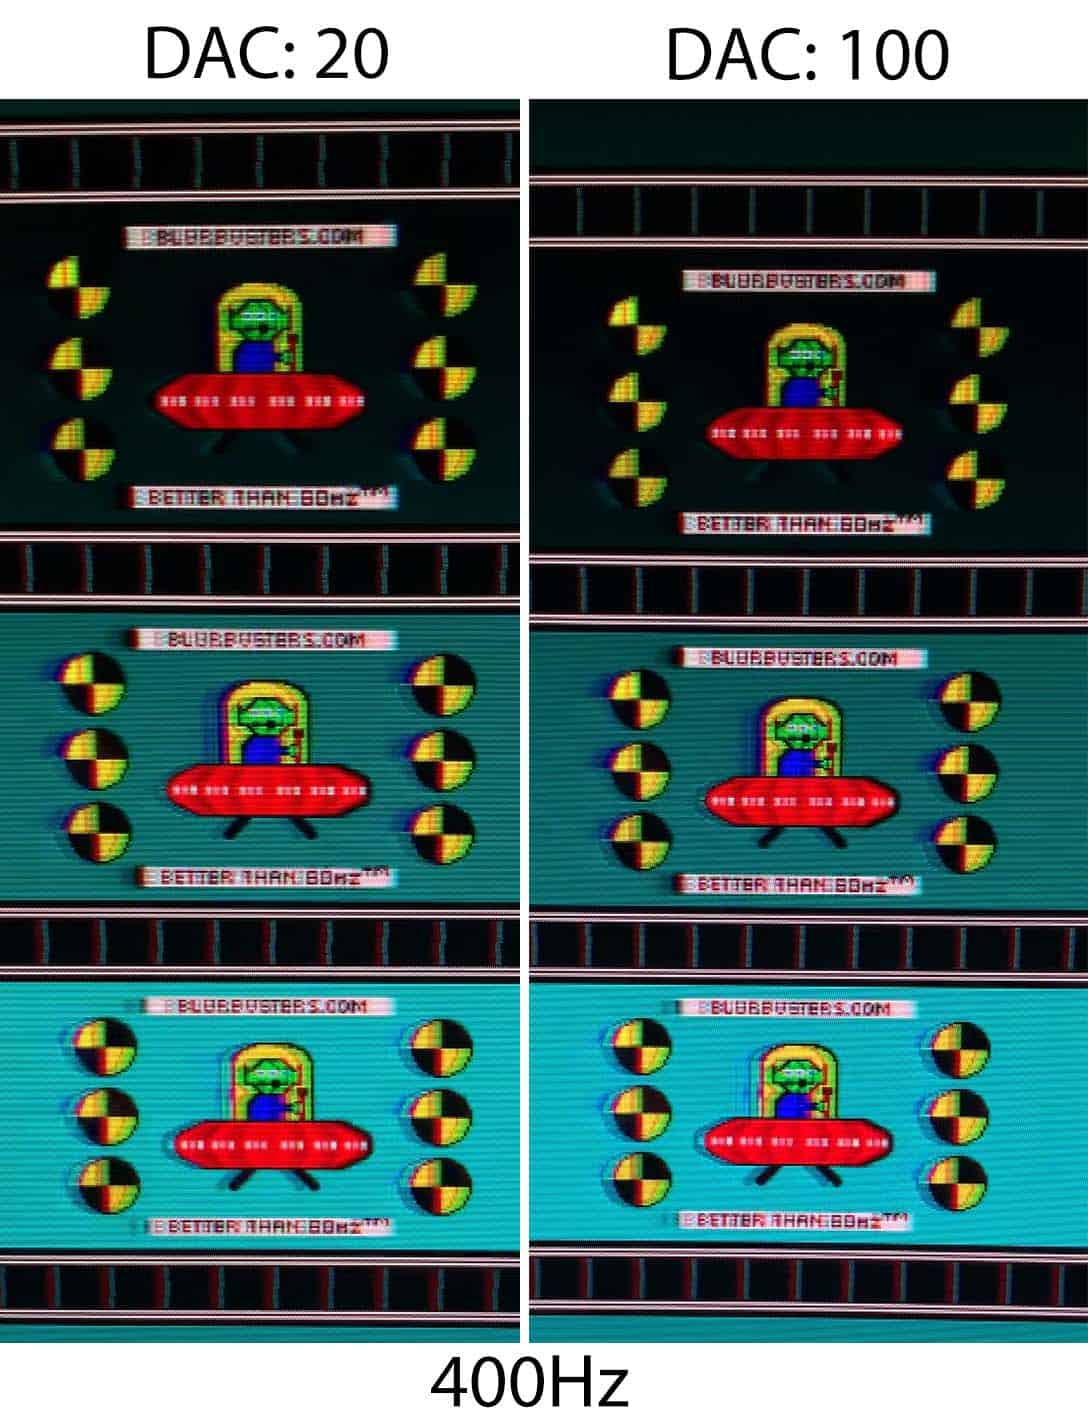
As shown above, DAC 20 is slightly clearer, although the difference is fairly minor.
We also captured backlight strobing performance at 400Hz using both Standard and Advanced overdrive modes. Standard shows more ghosting, while Advanced introduces more overshoot, so you’ll need to choose between the two trade-offs.

Moving on, here’s how backlight strobing performs at lower refresh rates.
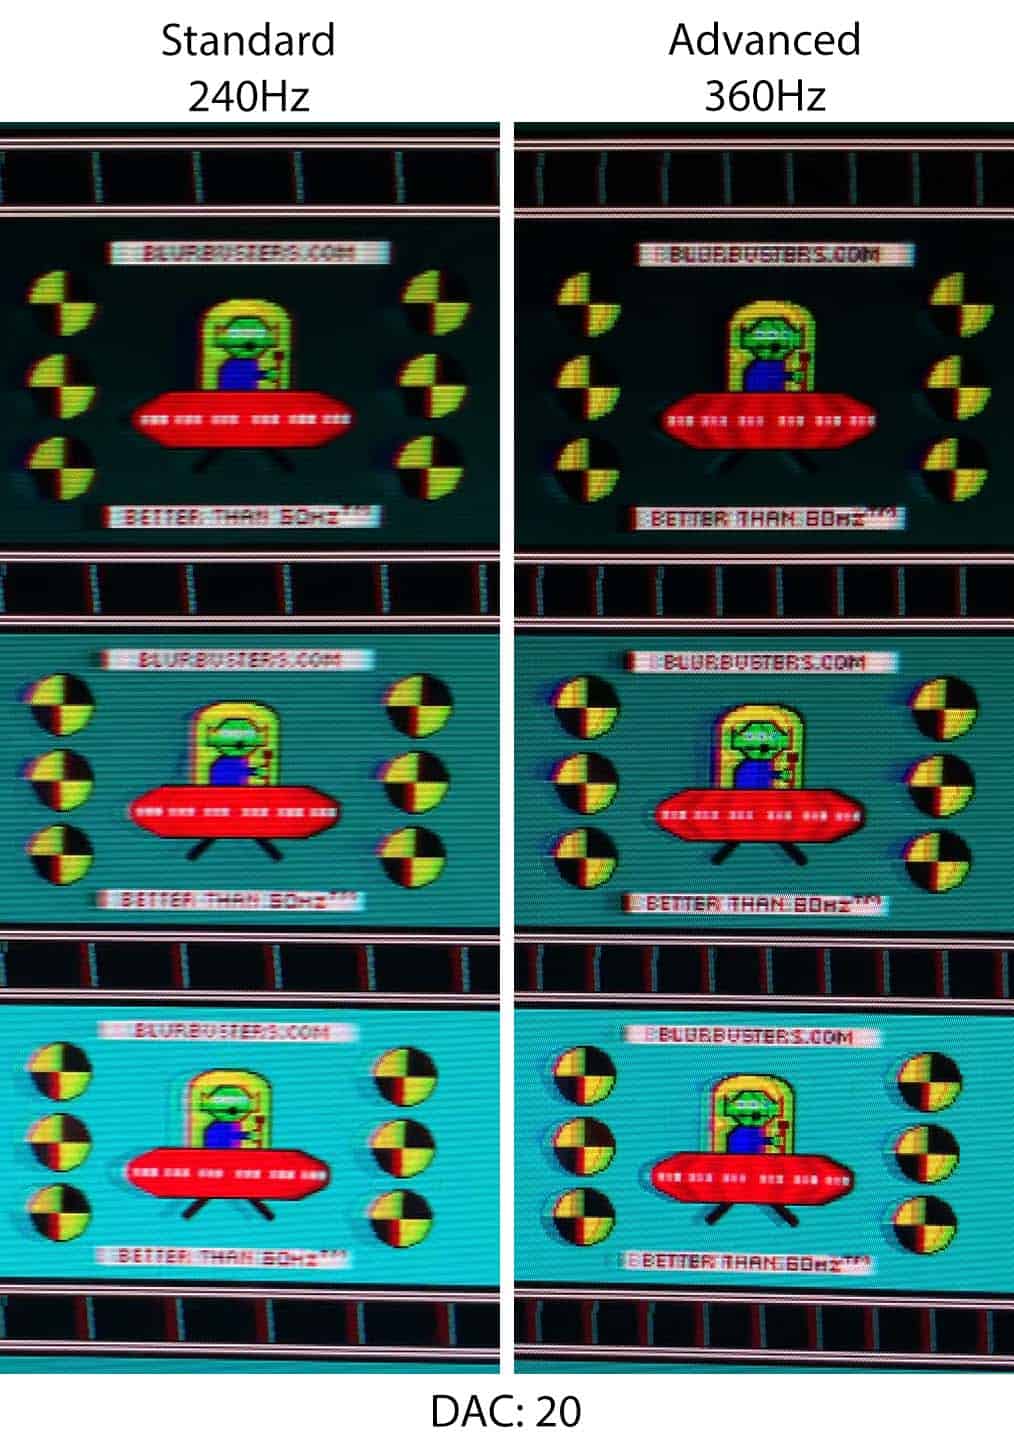
Strobing performance at 360Hz is slightly clearer than at 400Hz, which is typical for strobing monitors, as motion clarity often improves when running below maximum refresh rate.
At lower refresh rates, such as 240Hz and especially 120Hz, strobe crosstalk becomes even more noticeable, though.
Remember that for the best backlight strobing performance in games, your frame rate should match the refresh rate. So, if you can only maintain 360FPS, you should set the monitor to 360Hz and cap your FPS to 360.
Now, here’s how the KTC 25M1 compares to the BenQ Zowie XL2566K we tested, which uses a 24.5″ 1080p 360Hz TN panel with DyAc+ backlight strobing implementation. Sadly, we didn’t test the XL2566K at the more demanding 1920 Pixels Per Sec test pattern, so both monitors are compared at 960 PPS here.

As you can see, BenQ’s DyAc+ is better implemented as there’s less strobe crosstalk (text is a lot clearer, for instance).
Moreover, the BenQ XL2566K had less crosstalk at the top and bottom of the screen, but it’s also more expensive. It’s now been replaced with the XL2566X+ variant with 400Hz and DyAc2, which should have even better backlight strobing performance, but it goes for $650, whereas the KTC 25M1 can be found for $390.
Finally, here’s how the KTC 25M1 compares to the MSI MPG 272QRF X36 with a 1440p 360Hz IPS G-SYNC Pulsar display and the MSI MPG 271QR QD-OLED X50 with a 1440p 500Hz panel at 1920 Pixels Per Sec.
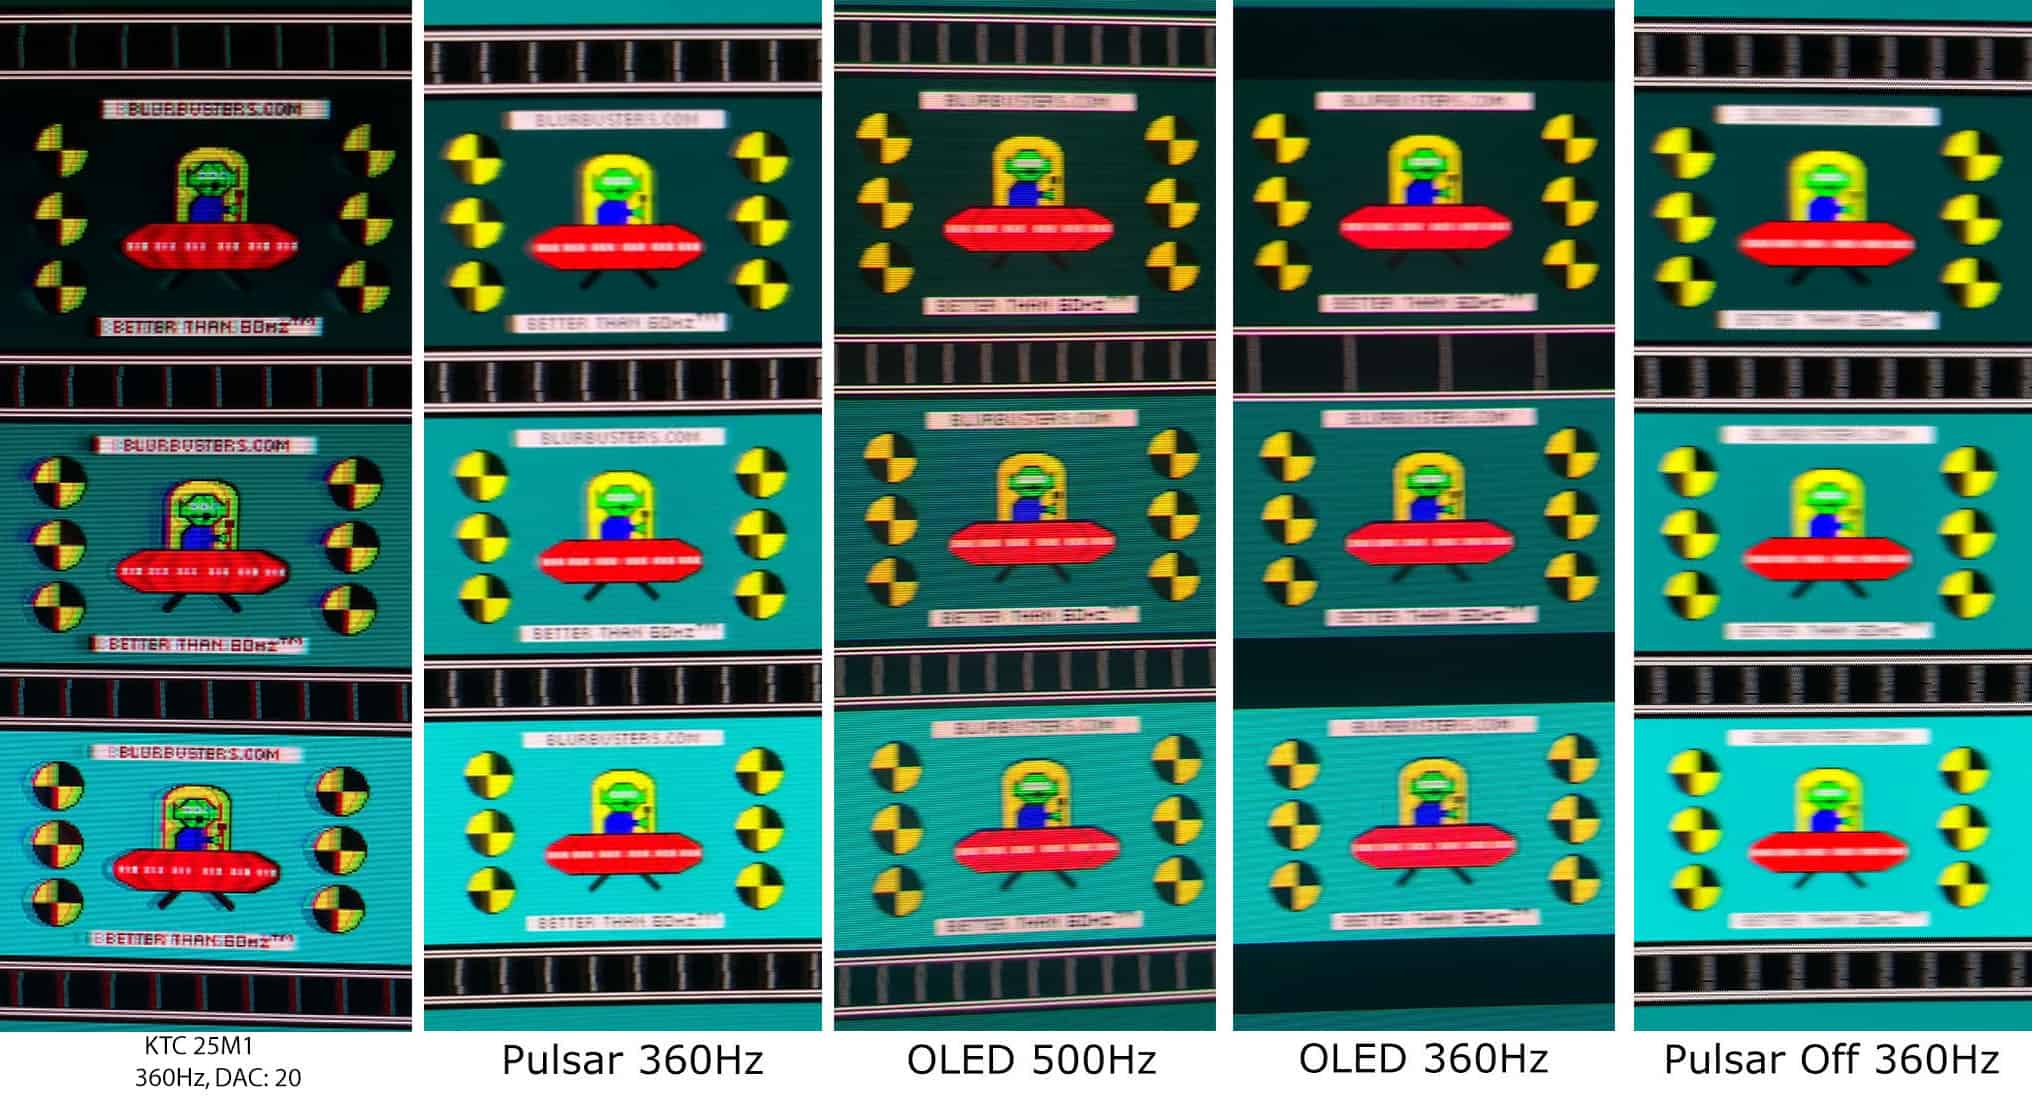
As shown above, the KTC 25M1 is the sharpest, but unfortunately, strobe crosstalk reduces overall clarity.
It’s also worth noting that the Pulsar display delivers better clarity across a wider refresh rate range (75 – 360Hz), with VRR support for tear-free motion, higher brightness, and essentially no visible strobe crosstalk across the screen. It even supports 60Hz strobing and uses a 1440p IPS panel, although it comes at a higher price.
The OLED panel, on the other hand, offers a drastically better image quality with proper HDR support.
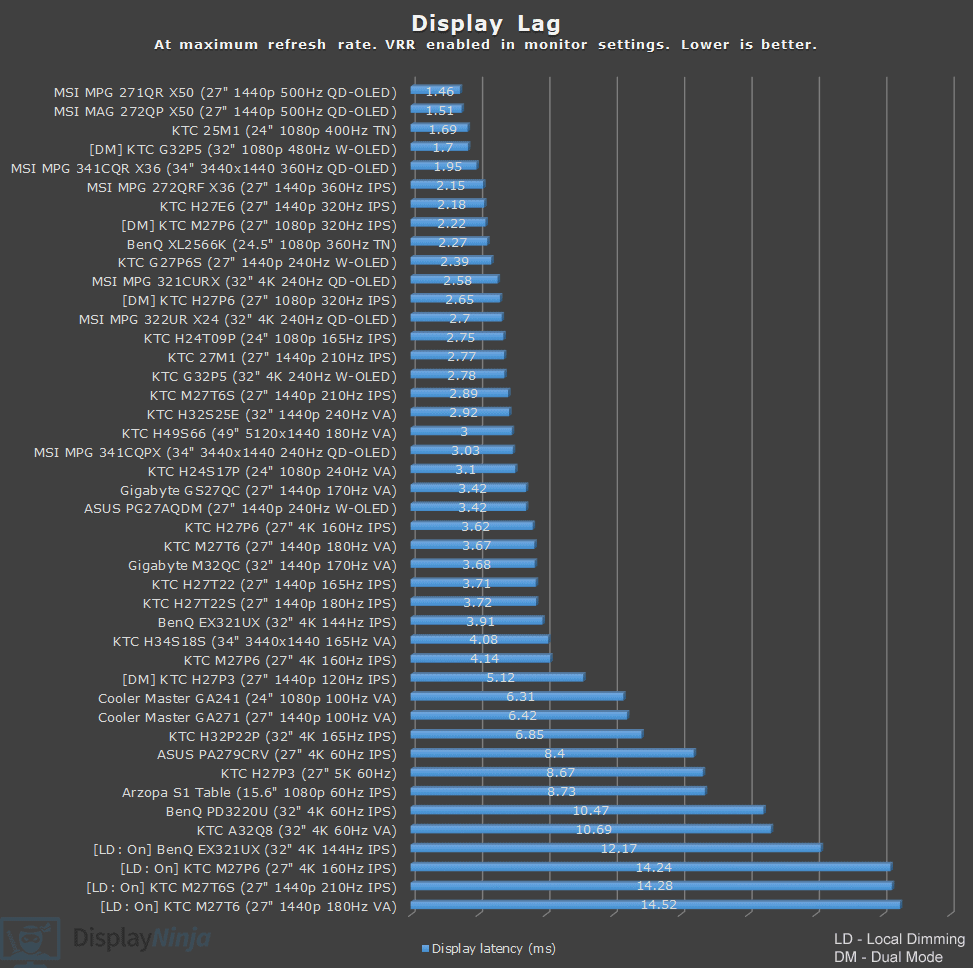
Latency
Unlike some KTC monitors, the display’s latency doesn’t change depending on whether ‘Adaptive-Sync’ is enabled or disabled in the OSD menu.
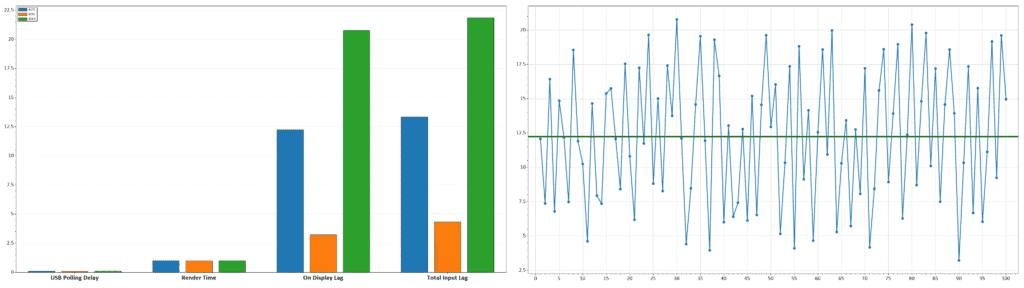
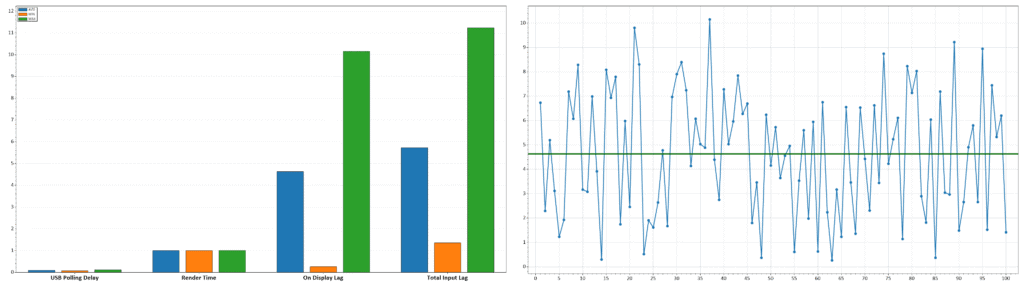
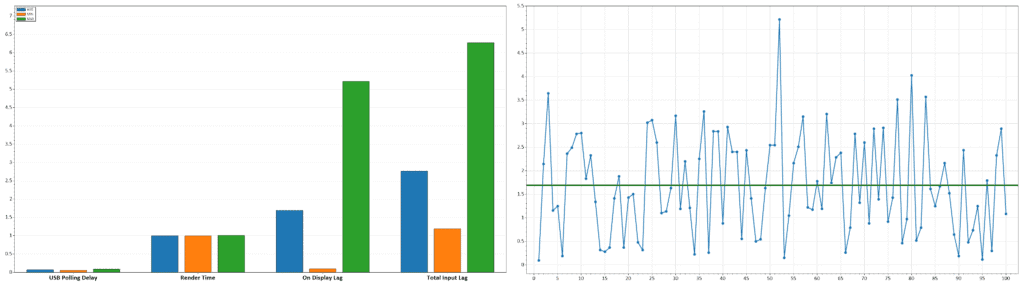
The measured display latency is low and amounts to 1.69ms at 400Hz, 4.63ms at 120Hz and 12.24ms at 60Hz.
As the latency is lower than the refresh rate cycle, this means that you won’t be able to notice or feel any delay between your actions and the result on the screen.
Backlight strobing increases latency, but we were unable to measure it with our OSRTT tool.

Uniformity & Quality Control
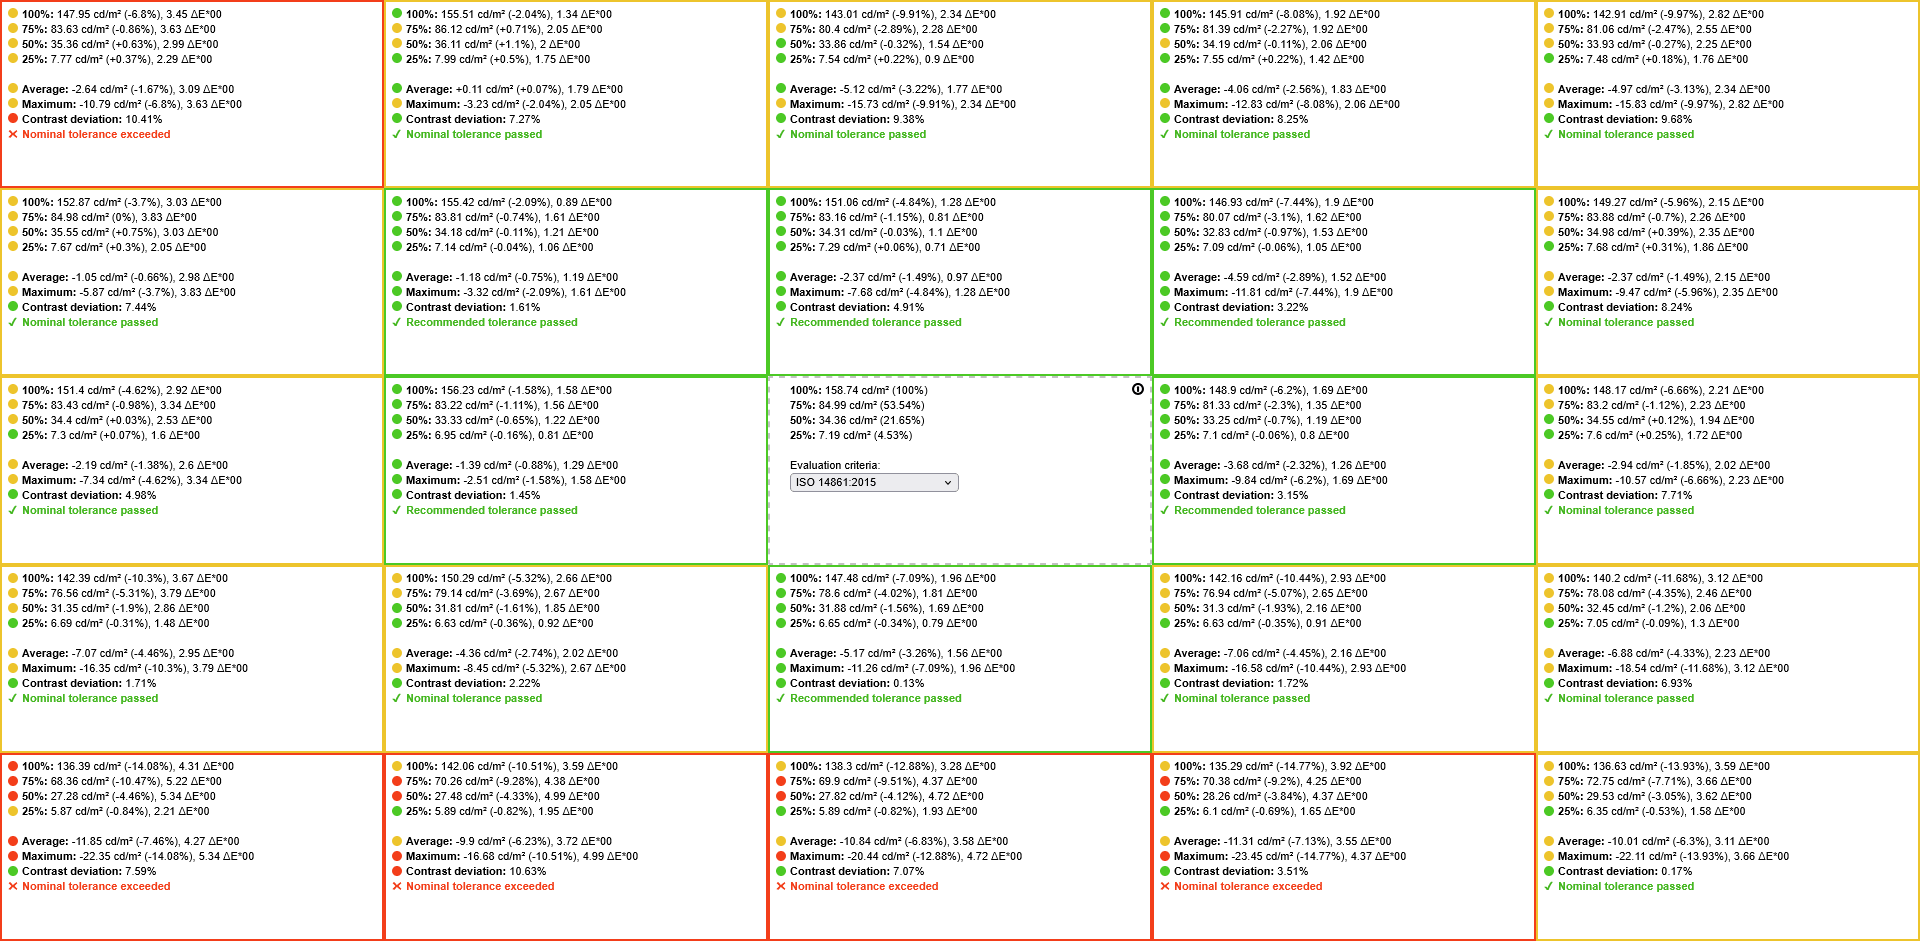
The KTC 25M1 shows decent image uniformity, with up to 15% lower brightness at the bottom of the screen on a full white image, around 10% contrast deviation across the panel, and a maximum Delta E of 5.34 for color and tint uniformity.
These results are within expectations for this type of display, and no uniformity issues were noticeable during regular use.
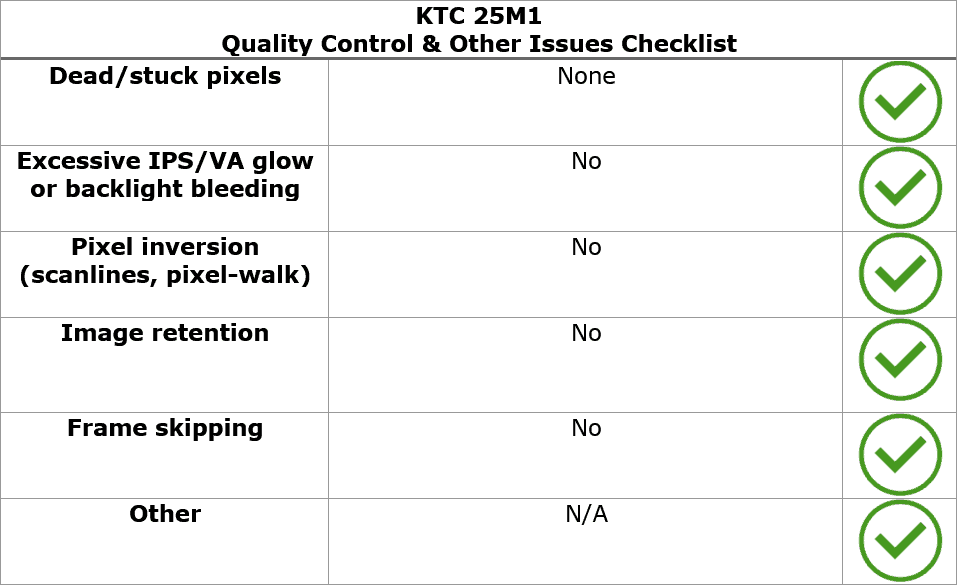
We didn’t find any dead or stuck pixels, no excessive backlight bleeding, image retention or frame skipping.
Moving on, the monitor uses a flicker-free backlight (unless DAC is enabled), ensuring a comfortable viewing experience without the risk of eye strain or headaches for sensitive users during extended use.
There’s also a low blue light mode with four intensity levels (we measured color temperatures of 5522K, 4837K, 4277K, and 3852K), which can be helpful if you have trouble falling asleep at night after prolonged screen time.
Features
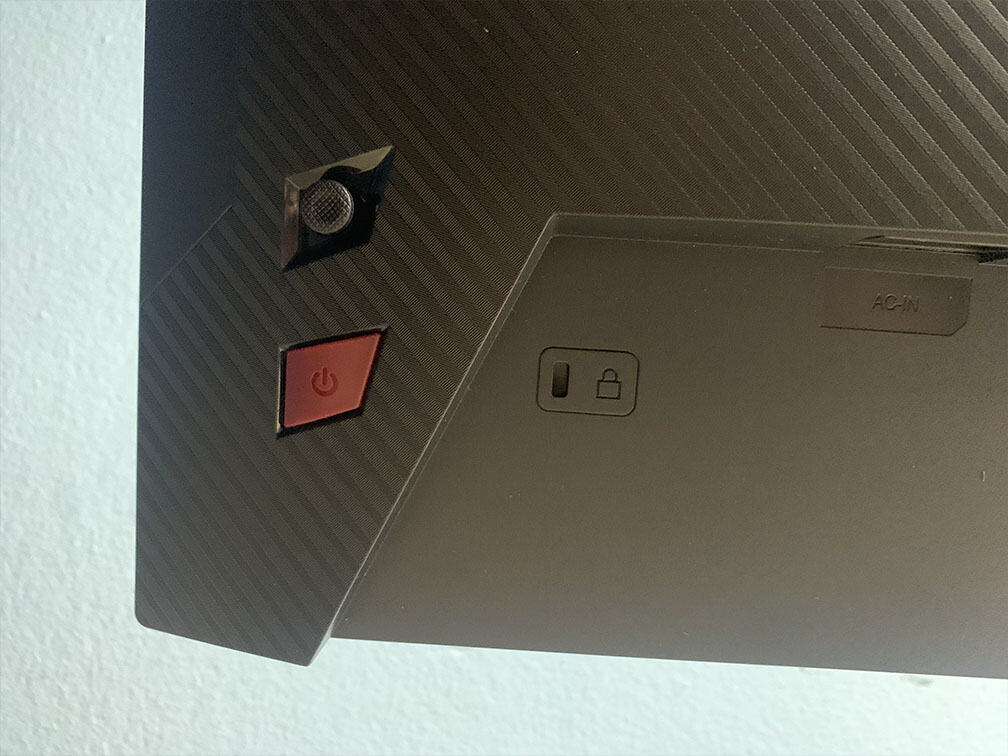
On the rear of the monitor, there’s a power button and a directional joystick for quick and easy navigation through the OSD menu. Moving the joystick in any direction also brings up a quick menu for various functions, which can be customized in the settings.
Available hotkey shortcuts include Brightness, Volume, Mute, Game Assist, Preset, Color Temperature, Black Equalizer, HDR and Aspect Ratio. Moving the joystick up is reserved for input source selection.
Pressing the joystick opens a quick-start menu with five options: OSD Menu, Preset, Brightness, Color Temperature and Black Equalize, allowing quick access to commonly used settings. These can also be reassigned, similar to the other hotkey shortcuts. Sadly, there’s no way to add backlight strobing or overdrive options here.
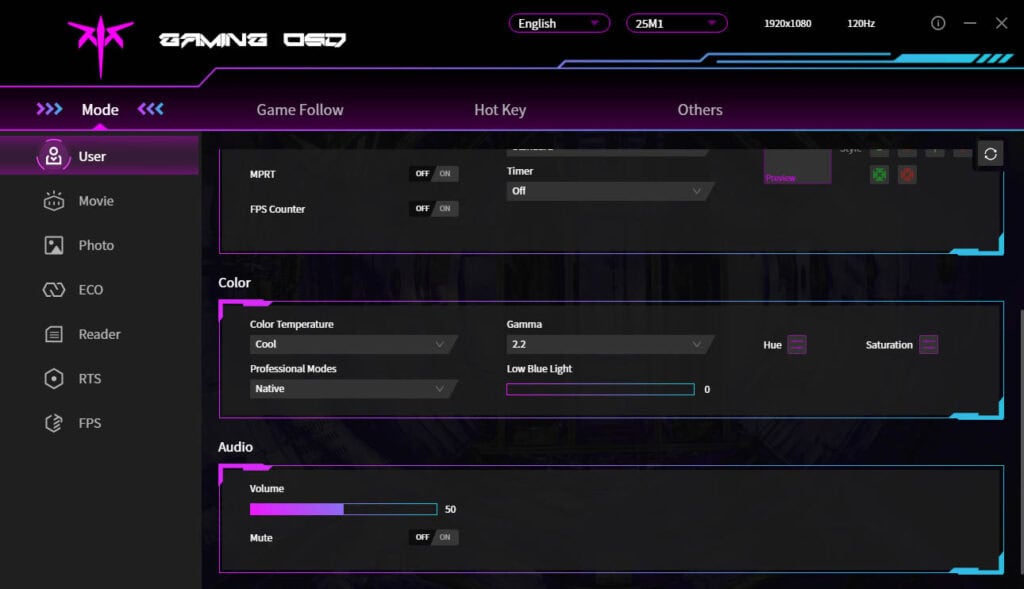
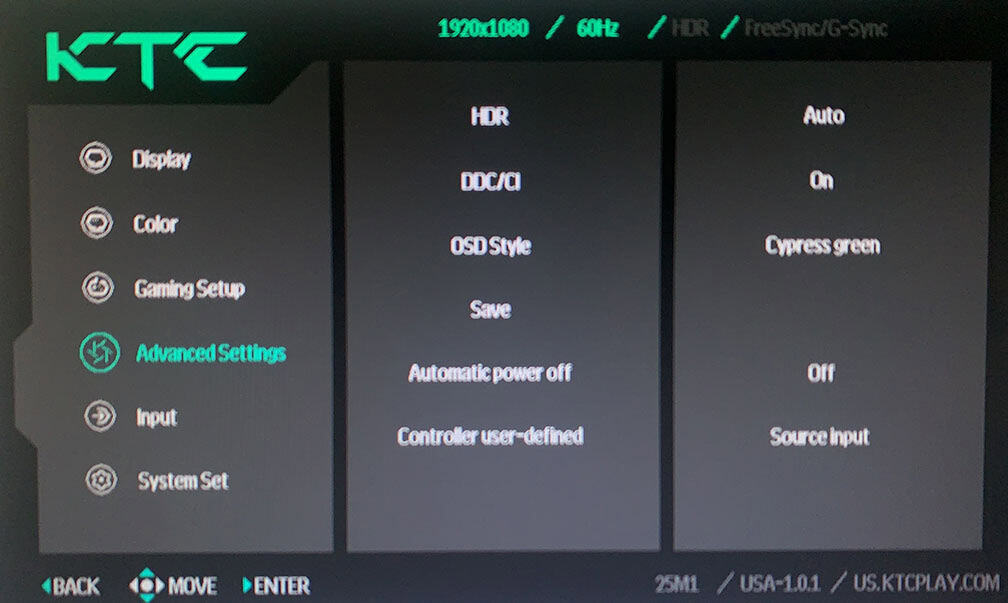
Besides typical image adjustment tools (brightness, contrast, color temperature), there are some advanced settings available too, including sharpness, aspect ratio (full, 16:9, 4:3), gamma (from 1.8 to 2.4), color range (auto, full, limited), 6-axis hue and saturation, and automatic input detection.
You’ll also find the ‘Dynamic contrast’ option, which we recommend leaving at the default ‘Off’ for best image quality. It adjusts the screen’s brightness and contrast depending on the content being displayed, but causes distracting brightness fluctuations and reduces image accuracy.
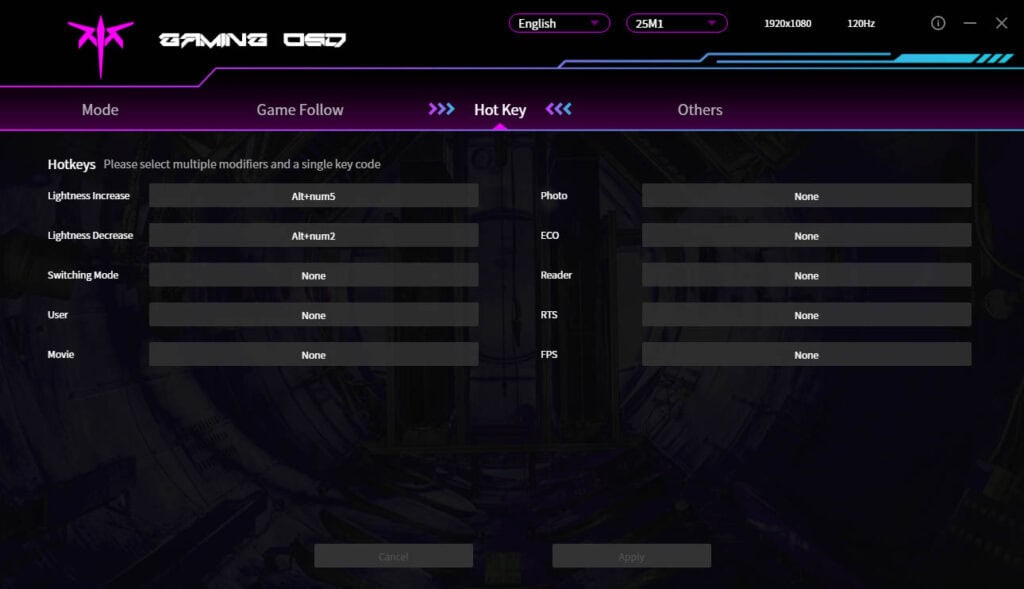
KTC offers a desktop application called MCC (Monitor Control Center), which you can use to make some OSD-related adjustments, assign keyboard hotkeys for certain functions or picture modes to different applications.
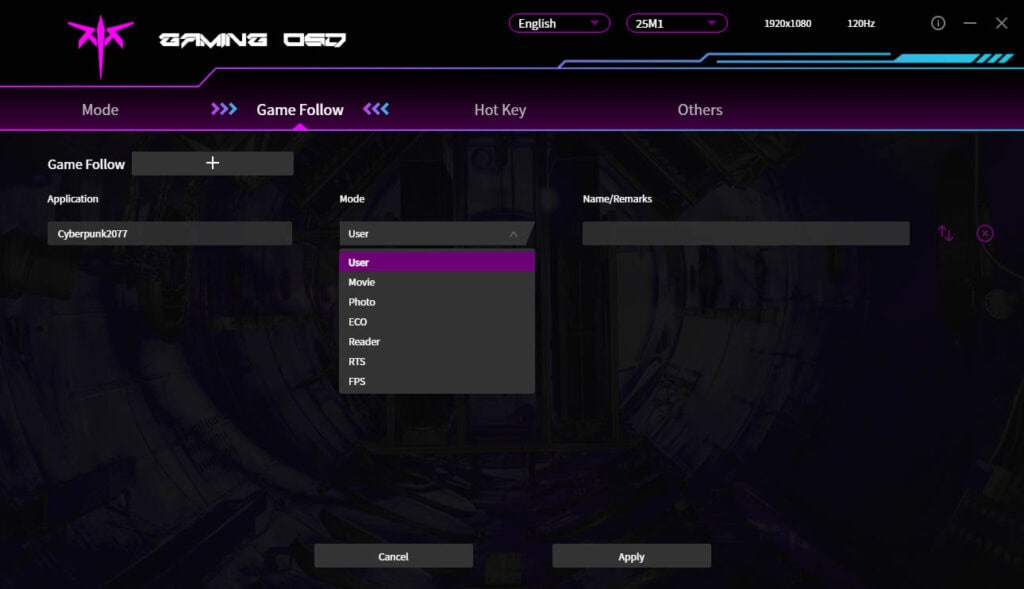

You can download the MCC app here, though you’ll need to change your browser’s preferred language to ‘Chinese (Simplified)’; otherwise, it will just take you to the English homepage. Alternatively, use this direct download link (clicking it will start the download immediately).
Some features, like MPRT, cannot be enabled in the MCC app and certain crosshair overlays and color temperature presets are mixed up. For instance, clicking on ‘Normal’ color temperature in the app results in ‘Warm’ on the monitor.
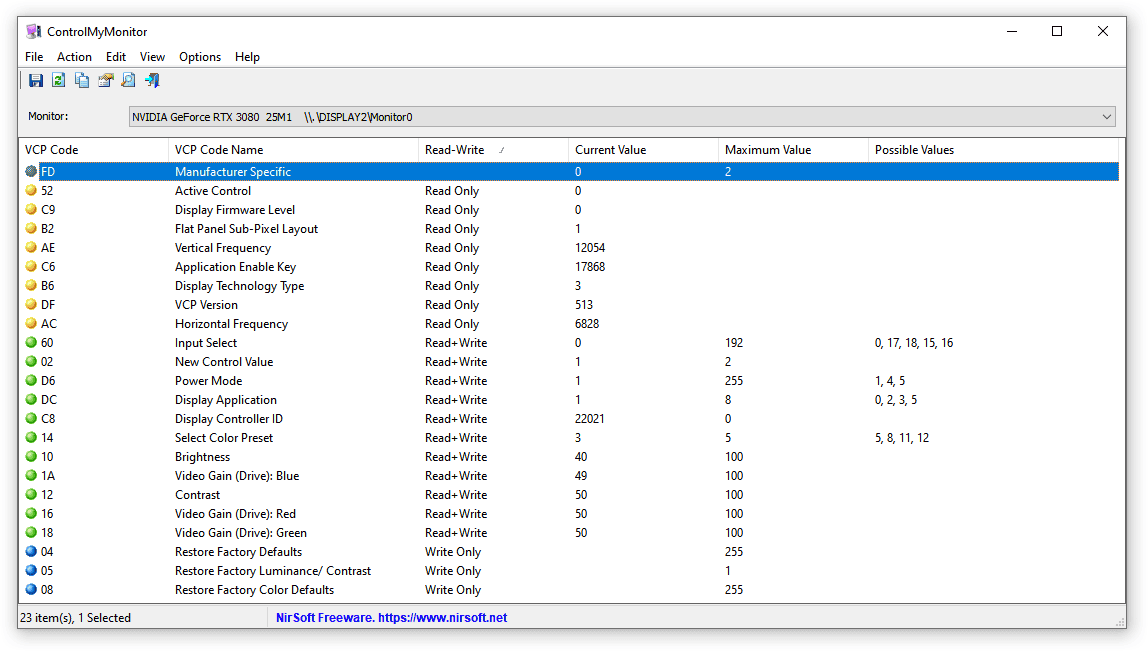
You can also use third-party apps, such as ControlMyMonitor, to make the following OSD settings:
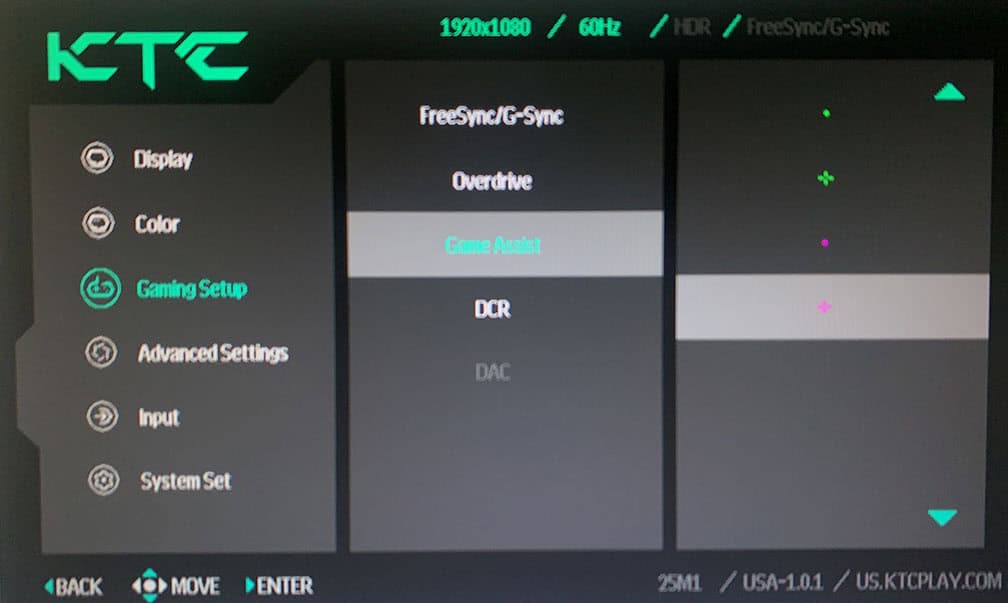
Useful gaming features include Black Equalize (improves visibility in dark scenes by altering the gamma curvature), Night-Vision (sets Black Equalize to 80 and Sharpness to 60), crosshair overlays, a refresh rate tracker and an on-screen timer.
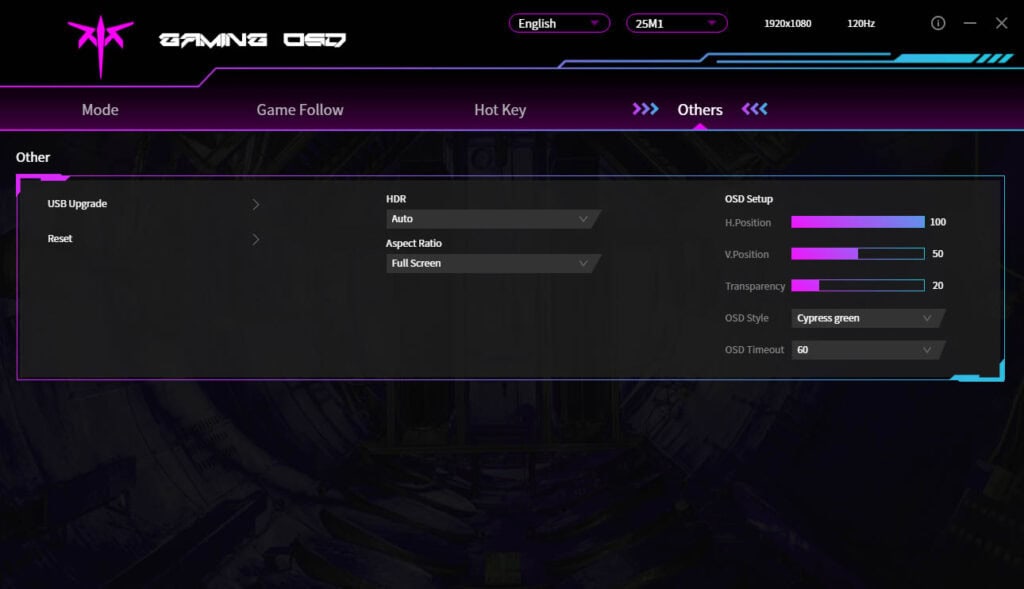
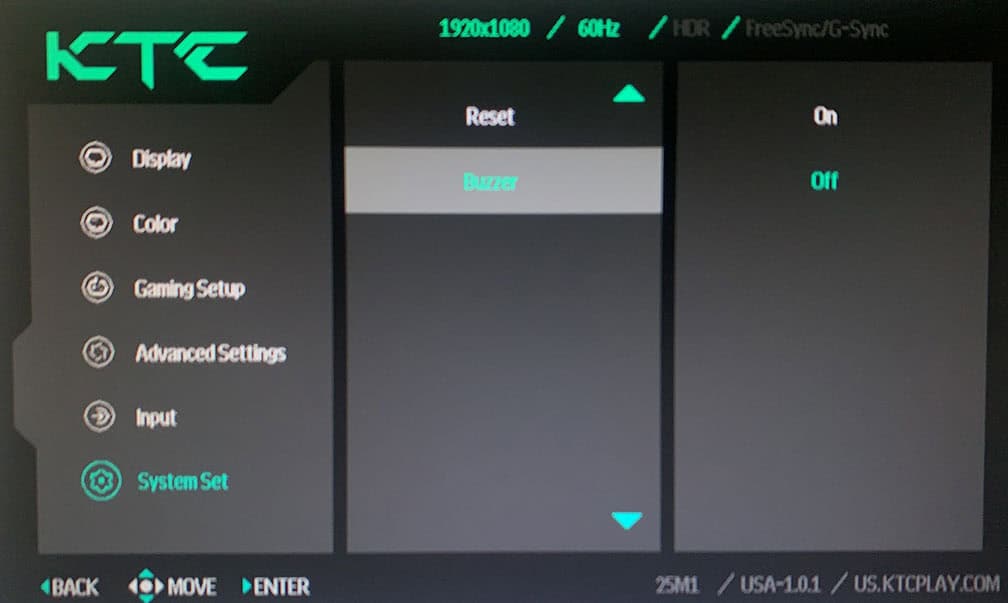
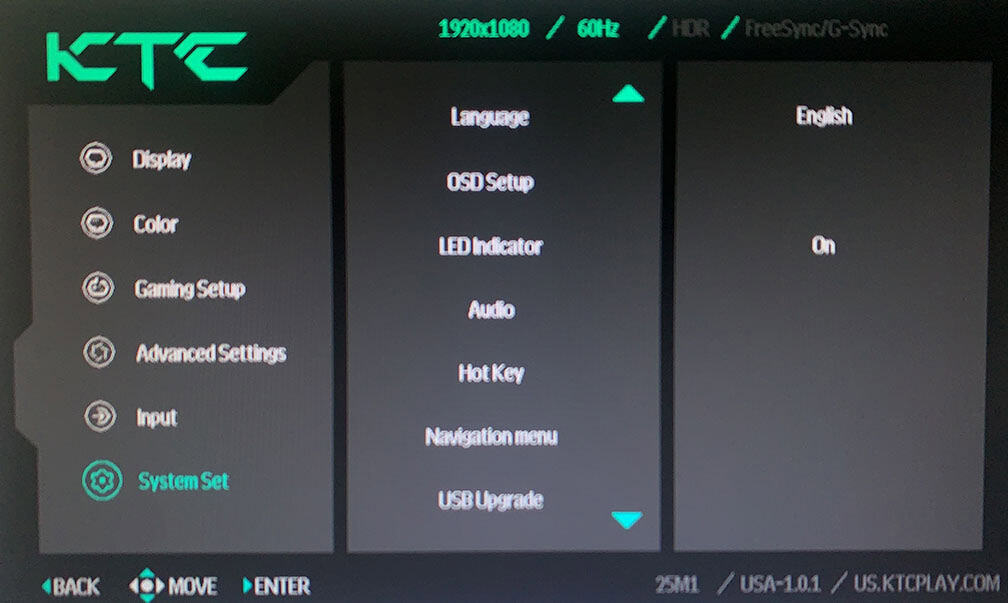
Other OSD settings include language, OSD setup (position, timeout, transparency, style), power LED indicator (on, off), Buzzer (on, off – audible hotkey feedback), automatic power off (off, 10 mins, 20 mins, 30 mins), audio (mute, volume), USB Upgrade and factory reset.
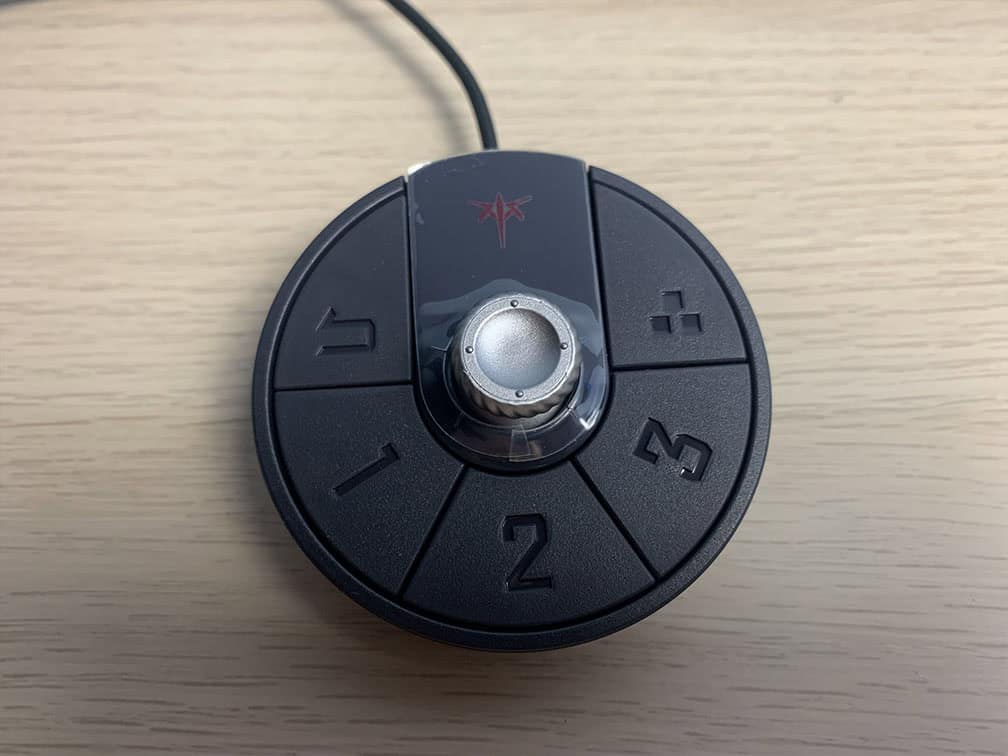
You can also use the wired OSD controller to navigate the menu.
Pressing it brings up the quick-start menu, and its directional joystick works just like the one on the monitor itself. It also includes a ‘back’ button, three preset buttons (1, 2, and 3) for switching between Player 1, 2, and 3 profiles, and an additional button that can be assigned either to power the monitor on/off or to switch inputs.
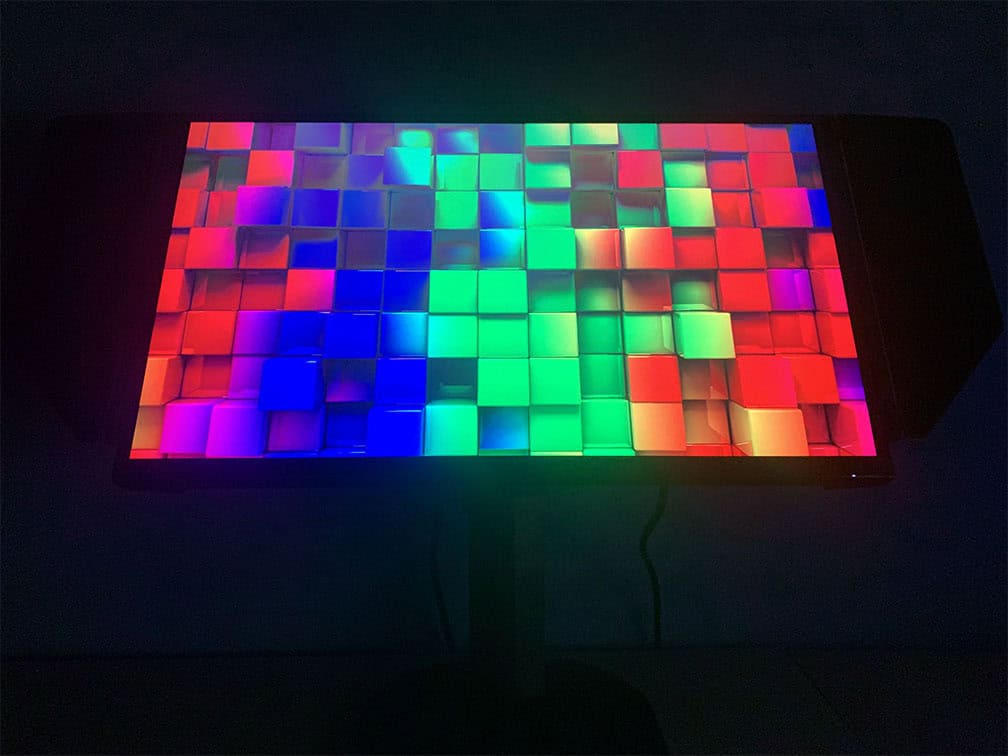
Design & Connectivity
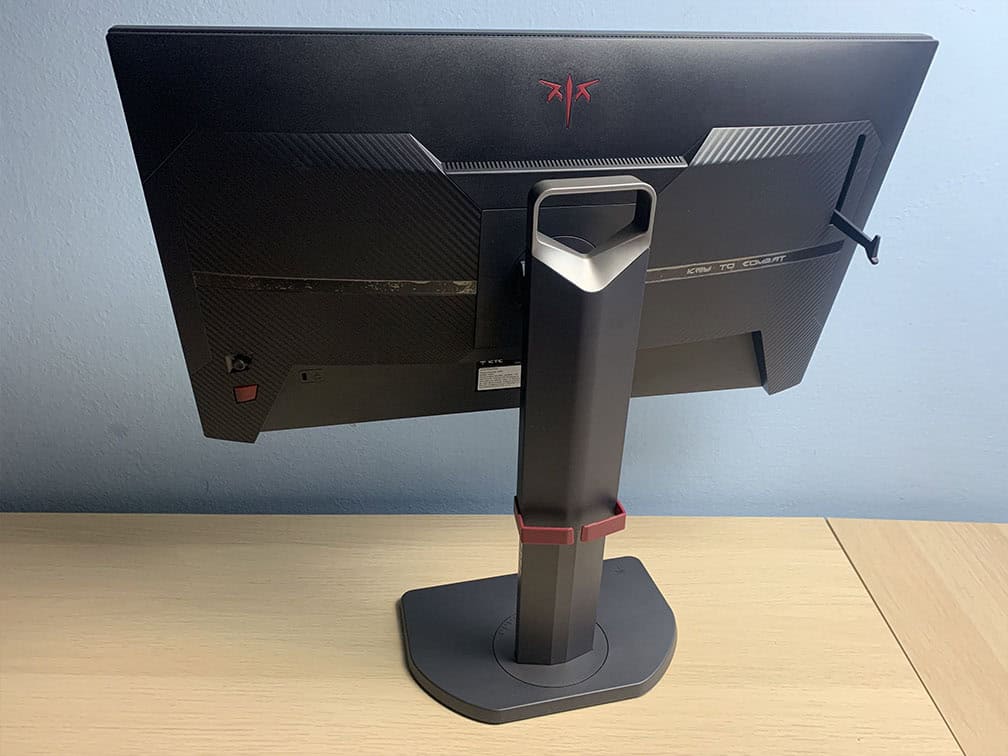
The stand of the monitor is robust and sturdy. It supports up to 155mm height adjustment, -5°/35° tilt, +/- 60° swivel, -5°/90° clockwise pivot and 100x100mm VESA mount compatibility (M4*10mm recommended screw size).
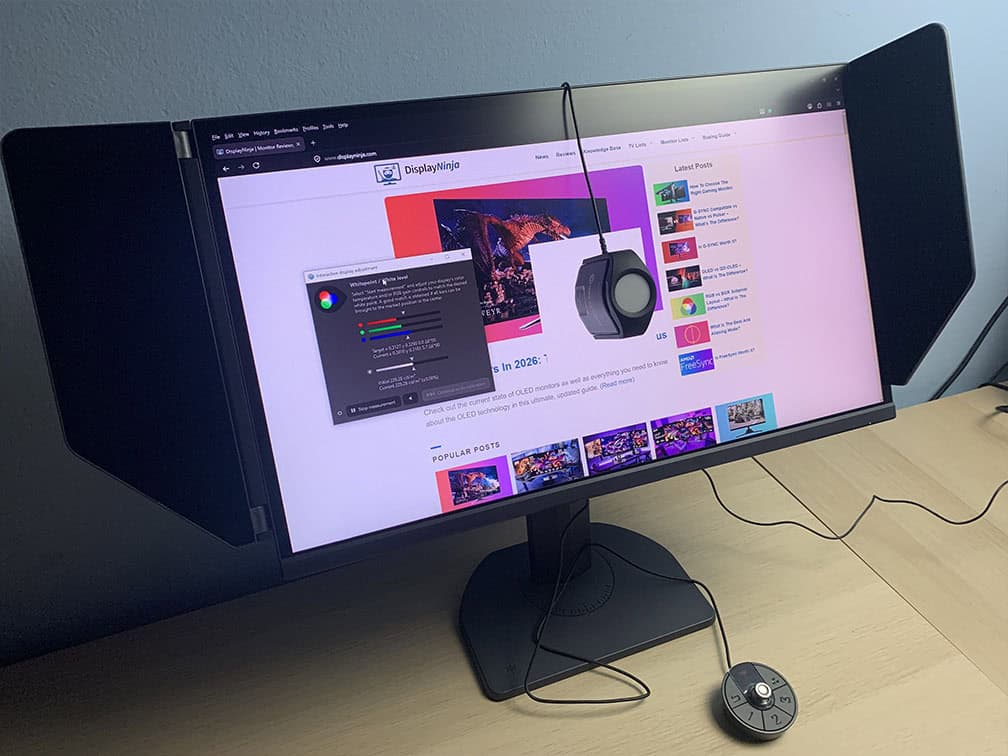
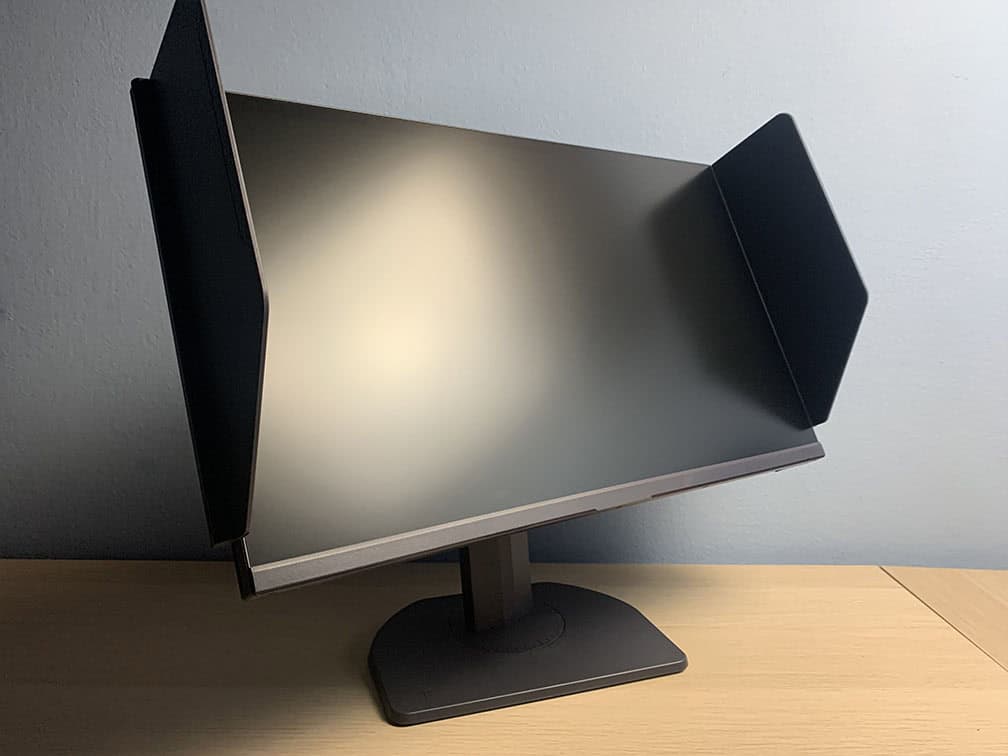
There’s also a cable management cutout, a carrying handle, a headset hanger and two detachable light shields.
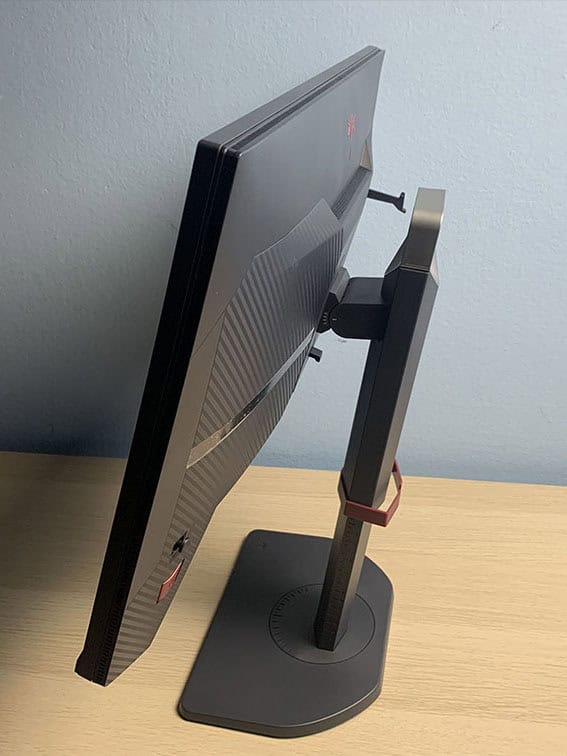
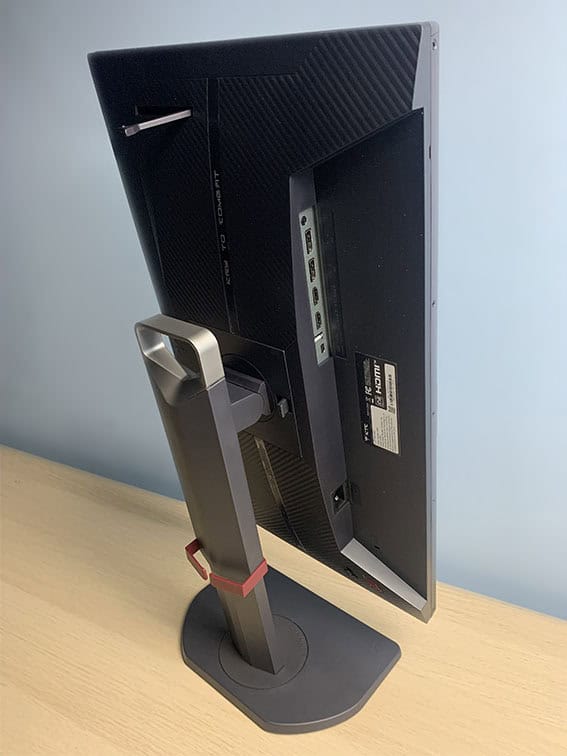
The foot of the base is small, allowing you to place your keyboard and mouse close to the screen. The swivel, height and tilt adjustments are clearly labeled with markings, making it easier to quickly dial in your preferred gaming position.
The screen has a light matte anti-glare coating, which diffuses reflections without adding too much graininess to the image.
Next, the bezels are ultra-thin at just 2mm on the top and sides, while the bottom bezel is slightly thicker at 16mm. There’s also an 8mm black border around the screen on the top and sides (and 1mm at the bottom) before the image begins (you can see this in the images of the refresh rate tracker and on-screen timer above).
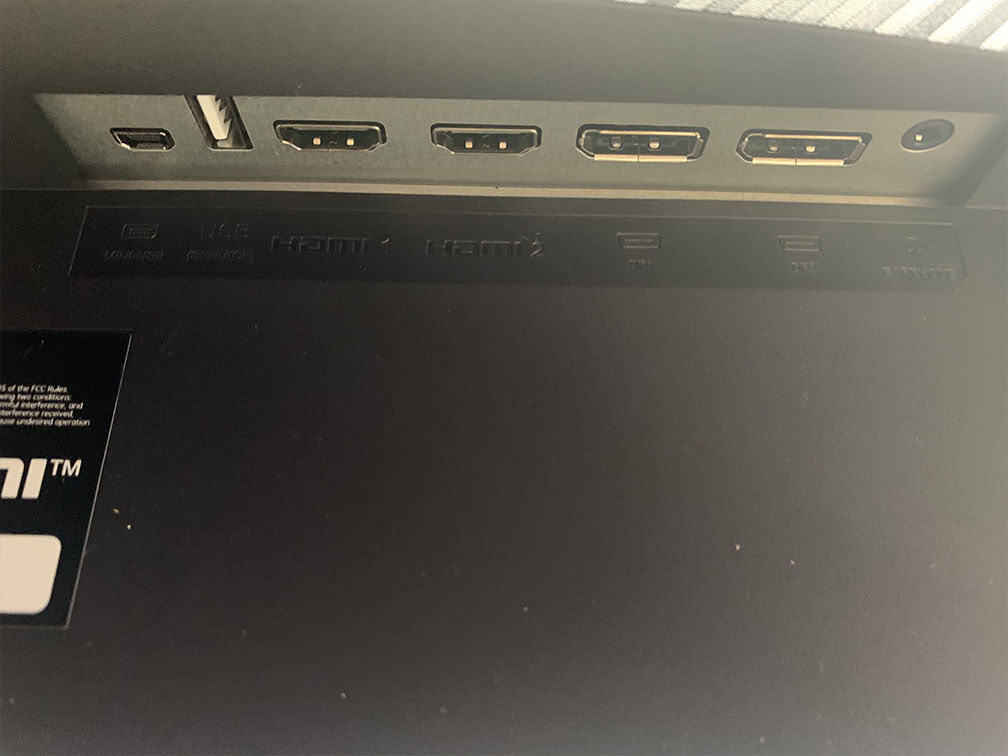
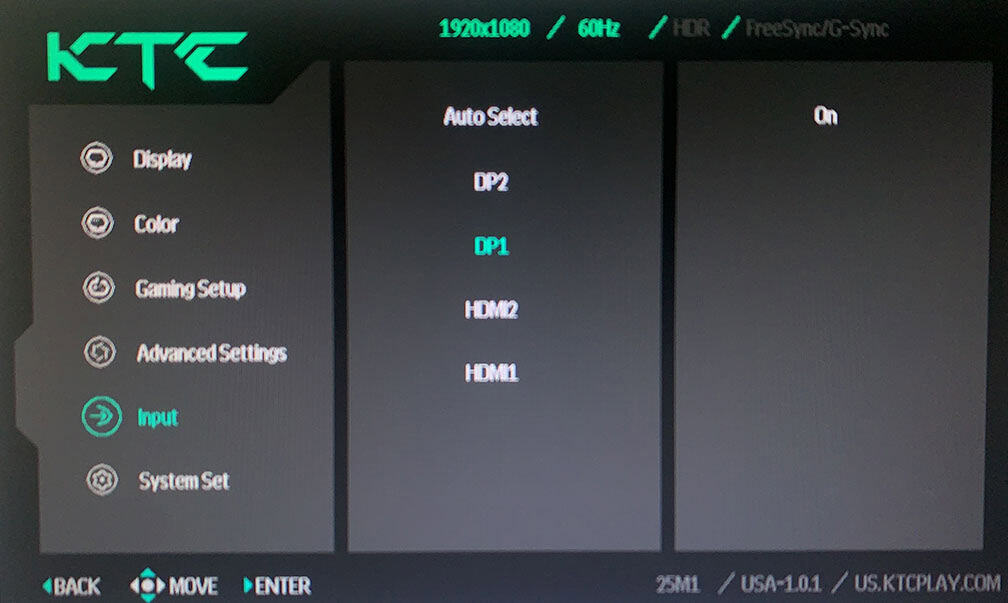
Connectivity options include two HDMI 2.0 ports (limited to 240Hz), two DisplayPort 1.4 inputs, a USB port for firmware updates, a mini-USB port for the wired controller and a headphone jack.
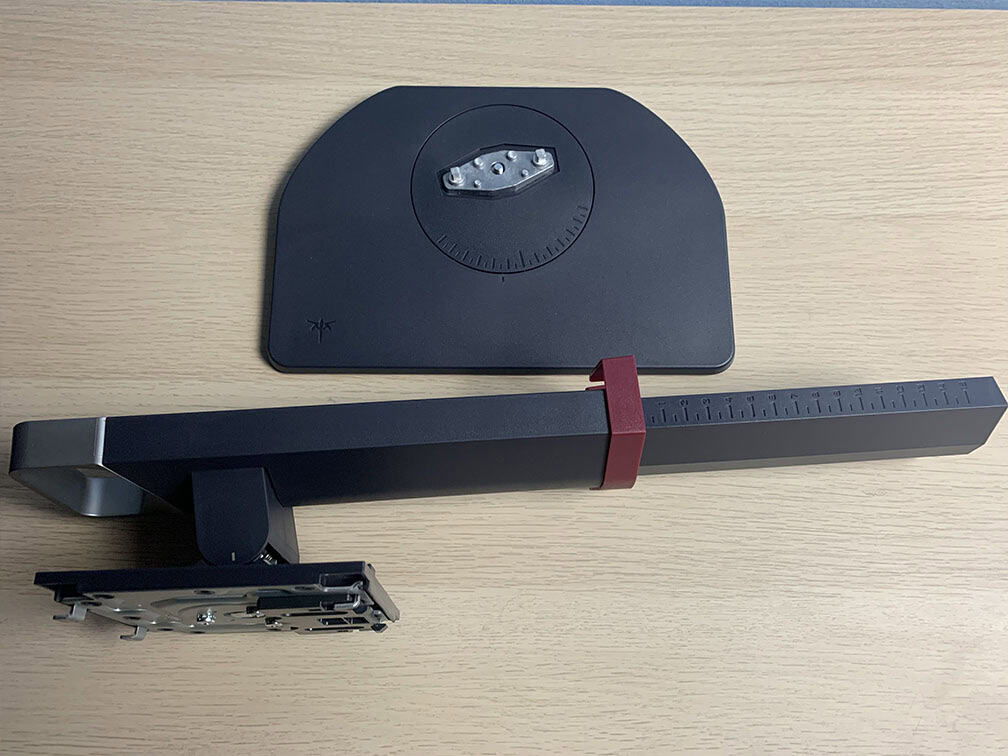
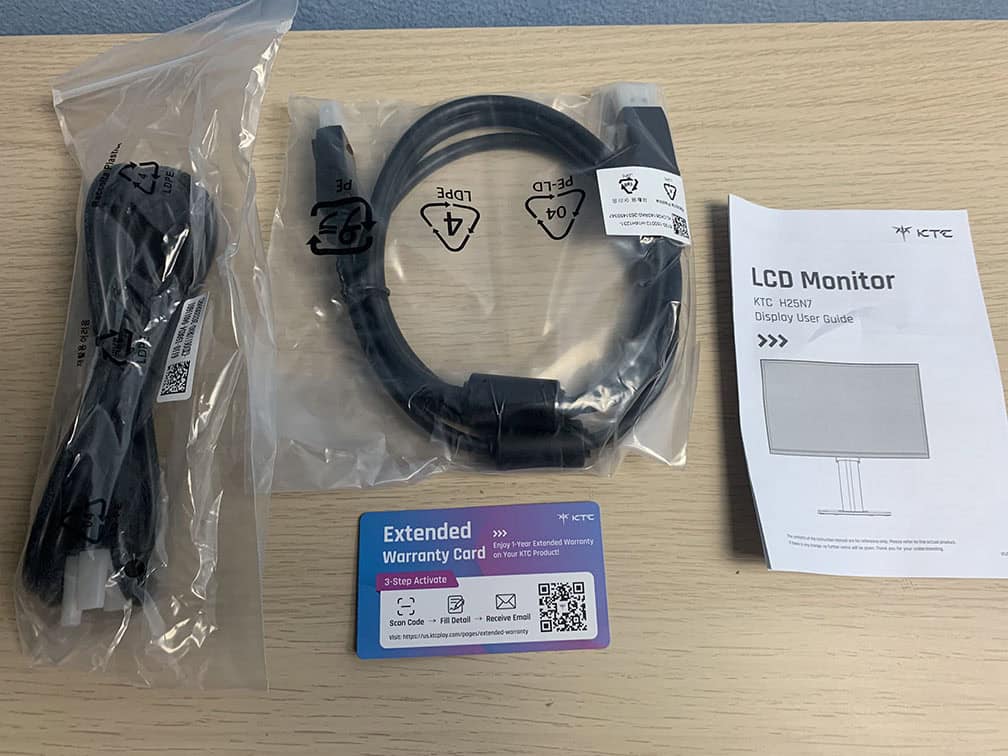
In the box, along with the monitor, its stand and side shields, you also get a DisplayPort cable, a power cord, a quick start guide and a warranty card.
Price & Similar Monitors
The KTC 25M1 goes for $390, which is a good price for a 400Hz eSports-oriented display.
It’s available in two KTC stores on Amazon: Link 1, Link 2.
Its main competitor is the BenQ Zowie XL2566X+, which is also based on a 24.1″ 1080p 400Hz TN panel with a similar design. While we didn’t test this model, the previous-gen XL2566K version had excellent backlight strobing implementation with notably fewer strobe crosstalk artifacts than the KTC 25M1.
So, depending on how sensitive you are to these visual artifacts and how serious you are about eSports FPS gaming, the XL2566X+ may be worth the extra $250. It also adds a few extra features, such as XL Settings To Share, which allows you to download and apply picture presets with settings optimized for specific competitive games, such as CS: GO, Valorant, Overwatch, COD, Apex and more.
Alternatively, there’s the BenQ Zowie XL2546X+ with DyAc2 for $500, but it has a lower 280Hz refresh rate. So, it’s a good option if you cannot maintain over 280FPS.
A good, cheaper MBR option worth considering is the ViewSonic XG2431 with a 1080p 240Hz IPS panel (great strobing at 120Hz, decent at 240Hz) for $280, while 1440p 240Hz OLED models start at around $350.
As for the more expensive models, there are the 27″ 1440p 360Hz IPS G-SYNC Pulsar displays starting at $650, 1440p 360Hz OLED displays from $500, 1440p 500Hz and 1440p 540Hz (720p 720Hz Dual Mode) OLED models for $600 – $700, as well as 600Hz+ models from $700, and upcoming 1000Hz displays for $1,000 and over.
There’s also the upcoming ASUS XG259QWPG Ace 24.5″ 1080p 540Hz W-OLED gaming monitor with a glossy screen surface, True Black 600 and BFI (up to 270FPS) support. It should be available in November 2026, though there’s no word on pricing.
Conclusion
All in all, the KTC 25M1 is an excellent value monitor for eSports FPS gamers.
It has a versatile design, plenty of useful gaming features, fast response times, low latency and a solid backlight strobing implementation at 240Hz, 360Hz and 400Hz.
We would have liked to see a bit less strobe crosstalk, or at least a Pulse Phase option to make the center of the screen clearer. At lower refresh rates, such as 120Hz, the amount of strobe crosstalk is simply too high.
However, while its backlight strobing implementation isn’t as refined as what you get with premium monitors featuring DyAc+, DyAc2, ULMB 2 or Pulsar, those displays cost at least $250 more.
Whether the reduced crosstalk and improved strobing performance at lower refresh rates (or with VRR in the case of Pulsar) are worth the extra cost is up to you.
In short, the KTC 25M1 is easily the best monitor for eSports FPS games under $400. If your budget doesn’t stretch to the $650+ flagship models, there’s simply no better value for competitive gaming.
Specifications
| Screen Size | 24.1-inch |
| Resolution | 1920×1080 (Full HD) |
| Panel Type | TN |
| Aspect Ratio | 16:9 (Widescreen) |
| Refresh Rate | 400Hz |
| Response Time | 0.5ms (GtG) |
| Motion Blur Reduction | DAC |
| Adaptive-Sync | FreeSync Premium (48-400Hz) |
| Ports | 2x DisplayPort 1.4, 2x HDMI 2.0 |
| Other Ports | Headphone Jack, USB-A 2.0 (for firmware updates), Mini-USB (for wired controler) |
| Brightness | 350 cd/m² |
| Contrast Ratio | 1000:1 |
| Colors | 16.7 million (8-bit) 125% sRGB |
| HDR | HDR10 |
| VESA | Yes (100x100mm) |
The Pros:
- Fast response time and low latency
- Plenty of gaming features, including VRR and MBR support up to 400FPS
- Ergonomic eSports-inspired design with a wired controller
The Cons:
- Narrow viewing angles
- Some strobe crosstalk at the bottom and near the center of the display