
Whether you are a content creator who needs a color-accurate display to ensure that your photos or videos look the same to your viewers as they do to you – or you’re at the opposite end and want to view content just how its creators intended, a properly calibrated monitor is essential.
For precise calibration, a device such as a colorimeter or a spectrophotometer is required. Without it, you cannot get accurate results, but there are ways to improve the image quality in general. We’ll include both methods in this guide.
Calibration With A Colorimeter

Since spectrophotometers are rather expensive (~$1,500+) and usually used for high-end professional color-critical work, we’ll focus on calibration with colorimeters.
The most popular colorimeters are the DataColor SpyderX Pro / Elite and the X-rite i1Display / Pro / Plus.
The i1Display / Pro / Plus devices have been replaced by the Calibrite ColorChecker Display Pro / Plus. They have the same hardware (i3D3), just different branding.
The DataColor SpyderX is available as Pro and Elite variants, but these are actually the same colorimeters, the main difference is in the software that comes with them. They also have a new SpyderX2 Elite / Ultra series.
We recommend using the free DisplayCAL application instead of the DataColor or i1Profiler (ccStudio) software, so get the cheaper SpyderX Pro variant if you’re looking for something on a budget and the Calibrite Display in case you want something more future-proof and with more precise contrast ratio measurements.
For HDR displays, you might also be interested in the Calibrite Display Plus and the new Calibrite Display Pro HL, which support higher brightness levels of up to 2,000-nits and 3,000-nits, respectively, up from 1,000-nits of the SpyderX and the Calibrite ColorChecker Display.
Preparing For Calibration

Now, before the actual calibration, it’s best to reset your monitor to factory settings and make sure that all image-altering settings are at their default values, such as Black Equalizer/Shadow Boost, VividPixel, etc.
Features such as Dynamic Brightness, Dynamic Contrast Ratio, low blue light filters, MBR and Eco/power-saving modes should all be disabled, while the brightness setting should be set to your liking. Contrast should be left at the default setting.
You should also make sure that you’re using the default color settings in your NVIDIA, AMD, or Intel graphics control panel. Color channel, brightness, contrast, gamma and hue/vibrance settings should all be left at default. The color depth should be set to the highest available, with color format set to ‘RGB’ and dynamic range to ‘Full’ or ‘0-255.’
It’s highly recommended to clean the screen surface before calibration and to let your monitor run for at least 30 minutes before starting the calibration process.
DisplayCAL Setup

You can download DisplayCAL here. It’s completely free to use, so consider donating if you can.
The installation process is straightforward; just make sure that the ‘Let DisplayCAL handle calibration loading’ option is enabled, and download the ArgyllCMS color engine when prompted upon first starting the app.
After installation, if your calibration instrument is not recognized by the software straight away, click on ‘Tools’ and then ‘Detect display devices and instruments.’
If that doesn’t work, go to Tools -> Instrument -> Install ArgyllCMS instrument drivers -> Download and install.
Note that this will install the latest version of Argyll.
If you have a Datacolor Spyder colorimeter, you may need to use the older V2.1.2 version. You can download the [color]profiler application and install it. You won’t need this application for calibration via DisplayCAL, but installing it will also provide you with the Argyll_V2.1.2 folder.
Then, in DisplayCAL, go to File, Locate ArgyllCMS executables…, and select the installed Argyll_V2.1.2 folder.
Note that if you wish to use the DataColor or i1Profiler apps later, you’ll need to uninstall the Argyll drivers.


DisplayCAL Calibration Process
For everyday use, we recommend using the sRGB setting for calibration. If your work requires a different whitepoint and tone curve, you can change them under the ‘Calibration’ tab.
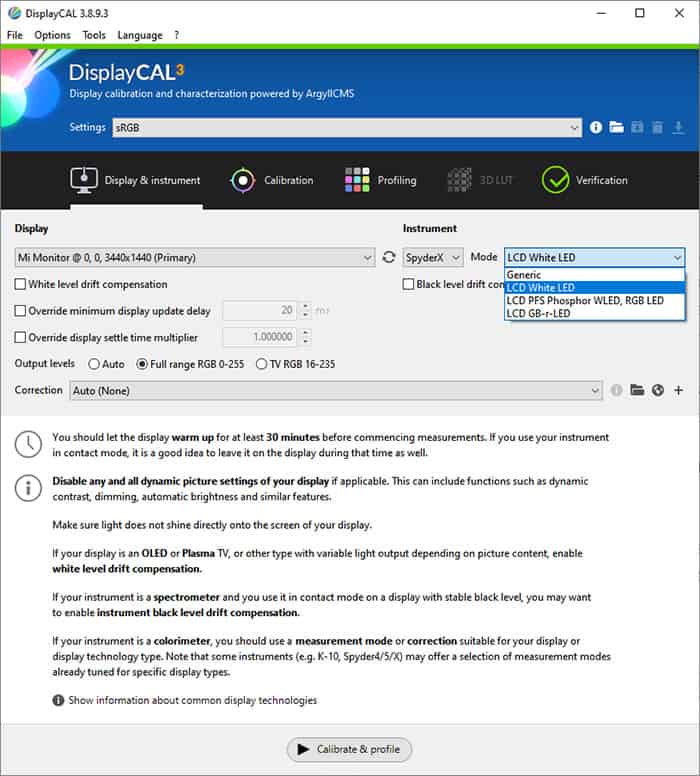
Select your monitor, instrument and appropriate mode:
- LCD White LED – for standard sRGB gamut monitors
- LCD PFS Phosphor WLED, RGB LED – for modern wide gamut monitors
- LCD GB-r-LED – for old wide gamut monitors
For other display technology, such as CCFL, OLED, CRT and plasma, use the ‘Generic’ mode. For OLEDs, make sure ‘White level drift compensation’ is enabled.
The X-rite/Calibrite Display Pro will also have correction options available for better accuracy, so you can choose the appropriate option for your monitor. You can also search for corrections here. If none are available, just leave it at ‘Auto (None).’
Finally, click on ‘Calibrate & profile’, place the colorimeter on the screen, and click on ‘Start measurement.’

Now, go to your monitor color temperature settings in the OSD menu and set them to manual so that you can adjust the red, green and blue gain controls.
Increase or decrease RGB gain controls until you can get them to be the same width (or as close as possible); text will turn green like in the image above when you get good results. By doing so, you’ll get the desired whitepoint.
After that, click on ‘Stop measurement’ and ‘Continue on to calibration.’ The calibration process will start, after which you’ll get a report and should click on ‘Install profile’ – and it’s done.
DisplayCAL also comes with the DisplayCAL Profile Loader, which ensures that the profile is automatically re-applied if Windows changes back to the default profile for some reason.
Keep in mind that an ICC profile will only provide you with properly mapped colors in color-managed applications. Most video games (and 3D applications) don’t utilize ICC profiles, but at least you get accurate whitepoint and gamma.
You can try and force the ICC profile to load by running games in windowed-borderless instead of full-screen or via third-party apps, such as Color Clutch and Reshade, as explored more in our How To Install An ICC Profile article.
You can also use ICC profiles to create 3D LUTS and/or clamp the native color gamut down to a specific color space. For more information, check out our sRGB emulation article.
Calibration Without A Colorimeter

Calibration without a colorimeter is not technically calibration, but there are things you can do to make the image look more accurate.
To start with, the default image mode you get out of the box with your monitor may not be the most accurate one. We recommend going over Lagom’s test images, mainly the contrast, gamma, black level and white saturation tests.
Try different picture presets, gamma modes and color temperature options and see how they perform in the above-mentioned tests. If your monitor has an sRGB mode, it should be the most color-accurate preset.
If white has a warm (red/yellow) or cold (blueish) tint on your display and none of the color temperature presets provide you with pure white, you can try eyeballing it by manually adjusting the red, green and blue color channels, which are available on most monitors after setting the color temperature to ‘custom/user.’
You should also try Windows’ calibration feature by typing ‘calibrate display color’ in the search bar. It will provide you with images where you’ll need to adjust a few sliders in order to improve image quality.


